


Ot
her
s
Using the SNC toolbox
114
Using Panorama Creator
— Creating a Panorama Image
The Panorama Creator function of SNC toolbox allows
you to create a panorama image to be displayed on the
main viewer.
Using the panorama image, you can move the camera to
a desired position simply by clicking on the image.
This section explains setup and operation of Panorama
Creator.
Starting the Panorama Creator
1
Select the camera to create the panorama image
from the Device list.
2
Click
Panorama
.
Panorama Creator opens.
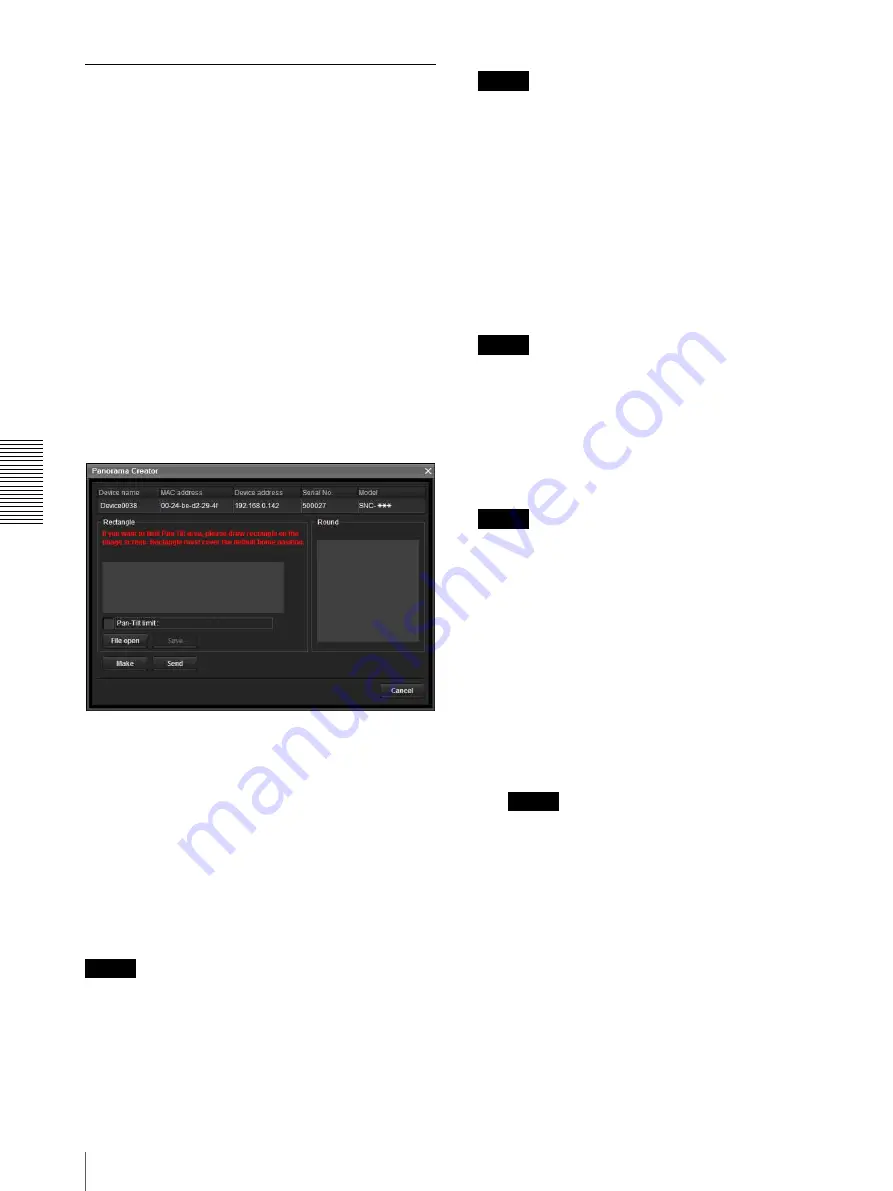
Using Panorama Creator
Viewer
The created panorama image is displayed in the upper
viewer.
Pan-Tilt limit
Specify the camera movement area on the panorama
image.
Drag the mouse to draw a rectangle within which the
camera movement is limited. You can enlarge, reduce or
move the created rectangle. To erase the rectangle,
right-click on the mouse or remove the check for pan/tilt
restrictions.
Note
The edges of a panorama image may not be displayed
correctly when the camera is zoomed in.
Make
Starts shooting to create a panorama image (a complete
360-degree panorama image).
Tips
• Panorama images have two formats: Map view and
Arctic view.
• The exposure and white balance settings are fixed
while a panorama image is being created. To create a
clear panorama image, set
Exposure mode
to
Full
auto
and
White balance
to
Auto
in the Camera menu
and point the camera at the main subject before
starting shooting.
File open
Allows use of a Bitmap or JPEG image file instead of a
panorama image.
Notes
• Only Map view is available.
• The size of the image in the file should be 320 × 90
pixels (horizontal/vertical). Other image sizes are not
supported.
Save
You can save the panorama image in a file.
Note
Only Map view panorama images can be saved.
Send
Transmits a panorama image converted into a JPEG file
to the camera.
Both Map view and Arctic view panorama images are
sent to the camera.
Creating and transmitting a panorama
image
1
Click
Make
on the Main tab to start shooting.
A panorama inage will be created.
Note
Do not perform settings of the camera or move the
camera during shooting.
2
Specify the camera movement area by dragging the
mouse to draw a rectangle on the Map view
panorama image.
The specified camera movement area will be
effective when the panorama image is saved in the
camera.
3
Click
Send
to transmit the panorama image to the
camera.
The panorama image is saved in the camera. You can use
the saved panorama image when you control panning
and tilting from the main viewer.


