GB
11
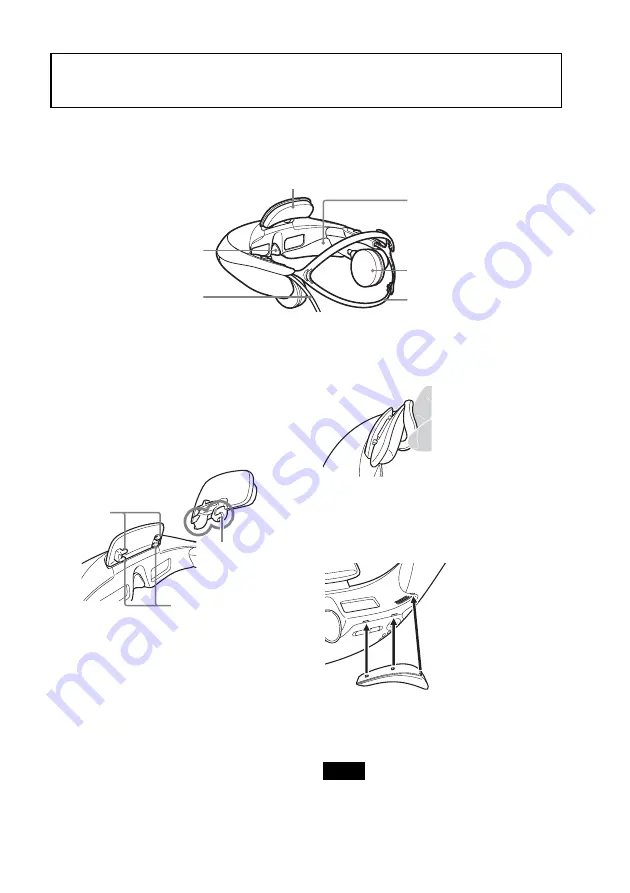
The head mounted unit can be adjusted in several ways to ensure a personalised, comfortable
fit. For a more comfortable fit, always adjust the head mounted unit before putting it on.
1
Adjusting the forehead supporter
Forehead supporters in two thicknesses are
included. Choose the best thickness for your
needs, accounting for image focus, pressure
on your nose, distance between your glasses
and the lenses and other considerations.
The forehead supporter can be detached by pulling
it diagonally up and away from the unit, so that you
can attach the supporter of your preferred
thickness. Also choose the best supporter height
(on top or bottom axis) for your forehead. To attach
the supporter, align the supporter slits with the axes
on both sides and push until the supporter clicks
into place.
Attach the forehead supporter cover as desired.
2
Light blocker
If external light reflected on the screens is
distracting, attach the light blockers.
The left light blocker is labelled “L,” and the right
one, “R.” Attach the correct blocker on each side by
pushing the tabs into the three holes on the bottom
of the lens section.
• It may not be possible to attach the light
blockers when wearing some sorts of glasses.
Fitting the Head Mounted Unit
Nose pad
Ear pad
3
2
1
4
Slit
Top axis
Bottom axis
Notes
Attach the included cover
to the forehead
supporter.
Light blocker
Содержание HMZ-T1
Страница 31: ...GB 31 ...
Страница 35: ...CT 5 健康注意事項 2 注意事項 3 產品簡介 6 隨附的配件 6 零組件與控制器 8 配戴頭戴式顯示器螢幕 10 確認畫面對齊 14 系統設定 16 故障排除 24 規格 30 授權與商標通知 32 內容 ...
Страница 37: ...CT 7 前額支撐墊 3 前額支撐器蓋 1 參考指南 本指南 1 入門指南 1 A 型 薄 B 型 中 C 型 厚 購買時頭戴式顯示器螢幕上安裝的是 B 型前額支撐墊 ...
Страница 63: ...CT 33 ...
Страница 64: ... 2011 Sony Corporation Printed in Japan 4 297 824 61 1 ...


