background image

US

Rec

or

ding/P

la

yback

Playback.

on.the.camcorder

You can enjoy the playback of images with powerful sound through the stereo speakers built 

into the camcorder.

In the default setting, movies and photos that are recorded on the internal recording media 

are played.

Tips

 To change the recording media, see page 21.

The camcorder displays recorded images as an event automatically, based on the date and time. It can also 

display recorded images on the basis of location information (HDR-PJ50V).

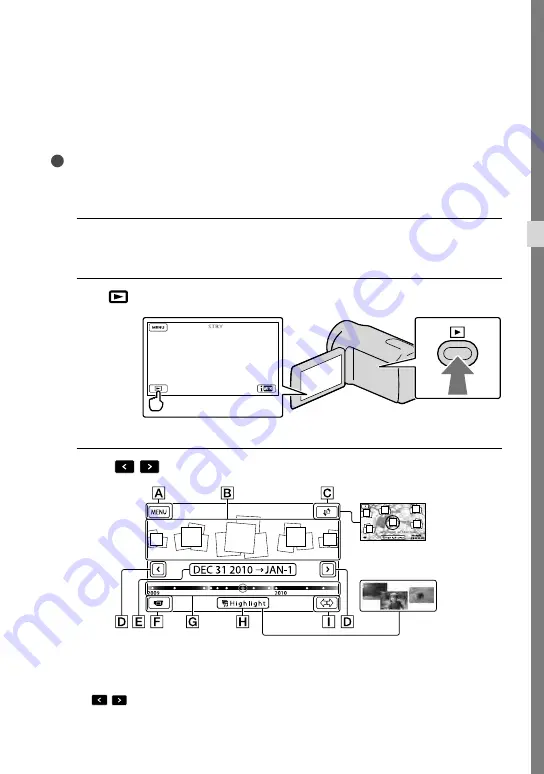
1


Open the LCD screen of your camcorder.

Your camcorder is turned on and the lens cover is opened.

2


Press 

 (View Images).

The Event View screen appears after some seconds.

3


Touch 

/

 to select the desired event (

).

To the MENU screen

Events

Change View button (HDR-PJ50V)

/  : To the previous/next event

Event name


Highlight 

Playback 

button

[Change View] 

button

Содержание Handycam HDR-PJ50

Страница 1: ...et des réponses aux questions fréquemment posées sont disponibles sur le site Web de l Assistance à la clientèle http www sony net Printed on 70 or more recycled paper Imprimé sur papier recyclé à 70 ou plus 2011 Sony Corporation HDR PJ50 PJ50V XR160 US FR Printed in China Operating Guide US Mode d emploi FR Digital HD Video Camera Recorder Caméscope numérique HD 4 285 335 21 1 ...

Страница 2: ...d do not expose the unit to rain or moisture Do not expose the batteries to excessive heat such as sunshine fire or the like This symbol is intended to alert the user to the presence of uninsulated dangerous voltage within the product s enclosure that may be of sufficient magnitude to constitute a risk of electric shock to persons This symbol is intended to alert the user to the presence of import...

Страница 3: ...utlet consult an electrician for replacement of the obsolete outlet Protect the power cord from being walked on or pinched particularly at plugs convenience receptacles and the point where they exit from the apparatus Only use attachments accessories specified by the manufacturer Use only with the cart stand tripod bracket or table specified by the manufacturer or sold with the apparatus When a ca...

Страница 4: ... 1 15P plug rated for 125 V 15 A Europe Countries regions Voltage Frequency Hz Plug type Austria 230 50 C Belgium 230 50 C Czech 220 50 C Denmark 230 50 C Finland 230 50 C France 230 50 C Germany 230 50 C Greece 220 50 C Hungary 220 50 C Iceland 230 50 C Ireland 230 50 C BF Italy 220 50 C Luxemburg 230 50 C Netherlands 230 50 C Norway 230 50 C Poland 220 50 C Portugal 230 50 C Romania 220 50 C Rus...

Страница 5: ...60 A Jamaica 110 50 A Mexico 120 127 60 A Nicaragua 120 240 60 A Panama 110 220 60 A South America Countries regions Voltage Frequency Hz Plug type Argentina 220 50 C BF O Brazil 127 220 60 A C Chile 220 50 C Colombia 120 60 A Peru 220 60 A C Venezuela 120 60 A Middle East Countries regions Voltage Frequency Hz Plug type Iran 220 50 C BF Iraq 220 50 C BF Israel 230 50 C Saudi Arabia 127 220 50 A C...

Страница 6: ...n the instructions Replace the battery with the specified type only Otherwise fire or injury may result AC Adaptor Do not use the AC Adaptor placed in a narrow space such as between a wall and furniture Use the nearby wall outlet wall socket when using the AC Adaptor Disconnect the AC Adaptor from the wall outlet wall socket immediately if any malfunction occurs while using your camcorder Even if ...

Страница 7: ...y Sony Electronics Inc Address 16530 Via Esprillo San Diego CA 92127 U S A Telephone No 858 942 2230 This device complies with Part 15 of the FCC Rules Operation is subject to the following two conditions 1 This device may not cause harmful interference and 2 this device must accept any interference received including interference that may cause undesired operation CAUTION You are cautioned that a...

Страница 8: ...Remove the insulation sheet before using the Wireless Remote Commander Rechargeable battery pack NP FV50 1 CD ROM Handycam Application Software 1 p 39 PMB software including PMB Help Handycam Handbook PDF Operating Guide This manual 1 This camcorder has a built in software application called PMB Portable p 41 See page 22 for the memory card you can use with this camcorder Using the camcorder Do no...

Страница 9: ...ht laws Use the camcorder in accordance with local regulations Notes on playing back You may not be able to play back normally images recorded on your camcorder with other devices Also you may not be able to play back images recorded on other devices with your camcorder Standard STD image quality movies recorded on SD memory cards cannot be played on AV equipment of other manufacturers DVD media r...

Страница 10: ...the desired medium Notes on optional accessories We recommend using genuine Sony accessories Genuine Sony accessories may not be available in some countries regions About this manual illustrations and on screen displays The example images used in this manual for illustration purposes are captured using a digital still camera and therefore may appear different from images and screen indicators that...

Страница 11: ...sensor To protect the internal hard disk from shock by dropping the camcorder has a drop sensor function When a drop occurs or under a nongravity condition the block noise made when this function is activated by the camcorder may also be recorded If the drop sensor catches a drop repeatedly recording playback may be stopped Note on using the camcorder at high altitudes Do not turn on the camcorder...

Страница 12: ...photos 23 Recording Playback Recording 24 Acquiring location information using the GPS HDR PJ50V 28 Selecting the recording mode 28 Playback on the camcorder 29 Performing Highlight Playback 32 Using a built in projector HDR PJ50 PJ50V 32 Playing images on a TV 33 Advanced operations Deleting movies and photos 36 Saving movies and photos with a computer Useful functions available if you connect th...

Страница 13: ...n image quality HD disc with a DVD writer etc other than DVDirect Express 52 Creating a standard definition image quality STD disc with a recorder etc 53 Customizing your camcorder Using menus 55 Getting detailed information from the Handycam Handbook 59 Additional information Troubleshooting 60 Recording time of movies number of recordable photos 63 Precautions 66 Specifications 68 Quick referenc...

Страница 14: ...ing it in the direction of the arrow until it clicks 3 Connect the AC Adaptor and the power cord mains lead to your camcorder and the wall outlet wall socket The CHG charge lamp or the CHG flash charge lamp lights up and charging starts The CHG charge lamp or the CHG flash charge lamp turns off when the battery pack is fully charged CHG charge lamp CHG flash charge lamp Battery pack DC IN jack To ...

Страница 15: ...embled computer with a converted computer or through a USB hub are not guaranteed The camcorder may not function correctly depending on the USB device which is used with the computer Tips You can charge the battery by connecting the Built in USB Cable to a wall outlet wall socket using an AC U501AD AC U50AG USB charger AC Adaptor sold separately You cannot use a Sony CP AH2R or CP AL portable powe...

Страница 16: ...4 Even if the battery pack is attached the battery pack is not discharged Notes on the battery pack When you remove the battery pack or disconnect the AC Adaptor turn the camcorder off and make sure that the Movie Photo lamps p 24 the access lamp p 23 are turned off The CHG charge lamp or the CHG flash charge lamp flashes during charging under the following conditions The battery pack is not attac...

Страница 17: ...not use the AC Adaptor placed in a narrow space such as between a wall and furniture Do not short circuit the DC plug of the AC Adaptor or battery terminal with any metallic objects This may cause a malfunction Charging the battery pack abroad You can charge the battery pack in any countries regions using the AC Adaptor supplied with your camcorder within the AC 100 V 240 V 50 Hz 60 Hz range Do no...

Страница 18: ...screen is open press POWER 2 Select the desired language then touch Next 3 Select the desired geographical area with then touch Next To set the date and time again touch MENU Setup Clock Settings Date Time Setting Date Time When an item is not on the screen touch until the item appears Touch the button on the LCD screen MODE lamp POWER button ...

Страница 19: ...edia and can be displayed during playback To display the date and time touch MENU Setup Playback Settings Data Code Date Time You can turn off the operation beeps by touching MENU Setup General Settings Beep Off If the button you touch does not react correctly calibrate the touch panel Once the clock is set the clock time is automatically adjusted with Auto Clock ADJ and Auto Area ADJ set to On Th...

Страница 20: ... off Tips You can turn off the camcorder also by pressing POWER When Power On By LCD is set to Off turn off your camcorder by pressing POWER Changing the language setting You can change the on screen displays to show messages in a specified language Touch MENU Setup General Settings Language Setting a desired language ...

Страница 21: ...the selected medium Tips See page 63 for the recordable time of movies See page 65 for the number of recordable photos Selecting recording media Touch MENU Setup Media Settings Media Select The Media Select screen appears Touch the desired recording medium then touch Both movies and photos are recorded on the selected medium To check the recording media settings In either movie recording mode or p...

Страница 22: ...label or the like on memory card or memory card adaptor Doing so may cause a malfunction Memory Stick PRO Duo media of up to 32 GB and SD cards of up to 64 GB have been verified to operate with your camcorder Notes A MultiMediaCard cannot be used with this camcorder Movies recorded on SDXC memory cards cannot be imported to or played back on computers or AV devices not supporting the exFAT file sy...

Страница 23: ... is not enough free space is displayed format the memory card Confirm the direction of the memory card If you forcibly insert the memory card in the wrong direction the memory card memory card slot or image data may be damaged Do not open the cover during recording When inserting or ejecting the memory card be careful so that the memory card does not pop out and drop To eject the memory card Open ...

Страница 24: ...re recorded with high definition image quality HD Tips To change the recording media see page 21 1 Fasten the grip belt 2 Open the LCD screen of your camcorder Your camcorder is turned on and the lens cover is opened Recording movies MODE button Movie When recording a movie Photo When recording a photo STBY REC START STOP button ...

Страница 25: ...tection Notes If you close the LCD screen while recording movies the camcorder stops recording The maximum continuous recordable time of movies is about 13 hours When a movie file exceeds 2 GB the next movie file is created automatically It will take several seconds until you can start recording after you turn on the camcorder You cannot operate your camcorder during this time The following states...

Страница 26: ... a TV which is not compatible with full pixel display In this case set Guide Frame to On and record images using the outer frame displayed on the screen as a guide To adjust the angle of the LCD panel first open the LCD panel 90 degrees to the camcorder and then adjust the angle Data code during recording The recording date time and condition and coordinates HDR PJ50V are recorded automatically on...

Страница 27: ...ere is insufficient ambient light The flash does not work in the movie recording mode You can change how your camcorder flashes by MENU Camera Mic Flash Flash a desired setting HDR PJ50 PJ50V If you record photos using flash with a conversion lens sold separately the shadow may be reflected HDR PJ50 PJ50V If white circular spots appear on photos HDR PJ50 PJ50V This is caused by particles dust poll...

Страница 28: ...ed The GPS assist data may not function in the following cases When the GPS assist data are not updated for about 30 days or more When the date and time of the camcorder are not correctly set When the camcorder is moved for a long distance Built in map is powered by companies as follows Map of Japan by ZENRIN CO LTD other areas by NAVTEQ Selecting the recording mode You can change the quality of t...

Страница 29: ...he camcorder displays recorded images as an event automatically based on the date and time It can also display recorded images on the basis of location information HDR PJ50V 1 Open the LCD screen of your camcorder Your camcorder is turned on and the lens cover is opened 2 Press View Images The Event View screen appears after some seconds 3 Touch to select the desired event To the MENU screen Event...

Страница 30: ...the number of the events that can be displayed on the time line bar 4 Touch an image you want to view Touch to select the image type to be displayed in the index from MOVIE movies only PHOTO photos only or MOVIE PHOTO movies and photos mixed To go back to the Event View screen Displays the previous next page Touching and holding the button scrolls the index screen Change to the movie photo recordi...

Страница 31: ...ily When playback from the selected image reaches the last image the screen returns to the INDEX screen Touch during pause to play back movies slowly As you repeat touching during playback movies are played as fast as about 5 times about 10 times about 30 times about 60 times The recording date time and shooting conditions and coordinates HDR PJ50V are recorded automatically during recording This ...

Страница 32: ... To repeat Slideshow touch Slideshow Set Performing Highlight Playback Press Touch to select the desired event then touch Highlight Touch Scenario Save on the screen after the Highlight Playback is finished so that you can save the Highlight Playback scenario Using a built in projector HDR PJ50 PJ50V Press Touch to select the desired event and touch the event Press PROJECTOR To start stop slide sh...

Страница 33: ...Connect the camcorder to a TV Use the supplied AC Adaptor as the power source p 16 3 Play a movie or a photo on the camcorder p 29 List of connection Connecting to a high definition TV When the recording quality is high definition image quality HD the movies are played back in high definition image quality HD When the recoding quality is standard image quality STD the movies are played back in sta...

Страница 34: ... the HDMI OUT jack of your camcorder Some TVs may not function correctly e g no sound or image with this connection Do not connect the camcorder HDMI OUT jack to an external device HDMI OUT jack as malfunction may result When the connected device is compatible with 5 1ch surround sound high definition image quality HD movies are output in 5 1ch surround sound automatically Standard definition imag...

Страница 35: ...h standard definition image quality STD Tips If you connect your camcorder to the TV using more than one type of cable to output images the order of priority of the TV input jacks is as follows HDMI component S VIDEO video HDMI High Definition Multimedia Interface is an interface to send both video audio signals The HDMI OUT jack outputs high quality images and digital audio On Photo TV HD This ca...

Страница 36: ...n image by selecting it from the Event Index screen you can delete the image using on the playback screen To delete all images recorded in the recording media and recover all the recordable space of the media format the media Reduced size images which enable you to view many images at the same time on an index screen are called thumbnails 1 Press View Images p 29 2 Touch MENU Edit Copy Delete 3 To...

Страница 37: ...stored in the CD ROM supplied includes functions that enable you to do more with the images recorded with the camcorder Easy uploading when away from home Windows Macintosh With PMB Portable which is pre installed on the camcorder you can play back or upload your images to the Web by connecting your camcorder to a computer away from home View Edit Save on a disc Upload Calendar DVD Blu ray Joining...

Страница 38: ...finition image quality STD For Windows Vista Windows 7 1 GB or more Hard disk Disk volume required for installation Approximately 500 MB 10 GB or more may be necessary when creating AVCHD recording discs 50 GB maximum may be necessary when creating Blu ray discs Display Minimum 1 024 768 dots Others USB port this must be provided as standard Hi Speed USB USB 2 0 compatible Blu ray disc DVD burner ...

Страница 39: ...tallation screen appears If the screen does not appear click Start Computer in Windows XP My Computer then double click SONYPMB E CD ROM Drive names such as E may vary depending on the computer Click Install Select the country or region Select the language for the application to be installed then proceed to the next screen Read the terms of the license agreement carefully If you agree to the terms...

Страница 40: ...ill not operate correctly Do not insert AVCHD recording discs that have been created using the PMB software to DVD players or recorders as these devices do not support the AVCHD standard If you do you may not be able to remove the disc from these devices This camcorder captures high definition footage in the AVCHD format Using the enclosed PC software high definition footage can be copied onto DVD...

Страница 41: ... PMB functions Uploading images to a network service The application software PMB Portable is pre installed in the camcorder You can enjoy the following functions using the PMB Portable Uploading images to network services such as blogs with ease Uploading by a network connected computer while away from home Register network services such as blogs to use frequently Click the Help button on the upp...

Страница 42: ...reement well and click I Agree PMB Portable starts up Touch USB Connect on the camcorder screen When using Windows 7 The Device Stage window opens When using Windows XP Windows Vista The AutoPlay wizard is displayed If the USB Select screen does not appear touch MENU Setup Connection USB Connect Device Stage is a menu of Windows 7 that is used to manage devices camcorder camera etc that are connec...

Страница 43: ...g on the service provider to upload the image to If a problem occurs to PMB Portable or if you wrongly delete the software you can download the PMB Portable installer from the Web to repair Notes on PMB Portable You can download the URLs of some websites from a server administered by Sony hereinafter referred to as the Sony server using PMB Portable You must agree to the following in order to util...

Страница 44: ...r with standard definition image quality STD Built in USB Cable 52 Hard disk recorder etc Saving images on a DVD disc with standard definition image quality STD A V connecting cable supplied 53 Movies that are recorded with standard definition image quality STD Use the A V connecting cable to connect the camcorder to an external device in which images are saved Notes The AVCHD recording disc can b...

Страница 45: ... disc with high definition image quality HD AVCHD format playback devices such as a Sony Blu ray disc player or a PlayStation 3 DVD disc with standard definition image quality STD Ordinary DVD playback devices such as a DVD player Notes Always maintain your PlayStation 3 to use the latest version of the PlayStation 3 system software The PlayStation 3 may not be available in some countries regions ...

Страница 46: ...media devices with built in USB hub card reader Notes You may not be able to use external media devices with a code function The FAT file system is available for your camcorder If the storage medium of the external device was formatted for the NTFS file system etc format the external media device using the camcorder before use The format screen appears when an external media device is connected to...

Страница 47: ...CD screen When an external media device is connected the USB icon will appear on the Event View screen etc You can make menu settings of the external media device such as deleting images Touch MENU Edit Copy on Event View To disconnect the external media device Touch while the camcorder is in the playback standby mode Event View or Event Index is displayed of the external media device Disconnect t...

Страница 48: ...ent select the event to copy with You cannot select multiple events Touch on the camcorder screen Playing back images in the external media device on the camcorder Connect the camcorder to the external media device and touch Play without copying Event View of the external media device is displayed Select the image you want to view and play back the image p 29 You can also view images on a TV conne...

Страница 49: ...eparately Refer also to the instruction manual supplied with the DVD writer Notes Connect your camcorder to the wall outlet wall socket using the supplied AC Adaptor for this operation p 16 DVDirect Express is referred to as DVD writer in this section Discs that can be used 12 cm DVD R 12 cm DVD R The device does not support two layered discs 1 Connect the AC Adaptor and the power cord mains lead ...

Страница 50: ...ion is completed touch the tray opens remove the disc touch on the camcorder screen 6 Touch then disconnect the USB cable Tips If the total memory size of movies to be burnt by the DISC BURN operation exceeds that of the disc disc creation stops when the limit is reached The last movie on the disc may be cut off Performing DISC BURN OPTION Perform this operation in the following cases When copying...

Страница 51: ...ed appears on the screen insert another disc into the DVD writer and perform the DISC BURN operation again Tips Disc creation time to copy movies to the limit of the disc is about 20 to 60 minutes It may take more time depending on the recording mode or the number of scenes Playing back a disc on the DVD writer Connect the AC Adaptor and the power cord mains lead to the DC IN jack of your camcorde...

Страница 52: ... HD movies such as a Sony DVD writer Refer also to the instruction manuals supplied with the device to be connected Notes Connect your camcorder to the wall outlet wall socket using the supplied AC Adaptor for this operation p 16 Sony DVD writer may not be available in some countries regions Always maintain the firmware of the Sony DVDirect DVD writer to its latest version For details see the foll...

Страница 53: ...mpleted touch on the camcorder screen 6 Disconnect the USB cable Creating a standard definition image quality STD disc with a recorder etc You can copy images played back on your camcorder on a disc or video cassette by connecting your camcorder to a disc recorder a Sony DVD writer etc other than DVDirect Express with the A V connecting cable Connect the device in either way of or Refer also to th...

Страница 54: ...he input jacks of the recording device 3 Start playback on your camcorder and record it on the recording device Refer to the instruction manuals supplied with your recording device for details 4 When dubbing is finished stop the recording device and then your camcorder Notes Since copying is performed via analog data transfer the image quality may deteriorate You cannot copy images to recorders co...

Страница 55: ...image quality or size p 57 Playback Function Items for playback p 57 Edit Copy Items for editing p 57 Setup Other setup items p 57 Operating menus Follow the procedures explained below to set the menu items The Camera Mic and Setup menus have sub categories Touch the sub category icon and the screen changes to other sub category menus Grayed out menu items or settings are not available Notes You m...

Страница 56: ...mer when your camcorder is in photo recording mode Tele Macro Shoots a subject in focus with the background out of focus SteadyShot Sets the SteadyShot function when recording movies SteadyShot Sets the SteadyShot function when shooting photos Digital Zoom Sets the maximum zoom level of the digital zoom that exceeds the zoom level of the zoom Conversion Lens Sets the type of an attached conversion...

Страница 57: ...isplay Map View 2 Shows the Map View display Highlight Movie Starts Highlight Playback Scenario Starts playing Highlight Scenario that has been saved Edit Copy Delete Deletes movies or photos Protect Protects movies or photos to avoid deleting Copy Copies images back and forth between the selected internal recording medium and the inserted memory card Direct Copy Copies images stored on the intern...

Страница 58: ...eration beeps or not LCD Brightness Adjusts the brightness of the LCD screen Your Location 2 Displays the current location on a map GPS Setting 2 Sets the GPS signal reception on or off REC Lamp 1 Sets the recording lamp to light up or not Remote Ctrl 1 Sets whether the Wireless Remote Commander is to be used or not A Shut Off Changes the A Shut Off setting p 16 Power On By LCD Sets whether or not...

Страница 59: ...click SONYPMB E CD ROM install exe Drive names such as E may vary depinding on the computer 2 Click Handbook 3 Click the desired language and the model name of your camcorder Install and follow the on screen instructions to install Handycam Handbook The model name of your camcorder is printed on the bottom surface To view the Handycam Handbook double click the short cut icon on the computer screen...

Страница 60: ...ok p 59 for details on the symptoms of your camcorder and PMB Help p 41 on connecting your camcorder to a computer The power does not turn on Attach a charged battery pack to the camcorder p 14 Connect the plug of the AC Adaptor to the wall outlet wall socket p 16 The camcorder does not operate even when the power is set to on It takes a few seconds for your camcorder to be ready to shoot after th...

Страница 61: ...rder and restart the computer then connect the computer and your camcorder again in an orderly manner When both the built in USB cable and other USB cable that is connected to the USB port on the camcorder are connected to external devices at the same time disconnect the one that is not connected to a computer Self diagnosis display Warning indicators If indicators appear on the LCD screen check t...

Страница 62: ...rding medium The memory card is damaged Format the memory card with your camcorder p 57 Incompatible memory card is inserted p 22 The memory card is write protected Access to the memory card was restricted on another device There is something wrong with the flash The amount of light is not sufficient Use the flash HDR PJ50 PJ50V The camcorder is unsteady Hold the camcorder steady with both hands H...

Страница 63: ...h 10 m 29 h 10 m 29 h 0 m 29 h 0 m Recording time of movies number of recordable photos HD stands for high definition image quality and STD stands for standard image quality Expected time of recording and playback with each battery pack Recording time Approximate time available when you use a fully charged battery pack HDR PJ50 PJ50V unit minute Battery pack Continuous recording time Typical recor...

Страница 64: ... change the recording sound format with Audio Mode p 57 Notes The number in is the minimum recordable time Tips You can record movies of a maximum of 3 999 scenes with high definition image quality HD and 9 999 scenes with standard definition image quality STD The maximum continuous recording time of movies is approximately 13 hours If you want to record up to the maximum recording time indicated ...

Страница 65: ...recording HDR PJ50 PJ50V 3 072 1 728 dots 16 9 2 304 1 728 dots 4 3 HDR XR160 2 304 1 296 dots 16 9 1 728 1 296 dots 4 3 Capturing a photo from a movie 1 920 1 080 dots 16 9 640 360 dots 16 9 640 480 dots 4 3 Standard definition image quality STD unit minute 2 GB 4 GB 8 GB 16 GB 32 GB 5 1ch 25 20 50 50 110 100 220 205 445 410 2ch 25 25 55 50 110 100 225 210 460 420 You can change the recording sou...

Страница 66: ...wel for example and operate it Doing so might cause heat to build up inside When disconnecting the power cord mains lead pull it by the plug and not the cord lead Do not damage the power cord mains lead such as by placing anything heavy on it Do not use a deformed or damaged battery pack Keep metal contacts clean If the battery electrolytic liquid has leaked Consult your local authorized Sony serv...

Страница 67: ...r after charging the pre installed rechargeable battery However even if the pre installed rechargeable battery is not charged the camcorder operation will not be affected as long as you are not recording the date Procedures Connect your camcorder to a wall outlet wall socket using the supplied AC Adaptor and leave it with the LCD screen closed for more than 24 hours Note on disposal transfer of th...

Страница 68: ...2 3 Compatible MPF Baseline Compatible Recording media Movie Photo Internal hard disk HDR PJ50 PJ50V 220 GB HDR XR160 160 GB Memory Stick PRO Duo media SD card Class 4 or faster When measuring media capacity 1 GB equals 1 billion bytes a portion of which is used for system management and or application files The capacity that a user can use is below HDR PJ50 PJ50V approximately 219 GB HDR XR160 ap...

Страница 69: ... Headphone jack HDR PJ50 PJ50V Stereo minijack 3 5 mm MIC input jack Stereo minijack 3 5 mm LCD screen Picture 7 5 cm 3 0 type aspect ratio 16 9 Total number of pixels 230 400 960 240 Projector HDR PJ50 PJ50V Projection type DLP Light source LED R G B Focus Manual Image size 10 type 60 type Throw Distance Approx 0 5 m 3 0 m 1 6 feet 9 8 feet Color repeatability Approx 16 700 000 Brightness Max 10 ...

Страница 70: ...ements AC 100 V 240 V 50 Hz 60 Hz Current consumption 0 35 A 0 18 A Power consumption 18 W Output voltage DC 8 4 V Operating temperature 0 C to 40 C 32 F to 104 F Storage temperature 20 C to 60 C 4 F to 140 F Dimensions approx 48 mm 29 mm 81 mm 1 15 16 in 1 3 16 in 3 1 4 in w h d excluding the projecting parts Mass approx 170 g 6 0 oz excluding the power cord mains lead See the label on the AC Ada...

Страница 71: ...d trademarks or trademarks of Microsoft Corporation in the United States and or other countries Macintosh and Mac OS are registered trademarks of Apple Inc in the U S and other countries Intel Intel Core and Pentium are trademarks or registered trademarks of Intel Corporation or its subsidiaries in the United States and other countries and PlayStation are registered trademarks of Sony Computer Ent...

Страница 72: ... off Drop sensor activated Center Indicator Meaning STBY REC Recording status Slide show set Warning Playback mode Right Indicator Meaning 60i Recording image quality HD STD frame rate 60p 60i 24p and recording mode PS FX FH HQ LP 60min Remaining battery Recording playback editing media 0 00 00 Counter hour minute second 00Min Estimated recording remaining time Photo size 9999 9999 Approximate num...

Страница 73: ...o Mode Audio Level Display Low Lux Spot Meter Fcs Spot Meter Exposure Intelligent Auto Slide show button 101 0005 Data file name Protected image Flash Red Eye Reduction Indicators and their positions are approximate and may differ from what you actually see Some indicators may not appear depending on your camcorder model ...

Страница 74: ...n your camcorder Lens G lens Flash HDR PJ50 PJ50V Built in microphone Remote sensor Camera recording lamp 58 The camera recording lamp lights up in red during recording The lamp flashes when the remaining recording media capacity or battery power is low LCD screen Touch panel If you rotate the LCD panel 180 degrees you can close the LCD panel with the LCD screen facing out This is convenient durin...

Страница 75: ...ones jack HDR PJ50 PJ50V MIC PLUG IN POWER jack HDMI OUT jack 33 USB jack 46 49 Power zoom lever PHOTO button 27 CHG charge lamp HDR XR160 CHG flash charge lamp HDR PJ50 PJ50V 14 Battery pack 14 START STOP button 25 DC IN jack 14 A V Remote Connector 33 Grip belt 24 Built in USB Cable 15 Memory card access lamp 23 While the lamp is lit or flashing the camcorder is reading or writing data Tripod re...

Страница 76: ... indicators 72 Self diagnosis display 61 Setting the date and time 18 Software 39 Specifications 68 Supplied items 8 T Thumbnail 36 Tripod 75 Troubleshooting 60 Turning the power on 18 TV 33 U USB cable 49 52 W Wall outlet wall socket 14 Warning indicators 61 Windows 38 A A V connecting cable 34 54 B Battery pack 14 Built in USB Cable 8 15 C Care 66 Charging the battery pack 14 Charging the batter...

Страница 77: ...77 US Quick reference ...

Страница 78: ...r cet appareil à l abri de la pluie et de l humidité N exposez pas les piles à une chaleur excessive notamment aux rayons directs du soleil à une flamme etc Ce symbole avise l utilisateur de la présence de pièces sous tension dangereuse non isolées à l intérieur du boîtier de l appareil leur tension est suffisante pour représenter un risque d électrocution pour les personnes Ce symbole avise l uti...

Страница 79: ...la terre Une fiche polarisée dispose de deux broches dont l une est plus large que l autre Une broche de mise à la terre dispose de deux broches et d une troisième pour la mise à la terre Cette broche plus large ou cette troisième broche visent à assurer votre sécurité Si la fiche fournie ne s adapte pas à votre prise murale consultez un électricien afin de remplacer la prise obsolète Faites en so...

Страница 80: ...e de fiche représentatifs sont décrits dans le tableau suivant Il est possible que plusieurs types de fiches et tensions d alimentation soient utilisés dans une région Attention il convient d utiliser un cordon d alimentation satisfaisant aux exigences de chaque pays Pour les États Unis uniquement Utilisez dans la liste UL un cordon d alimentation de 1 5 à 3 m 5 à 10 pieds type SPT 2 ou NISPT 2 AW...

Страница 81: ...che Australie 240 50 O Nouvelle Zélande 230 240 50 O Amérique du Nord Pays régions Tension Fréquence Hz Type de fiche Canada 120 60 A États Unis 120 60 A Amérique centrale Pays régions Tension Fréquence Hz Type de fiche Bahamas 120 240 60 A Costa Rica 110 60 A Cuba 110 220 60 A C République dominicaine 110 60 A El Salvador 110 60 A Guatemala 120 60 A Honduras 110 60 A Jamaïque 110 50 A Mexique 120...

Страница 82: ...e Saoudite 127 220 50 A C BF Turquie 220 50 C EAU 240 50 C BF Afrique Pays régions Tension Fréquence Hz Type de fiche Algérie 127 220 50 C République démocratique du Congo 220 50 C Egypte 220 50 C Ethiopie 220 50 C Kenya 240 50 C BF Nigéria 230 50 C BF Afrique du Sud 220 230 50 C BF Tanzanie 230 50 C BF Tunisie 220 50 C ...

Страница 83: ...au rebut sans attendre de la manière décrite dans les instructions Remplacez la batterie par une batterie du type spécifié uniquement Sinon vous risquez de provoquer un incendie ou des blessures Remarques sur l adaptateur CA N utilisez pas l adaptateur CA dans un espace étroit entre un mur et un meuble par exemple Branchez l adaptateur CA à une prise murale proche Débranchez immédiatement l adapta...

Страница 84: ...SONY No de modèle HDR XR160 Responsable Sony Electronics Inc Adresse 16530 Via Esprillo San Diego CA 92127 É U No de téléphone 858 942 2230 Cet appareil est conforme à la Partie 15 de la réglementation de la FCC des États Unis Son utilisation est sujette aux deux conditions suivantes 1 Cet appareil ne doit pas générer d interférences nuisibles et 2 il doit être en mesure d accepter toute interfére...

Страница 85: ...ent les quantités fournies Adaptateur CA 1 Câble d alimentation 1 Câble composante A V 1 Câble de raccordement A V 1 Câble prenant en charge la connexion USB 1 Utilisez ce câble lorsque le câble USB intégré du caméscope p 16 est trop court Télécommande sans fil HDR PJ50 PJ50V 1 Une pile au lithium de type bouton est déjà installée Retirez la feuille de protection avant d utiliser la télécommande s...

Страница 86: ...atage de la carte mémoire effacera toutes les données qui y sont stockées et celles ci seront irrécupérables Enregistrez vos données importantes sur votre ordinateur etc Avant de commencer à enregistrer testez la fonction d enregistrement pour vous assurer que l image et le son sont enregistrés sans problème Aucune compensation relative au contenu de l enregistrement ne sera accordée même si l enr...

Страница 87: ...tateur CA du caméscope en retenant à la fois le caméscope et la fiche CC Remarque sur la température du caméscope et du bloc piles Si la température du caméscope ou du bloc piles devient très élevée ou très basse vous ne pourrez peut être pas effectuer de prise de vue ou de lecture sur le caméscope en raison des fonctions de protection de ce dernier qui s activent dans de telles situations Dans ce...

Страница 88: ...érences principales dans les spécifications de cette série sont les suivantes Capacité du support d enregistrement interne Projecteur HDR PJ50 HDR PJ50V 220 Go HDR XR160 160 Go Les modèles marqués d un sont munis d un GPS Notes sur l utilisation Ne faites pas ce qui suit Sinon le support d enregistrement peut s endommager les images enregistrées risquent d être perdues ou il peut devenir impossibl...

Страница 89: ...os 24 Enregistrement ou Lecture Enregistrement 25 Obtention d information d emplacement à l aide du GPS HDR PJ50V 29 Sélection du mode d enregistrement 30 Lecture avec le caméscope 31 Utilisation de la lecture de sélection 34 Utilisation du projecteur intégré HDR PJ50 PJ50V 34 Lecture des images sur un téléviseur 35 Opérations avancées Suppression de films et de photos 38 Enregistrement de films e...

Страница 90: ...inition HD avec un graveur DVD autre que DVDirect Express 56 Création d un disque à qualité d image à définition standard STD avec un graveur etc 57 Personnalisation de votre caméscope Utilisation des menus 60 Information détaillée fournie dans le Guide pratique de Handycam 65 Informations complémentaires Dépannage 66 Durée d enregistrement des films et nombre de photos pouvant être enregistrées 6...

Страница 91: ...es en le glissant dans le sens de la flèche jusqu à ce qu il se produise un déclic 3 Raccordez l adaptateur CA et le câble d alimentation au caméscope et à la prise murale Le témoin CHG charge ou le témoin CHG flash ou charge s allume et la charge commence Le témoin CHG charge ou le témoin CHG flash ou charge s éteint lorsque le bloc piles est entièrement chargé Témoin CHG charge Témoin CHG flash ...

Страница 92: ...caméscope raccordé à un ordinateur de cette façon La charge du caméscope à l aide d un ordinateur assemblé ou converti ou à l aide d un concentrateur USB n est pas garantie Selon le périphérique USB utilisé avec l ordinateur le caméscope pourrait ne pas fonctionner adéquatement Conseils Vous pouvez charger le bloc piles en branchant le câble USB intégré à une prise murale à l aide de l adaptateur ...

Страница 93: ...arges ont été mesurées sans qu un câble prenant en charge la connexion USB soit utilisé Conseils Pour en savoir davantage sur les temps d enregistrement et de lecture consultez la page 69 Lorsque votre caméscope est en marche l autonomie approximative du bloc piles est indiquée par l icône située dans le coin supérieur droit de l écran LCD Pour retirer le bloc piles Fermez l écran LCD Faites gliss...

Страница 94: ...rée avec votre caméscope Par défaut l appareil s éteint automatiquement après environ 5 minutes d inactivité pour économiser l énergie du bloc piles Arrêt automatique Remarques sur l adaptateur CA Utilisez la prise murale la plus proche pour brancher l adaptateur CA Débranchez immédiatement l adaptateur CA de la prise murale lorsqu une défaillance se produit pendant l utilisation du caméscope N ut...

Страница 95: ...R 2 Sélectionnez la langue souhaitée puis touchez Suiv 3 Sélectionnez la zone souhaitée à l aide des touches puis touchez Suiv Pour régler la date et l heure de nouveau touchez MENU Configuration Réglages horloge Régl date heure Date et heure Si une option n apparaît pas à l écran appuyez sur les touches ou jusqu à ce que l option s affiche Appuyez sur la touche située sur l écran LCD Témoin MODE ...

Страница 96: ...endant la lecture Pour afficher la date et l heure touchez MENU Configuration Réglages lecture Code données Date heure Vous pouvez désactiver les bips en touchant MENU Configuration Réglages généraux Bip Désactivé Si une touche ne répond pas correctement lorsque vous appuyez dessus étalonnez l écran tactile Une fois l horloge configurée l heure est automatiquement réglée et les options AJU auto ho...

Страница 97: ...Vous pouvez également éteindre votre caméscope en appuyant sur POWER Lorsque l option Mise ss tens par LCD est réglée à Désactivé éteignez votre caméscope en appuyant sur POWER Modification du réglage de la langue Vous pouvez modifier la langue des messages affichés à l écran Touchez MENU Configuration Réglages généraux Language Setting la langue souhaitée ...

Страница 98: ...ée d enregistrement des films Reportez vous à la page 72 pour en savoir davantage sur le nombre de photos pouvant être enregistrées Sélection du support d enregistrement Touchez MENU Configuration Réglages support Sélection support L écran Sélection support s affiche Touchez le support d enregistrement souhaité puis touchez Les films et les photos sont enregistrés sur le support sélectionné Pour v...

Страница 99: ...iquette sur la carte mémoire ou sur l adaptateur Cela pourrait entraîner un problème de fonctionnement Il a été vérifié que le Memory Stick PRO Duo allant jusqu à 32 Go et les cartes SD allant jusqu à 64 Go fonctionnent avec votre caméscope Remarques Il est impossible d utiliser une MultiMediaCard avec ce caméscope Seuls les ordinateurs ou les appareils audio vidéo qui prennent en charge le systèm...

Страница 100: ...re est peut être insuffisant s affiche formatez la carte mémoire Assurez vous d insérer la carte mémoire dans le bon sens En forçant la carte mémoire dans le mauvais sens vous risquez d endommager la carte mémoire la fente pour carte mémoire ou les données d images N ouvrez pas le cache en cours d enregistrement Lors de l insertion ou de l éjection de la carte mémoire veillez à ce que la carte mém...

Страница 101: ...s sur le support d enregistrement interne Les films sont enregistrés en mode de qualité d image haute définition HD Conseils Pour changer le support d enregistrement consulter la page 22 1 Attachez la dragonne 2 Ouvrez l écran LCD de votre caméscope Votre caméscope est mis sous tension et le couvercle de l objectif s ouvre ...

Страница 102: ...veau sur START STOP Pour afficher de nouveau les options sur l écran LCD Pour utiliser les options touchez l écran LCD n importe où sauf sur les touches Vous pouvez modifier les réglages à l aide du menu Réglage d affichage environ 4 secondes plus tard Touche MODE Film Pendant l enregistrement d un film Photo Pendant l enregistrement d une photo VEILLE ENR Touche START STOP ...

Страница 103: ...port dans le coin supérieur droit de l écran LCD clignote Conseils Reportez vous à la page 70 pour en savoir davantage sur la durée d enregistrement des films Vous pouvez enregistrer des photos pendant que vous tournez un film en appuyant à fond sur PHOTO Dual Rec SteadyShot est réglé à Activé par défaut Vous pouvez sélectionner le visage prioritaire en le touchant Vous pouvez prendre des photos à...

Страница 104: ...nt puis enfoncez la complètement Conseils Reportez vous à la page 72 pour en savoir davantage sur le nombre de photos pouvant être enregistrées Pour modifier la taille de l image touchez MENU Qualité image Taille Taille d image le réglage souhaité Il est impossible d enregistrer des photos lorsque est affiché Votre caméscope déclenche automatiquement le flash lorsque la luminosité ambiante est ins...

Страница 105: ...ser certaines fonctions comme Visualiser carte L aspect du témoin varie en fonction de l intensité du signal GPS reçu Vous pouvez réduire le temps de traitement en chargeant les données d assistance GPS dans le caméscope à l aide du logiciel PMB fourni Installez PMB sur votre ordinateur p 42 et connectez ce dernier à Internet Raccordez ensuite le caméscope à l ordinateur les données d assistance G...

Страница 106: ...strement sélectionné Pour obtenir plus de renseignements concernant l enregistrement sur un dispositif externe consultez la plage 48 Types de support Mode d enregistrement PS FX FH HQ LP Sur ce caméscope Support d enregistrement interne Carte mémoire Sur des appareils externes Support externe périphériques de stockage USB Blu ray Disques AVCHD disques d enregistrement L option PS ne peut être régl...

Страница 107: ...rées comme événements dont la date et l heure sont précisées Les images enregistrées peuvent également être affichées selon l information relative à l emplacement HDR PJ50V 1 Ouvrez l écran LCD de votre caméscope Votre caméscope est mis sous tension et le couvercle de l objectif s ouvre 2 Appuyez sur Afficher Images L écran Visualiser évènement apparaît après quelques instants 3 Touchez pour sélec...

Страница 108: ...nements pouvant être affichés dans la barre chronologique 4 Touchez à l image que vous souhaitez visionner Touchez pour sélectionner le type d image à afficher dans l index à partir de FILM films seulement PHOTO photos seulement ou FILM PHOTO combinaison de films et de photos Revenir à l écran Visualiser évènement Affiche la page précédente ou suivante maintenez la touche enfoncée pour faire défil...

Страница 109: ... de nouveau lorsque la lecture à partir d images sélectionnées atteint la dernière image Touchez en mode pause pour lire les films au ralenti Lorsque vous continuez de toucher pendant la lecture les films sont lus à une vitesse d environ cinq fois environ 10 fois environ 30 fois environ 60 fois la normale La date l heure et les conditions d enregistrement de même que les coordonnées HDR PJ50V sont...

Страница 110: ...r répéter Diaporama touchez Rég diaporama Utilisation de la lecture de sélection Touchez puis afin de sélectionner l événement de votre choix puis touchez Sélection Touchez Enreg de scénario sur l écran après la lecture de sélection afin d enregistrer le scénario de lecture de Sélection Utilisation du projecteur intégré HDR PJ50 PJ50V Touchez Touchez afin de sélectionner l événement de votre choix...

Страница 111: ...z l adaptateur CA fourni comme source d alimentation p 17 3 Faites jouer un film sur le caméscope ou affichez y une photo p 31 Liste des différents types de raccordements Raccordement à un téléviseur haute définition Lorsque l enregistrement a été fait avec une qualité d image haute définition HD les films sont lus avec une qualité d image haute définition HD Lorsque l enregistrement a été fait av...

Страница 112: ...mité un mini connecteur HDMI pour le caméscope et une prise appropriée pour y brancher votre téléviseur à l autre extrémité Les images protégées par des droits d auteurs ne seront pas transmises par la prise HDMI OUT de votre caméscope Certains téléviseurs peuvent ne pas fonctionner correctement ex aucun son ou image avec ce type de raccordement Ne raccordez pas la prise HDMI OUT du caméscope à un...

Страница 113: ... Taille Mode large 4 3 Lorsque le câble de raccordement A V est utilisé pour transmettre des films ces derniers sont reproduits avec une qualité d image à définition standard STD Conseils Si vous raccordez le caméscope au téléviseur en utilisant plus d un type de câble pour reproduire les images l ordre de priorité des prises d entrée du téléviseur est le suivant HDMI composante S VIDEO vidéo L in...

Страница 114: ...s films ou des photos utilisés dans des scénarios enregistrés ces scénarios seront également supprimés Conseils Si vous lancez la lecture d une image à partir de l écran d index d événements vous pouvez supprimer cette image à l aide de l icône située sur l écran de lecture Pour supprimer toutes les images du support d enregistrement et en récupérer tout l espace formatez le Les vignettes sont des...

Страница 115: ...s d un événement en une seule fois À l étape 3 touchez Tout dans évènement Touchez pour sélectionner l événement de votre choix puis touchez Touchez la vignette souhaitée et laissez votre doigt dessus afin de confirmer l image Pour retourner à l écran précédent touchez Touchez ...

Страница 116: ...iter davantage les images prises avec le caméscope Téléversement facile lorsque vous n êtes pas à la maison Windows Macintosh Lorsque vous êtes à l extérieur de la maison vous pouvez lire des images et les téléverser sur le Web en raccordant votre caméscope à un ordinateur et en utilisant le logiciel PMB Portable déjà installé sur le caméscope Affichage Édition Enregistrement sur un disque Téléver...

Страница 117: ... installation Approximativement 500 Mo 10 Go ou plus peuvent être nécessaires lors de la création de disques d enregistrement AVCHD 50 Go maximum peuvent être nécessaires lors de la création de disques Blu ray Affichage Minimum 1 024 768 points Autres Port USB doit être fourni en équipement standard Hi Speed USB USB compatible 2 0 graveur Blu ray ou DVD un lecteur CD ROM est nécessaire pour l inst...

Страница 118: ...de votre ordinateur L écran d installation s affiche Si l écran ne s affiche pas cliquez sur Démarrer Ordinateur dans Windows XP Poste de travail puis double cliquez SONYPMB E CD ROM Les noms de lecteurs tels que E peuvent varier selon l ordinateur Cliquez sur Installation Sélectionnez le pays ou la région Sélectionnez la langue qui sera utilisée dans l application puis passez à l écran suivant Li...

Страница 119: ...ockage de masse USB en toute sécurité Touchez Annuler Oui sur l écran du caméscope Débranchez le câble USB Si vous utilisez Windows 7 l icône pourrait ne pas s afficher sur le bureau de l ordinateur Si c est le cas vous pouvez déconnecter le caméscope de l ordinateur sans suivre les procédures décrites ci dessus Remarques Ne formatez pas le support d enregistrement interne du caméscope à l aide d ...

Страница 120: ...e que les images ne soient pas importées correctement Lorsque vous supprimez des fichiers image exécutez les étapes sur la page 38 Vous pouvez créer un disque Blu ray à l aide d un ordinateur doté d un graveur Blu ray Installez le Logiciel Supplémentaire pour BD pour PMB Démarrer PMB Picture Motion Browser 1 Double cliquez l icône de raccourci PMB sur l écran de l ordinateur Le logiciel PMB démarr...

Страница 121: ...méscope puis raccordez le à l ordinateur à l aide du câble USB intégré L écran Sélection USB s affiche alors sur le caméscope Touchez Connexion USB sur l écran du caméscope Si vous utilisez Windows 7 la fenêtre Device Stage s ouvre Si vous utilisez Windows XP Windows Vista l assistant AutoPlay s affiche Si l écran Sélection USB ne s affiche pas touchez MENU Configuration Connexion Connexion USB De...

Страница 122: ... sur Démarrer Ordinateur dans Windows XP Poste de travail PMBPORTABLE puis double cliquez sur PMBP_Win exe Si vous utilisez Windows 7 et que le Device Stage ne démarre pas cliquez sur Démarrer puis double cliquez sur l icône d appareil photo pour ce caméscope l icône du support sur lequel les photos désirées sont stockées APPLICATION PMBP_MTP exe Selon la configuration de l ordinateur si vous util...

Страница 123: ...ce peut être interrompu ou modifié sans préavis par l administrateur du site Web En aucun cas Sony ne pourra t elle être tenue responsable de toute perte de tout dommage ou de tout problème entre vous et un tiers découlant de l utilisation du service Vous serez redirigé vers les sites Web par le serveur Sony Cependant différents facteurs pourraient vous empêcher d accéder aux sites Web notamment l...

Страница 124: ...xterne avec une qualité d image haute définition HD Câble adaptateur USB VMC UAM1 vendu séparément 50 DVDirect Express Graveur DVD Enregistrement d images sur un disque DVD avec une qualité d image haute définition HD Câble USB intégré de DVDirect Express 53 DVD Graveur autre que DVDirect Express Enregistrement d images sur un disque DVD avec une qualité d image haute définition HD ou avec qualité...

Страница 125: ...émonstration lors de la duplication ou de la création de disques S il n est pas supprimé le caméscope pourrait ne pas fonctionner correctement Cependant si vous supprimez le film de démonstration vous ne pourrez pas le récupérer Types de support dans lesquels des images sont enregistrées Reportez vous à la rubrique Sélection du mode d enregistrement à la page 30 Appareils sur lesquels le disque gr...

Страница 126: ...externe support d une capacité excédant 2 To lecteur ordinaire comme un lecteur CD ou DVD support raccordé à l aide d un concentrateur USB support avec concentrateur USB intégré lecteur de carte Remarques Il peut s avérer impossible d utiliser un support externe avec une fonction code Le système de fichiers FAT est disponible sur votre caméscope Si le support externe a été formaté en fonction d un...

Страница 127: ...registrés sur le support externe peuvent désormais y être enregistrés Cette opération peut être effectuée seulement lorsqu il y a de nouvelles images enregistrées 6 Une fois l opération terminée touchez sur l écran du caméscope Lors du branchement d un support externe Les images enregistrées sur le support externe sont affichées à l écran LCD Lorsqu un support externe est connecté à votre caméscop...

Страница 128: ...support externe s affiche Touchez MENU Éditer Copier Copier Suivez les instructions à l écran pour sélectionner le support d enregistrement les méthodes de sélection d images et le type d image Il est impossible de copier des images d un support externe au support d enregistrement interne du caméscope Lorsque vous sélectionnez Plusieurs images touchez l image à enregistrer s affiche Touchez l imag...

Страница 129: ...opérations suivantes Rebranchez le câble adaptateur USB à votre caméscope Si le support externe possède un câble d alimentation CA branchez le sur la prise murale Création d un disque avec le graveur DVD DVDirect Express Vous pouvez créer un disque ou lire les images sur un disque créé en utilisant le graveur DVD DVDirect Express vendu séparément Consultez également le mode d emploi fourni avec le...

Страница 130: ...sque touchez sur l écran du caméscope 6 Touchez et débranchez le câble USB Conseils Si la taille totale des films à graver avec la fonction DISC BURN excède celle du disque l opération s arrêtera une fois la limite atteinte Le dernier film gravé sur le disque pourrait être coupé Utilisation de OPT GRAVURE DIS Effectuez cette opération dans les cas suivants Pour copier une image souhaitée Pour crée...

Страница 131: ...C BURN Conseils Le temps de création du disque et de copie des films jusqu à la limite du disque peut varier entre 20 et 60 minutes Cela peut aussi prendre plus de temps selon le mode d enregistrement choisi ou le nombre de scènes Lecture d un disque sur le graveur DVD Raccordez l adaptateur CA et le câble d alimentation à la prise DC IN de votre caméscope et à la prise murale p 17 Mettez le camés...

Страница 132: ...aute définition HD comme un graveur DVD Sony Consultez également les modes d emploi fournis avec l appareil à raccorder Remarques Raccordez votre caméscope à la prise murale à l aide de l adaptateur CA fourni à cet effet p 17 Le graveur DVD de Sony peut ne pas être disponible dans votre pays région Tenez à jour le micrologiciel de votre Sony DVDirect graveur DVD afin d utiliser la dernière version...

Страница 133: ...pération terminée touchez sur l écran du caméscope 6 Débranchez le câble USB Création d un disque à qualité d image à définition standard STD avec un graveur etc Vous pouvez copier des images lues à partir du caméscope sur un disque ou une cassette vidéo en raccordant le caméscope à un graveur de disque ou à un graveur Sony DVD etc autre que DVDirect Express à l aide du câble A V Raccordez l appar...

Страница 134: ...ment Si l appareil d enregistrement est équipé d un sélecteur d entrée réglez le sur le mode d entrée adéquat 2 Raccordez votre caméscope à l appareil d enregistrement graveur etc à l aide du câble de raccordement A V fourni ou d un câble de raccordement A V avec S VIDEO vendu séparément Raccordez votre caméscope aux prises d entrée de l appareil d enregistrement 3 Démarrez la lecture sur votre ca...

Страница 135: ...s données de la caméra et les coordonnées HDR PJ50V touchez MENU Configuration Réglages lecture Code données le réglage souhaité Si le format d affichage de l appareil ex téléviseur est 4 3 touchez MENU Configuration Connexion Type de téléviseur 4 3 Lorsque vous raccordez votre caméscope à un appareil monophonique branchez la fiche jaune du câble de raccordement A V à la prise d entrée vidéo et la...

Страница 136: ...tion lecture Options de lecture p 62 Éditer Copier Options pour l édition p 62 Configuration Autres réglages p 63 Menus de fonctionnement Suivez les procédures expliquées ci dessous pour régler les options de menu Les menus Caméra Micro et Configuration ont des sous catégories Touchez l icône de sous catégorie et l écran affichera d autres menus de sous catégories Les options de menu ou les réglag...

Страница 137: ...ne prise de vue de nuit ou la plage Transition fondu Effectue des transitions d entrée ou de sortie Minuterie Active le retardateur lorsque le caméscope est en mode d enregistrement de photos Télé macro Prend en photo un sujet sur lequel a été faite la mise au point alors que l arrière plan est flou SteadyShot Règle la fonction SteadyShot pendant le tournage d un film SteadyShot Règle la fonction ...

Страница 138: ...nregistrement des films Réglage Règle la qualité d image pour l enregistrement la lecture ou la modification des films Mode large Règle le rapport horizontal à vertical lorsque vous enregistrez des films avec qualité d image à définition standard STD x v Color Capture une gamme de couleurs plus étendue Taille d image Règle la taille des photos Fonction lecture Visualiser évènement Affiche l écran ...

Страница 139: ...iseur Convertis le signal en fonction du téléviseur raccordé p 35 Composant Sélectionnez cette option lorsque vous raccordez le caméscope à un téléviseur à l aide d une prise d entrée composante p 36 Résolution HDMI Règle la résolution de l image transmise lorsque vous raccordez le caméscope à un téléviseur à l aide d un câble HDMI vendu séparément CTRL POUR HDMI Détermine si la télécommande du té...

Страница 140: ... marche et s éteint lorsque vous ouvrez et que vous fermez l écran LCD Language Setting Règle la langue d affichage p 21 Calibration Étalonne l écran tactile Capt chute Active ou désactive l option Capt chute Informations batterie Affiche l information sur le bloc piles Mode démonstration Détermine si la démonstration apparaît Réglages horloge Régl date heure Règle l option Format date heure l opt...

Страница 141: ... E CD ROM install exe Les noms de lecteurs tels que E peuvent varier selon l ordinateur 2 Cliquez sur Guide pratique 3 Cliquez sur la langue souhaitée et sur le nom de votre caméscope Installation puis suivez les instructions à l écran afin d installer Guide pratique de Handycam Le nom de modèle du caméscope est imprimé sur sa surface inférieure Pour voir le Guide pratique de Handycam double cliqu...

Страница 142: ...ie ou ne conserve pas vos données Reportez vous au Guide pratique de Handycam p 65 pour en savoir davantage sur les symptômes que présente votre caméscope et à l Aide PMB p 44 pour savoir comment raccorder votre caméscope à un ordinateur Le caméscope ne s allume pas Insérez un bloc piles chargé dans le caméscope p 15 Branchez l adaptateur CA sur une prise murale p 17 Le caméscope ne fonctionne pas...

Страница 143: ... pour installer PMB p 41 PMB ne fonctionne pas correctement Quittez PMB et redémarrez l ordinateur Le caméscope n est pas reconnu par l ordinateur Débranchez les appareils autres que le clavier la souris et le caméscope des prises USB de l ordinateur Débranchez le câble USB de l ordinateur et du caméscope redémarrez l ordinateur puis rebranchez l ordinateur et le caméscope dans le bon ordre Lorsqu...

Страница 144: ... caméscope Aucune carte mémoire n est insérée p 23 Le clignotement du témoin indique que l espace libre n est pas suffisant pour enregistrer des images Supprimez les images inutiles p 38 ou formatez la carte mémoire après avoir stocké les images sur un autre support Le fichier de la base de données d images est endommagé Vérifiez le fichier de base de données en touchant MENU Configuration Réglage...

Страница 145: ... d image à haute définition et STD signifie qualité d image à définition standard Durée approximative prévue d enregistrement et de lecture de chaque bloc piles Durée d enregistrement Durée approximative lorsque vous utilisez un bloc piles entièrement chargé HDR PJ50 PJ50V en minutes Bloc piles Durée d enregistrement continu Durée d enregistrement typique Qualité de l image HD STD HD STD NP FV50 f...

Страница 146: ...aux 53 h 10 m 49 h 0 m 53 h 0 m 48 h 50 m Standard 2 canaux 54 h 40 m 50 h 20 m 54 h 30 m 50 h 10 m La durée d enregistrement typique indique la durée lorsque vous arrêtez puis recommencez l enregistrement que vous changez de MODE et que vous utilisez le zoom Les durées ont été mesurées à 25 C 77 F 10 C à 30 C 50 F à 86 F constitue la plage de température recommandée Les durées d enregistrement et...

Страница 147: ...99 scènes La durée d enregistrement maximale des films est d environ 13 heures Pour obtenir la durée d enregistrement maximale indiquée dans le tableau vous devez préalablement supprimer le film de démonstration de votre caméscope Votre caméscope utilise le format de débit binaire variable VBR afin de régler la qualité d image en fonction du lieu d enregistrement Cette technologie fait fluctuer la...

Страница 148: ...obtenir une résolution d image fixe qui équivaut aux formats présentés Conseils Vous pouvez également enregistrer vos photos sur une carte mémoire de capacité inférieure à 1 Go La liste ci dessous indique le débit binaire les pixels et le format d écran de chaque mode d enregistrement film audio ou autre Qualité d image haute définition HD PS max 28 Mbps 1 920 1 080 pixels 16 9 FX max 24 Mbps 1 92...

Страница 149: ...gez pas le caméscope ni ses accessoires dans les endroits suivants Dans des endroits extrêmement chauds froids ou humides Ne les exposez jamais à des températures supérieures à 60 C 140 F comme en plein soleil à proximité de calorifères ou dans un véhicule stationné au soleil Ils pourraient ne pas fonctionner correctement ou se déformer À proximité de forts champs magnétiques ou de vibrations méca...

Страница 150: ...a saleté Pour éviter la formation de moisissures nettoyez régulièrement l objectif comme indiqué ci dessus À propos de la charge de la pile rechargeable pré installée Le caméscope est équipé d une pile rechargeable pré installée permettant de conserver en mémoire la date l heure et d autres réglages même lorsque le caméscope est éteint La pile rechargeable pré installée est toujours chargée lorsqu...

Страница 151: ...ilm 16 9 environ 2 650 000 pixels 2 Réelle photo 16 9 environ 2 650 000 pixels Réelle photo 4 3 environ 3 540 000 pixels Remarque sur la mise au rebut ou le transfert de la carte mémoire Même si vous supprimez les données enregistrées sur la carte mémoire ou si vous formatez la carte mémoire dans le caméscope ou avec un ordinateur il est impossible d éliminer totalement les données de la carte mém...

Страница 152: ...ce Prise composante ou prise de sortie audio vidéo Prise HDMI Connecteur HDMI mini Prise USB mini AB Type A USB intégré Prise casque d écoute HDR PJ50 PJ50V Miniprise stéréo 3 5 mm Prise d entrée MIC Miniprise stéréo 3 5 mm Écran LCD Image 7 5 cm type 3 0 rapport hauteur ou largeur 16 9 Nombre total de pixels 230 400 960 240 Projecteur HDR PJ50 PJ50V Type de projection DLP Source lumineuse LED R G...

Страница 153: ...uant les parties saillantes 59 5 mm 66 mm 128 mm 2 3 8 po 2 5 8 po 5 1 8 po l h p incluant les parties saillantes et le bloc piles rechargeable fourni fixé Masse approx HDR PJ50 400 g 14 1 oz unité principale seulement 450 g 15 9 oz incluant le bloc piles rechargeable fourni HDR PJ50V 405 g 14 3 oz unité principale seulement 455 g 1 lb incluant le bloc piles rechargeable fourni HDR XR160 350 g 12 ...

Страница 154: ...is et dans d autres pays Macintosh et Mac OS sont des marques de commerce de Apple Inc aux États Unis et dans d autres pays Intel Intel Core et Pentium sont des marques de commerce et des marques déposées de Intel Corporation ou de ses filiales aux États Unis ou dans d autres pays et PlayStation sont des marques déposées de Sony Computer Entertainment Inc Adobe le logo Adobe et Adobe Acrobat sont ...

Страница 155: ...apteur de chute activé Centre Icône Signification VEILLE ENR État de l enregistrement Réglage du diaporama Avertissement Mode de lecture Droite Icône Signification 60i Qualité d enregistrement d image HD STD cadence de prise de vue 60p 60i 24p et mode d enregistrement PS FX FH HQ LP 60min Autonomie du bloc piles Support d enregistrement de lecture ou d édition 0 00 00 Compteur heures minutes secon...

Страница 156: ...améscope Objectif objectif G Flash HDR PJ50 PJ50V Microphone intégré En bas Icône Signification Touche Afficher Images Niv référence micro faible Réduction bruit vent Zoom micro intégré Mode audio Affich niv audio Low Lux Spotmètre Mise au p Spotmètre Exposition Automatique intelligent Touche de diaporama 101 0005 Nom du fichier de données Image protégée Flash Attén yeux rouges Les icônes et leur ...

Страница 157: ... rabattre avec l écran LCD orienté vers l extérieur Cette position est très pratique pour la lecture Haut parleur Objectif du projecteur HDR PJ50 PJ50V Manette de mise au point HDR PJ50 PJ50V Touche Afficher Images 31 Touche POWER 19 Touche PROJECTOR HDR PJ50 PJ50V 34 Touche MODE 26 Témoins de mode Film ou Photo 26 Touche RESET Appuyez sur RESET à l aide d un objet pointu Appuyez sur RESET pour ré...

Страница 158: ...piles 15 Touche START STOP 26 Prise DC IN 15 Connecteur A V à distance 35 Dragonne 25 Câble USB intégré 16 Témoin d accès de carte mémoire 24 Lorsque le témoin d accès est allumé ou clignote le caméscope est en train de lire ou d écrire des données Réceptacle pour trépied Fente pour carte mémoire 24 Levier de dégagement BATT bloc piles 17 ...

Страница 159: ...2 Spécifications 75 Support d enregistrement 22 Support externe 50 Système informatique 41 T Téléviseur 35 Témoins d avertissement 67 Trépied 82 V VBR 70 Vignettes 38 Visualiser évènement 31 W Windows 41 A Accessoires fournis 9 B Bloc piles 15 C Câble de raccordement A V 36 58 Câble USB 53 56 Câble USB intégré 9 16 Carte mémoire 23 Charge du bloc piles 15 Chargement du bloc piles à l étranger 18 C...

Отзывы: