background image

71

Using a Computer

DCR-PC53E/PC55E 2-548-726-11(1)

Creating a DVD (Direct 

Access to “Click to DVD”)

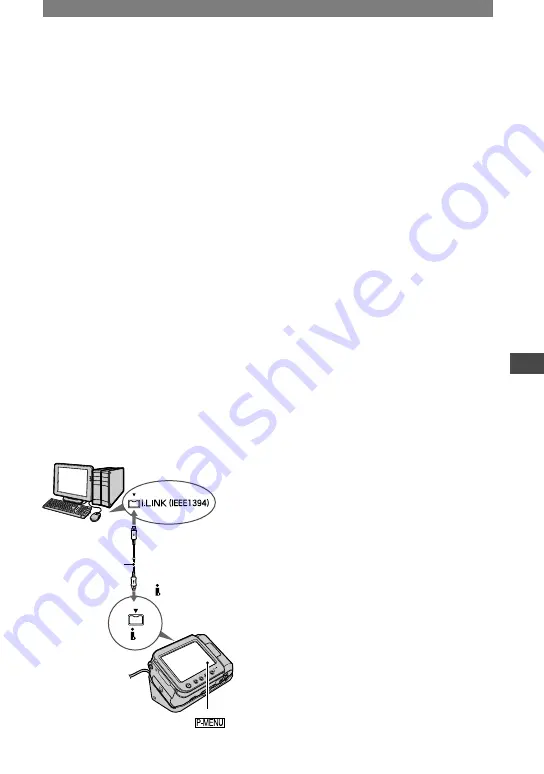
You can create DVDs when you connect 
your camcorder to a Sony VAIO series 
computer* that supports “Click to DVD” 
via an i.LINK cable (optional). The picture 
is automatically copied and written to a 
DVD.
The following procedures describe how 
to create a DVD from a picture recorded 
on a tape. For system and operation 
requirements, visit the following URL:

– Europe 

http://www.vaio-link.com/

– USA 

http://www.ita.sel.sony.com/support/
dvimag/

– Asia Pacific Regional 

http://www.css.ap.sony.com/

– Korea 

http://scs.sony.co.kr/

– Taiwan 

http://vaio-online.sony.com/tw/vaio/

– China 

http://www.sonystyle.com.cn/vaio/

– Thailand 

http://www.sony.co.th/vaio/index.html

– Latin America 

http://vaio-online.sony.com/


to i.LINK (IEEE1394) 

connector

i.LINK cable 

(optional)

to   DV Interface

• You can only use an i.LINK cable for this 

operation. You cannot use a USB cable.

* Note that you need a Sony VAIO 

computer equipped with a DVD drive 
that can be used to write DVDs. You also 
need the computer with “Click to DVD 
Ver.1.2” (Sony original software) or later 
installed.

Using the Direct Access to “Click to 

DVD” function for the first time

The Direct Access to “Click to DVD” 
function enables you to copy pictures 
recorded on a tape to a DVD easily if your 
camcorder is connected to a computer. 
Before operating the Direct Access to 
“Click to DVD” function, follow the steps 
below to start “Click to DVD Automatic 
Mode Launcher.”

 Turn on the computer.

 Click the start menu, then select [All 

Programs].

 Select [Click to DVD] from the programs 

displayed, then click [Click to DVD 
Automatic Mode Launcher].

[Click to DVD Automatic Mode 
Launcher] starts up.

• After you start up [Click to DVD 

Automatic Mode Launcher] once, from 
then on it starts up automatically when 
you turn on your computer.

• [Click to DVD Automatic Mode 

Launcher] is set up for each Windows XP 
user.

Continued 

Содержание Handycam DCR-PC53E

Страница 1: ...ompound free vegetable oil based ink 2005 Sony Corporation Digital Video Camera Recorder Operating Guide DCR PC53E PC55E 2 548 726 12 1 Using the Menu Dubbing Editing Using a Computer Troubleshooting Additional Information 34 54 64 76 96 Getting Started Recording Playback 7 18 ...

Страница 2: ...earest Sony service station FOR CUSTOMERS IN EUROPE ATTENTION The electromagnetic fields at the specific frequencies may influence the picture and sound of this camcorder This product has been tested and found compliant with the limits set out in the EMC Directive for using connection cables shorter than 3 meters 9 8 feet Notice If static electricity or electromagnetism causes data transfer to discon...

Страница 3: ... sun only in low light conditions such as at dusk On recording Before starting to record test the recording function to make sure the picture and sound are recorded without any problems Compensation for the contents of recordings cannot be provided even if recording or playback is not possible due to a malfunction of the camcorder storage media etc TV color systems differ depending on the countrie...

Страница 4: ...g To use zoom To adjust the exposure for backlit subjects To adjust the focus for an off center subject SPOT FOCUS To fix the exposure for the selected subject Flexible spot meter To record in mirror mode To use a tripod Playback Viewing pictures with motion effects SLIDE SHOW PLUS To use PB zoom Recording playback To check the remaining battery Battery Info To turn off the operation confirmation be...

Страница 5: ...layback FADER PICT EFFECT etc EDIT PLAY menu 47 Settings for editing or playing back in various modes VAR SPD PB END SEARCH etc STANDARD SET menu 48 Settings while recording on a tape or other basic settings REC MODE MULTI SOUND LCD SET DISP OUTPUT USB etc TIME LANGU menu 51 CLOCK SET WORLD TIME LANGUAGE Customizing Personal Menu 52 Dubbing Editing Connecting to a VCR or TV 54 Dubbing to another d...

Страница 6: ... Step Guide 70 Creating a DVD Direct Access to Click to DVD 71 Connecting an analog VCR to the computer via your camcorder Signal convert function DCR PC55E 74 Troubleshooting Troubleshooting 76 Warning indicators and messages 92 Additional Information Using your camcorder abroad 96 Usable cassette tapes 97 About the Memory Stick 98 About the InfoLITHIUM battery pack 100 About i LINK 101 Maintenan...

Страница 7: ...s lead 1 p 8 Handycam Station 1 p 8 Wireless Remote Commander 1 p 30 A button type lithium battery is already installed A V connecting cable 1 p 32 54 USB cable 1 p 64 Wrist strap 1 To attach the Wrist strap Folding the tip of the string makes it easier to run the string through the hook for the strap Rechargeable battery pack NP FA50 1 p 8 100 CD ROM Picture Package Ver 1 5 1 p 66 21 pin adaptor ...

Страница 8: ...Slide the battery cover in the direction of the arrow to open it 2 Insert the battery pack aligning the top of the mark on the side with the top of the mark on your camcorder until it clicks 3 Close the battery cover Be sure to close the cover completely 4 Slide the POWER switch up to OFF CHG The default setting 5 Connect the AC Adaptor to the DC IN jack on the Handycam Station With the mark facin...

Страница 9: ...G charge lamp lights up and charging starts The CHG charge lamp turns off when the battery is fully charged To charge the battery pack using only the AC Adaptor Turn off the power then connect the AC Adaptor to the DC IN jack on your camcorder You can operate your camcorder connected to a power source such as a wall socket as shown in the illustration The battery pack will not lose its charge in t...

Страница 10: ... when you use a fully charged battery pack Battery pack Continuous recording time Typical recording time NP FA50 supplied 95 110 55 65 Top When the LCD backlight turns on Bottom When the LCD backlight turns off Typical recording time shows the time when you repeat recording start stop turning the power on off and zooming Playing time Approximate time min available when you use a fully charged batt...

Страница 11: ...s The recording and playback time will be shorter depending on the conditions under which you use your camcorder On the AC Adaptor Use the nearby wall socket when using the AC Adaptor Disconnect the AC Adaptor from the wall socket immediately if any malfunction occurs while using your camcorder Do not use the AC Adaptor placed in a narrow space such as between a wall and furniture Do not short cir...

Страница 12: ...FF slide it down while pressing the green button Lamps that light up CAMERA TAPE To record on a tape CAMERA MEM To record on a Memory Stick Duo PLAY EDIT To play or edit pictures When you slide the POWER switch from OFF CHG to CAMERA TAPE or CAMERA MEM the current date and time will be displayed on the LCD screen for about 5 seconds 2 Hold the camcorder correctly To turn off the power Slide the PO...

Страница 13: ... panel 180 degrees to the lens side you can close the LCD panel with the LCD screen facing out This is convenient during playback operations To darken the LCD screen Press and hold DISP BATT INFO for a few seconds until appears This setting is practical when you use your camcorder in bright conditions or where you want to save battery power The recorded picture will not be affected by the setting ...

Страница 14: ...on screen displays to show messages in a specified language Select the screen language in LANGUAGE on the TIME LANGU menu p 34 51 Checking the screen indicators Display guide You can easily check the meaning of each indicator that appears on the LCD screen 1 Touch Touch MENU during Easy Handycam operation p 18 MENU EXPO SURE 1 3 0 00 00 60min TELE MACRO FADER DISP GUIDE SPOT FOCUS 2 Touch DISP GUID...

Страница 15: ...eared from the memory In that case charge the rechargeable battery and then set the date and time again p 105 POWER switch Skip to step 4 when you set the clock for the first time 1 Touch MENU OK 60min PROGRAM AE CAMERA SET SPOT METER EXPOSURE 2 Select TIME LANGU menu with then touch OK 60min CLOCK SET A SHUT OFF WORLD MENU ROTATE LANGUAGE DISPLA Y PROGRAM AE 3 Select CLOCK SET with then touch OK C...

Страница 16: ...y slides back in Do not force the cassette into the compartment This may cause a malfunction 3 Close the lid To eject the cassette Proceed with the same steps as you would when inserting a cassette tape Memory Stick Duo You can use only a Memory Stick Duo marked with or p 98 The number and time of recordable pictures varies depending on the image quality or the image size For details see page 42 I...

Страница 17: ...push the Memory Stick Duo in once When the access lamp is lit or flashing your camcorder is reading writing data Do not shake or knock your camcorder turn the power off eject the Memory Stick Duo or remove the battery pack Otherwise image data may be damaged ...

Страница 18: ... with ease 1 Slide the POWER switch in the direction of the arrow repeatedly to turn on the respective lamp to select a recording medium If the POWER switch is set to OFF slide it down while pressing the green button Recording movies Light up the CAMERA TAPE lamp Recording still images Light up the CAMERA MEM lamp 2 Press EASY The EASY lamp lights up in blue Easy Handycam operation ON 3 Start reco...

Страница 19: ... To cancel Easy Handycam operation Press EASY again The EASY lamp turns off and all the settings are returned to the previous situation The recording mode for tape and the image quality for Memory Stick Duo return to the default settings What you can do during Easy Handycam operation Adjust some menu settings p 36 If you touch MENU adjustable items will be displayed Items not displayed return to t...

Страница 20: ... Start recording Movies Press REC START STOP or A The indicator changes STBY tape only to REC The sound of a movie MPEG MOVIE EX recorded on a Memory Stick Duo will be monaural Still images Press and hold PHOTO lightly to adjust the focus then press it fully A B Flashing Lights up A shutter sound is heard When disappears the image has been recorded To stop movie recording Press REC START STOP agai...

Страница 21: ...ext Index screen display You can delete unnecessary pictures in a Memory Stick Duo p 60 To adjust the volume Touch VOLUME then to adjust the volume If you cannot find VOLUME in touch MENU To search for a scene during playback Touch and hold during playback Picture Search or while fast forwarding or rewinding the tape Skip Scan You can play back in various modes VAR SPD PB p 47 To display pictures o...

Страница 22: ...for an off center subject SPOT FOCUS See SPOT FOCUS on page 40 To fix the exposure for the selected subject Flexible spot meter See SPOT METER on page 39 To record in mirror mode Open the LCD panel 90 degrees to the camcorder then rotate it 270 degrees to the lens side A mirror image of the subject appears on the LCD screen but the picture will be normal when recorded To use a tripod Attach the tri...

Страница 23: ...hows pictures without effects The file information disappears when the DISP BATT INFO button is pressed The clock does not appear if CLOCK SET p 15 has not been set If is not displayed touch the LCD screen to show it When using SLIDE SHOW PLUS for an extended period of time connect your camcorder to a wall socket using the supplied AC Adaptor To protect the LCD screen we recommend Using multiple fil...

Страница 24: ...peration beep To use special effects See PICT APPLI menu p 44 To initialize the settings RESET Press RESET to initialize all the settings including the setting of the date and time Menu items customized on Personal Menu are not initialized Other part names and functions Speaker Sounds come out from the speaker For how to adjust the volume see page 21 REC lamp The REC lamp lights up in red during r...

Страница 25: ...25 Recording Playback ...

Страница 26: ... On a Memory Stick Duo A B C D E Recording folder 44 Recording capacity approx Movie size 43 Recording start indicator appears for about 5 seconds Review button 20 Recording still images 30 P MENU 60min FINE 101 8 1 9 0 qa 7 Recording folder 44 Quality FINE or STD 42 Memory Stick Duo indicator and the number of images that can be recorded approx Review button 20 Data code during playback The date ...

Страница 27: ...ed depends on the length of the movie After selecting a scene from which to start the playback touch to play back Viewing still images MEMORY PLAY 1 qg qh qj qk ql 7 wswd wa w qf Data file name Picture number Total number of recorded pictures in the current playback folder Playback folder 44 Previous Next folder icon The following indicators appear when the first or last picture of the current folde...

Страница 28: ... This indicator appears when you use video flash light optional 41 Upper right Indicator Meaning A V DV OUT 49 DV input 56 Zero set memory 30 SLIDE SHOW PLUS 22 LCD backlight off 13 Center Indicator Meaning Color Slow Shutter 41 PictBridge connecting 61 Warning 92 Bottom Indicator Meaning Picture effect 46 Digital effect 45 Manual focus 40 PROGRAM AE 38 Backlight 22 White balance 39 WIDE SELECT 42 ...

Страница 29: ...tween recorded sections on the tape You can also select END SEARCH from the menu When the PLAY EDIT lamp lights up select the END SEARCH short cut in Personal Menu p 34 Searching manually EDIT SEARCH You can search for the start point to start the next recording while viewing the pictures on the screen The sound is not played back during the search 1 Touch 0 00 00 STBY 60min EDIT 2 Touch and hold ...

Страница 30: ... operate your camcorder p 24 To change the battery see page 105 Searching quickly for a desired scene Zero set memory 1 During playback press ZERO SET MEMORY at a point you want to locate later on The tape counter is reset to 0 00 00 and appears on the screen 0 00 00 60min P MENU If the tape counter is not displayed press DISPLAY 2 Press STOP when you want to stop playback 3 Press REW The tape sto...

Страница 31: ...nt where the recording date changes 1 Slide the POWER switch down to turn on the PLAY EDIT lamp 2 Press SEARCH M 3 Press previous next to select a recording date P MENU 30min DATE 01 SEACH 60min 0 00 00 00 To cancel the operation Press STOP The Date search will not function correctly when there is a blank section between recorded sections on the tape ...

Страница 32: ...connection Connect the white and red plugs left right audio and S VIDEO plug S VIDEO channel of an A V connecting cable optional In this case the yellow standard video plug connection is not necessary S VIDEO connection only will not output audio When your TV is connected to a VCR Connect your camcorder to the LINE IN input on the VCR Set the input selector on the VCR to LINE When your TV is monau...

Страница 33: ...ack If your TV VCR has a 21 pin adaptor EUROCONNECTOR Use the 21 pin adaptor supplied with your camcorder For models with the mark printed on their bottom surfaces only This adaptor is designed for output use only TV VCR ...

Страница 34: ...tly used menu items are added You can customize Personal Menu as you like p 52 Touch 1 3 0 00 00 00 60min MENU VOLUME END SEARCH DISP GUIDE REC CTRL VAR SPD PB Touch the desired item If the desired item is not displayed on the screen touch until the item is displayed Select the desired setting then touch To use menu items You can customize menu items that are not added to Personal Menu BURN DVD BU...

Страница 35: ...35 Using the Menu After finishing the settings touch close to hide the menu screen If you decide not to change the setting touch to return to the previous screen ...

Страница 36: ...SURE WHITE BAL AUTO SHUTTER SPOT FOCUS FOCUS TELE MACRO FLASH SET COLOR SLOW S SELF TIMER DIGITAL ZOOM WIDE SELECT STEADYSHOT MEMORY SET menu p 42 STILL SET MOVIE SET ALL ERASE FORMAT FILE NO NEW FOLDER REC FOLDER PB FOLDER PICT APPLI menu p 44 FADER D EFFECT PICT EFFECT INT REC STL DEMO MODE PRINT ...

Страница 37: ...nu p 47 VAR SPD PB REC CTRL AUD DUB CTRL REC MOVIE BURN DVD BURN VCD END SEARCH STANDARD SET menu p 48 REC MODE AUDIO MODE VOLUME MULTI SOUND AUDIO MIX EXT SUR MIC LCD SET A V DV OUT DCR PC55E VIDEO INPUT DCR PC55E USB CAMERA USB PLY EDT DISP GUIDE DATA CODE REMAINING REMOTE CTRL REC LAMP BEEP DISP OUTPUT MENU ROTATE A SHUT OFF CALIBRATION TIME LANGU menu p 51 CLOCK SET WORLD TIME LANGUAGE ...

Страница 38: ...rait Select to bring out the subject such as people or flowers while creating a soft background SPORTS Sports lesson Select to minimize shake when shooting fast moving subjects BEACH SKI Select to prevent people s faces from appearing dark in strong light or reflected light such as at a beach in midsummer or on a ski slope SUNSET MOON Select to maintain the atmosphere of situations such as sunsets g...

Страница 39: ...ly OUTDOOR The white balance is set to be appropriate for shooting outdoors or under daylight fluorescent light INDOOR The white balance is set to the brightness of warm white fluorescent lamps ONE PUSH The white balance will be adjusted according to the ambient light Touch ONE PUSH Frame a white object such as a piece of paper to fill the screen under the same lighting conditions as you will shoot t...

Страница 40: ... automatically touch AUTO in step It is easier to focus on the subject by moving the power zoom lever towards T telephoto to adjust the focus then towards W wide angle to adjust the zoom for recording When you want to record a subject at close range move the power zoom lever to W wide angle then adjust the focus The minimum distance required between your camcorder and the subject to get a sharp fo...

Страница 41: ... OFF Adjust the focus manually FOCUS p 40 when it is hard to focus automatically The shutter speed of your camcorder changes depending on the brightness The motion of the picture may slow down at this time SELF TIMER The self timer starts recording after about 10 seconds Touch SELF TIMER ON appears Press REC START STOP to record movies or PHOTO to record still images To cancel the count down touch...

Страница 42: ...e LCD screen STEADYSHOT You can compensate for camera shake the default setting is ON Set STEADYSHOT to OFF when using a tripod optional MEMORY SET menu Settings for the Memory Stick Duo QUALITY IMAGE SIZE ALL ERASE NEW FOLDER etc The default settings are marked with The indicators in parentheses appear when the items are selected See page 34 for details on selecting menu items STILL SET QUALITY F...

Страница 43: ...DER ALL FILES Deletes all the images on the Memory Stick Duo CURRENT FOLDER Deletes all the images in the selected folder Touch YES twice Cancel image protection on the Memory Stick Duo beforehand when using the Memory Stick Duo with the write protect tab p 98 The folder will not be deleted even when you delete all the pictures in the folder Do not do any of the following while Erasing all data is...

Страница 44: ...the playback folder with then touch PICT APPLI menu Special effects on pictures or additional functions on recording playback FADER PICT EFFECT etc The default settings are marked with The indicators in parentheses appear when the items are selected See page 34 for details on selecting menu items FADER You can add the following effects to currently recording pictures Select the desired effect then...

Страница 45: ...uperimposing it on a previously recorded still image FLASH flash motion Records a movie with a serial still image effect strobe effect LUMI KEY luminance key Replaces a brighter area in a previously recorded still image e g background of a person with a movie TRAIL Records a picture so that an incidental image like a trail is left SLOW SHUTTR slow shutter The shutter speed is slowed down Suitable f...

Страница 46: ...ording You can record still images on the Memory Stick Duo at a selected interval This function is useful to observe the movement of clouds or the changes in daylight etc a Recording b Interval Touch a desired interval time 1 5 or 10 minutes ON Press PHOTO fully stops flashing and the interval still image recording starts To cancel INT REC STL select OFF in step DEMO MODE The default setting is ON ...

Страница 47: ...e DV Interface cannot be played back smoothly in slow mode Touch To return to the normal playback mode touch Play Pause twice once from frame playback You will not hear the recorded sound You may see mosaic like images of the previously played picture REC CTRL Movie recording control See page 56 AUD DUB CTRL Audio dubbing See page 59 REC MOVIE Recording control See page 57 BURN DVD When your camco...

Страница 48: ... page 21 MULTI SOUND You can select whether to play back audio recorded using other devices with dual sound or stereo sound STEREO Plays back with main and sub sound or stereo sound 1 Plays back with main sound or the left channel sound 2 Plays back with sub sound or the right channel sound You can play back but cannot record a dual sound track cassette on your camcorder The setting returns to STE...

Страница 49: ...ting a digital device and an analog device to your camcorder See page 74 for details VIDEO INPUT DCR PC55E Selects the video plug to connect when you input the picture from the other device via A V connecting cable VIDEO Connects via video plug of the A V connecting cable supplied S VIDEO Connects via S VIDEO plug of the A V connecting cable with S VIDEO cable optional USB CAMERA You can view the ...

Страница 50: ...ning tape indicator for about 8 seconds in situations such as those described below When you set the POWER switch to PLAY EDIT or CAMERA TAPE with a cassette inserted When you touch Play Pause ON Always displays the remaining tape indicator REMOTE CTRL Remote control The default setting is ON allowing you to use the Remote Commander p 30 Set to OFF to prevent your camcorder from responding to a co...

Страница 51: ... SET WORLD TIME LANGUAGE See page 34 for details on selecting menu items CLOCK SET See page 15 WORLD TIME When using your camcorder abroad you can set the time difference by touching the clock will be adjusted in accordance with the time difference If you set the time difference to 0 the clock returns to the originally set time LANGUAGE You can select the language to be used on the LCD screen You ...

Страница 52: ...nu category then touch OK END 0 00 00 60min Select the item PROGRAM AE SPOT METER EXPOSURE WHITE BAL AUTO SHUTTER STBY 3 Touch to select a menu item then touch YES The menu item is added to the end of list Deleting a menu item 1 Touch P MENU SET UP DELETE If the desired menu item is not displayed touch Select button to delete 1 3 0 00 00 60min END MENU SPOT FOCUS STBY EXPO SURE TELE MACRO FADER DI...

Страница 53: ... item to the desired place 4 Touch To sort more items repeat steps 2 to 4 5 Touch END You cannot move P MENU SET UP Initializing the Personal Menu settings Reset Touch P MENU SET UP RESET YES YES If the desired menu item is not displayed touch ...

Страница 54: ... A V cable connection Connect the white and red plugs left right audio and S VIDEO plug S VIDEO channel of an A V connecting cable optional In this case the yellow standard video plug connection is not necessary S VIDEO connection only will not output audio i LINK cable optional Use an i LINK cable optional to connect your camcorder to another device The video and audio signals are transmitted dig...

Страница 55: ... See page 54 for connection details 2 Prepare your VCR DVD recorder for recording When dubbing to the VCR insert a cassette for recording When dubbing to the DVD recorder insert a DVD for recording If your recording device has an input selector set it to the appropriate input such as video 1 video 2 etc 3 Prepare your camcorder for playback Insert the recorded cassette 4 Start the playback on your...

Страница 56: ...ure to insert a cassette or a Memory Stick Duo for recording in your camcorder beforehand Your camcorder can only record from a PAL source For example French video or TV programs SECAM cannot be recorded correctly See page 96 for detail on TV color systems If you use a 21 pin adaptor to input PAL source you need a dual direction 21 pin adaptor optional A TV without an output jack does not allow re...

Страница 57: ...ictures from a tape to a Memory Stick Duo You can record movies or still images on a Memory Stick Duo Make sure you have a recorded tape and a Memory Stick Duo inserted into your camcorder 1 Slide the POWER switch down to turn on the PLAY EDIT lamp 2 Search and record the scene you want to record When you dub pictures as a still image Touch PLAY to play back the tape then press PHOTO lightly at th...

Страница 58: ...ng the A V connecting cable Using the internal microphone no connection required The audio input to be recorded takes precedence over others in the order of You cannot record additional audio When the tape has been recorded in the 16 bit mode p 48 When the tape has been recorded in the LP mode When your camcorder is connected via an i LINK cable On blank sections of the tape When the tape has been...

Страница 59: ...while recording the new sound in stereo 2 ST2 during the playback of the tape 5 Touch stop when you want to stop recording To dub on other scenes repeat step 2 to select scenes then touch AUDIO DUB 6 Touch To set the end point for audio dubbing beforehand press ZERO SET MEMORY on the Remote Commander at the scene at which you want to stop audio dubbing during playback After step 2 to 4 the recordi...

Страница 60: ...ed when a Memory Stick Duo with the write protect tab is set to the write protect position p 98 or when the selected picture is protected p 60 Marking images on the Memory Stick Duo with specific information Image protection Print mark When you are using a Memory Stick Duo with the write protect tab make sure the write protect tab on the Memory Stick Duo is not set to the write protect position p 9...

Страница 61: ...t on using other devices This may change the information of the images with the Print mark put on using the other device Printing recorded images PictBridge compliant printer You can print out pictures using a PictBridge compliant printer without connecting the camcorder to a computer Connect the supplied AC Adaptor to a wall socket for power Insert the Memory Stick Duo on which still images are s...

Страница 62: ...en is on the screen The operations may not be performed properly Operating the POWER switch Disconnecting the USB cable from your Handycam Station or the printer Removing the Memory Stick Duo from your camcorder If the printer stops working disconnect the USB cable and restart the operation from the beginning Some printer models may not support the date printing function Refer to your printer s op...

Страница 63: ... device for fixing the installed accessory securely To connect an accessory press down and push it to the end and then tighten the screw To remove an accessory loosen the screw and then press down and pull out the accessory When you are recording on a Memory Stick Duo with an external flash optional connected to the accessory shoe turn off the power of the external flash to prevent charging noise bei...

Страница 64: ...n view the pictures copied from your camcorder by selecting from thumbnails Still images and movies are saved in folders by date Music Video Slideshow Producer You can select your favorite movies and still images from pictures saved on your computer and easily create a short original video or slide show with added music and visual styles Automatic Music Video Producer You can easily create a short...

Страница 65: ... or faster recommended For using ImageMixer VCD2 Intel Pentium III 800 MHz or faster recommended Application DirectX 9 0c or later This product is based on DirectX technology It is necessary to have DirectX installed Windows Media Player 7 0 or later Macromedia Flash Player 6 0 or later Sound system 16 bit stereo sound card and stereo speakers Memory 64 MB or more Hard disk Available memory requir...

Страница 66: ... copy pictures recorded on a tape to the computer To copy recordings from a tape connect your camcorder to the computer with an i LINK cable and use the standard software in the OS Installing the software and First Step Guide on a computer You need to install the software etc with the supplied CD ROM on your computer before connecting your camcorder and your computer Once you install it the instal...

Страница 67: ...lShield Wizard In such a case manually copy First Step Guide to your computer according to the message instructions 5 Select the language for the application to be installed then click Next 6 Click Next 7 Read License Agreement check I accept the terms of the license agreement when you agree then click Next 8 Select where to save the software then click Next 9 Click Install on the Ready to Install...

Страница 68: ...lick Next then follow the on screen instructions to install ImageMixer VCD2 13If the Installing Microsoft R DirectX R screen is displayed follow the steps below to install DirectX 9 0c If not skip to step 14 Read License Agreement then click Next Click Next Click Finish 14Make sure Yes I want to restart my computer now is checked then click Finish Installing the software and First Step Guide on a ...

Страница 69: ...o the computer 2 Turn on the computer Close all applications running on the computer before installing the software 3 Place the CD ROM in the disc drive of your computer 4 Double click CD ROM icon 5 Copy FirstStepGuide pdf stored in the desired language in the FirstStepGuide folder to your computer 6 Copy IMXINST SIT in the MAC folder of the CD ROM to a folder of your choice 7 Double click IMXINST...

Страница 70: ...ems web page http www adobe com For inquires about this software Pixela User Support Center Pixela Home Page Windows http www ppackage com Macintosh http www ImageMixer com North America Los Angeles Telephone 1 213 341 0163 Europe U K Telephone 44 1489 564 764 Asia Philippines Telephone 63 2 438 0090 On Copyrights Music works sound recording or other third party musical contents you may acquire fr...

Страница 71: ... cable for this operation You cannot use a USB cable Note that you need a Sony VAIO computer equipped with a DVD drive that can be used to write DVDs You also need the computer with Click to DVD Ver 1 2 Sony original software or later installed Using the Direct Access to Click to DVD function for the first time The Direct Access to Click to DVD function enables you to copy pictures recorded on a ta...

Страница 72: ...puter 7 Touch EXEC on the screen of your camcorder BURN DVD START 0 00 00 00 CREATE DVD EXEC CANCEL 60min The status of the operation on your computer is displayed on the LCD screen of your camcorder CAPTURING The picture recorded on the tape is being copied to the computer CONVERTING The picture is being converted to the MPEG2 format WRITING The picture is being written onto the DVD If you use a ...

Страница 73: ...er at this stage DVD creation will continue on your computer When any of the following occurs copying of the picture is canceled A DVD containing the data up to the point the operation was canceled is created Refer to the help files of Click to DVD Automatic Mode Launcher for details When there is a blank portion of 10 seconds or longer on the tape When the data of the tape contains a date before t...

Страница 74: ...nnecting cable to the Handycam Station The A V jack accepts analog signals A V connecting cable with S VIDEO optional When connecting to another device via the S VIDEO jack by using the A V connecting cable with an S VIDEO cable optional pictures can be reproduced more faithfully than with the supplied A V cable connection Connect the white and red plugs left right audio and S VIDEO plug S VIDEO c...

Страница 75: ...pport the signal convert function You may not be able to output the pictures correctly depending on the condition of the analog video signal input to your camcorder You cannot transfer pictures with copyright protection signals to a computer You can use a USB cable instead of an i LINK cable optional to transfer pictures to a computer Note however that the picture displayed may lack the same smoot...

Страница 76: ...tton all settings including the clock setting are reset except the Personal Menu items Buttons do not work During Easy Handycam operation the available buttons are limited p 18 You cannot turn Easy Handycam operation on or off During recording or communicating with another device via USB cable you cannot turn Easy Handycam operation on or off Settings change during Easy Handycam operation During E...

Страница 77: ...at the battery pack has enough power to operate A problem has occurred in the remaining battery time indicator or the battery pack has not been charged enough Fully charge the battery again to correct the indication p 8 The remaining battery time indicator does not indicate the correct time The temperature of the environment is too high or too low or the battery pack has not been charged enough Th...

Страница 78: ...panel Touch the LCD screen lightly Press DISP BATT INFO on your camcorder or DISPLAY on the Remote Commander p 14 The buttons on the touch panel do not work correctly or do not work at all Adjust the screen CALIBRATION p 104 Cassette tapes The cassette cannot be ejected from the compartment Make sure the power source battery pack or AC Adaptor is connected correctly p 8 Remove the battery pack fro...

Страница 79: ...on the write protect tab of the Memory Stick Duo p 98 Cancel image protection on the picture p 60 The maximum number of pictures that you can delete at one time is 100 You cannot delete all pictures at once Release the lock on the write protect tab of the Memory Stick Duo p 98 Cancel image protection on the pictures p 60 You cannot format the Memory Stick Duo Release the lock on the write protect ...

Страница 80: ...nd leave your camcorder for at least 1 hour then re insert the cassette p 103 You cannot record on the Memory Stick Duo Release the lock on the write protect tab of the Memory Stick Duo p 98 The capacity is full Delete unnecessary pictures recorded on the Memory Stick Duo p 60 Format the Memory Stick Duo on your camcorder or insert another Memory Stick Duo p 43 When WIDE SELECT is set to 16 9 WIDE...

Страница 81: ...40 STEADYSHOT does not function Set STEADYSHOT to ON p 42 The BACK LIGHT function does not function The BACK LIGHT function is canceled when you set EXPOSURE to MANUAL p 39 or select SPOT METER p 39 The BACK LIGHT function does not work during Easy Handycam operation The FLASH LEVEL cannot be changed FLASH LEVEL cannot be changed during Easy Handycam operation p 41 DIGITAL ZOOM does not function D...

Страница 82: ...ack If you are playing back the pictures stored on a Memory Stick Duo refer also to the Memory Stick Duo section p 79 You cannot play back the tape Slide the POWER switch down to turn on the PLAY EDIT lamp Rewind the tape p 21 The pictures stored on a Memory Stick Duo are not played back in the actual size or aspect ratio Pictures recorded on other devices may not appear in the actual size This is...

Страница 83: ...creen The tape you are playing was recorded without setting the date and time A blank section on the tape is being played The data code on a tape with a scratch or noise cannot be read Noises appear and is displayed on the screen The tape was recorded in a TV color system other than that of your camcorder PAL This is not a malfunction p 96 is displayed on the screen The tape you are playing was re...

Страница 84: ... your VCR or cover the sensor of your VCR with black paper Menu Menu items are grayed out You cannot select grayed items in the current recording playback situation You cannot use PROGRAM AE You cannot use PROGRAM AE together with COLOR SLOW S TELE MACRO SPORTS will not work when the POWER switch is set to CAMERA MEM You cannot use SPOT METER You cannot use SPOT METER when COLOR SLOW S is set to O...

Страница 85: ...CT PICT EFFECT Dubbing Editing Connecting to other devices Pictures from connected devices are not displayed on the LCD screen Set DISP OUTPUT to LCD PANEL p 50 You cannot input a signal to your camcorder if you press DISP BATT INFO while DISP OUTPUT is set to V OUT PANEL p 50 For DCR PC55E Make sure that the proper video plug is connected to the other device and then set VIDEO INPUT properly p 49...

Страница 86: ...tions The tape has a blank section The tape has been used repeatedly for recording The input signal has been interrupted or cut You cannot input pictures DCR PC55E You cannot input pictures while DISP OUTPUT is set to V OUT PANEL p 50 You cannot input pictures if you press the DISP BATT INFO button Connecting to a computer The computer does not recognize your camcorder Disconnect the cable from th...

Страница 87: ...K cable and use the standard software in the OS You cannot view the pictures recorded on a Memory Stick Duo on the computer Insert a Memory Stick Duo in the correct direction then push it all the way in You cannot use an i LINK cable Connect the camcorder and the computer using the USB cable Slide the POWER switch down to turn on the PLAY EDIT lamp on your camcorder set USB PLY EDT to STD USB p 49...

Страница 88: ...der USB Composite Device in the Universal Serial Bus Controller folder For copying and viewing pictures recorded on a Memory Stick Duo Sony Handycam or Sony DSC with a mark in the Other devices folder 5 When the Confirm Device Removal screen appears click OK 6 Turn off the power of your camcorder disconnect the USB cable then restart the computer 7 Place the supplied CD ROM in the disc drive of you...

Страница 89: ...click Setup exe Deleting anything other than USB Composite Device USB Audio Device Composite USB Device Sony Handycam and Sony DSC may cause a malfunction of your computer For Windows XP Log on as Administrator 1 Check that your camcorder is connected to a computer 2 Click Start 3 Right click My Computer then click Properties The System Properties screen appears 4 Click and choose the Hardware tab...

Страница 90: ...dycam with USB connected or Cannot cancel Easy Handycam with USB connected appears on the screen of your camcorder You cannot start or cancel the Easy Handycam settings while the USB cable is connected Disconnect the USB cable from your camcorder first There is no sound when the camcorder is connected to the Windows computer via a USB cable Change the settings for your computer environment as descr...

Страница 91: ...RL http www ppackage com USB streaming This function is not available appears on the screen of your camcorder Start recording or playing back pictures recorded on a Memory Stick Duo after USB Streaming is finished First Step Guide is not displayed correctly Follow the procedure below and refer to First Step Guide FirstStepGuide pdf 1 Place the supplied CD ROM in the disc drive of your computer 2 Do...

Страница 92: ...d operate your camcorder again E 61 E 62 Contact your Sony dealer or local authorized Sony service facility Inform them of the 5 digit code which starts from E 101 1001 Warning indicator pertaining to files The file is damaged The file is unreadable p 99 Battery level warning The battery pack is nearly used up Depending on the operating environment or battery conditions may flash even if there are app...

Страница 93: ...flashing There is something wrong with the flash You hear a melody when the warning indicators appear on the screen p 50 Description of warning messages If messages appear on the screen follow the instructions Battery Use the InfoLITHIUM battery pack p 100 Battery level is low Change the battery p 8 100 Old battery Use a new one p 100 Re attach the power source p 8 Moisture condensation Moisture con...

Страница 94: ...mory Stick Duo USB streaming This function is not available You tried to play back or record on a Memory Stick Duo during USB Streaming Memory Stick folders are full You cannot create folders exceeding 999MSDCF You cannot delete created folders using your camcorder You will have to format the Memory Stick Duo p 43 or delete them using your computer Cannot record still images on Memory Stick p 98 C...

Страница 95: ...d audio on the blank portion of a tape p 58 Cannot add audio p 58 Dirty video head Use a cleaning cassette p 103 Cannot start Easy Handycam Cannot cancel Easy Handycam p 18 USB is invalid in this mode during Easy Handycam You can select STD USB when you set the POWER switch to PLAY EDIT during Easy Handycam operation but you cannot select PictBridge or USB STREAM The message disappears when you to...

Страница 96: ...uador Guyana Jamaica Japan Korea Mexico Peru Surinam Taiwan the Philippines the U S A Venezuela etc PAL Australia Austria Belgium China Czech Republic Denmark Finland Germany Holland Hong Kong Hungary Italy Kuwait Malaysia New Zealand Norway Poland Portugal Singapore Slovak Republic Spain Sweden Switzerland Thailand United Kingdom etc PAL M Brazil PAL N Argentina Paraguay Uruguay SECAM Bulgaria Fr...

Страница 97: ...ware Your camcorder does not record copyright control signals on the tape when it records Notes on use When not using your camcorder for a long time Remove the cassette and store it To prevent accidental erasure Slide the write protect tab on the cassette to set it to SAVE REC SAVE REC The cassette can be recorded SAVE The cassette cannot be recorded write protected When labeling the cassette Be s...

Страница 98: ... on the display of a computer File names of movies MOV00001 This file name appears on the screen on your camcorder MOV00001 MPG This file name appears on the display of a computer A Memory Stick Duo formatted by a computer Windows OS Mac OS does not have guaranteed compatibility with your camcorder Data read write speed may vary depending on the combination of the Memory Stick and Memory Stick compl...

Страница 99: ...n the correct direction then insert it all the way in Note that improper use may damage the device Also if you force the Memory Stick Duo into the Memory Stick Duo slot in the wrong direction the Memory Stick Duo slot may be damaged Do not insert a Memory Stick Duo adaptor without a Memory Stick Duo attached Doing so may result in malfunctions of the unit On a Memory Stick PRO Duo The maximum memo...

Страница 100: ...t the battery pack faster Be sure to set the POWER switch to OFF CHG when not recording or playing back on your camcorder The battery pack is also consumed when your camcorder is in recording standby or playback pause Have spare battery packs ready for two or three times the expected recording time and make trial recordings before making the actual recording Do not expose the battery pack to water...

Страница 101: ...vices When two or more i LINK compatible devices are connected to this unit in a daisy chain operations and data transactions are possible with not only the device that this unit is connected to but also with other devices via the directly connected device Note however that the method of operation sometimes varies according to the characteristics and specifications of the device to be connected Als...

Страница 102: ...ollowing locations Anywhere extremely hot or cold Never leave them exposed to temperatures above 60 C 140 F such as under direct sunlight near heaters or in a car parked in the sun They may malfunction or become deformed Near strong magnetic fields or mechanical vibration The camcorder may malfunction Near strong radio waves or radiation The camcorder may not be able to record properly Near AM rece...

Страница 103: ...se your camcorder sometimes cannot detect condensation If this happens the cassette is sometimes not ejected for 10 seconds after the cassette lid is opened This is not a malfunction Do not close the cassette lid until the cassette is ejected Note on moisture condensation Moisture may condense when you bring your camcorder from a cold place into a warm place or vice versa or when you use your camc...

Страница 104: ... down to turn on the PLAY EDIT lamp Keeping the AC Adaptor connected disconnect the Handycam Station and all other cables from your camcorder then eject the cassette and Memory Stick Duo from your camcorder Touch MENU STANDARD SET CALIBRATION CALIBRATION Touch the x 1 3 CANCEL Touch the displayed on the screen with the corner of the Memory Stick Duo or the like The position of the changes Touch CA...

Страница 105: ...cket using the supplied AC Adaptor or Handycam Station and leave it with the POWER switch set to OFF CHG for more than 24 hours To change the battery of the Remote Commander While pressing on the tab inset your fingernail into the slit to pull out the battery case Place a new battery with the side facing up Insert the battery case back into the Remote Commander until it clicks Tab WARNING Battery m...

Страница 106: ... 5 lx lux F 1 7 Exif is a file format for still images established by the JEITA Japan Electronics and Information Technology Industries Association Files in this format can have additional information such as your camcorder s setting information at the time of recording Input Output connectors For DCR PC55E Audio Video input output 10 pin connector Input output auto switch Video signal 1 Vp p 75 Ω ...

Страница 107: ...inance signal 0 3 Vp p 75 Ω ohms unbalanced Audio signal 327 mV at output impedance more than 47 kΩ kilohms Output impedance with less than 2 2 kΩ kilohms USB jack mini B DV jack 4 pin connector S100 AC Adaptor AC L200 Power requirements AC 100 240 V 50 60 Hz Current consumption 0 35 0 18 A Power consumption 18 W Output voltage DC 8 4 V Operating temperature 0 C to 40 C 32 F to 104 F Storage tempe...

Страница 108: ...ter 41 85 Compression format 98 Computer 66 Connect Computer 64 TV 32 54 Copyright 70 D DATA CODE 49 Date search 31 DATE TIME 50 DC IN jack 8 DC plug 8 Delete picture 60 DEMO MODE 46 76 DIGITAL ZOOM 41 81 Direct Access to Click to DVD See Click to DVD Display guide 14 Display indicators 26 DISP BATT INFO button 24 DISP OUTPUT 50 DOT FADER 45 Double speed Playback 47 Dubbing 55 DV Interface 54 71 D...

Страница 109: ...ong Play 48 LUMI KEY Luminance key 45 M Macintosh 66 69 Mains lead 7 Maintenance 102 Main sound 48 MEMORY SET menu 42 Memory Stick 98 Memory Stick Duo 16 FORMAT 43 Insert Eject 16 Number of recordable pictures 42 Recordable time 43 Write protect tab 98 Memory Stick Duo adaptor 7 99 Memory Stick Duo slot 16 Menu 34 CAMERA SET menu 38 EDIT PLAY menu 47 MEMORY SET menu 42 Menu items 36 Personal Menu ...

Страница 110: ...OTE CTRL Remote control 50 Remote sensor 24 RESET button 24 Reversal Playback 47 Review button 26 S Searching for the starting point 29 Self diagnosis display 92 SELF TIMER 41 SEPIA 46 Setting the date and time 15 Signal convert function 74 Skip Scan 21 SLIDE SHOW PLUS 22 Slow Playback 47 SLOW SHUTTR Slow shutter 45 Software 66 SOLARIZE 46 SP Standard Play 48 Speaker 24 Specifications 106 SPORTS Sp...

Страница 111: ... operation buttons 27 Volume 21 W Wall socket 8 Warning indicators 92 Warning messages 92 WHITE BAL White balance 39 WHITE FADER 44 Wide angle 22 WIDE SELECT 42 Windows 65 66 WIPE 45 WORLD TIME 51 Wrist strap 7 Write protect tab 97 98 Z Zero set memory 30 ZERO SET MEMORY button 30 Zoom 22 Zoom lever 22 ...

Страница 112: ......

Страница 113: ......

Страница 114: ......

Страница 115: ...owerMac are trademarks of Apple Computer Inc registered in the U S and other countries eMac is trademark of Apple Computer Inc QuickTime and the QuickTime logo are trademarks of Apple Computer Inc Roxio is a registered trademark of Roxio Inc Toast is a trademark of Roxio Inc Windows Media Player is a trademark of Microsoft Corporation Macromedia and Macromedia Flash Player are trademarks or regist...

Отзывы: