background image

48

3

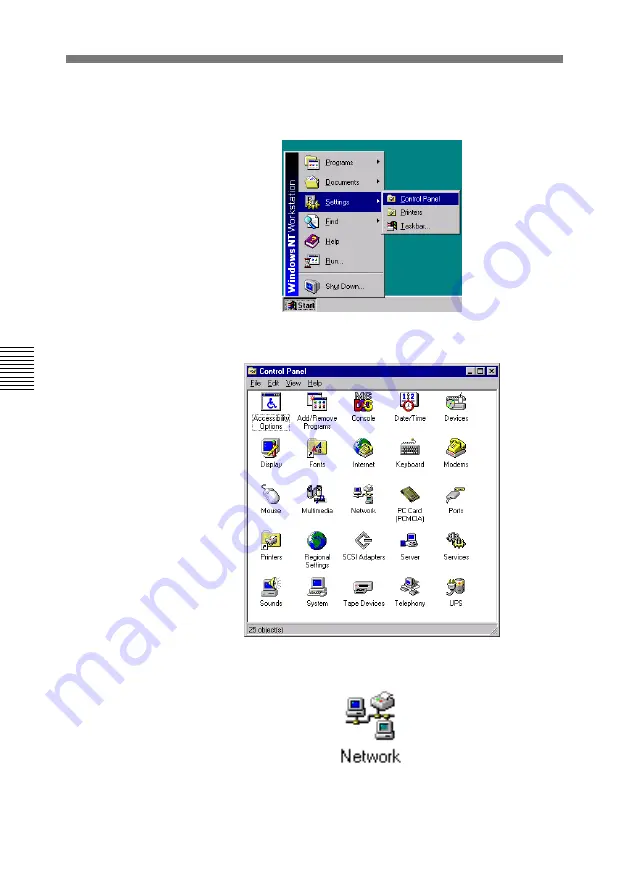
Klicken Sie in der Taskleiste auf Start, gehen Sie mit dem
Cursor auf Einstellungen (Settings), und klicken Sie auf
Systemsteuerung (Control Panel).

Das Systemsteuerung-Fenster (Control Panel) wird
geöffnet.

4

Doppelklicken Sie im Systemsteuerung-Fenster (Control
Panel) auf das Network-Symbol.

Installieren der Treiber-Software

Содержание ESBK-7052

Страница 1: ...説明書 2ページ Operating Instructions Page 17 Mode d emploi Page 31 Bedienungsanleitung Seite 45 お買い上げいただきありがとうございます 電気製品は 安全のための注意事項を守らないと 火災や人身事故になることがあります ご使用にあたっては エディットステーションES 7に付属の取扱説 明書の 安全のために と 警告 注意 をよくお読みくださ い Ethernet Option ESBK 7052 警告 ...

Страница 2: ...日本語 目次 概要 3 各部の名称と働き 3 取り付けについて 4 ドライバーソフトウェアをインストールする 4 保証書とアフターサービス 15 仕様 16 2 この装置は 情報処理装置等電波障害自主規制協議会 VCCI の基準に基づく 第一種情報技術装置です この装置を家庭環境で使用すると電波妨害を引き起 こすことがあります この場合には使用者が適切な対策を講ずるよう要求され ることがあります ...

Страница 3: ... ト1 を 使用したES 7のネッ ト ワークへの接続を可能にします ES 7で使用する データをネ ッ ト ワーク経由で他の機器と交換する ときに使用します 以下のどの端子にケーブルを接続するかについては ネ ッ ト ワーク管理者 にお問い合わせく ださい 1 RJ 45 端子 10base Tツイ ス トペアケーブルを接続します 2 AUI端子 10base 5同軸ケーブルを接続します 3 BNC端子 10base 2同軸ケーブルを接続します 各部の名称と働き 1 RJ 45 端子 2 AUI端子 3 BNC端子 1 イ ーサネ ッ ト は富士ゼロ ッ クス株式会社の登録商標です ...

Страница 4: ...ださい 本基板を使用する前に ドライ バーソフ ト ウェアをイ ンス ト ールする必要があ り ます 以下の操作で ログオンする ときは必ずAdministratorsグループ のメ ンバーのユーザー名およびパスワー ドを使ってく ださい 次の手順に従って操作します 1 ES 7の取扱説明書の システムを起動する の手順に従ってログオ ンを行う デスク ト ップ画面が表示されます 2 ES 7に付属の Windows NT1 Workstation Version 4 0 CD ROMディ スクをES 7のCD ROMドライ ブに入れる 1 Windows NTは米国マイ クロソフ ト社の商標です 取り付けについて ドライバーソフトウェアをインストー ルする ...

Страница 5: ...5 3 タスクバーの スター ト ボタ ンをク リ ッ ク し 設定 をポイ ン ト して コ ン ト ロールパネル をク リ ックする コン ト ロールパネル ウ ィ ン ドウが開きます 続く ...

Страница 6: ...6 ドライバーソフトウェアをインストールする 4 コン ト ロールパネル ウ ィ ン ドウの ネ ッ ト ワーク アイ コンをダブルク リ ッ クする 次の画面が表示されます 5 はい Y ボタ ンをク リ ックする しばら く する と 次の画面が表示されます ...

Страница 7: ...7 6 次へ N ボタ ンをク リ ックする 次の画面が表示されます 7 検索開始 T ボタ ンをク リ ックする 次の画面が表示されます 続く ...

Страница 8: ...アをインストールする 8 ネ ッ ト ワークアダプタ A 欄に 3Com Etherlink III ISA PCMCIA Adapter 検出 が表示されている こ とを確認し 次へ N ボタ ンをク リ ックする 次の画面が表示されます 9 ネ ッ ト ワークプロ ト コル P 欄の NetBEUIプロ ト コル チェ ッ クボッ クスのみをチェ ッ ク し 次へ N ボタ ンをク リ ックする 次の画面が表示されます ...

Страница 9: ...9 10 次へ N ボタ ンをク リ ッ クする 次の画面が表示されます 11 次へ N ボタ ンをク リ ッ クする 次の画面が表示されます 12テキス ト ボッ クスに半角で D I386 と入力し 続行 ボタ ンをク リ ッ クする 次の画面が表示されます 続く ...

Страница 10: ...トウェアをインストールする 13 I Oポー ト ア ドレス P 欄に 0x300 割り込み番号 I 欄に 10 が表示されていることを確認してから ト ランシーバの種類 T 欄の ドロ ップダウン リ ス ト から使用するネ ッ ト ワークを選び 続行 ボタ ンをク リ ッ クする 次の画面が表示されます 14 OK ボタ ンをク リ ックする イ ンス ト ールが始ま り しばら く する と次の画面が表示されます ...

Страница 11: ...11 15 次へ N ボタ ンをク リ ッ クする 次の画面が表示されます 16 次へ N ボタ ンをク リ ッ クする しばら く する と 次の画面が表示されます 続く ...

Страница 12: ...ては ネ ッ ト ワー ク管理者にお問い合わせく ださい 次の画面が表示されます 18 完了 ボタ ンをク リ ックする 次の画面が表示されます 19 Windows NT Workstation Version 4 0 CD ROMディ スクをES 7から取り出し はい Y ボタ ンをク リ ックする ES 7のシステムがシャッ トダウンされた後 再び起動され ESBK 7052基板が使用できるよ う になり ます ネ ッ ト ワークに接続するES 7が1台のときは これでイ ンス ト ールは完 了です ネ ッ ト ワークに2台以上のES 7を接続する と きは 手順20 に 進んでく ださい ...

Страница 13: ...13 20手順1 4を実行する 次の画面が表示されます 21 変更 C ボタ ンをク リ ックする 次の画面が表示されます 続く ...

Страница 14: ...14 ドライバーソフトウェアをインストールする 22 コンピュータ名 N 欄に新しい名前を入力し OK ボタ ンをク リ ッ クする こ こで入力するコンピューター名は ネ ッ ト ワークに接続されている他 のコンピューター名と重複しないよう にしてく ださい 詳しく はネッ ト ワーク管理者にお問い合わせく ださい ...

Страница 15: ... アフターサービス 調子が悪いときはまずチェックを この説明書をも う1度ご覧になってお調べく ださい それでも具合の悪いときはサービスへ お買い上げ店またはお近く のソニーサービス窓口にご相談く ださい 保証期間中の修理は 保証書の記載内容に基づいて修理させていただきます 詳しく は保証書 をご覧く ださい 保証期間経過後の修理は 修理によって機能が維持できる場合は ご要望によ り有料修理させてい ただきます 保証期間中の修理など アフターサービスについてご不明な点は お買 い上げ店またはお近く のソニーサービス窓口にお問い合わせく ださい 保証書とアフターサービス ...

Страница 16: ...ドライバーソフトウェアをインストールする 一般 外形寸法 幅 高さ 奥行き 179 121 22mm 質量 110g 入出力端子 RJ 45端子 10base Tツイ ス トペアケーブル接続用 AUI端子 10base 5同軸ケーブル接続用 BNC端子 10base 2同軸ケーブル接続用 付属品 取扱説明書 1 保証書 1 仕様および外観は予告なく 変更する こ とがあ り ますが ご了承く ださい 仕様 ...

Страница 17: ...erference to radio communications Operation of this equipment in a residential area is likely to cause harmful interference in which case the user will be required to correct the interference at his own expense You are cautioned that any changes or modifications not expressly approved in this manual could void your authority to operate this equipment The shielded interface cable recommended in thi...

Страница 18: ...h other equipment Contact your network administrator for information on which of the following connectors to use for connection to your network 1 RJ 45 connector Connect a 10Base T twisted pair cable 2 AUI connector Connect a 10Base 5 coaxial cable 3 BNC connector Connect a 10Base 2 coaxial cable 1 Ethernet is a registered trademark of Xerox Corporation Location and Function of Parts 1 RJ 45 conne...

Страница 19: ...ou start the system be sure to log on with the user name and password of a member of the Administrators group To install the driver software proceed as follows 1 Log on following the procedure explained in Starting the System in the ES 7 Operating Instructions The desktop appears on the screen 2 Insert the Windows NT1 Workstation Version 4 0 CD ROM disc supplied with the ES 7 into the CD ROM drive...

Страница 20: ...tart button on the taskbar point to Settings and click Control Panel The Control Panel window appears 4 Double click the Network icon in the Control Panel The following dialog box appears Installing the Driver Software ...

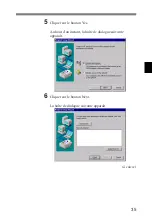
Страница 21: ...21 5 Click the Yes button After a few moments the following dialog box appears 6 Click the Next button The following dialog box appears Continued ...

Страница 22: ...n The following dialog box appears 8 Check to be sure that 3Com Etherlink III ISA PCMCIA Adapter detected is displayed under Network Adapter and then click the Next button The following dialog box appears Installing the Driver Software ...

Страница 23: ... 9 In the Network Protocol list check only the NetBEUI Protocol check box and then click the Next button The following dialog box appears 10Click the Next button The following dialog box appears Continued ...

Страница 24: ... and then click the Continue button The following dialog box appears 13Check to be sure that 0x300 is displayed in the I O Port Address box and that 10 is displayed in the Interrupt Number box Then select a network type from the Transceiver Type drop down list and click the Continue button The following dialog box appears ...

Страница 25: ...25 14Click the OK button Installation starts After a few moments the following dialog box appears 15Click the Next button The following dialog box appears Continued ...

Страница 26: ...g dialog box appears 17Enter a Workgroup or Domain name and then click the Next button For more information about the Workgroup or Domain name contact your Network Administrator The following dialog box appears Installing the Driver Software ...

Страница 27: ... Yes button After the system shuts down and restarts you will be able to use the ESBK 7052 board If you are connecting only one ES 7 system to your network this completes the installation If you will connect two or more ES 7 systems proceed to step 20 20Repeat steps 1 to 4 The following dialog box appears Continued ...

Страница 28: ...ars 22Enter a new name in the Computer Name box and click the OK button As the new computer name choose a name that is not being used by any other computer connected to your network For details contact your Network Administrator Installing the Driver Software ...

Страница 29: ...ss 110 g 3 oz Input and output connectors RJ 45 connector For 10Base T twisted pair cables AUI connector For 10Base 5 coaxial cables BNC connector For 10Base 2 coaxial cables Accessories supplied Operating Instructions 1 Design and specifications are subject to change without notice ...

Страница 30: ......

Страница 31: ...31 Aperçu 32 Emplacement et fonction des organes 32 Installation de la carte d extension 33 Installation du logiciel de pilotage 33 Spécifications 43 Français Table des matières ...

Страница 32: ...pareils Contacter l administrateur du réseau pour savoir lequel des connecteurs suivants doit être utilisé pour le raccordement au réseau 1 Connecteur RJ 45 Y raccorder un câble à paire torsadée 10Base T 2 Connecteur AUI Y raccorder un câble coaxial 10Base 5 3 Connecteur BNC Y raccorder un câble coaxial 10Base 2 Aperçu Emplacement et fonction des organes 1 Ethernet est une marque de fabrique dépos...

Страница 33: ...rrage du système ne pas oublier d entrer dans le système avec le nom et le mot de passe d utilisateur d un membre du groupe Administrators Procéder comme suit pour installer le logiciel de pilotage 1 Entrer dans le système selon la procédure expliquée dans Démarrage du système dans le mode d emploi de l ES 7 L écran desktop apparaît 2 Insérer le CD ROM Windows NT1 Workstation Version 4 0 fourni av...

Страница 34: ...rt de la Taskbar pointer Settings et cliquer sur Control Panel La fenêtre Control Panel apparaît 4 Cliquer deux fois sur l icône Network sous Control Panel La boîte de dialogue suivante apparaît Installation du logiciel de pilotage ...

Страница 35: ...35 5 Cliquer sur le bouton Yes Au bout d un instant la boîte de dialogue suivante apparaît 6 Cliquer sur le bouton Next La boîte de dialogue suivante apparaît à suivre ...

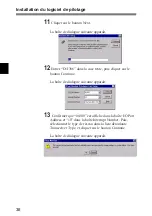
Страница 36: ...7 Cliquer sur le bouton Start Search La boîte de dialogue suivante apparaît 8 Confirmer que 3Com Etherlink III ISA PCMCIA Adapter detected est affiché sous Network Adapter puis cliquer sur le bouton Next La boîte de dialogue suivante apparaît ...

Страница 37: ...s la liste Network Protocol pointer seulement la case NetBEUI puis cliquer sur le bouton Next La boîte de dialogue suivante apparaît 10Cliquer sur le bouton Next La boîte de dialogue suivante apparaît à suivre ...

Страница 38: ...e texte puis cliquer sur le bouton Continue La boîte de dialogue suivante apparaît 13 Confirmer que 0x300 est affiché dans la boîte I O Port Address et 10 dans la boîte Interrupt Number Puis sélectionner le type de réseau dans la liste déroulante Transceiver Type et cliquer sur le bouton Continue La boîte de dialogue suivante apparaît ...

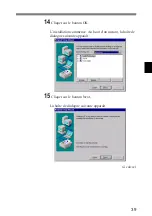
Страница 39: ...39 14Cliquer sur le bouton OK L installation commence Au bout d un instant la boîte de dialogue suivante apparaît 15Cliquer sur le bouton Next La boîte de dialogue suivante apparaît à suivre ...

Страница 40: ...uivante apparaît 17Entrer un nom Workgroup ou Domain puis cliquer sur le bouton Next Contacter l Administrateur du réseau pour plus d informations sur les noms Workgroup et Domain La boîte de dialogue suivante apparaît Installation du logiciel de pilotage ...

Страница 41: ...er sur le bouton Yes La carte ESBK 7052 sera utilisable après l arrêt et le redémarrage du système Si un seul système ES 7 est raccordé au réseau l installation est maintenant terminée Passer à l étape 20 pour raccorder deux ES 7 ou plus 20 Répéter les étapes 1 à 4 La boîte de dialogue suivante apparaît à suivre ...

Страница 42: ...2Entrer un nouveau nom dans la boîte Computer Name et cliquer sur le bouton OK Choisir un nom différent de ceux des ordinateurs déjà raccordés au réseau pour le nouveau nom d ordinateur Contacter l Administrateur du réseau pour les détails Installation du logiciel de pilotage ...

Страница 43: ...g 2 onces Connecteurs d entrée sortie Connecteur RJ 45 Pour câbles à paire torsadée 10Base T Connecteur AUI Pour câbles coaxiaux 10Base 5 Connecteur BNC Pour câbles coaxiaux 10Base 2 Accessoires fournis Mode d emploi 1 La conception et les spécifications sont sujettes à modification sans préavis ...

Страница 44: ......

Страница 45: ... Maße auch im industriellen Bereich eingesetzt werden Dies ist eine Einrichtung welche die Funk Entstörung nach Klasse B besitzt Kurzbeschreibung 46 Lage und Funktion der Teile 46 Installieren der Erweiterungskarte 47 Installieren der Treiber Software 47 Technische Daten 57 Inhaltsverzeichnis ...

Страница 46: ... anderen Geräten Fragen Sie Ihren Netzwerk Administrator über welche der folgenden drei Anschlüsse die Einbindung in das Netzwerk erfolgen soll 1 RJ 45 Für die Vernetzung über 10Base T Zweileiterkabel 2 AUI Für die Vernetzung über 10Base 5 Koaxialkabel 3 BNC Für die Vernetzung über 10Base 2 Koaxialkabel 1 RJ 45 2 AUI 3 BNC Lage und Funktion der Teile 1 Ethernet ist ein eingetragenes Warenzeichen d...

Страница 47: ...s System und melden Sie sich mit dem Benutzernamen und Paßwort eines Mitglieds der Administrator Gruppe an Zur Installierung der Treiber Software verfahren Sie wie folgt 1 Melden Sie sich beim System an wie unter Systemstart in der Bedienungsanleitung der ES 7 beschrieben Der Desktop erscheint 2 Legen Sie die Windows NT1 Workstation Version 4 0 CD ROM Disc die zum Lieferumfang der ES 7 gehört in d...

Страница 48: ...dem Cursor auf Einstellungen Settings und klicken Sie auf Systemsteuerung Control Panel Das Systemsteuerung Fenster Control Panel wird geöffnet 4 Doppelklicken Sie im Systemsteuerung Fenster Control Panel auf das Network Symbol Installieren der Treiber Software ...

Страница 49: ...49 Die folgende Dialogbox erscheint 5 Klicken Sie auf Yes Ja Kurz darauf erscheint die folgende Dialogbox 6 Klicken Sie auf Next Weiter Die folgende Dialogbox erscheint bitte wenden ...

Страница 50: ... Sie auf Start Search Suche beginnen Die folgende Dialogbox erscheint 8 Vergewissern Sie sich davon daß 3Com Etherlink III ISA PCMCIA Adapter detected unter Network Adapters erscheint und klicken Sie auf Next Weiter Die folgende Dialogbox erscheint ...

Страница 51: ...51 9 Aktivieren Sie in der Network Protocols Liste nur die Box NetBEUI Protocol und klicken Sie auf Next Weiter Die folgende Dialogbox erscheint 10Klicken Sie auf Next Weiter bitte wenden ...

Страница 52: ... die Textbox ein und klicken Sie auf Continue Weiter Die folgende Dialogbox erscheint 13Vergewissern Sie sich davon daß 0x300 in der I O Port Address Box und daß 10 in der Interrupt Number Box angezeigt wird Wählen Sie dann einen Netzwerktyp aus der Transceiver Type Drop Down Liste aus und klicken Sie auf Continue Weiter ...

Страница 53: ...53 14Klicken Sie auf OK Der Installationsvorgang beginnt Kurz darauf erscheint die folgende Dialogbox 15Klicken Sie auf Next Weiter Die folgende Dialogbox erscheint bitte wenden ...

Страница 54: ... erscheint 17Geben Sie einen Workgroup oder Domain Namen ein und klicken Sie auf Next Weiter Informationen zu Workgroup oder Domain Namen erfragen Sie bitte bei Ihrem Netzwerk Administrator Die folgende Dialogbox erscheint Installieren der Treiber Software ...

Страница 55: ...es Ja Mit der ESBK 7052 läßt sich nun arbeiten nachdem das System einmal heruntergefahren und wieder gestartet ist Wenn nur eine ES 7 in das Netz eingebunden wird ist die Installation hiermit abgeschlossen Zum Anschluß von zwei oder mehr ES 7 gehen Sie weiter auf Schritt 20 20Wiederholen Sie die Schritte 1 bis 4 Die folgende Dialogbox erscheint bitte wenden ...

Страница 56: ...nt 22Geben Sie einen neuen Namen in die Computer Name Box ein und klicken Sie auf OK Wählen Sie einen Computer Namen der noch nicht innerhalb des Netzes verwendet wird Einzelheiten erfragen Sie bitte bei Ihrem Netzwerk Administrator Installieren der Treiber Software ...

Страница 57: ...T 179 121 22 mm Gewicht ca 110 g Schnittstellen RJ 45 Für 10Base T Zweileiterkabel AUI Für 10Base 5 Koaxialkabel BNC Für 10Base 2 Koaxialkabel Im Lieferumfang Bedienungsanleitung 1 Änderungen die dem technischen Fortschritt dienen bleiben vorbehalten ...

Страница 58: ......

Страница 59: ......

Страница 60: ...営業所 022 257 7830 営業所 048 645 6880 出張所 025 270 3253 営業所 043 297 8531 営業所 03 5448 6740 営業所 0425 75 0201 出張所 0263 25 4551 営業所 045 243 6711 営業所 054 284 3601 営業所 052 201 6871 営業所 076 240 8110 営業所 075 691 7860 営業所 06 531 4111 営業所 078 322 0851 営業所 082 241 9211 営業所 0878 31 3003 営業所 092 741 2761 Printed in Japan 東京システム営業所 03 5448 6740 システム営業1部 2部 03 5448 5446 ...

Отзывы: