background image

79

Us
ing Va

ri

o

u

s

 Additiona

l Func

tions

5

Enter or re-enter your 4-digit password 
by pressing 

X/x

 to select the digit, 

followed by 

c

 to move the cursor. Then 

press ENTER.

“Custom parental control is set.” appears 
and then the screen returns to the Control 
Menu display.

To turn off the Custom Parental 

Control function

1

Follow Steps 1 through 3 of “Custom 
Parental Control.”

2

Press 

X/x

 to select “OFF 

t

,” then press 

ENTER.

3

Enter your 4-digit password using 

X/x


to select the digit, followed by 

c

 to move 

the cursor. Then press ENTER.

To play the disc for which Custom 

Parental Control is set

1

Insert the disc for which Custom Parental 
Control is set. 
The “CUSTOM PARENTAL 
CONTROL” display appears.

2

Enter your 4-digit password using 

X/x


to select the digit, followed by 

c

 to move 

the cursor. Then press ENTER.
The player is ready for playback.

z

If you forget your password, enter the 6-digit 

number “199703” when the “CUSTOM PARENTAL 
CONTROL” display asks you for your password, then 
press ENTER. (Press 

c

 after the 4th digit to allow the 

entire 6-digit number to be entered.) The display will 
ask you to enter a new 4-digit password.

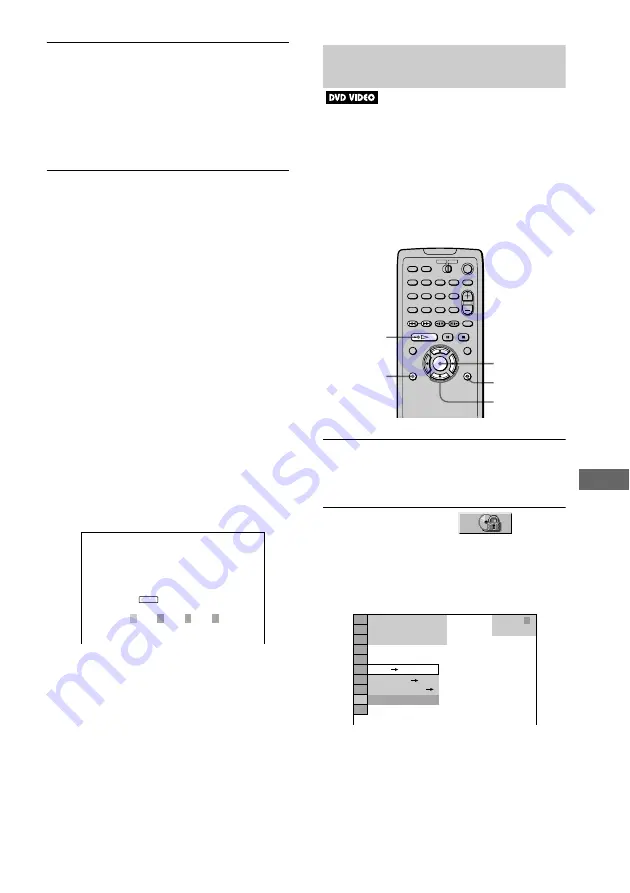
Parental Control (limiting playback 
by children)

Playback of some DVD VIDEOs can be 
limited according to a predetermined level 
such as the age of the users. The 
“PARENTAL CONTROL” function allows 
you to set a playback limitation level.
A scene that is limited is not played, or it is 
replaced by a different scene.

.

1

Press DISPLAY while the player is in 
stop mode.

The Control Menu appears.

2

Press 

X/x

 to select 


(PARENTAL CONTROL), then press 
ENTER.

The options for “PARENTAL 
CONTROL” appear.

CUSTOM PARENTAL CONTROL

Custom parental control is already
set. To play, enter your password
and press

          .

ENTER

ENTER

O

RETURN

DISPLAY

H

X/x/c

OFF

PASSWORD

PLAYER

ON

DVD VIDEO

STOP

1 8 ( 3 4 )

1 2 ( 2 7 )

T       1 : 3 2 : 5 5

continued 

,

Содержание DVP-F41M

Страница 1: ...3 072 475 11 2 2002 Sony Corporation DVP F41MS CD DVD Player Operating Instructions ...

Страница 2: ...t Model No DVP F41MS Serial No ______________ CAUTION You are cautioned that any change or modifications not expressly approved in this manual could void your authority to operate this equipment This equipment has been tested and found to comply with the limits for a Class B digital device pursuant to Part 15 of the FCC Rules These limits are designed to provide reasonable protection against harmf...

Страница 3: ...outlet On placement Place the player in a location with adequate ventilation to prevent heat build up in the player Do not place the player and the AC power adaptor on a soft surface such as a rug Do not place the player and the AC power adaptor in a location near heat sources or in a place subject to direct sunlight excessive dust or mechanical shock Do not put any object on top of the player The...

Страница 4: ... use a commercially available cleaning disc It may cause a malfunction If you have any questions or problems concerning your player please consult your nearest Sony dealer IMPORTANT NOTICE Caution This player is capable of holding a still video image or on screen display image on your television screen indefinitely If you leave the still video image or on screen display image displayed on your TV ...

Страница 5: ...e Jack Cover 32 Step 4 Connecting the Power Cord 33 Step 5 Quick Setup 34 Playing Discs 38 Playing Discs 38 Resuming Playback from the Point Where You Stopped the Disc Resume Play 40 Using the DVD s Menu 41 Selecting ORIGINAL or PLAY LIST on a DVD RW Disc 41 Playing VIDEO CDs with PBC Functions PBC Playback 42 Various Play Mode Functions Program Play Shuffle Play Repeat Play A B Repeat Play 43 Sea...

Страница 6: ...dio Track 73 Viewing a JPEG Image File 75 Using Various Additional Functions 78 Locking Discs Custom Parental Control Parental Control 78 Operation Sound Effects Sound Feedback 82 Controlling Your TV etc with the Supplied Remote 83 Settings and Adjustments 85 Using the Setup Display 85 Setting the Display or Sound Track Language LANGUAGE SETUP 86 Settings for the Display SCREEN SETUP 87 Custom Set...

Страница 7: ... code printed on the back of the unit and will only play DVDs labeled with identical region codes DVDs labeled will also play on this player If you try to play any other DVD the message Playback prohibited by area limitations will appear on the TV screen Depending on the DVD no region code indication may be labeled even though playing the DVD is prohibited by area restrictions Icon Meaning Functio...

Страница 8: ...of the recording device The disc will not play if it has not been correctly finalized Discs containing one generation copy controlled contents recorded with CPRM Content Protection for Recordable Media protection cannot be played on this player For more information see the operating instructions for the recording device Note that discs created in the Packet Write format also cannot be played Note ...

Страница 9: ...wipe the edge of the disc with the side of a pen or pencil so that the glue is spread evenly along the edge before inserting the disc into the player Be sure not to touch the playback side of the disc when wiping the edge If burrs remain on the outer edge of the disc remove them by rubbing with the side of a pen or pencil If burrs are not removed discs may not load properly into the player or frag...

Страница 10: ... mode Memory Stick playback mode yellow while reading the data in the Memory Stick It goes out in disc playback mode B MEMORY STICK Memory Stick slot 72 C previous next buttons 39 D x stop button 38 E X pause button 39 82 F N play button 38 G Disc slot 38 H Front panel display 11 I remote sensor 17 J SURROUND indicator 59 K A eject button 39 L 1 power button indicator 38 ...

Страница 11: ... is on 64 Current play mode A B Repeat Play 47 Current audio signal DTS format signal 57 Current title and chapter number playing time etc 52 Current audio signal Dolby Digital signal 57 Current scene number or playing time 52 Lights up when playing back a VIDEO CD with PBC 42 Playing status Disc type Current play mode A B Repeat Play 47 Lights up when BNR is on 64 continued ...

Страница 12: ... C DIGITAL OUT OPTICAL jack 26 28 30 D VIDEO OUT jack 19 22 E S VIDEO OUT jack 22 Playing status Playing time Current track Disc type does not appear for Memory Stick Lights up when BNR is on 64 Current play mode A B Repeat Play 47 Current track and index number playing time etc 52 Playing status Current file number Current album number Current album and file number file name etc 52 Disc type does...

Страница 13: ...AY button 38 L TOP MENU button 41 M DISPLAY button 14 85 N SEARCH MODE button 50 O TV DVD switch 83 P 1 power button 38 Q TV operation buttons 83 R SUBTITLE button 63 S CLEAR button 44 46 47 T VOL volume buttons 83 U A B button 47 V REPLAY button 39 W SCAN SLOW buttons 49 X x STOP button 39 Y X PAUSE button 39 Z MENU button 41 67 73 wj C X x c buttons 34 wk ORETURN button 42 wl ENTER button 34 Use...

Страница 14: ...ontrol Menu item Control Menu items Function name of selected Control Menu item Operation message Total number of chapters indexes tracks or files recorded Playback status N Playback X Pause x Stop etc Options Current setting Type of disc being played back MS for Memory Stick TITLE page 50 SCENE page 50 TRACK page 50 Selects the title scene or track to be played CHAPTER page 50 INDEX page 50 Selec...

Страница 15: ...he audio outputs CUSTOM Setup page 85 In addition to the Quick Setup setting you can adjust other various settings RESET Returns the settings in SETUP to the default setting PROGRAM page 44 Selects the title chapter or track to play in the order you want SHUFFLE page 46 Plays the title chapter or track in a random order REPEAT page 46 Plays the entire disc or MG Memory Stick all titles all tracks ...

Страница 16: ...pe of the disc or Memory Stick z The Control Menu icon indicator lights up in green when you select any item except OFF TVS PROGRAM SHUFFLE REPEAT A B REPEAT BNR only The ANGLE indicator lights up in green only when the angles can be changed Control Menu display 1 m Control Menu display 2 m ADVANCED display Appears if you select any setting other than OFF See page 55 m Control Menu display off t ...

Страница 17: ...the power of each component before connecting Step 1 Unpacking Check that you have the following items Audio video cord pinplug x 3 y pinplug x 3 1 Remote commander 1 Size AA R6 batteries 2 AC power adaptor AC F21 1 AC power cord 1 Jack cover for vertical installation 1 Step 2 Inserting Batteries into the Remote You can control the player using the supplied remote Insert two size AA R6 batteries b...

Страница 18: ...lected remote sensor is displayed on the front panel display as follows The default setting Notes Do not leave the remote in an extremely hot or humid place Do not drop any foreign object into the remote casing particularly when replacing the batteries Do not expose the remote sensor to direct light from the sun or lighting apparatus Doing so may cause a malfunction If you do not use the remote fo...

Страница 19: ...to a wide screen TV Depending on the disc the image may not fit your TV screen If you want to change the aspect ratio please refer to page 87 3 Power source 1 Audio video cord supplied CD DVD Player TV 2 Power source l Signal flow to video input to AUDIO OUT L red white yellow to VIDEO OUT red white yellow to audio input yellow white red AC power adaptor AC F21 supplied to AUDIO OUT R white red ye...

Страница 20: ...ay be displayed on the TV screen If so select the item you want from the menu and play the DVD VIDEO page 41 or VIDEO CD disc page 42 To stop playing Press x To take out the disc Press A on the player then remove the disc To turn off the player Press 1 The player is set to standby mode and the 1 indicator lights up in red z To play a DATA CD see page 67 You can play also a Memory Stick on this pla...

Страница 21: ...the player Before you start turn off the power check that you have all of the supplied accessories and insert the batteries into the remote page 17 Remove the jack cover page 19 Notes Plug cords securely to prevent unwanted noise Refer to the instructions supplied with the components to be connected ...

Страница 22: ...atterns A or B according to the input jack on your TV monitor projector or AV amplifier receiver Audio video cord supplied S video cord not supplied CD DVD player AC power adaptor AC F21 supplied TV projector AV amplifier receiver yellow yellow TV projector AV amplifier receiver yellow l Signal flow to VIDEO OUT AC power cord supplied to S VIDEO OUT ...

Страница 23: ...te plugs to connect to the audio input jacks page 25 B If you are connecting to an S VIDEO input jack Connect the S VIDEO cord not supplied You will enjoy high quality images Note Do not connect your player to a VCR You may not receive a clear image on the TV screen if you pass the player signals via the VCR Yellow Video White L Red R Yellow Video White L Red R VCR CD DVD player TV Connect directl...

Страница 24: ...DTS and DTS Digital Out are trademarks of Digital Theater Systems Inc Connection Components to be connected page 25 TV stereo page 26 Stereo amplifier receiver having L and R audio input jacks only or having a digital input jack 2 speakers front L and R page 26 MD deck DAT deck page 28 AV amplifier receiver with a Dolby Surround Pro Logic decoder having L and R audio input jacks only or having a d...

Страница 25: ... for this connection TVS DYNAMIC page 59 TVS WIDE page 59 The yellow plug is used for video signals page 22 A Audio video cord supplied CD DVD player TV white red yellow white red yellow l Signal flow to audio input to AUDIO OUT L to AUDIO OUT R AC power cord supplied AC power adaptor AC F21 supplied white red continued ...

Страница 26: ... player directly to the MD deck or DAT deck without using your stereo amplifier receiver xRecommended surround sound effects for the connection only TVS STANDARD page 59 z In connection you can use the supplied audio video cord instead of using a separate audio cord z To realize better surround sound effects make sure that your listening position is in between your speakers Notes If you select one...

Страница 27: ... Optical digital cord not supplied to audio input to optical digital input white red white red Speakers Front L Front R MD deck DAT deck or l Signal flow to AUDIO OUT R to AUDIO OUT L to DIGITAL OUT OPTICAL AC power adaptor AC F21 supplied AC power cord supplied white red continued ...

Страница 28: ... discs Pro Logic uses a minimum of 3 speakers front L and R and rear monaural The surround effects are enhanced if 6 speakers front L and R center rear L and R and subwoofer are used If your amplifier receiver has R and L audio input jacks only use If your amplifier receiver has a digital input jack use xRecommended surround sound effects using this connection with your amplifier receiver Dolby Su...

Страница 29: ...gital cord not supplied Stereo audio cord not supplied to optical digital input white red white red Amplifier receiver with Dolby Surround decoder Speakers Speakers Rear L Rear R Subwoofer Center Rear mono Front L Front R l Signal flow or to AUDIO OUT R to AUDIO OUT L to DIGITAL OUT OPTICAL AC power adaptor AC F21 supplied AC power cord supplied white red continued ...

Страница 30: ...our amplifier receiver Dolby Digital 5 1ch page 91 DTS 5 1ch page 91 z To enhance the surround sound effects refer to the operating instructions of the amplifier receiver for correct speaker setting location Notes After you have completed the connection be sure to set DOLBY DIGITAL in AUDIO SETUP to DOLBY DIGITAL page 34 If your AV amplifier receiver has a DTS decoder set DTS in AUDIO SETUP to ON ...

Страница 31: ...tical digital cord not supplied CD DVD player Speakers Speakers AV amplifier receiver with a decoder Front R Front L Center Rear R Rear L Subwoofer l Signal flow to DIGITAL OUT OPTICAL AC power adaptor AC F21 supplied AC power cord supplied ...

Страница 32: ...the side of the player Then attach the jack cover carefully not to trap the cords When you install the player vertically First gather all the connecting cords together and let them pass through the side of the player Then attach the jack cover for vertical installation supplied carefully not to trap the cords Notes When you place the player in a horizontal position remove the jack cover for vertic...

Страница 33: ...2 in 4 to 5 mm Please be sure you have selected fasteners or screws that will fit in the hanging holes on the bottom of the unit Remove the seals covering the hanging holes Hang the player on the screws Push the player tightly against the wall Note WHEN YOU DISCONNECT OR CONNECT THE CORDS TAKE THE PLAYER DOWN FROM THE WALL Step 4 Connecting the Power Cord Plug the player and TV power cords into an...

Страница 34: ...o run QUICK SETUP appears at the bottom of the screen If this message does not appear select QUICK QUICK under SETUP SETUP in the Control Menu page 85 to run Quick Setup D Press ENTER without inserting a disc The Setup Display for selecting the language used in the on screen display appears E Press X x to select a language The player uses the language selected here to display the menu and subtitle...

Страница 35: ... selected Quick Setup is finished and connections are complete When DIGITAL OUTPUT is selected the Setup Display for DOLBY DIGITAL appears Proceed to Step 0 TV Type You select Page 4 3 standard TV 4 3 LETTER BOX or 4 3 PAN SCAN 87 A wide screen TV or 4 3 standard TV with the wide screen mode 16 9 87 SCREEN SETUP TV TYPE SCREEN SAVER BACKGROUND 4 3 PAN SCAN 4 3 LETTER BOX 16 9 4 3 LETTER BOX YES NO...

Страница 36: ...run it for the first time To run Quick Setup a second time select QUICK under SETUP in the Control Menu page 85 Audio Cord Connection Type You select Page D PCM 91 DOLBY DIGITAL only if the amplifier receiver has a Dolby Digital decoder 91 Audio Cord Connection Type You select Page OFF 91 ON only if the amplifier receiver has a DTS decoder 91 B D AUDIO SETUP AUDIO ATT AUDIO DRC DIGITAL OUT DOLBY D...

Страница 37: ...gh Each of these are the default settings and do not need to be adjusted when you first connect the player Refer to page 85 for using the Setup Display Audio Connection pages 25 to 30 No additional settings are needed If the sound distorts even when the volume is turned down set AUDIO ATT to ON page 90 Item You select Page DOWNMIX DOLBY SURROUND 91 Item You select Page DOWNMIX DOLBY SURROUND 91 DI...

Страница 38: ... player or H on the remote The player starts playback continuous play Adjust the volume on the TV or the amplifier receiver After following Step 5 Depending on the disc a menu may appear on the TV screen You can play the disc interactively by following the instructions on the menu DVD page 41 VIDEO CD page 42 To turn off the player Press 1 The player enters standby mode and the 1 indicator lights ...

Страница 39: ...t without a DTS decoder do not set DTS to ON in AUDIO SETUP page 92 A loud noise may come out from the speakers affecting your ears or causing the speakers to be damaged When you play a DVD with DTS sound tracks set DTS to ON in AUDIO SETUP page 92 Notes When you insert an 8 cm 3 inch disc insert the disc slowly at the center of the disc slot If you cannot eject the disc consult your nearest Sony ...

Страница 40: ...c from the point where you stopped the disc If RESUME does not appear Resume Play is not available 2 Press H The player starts playback from the point where you stopped the disc in Step 1 z To play from the beginning of the disc press x twice then press H Notes Depending on where you stopped the disc the player may not resume playback from exactly the same point The point where you stopped playing...

Страница 41: ...contents of the menu vary from disc to disc 2 Press C X x c to select the item you want to play or change 3 Press ENTER Selecting ORIGINAL or PLAY LIST on a DVD RW Disc Some DVD RW discs in VR Video Recording mode have two types of titles for playback originally recorded titles ORIGINAL and titles that can be created on recordable DVD players for editing PLAY LIST You can select the type of titles...

Страница 42: ...tive operations search functions and other operations PBC playback allows you to play VIDEO CDs interactively by following the menu on the TV screen 1 Start playing a VIDEO CD with PBC functions The menu for your selection appears 2 Select the item number you want by pressing X x 3 Press ENTER 4 Follow the instructions in the menu for interactive operations Refer to the instructions supplied with ...

Страница 43: ...ENTER in Step 3 may appear as Press SELECT in the instructions supplied with the disc In this case press H Various Play Mode Functions Program Play Shuffle Play Repeat Play A B Repeat Play You can set the following play modes Program Play page 44 Shuffle Play page 46 Repeat Play page 46 A B Repeat Play page 47 Note The play mode is canceled when you eject the disc the player enters standby mode by...

Страница 44: ... 01 5 Select the title chapter or track you want to program x When playing a DVD VIDEO For example select chapter 03 of title 02 Press X x to select 02 under T then press ENTER CLEAR PROGRAM H ENTER X x c DISPLAY REPEAT SHUFFLE OFF OFF SET ON 1 8 3 4 1 2 2 7 T 1 3 2 5 5 DVD VIDEO PLAY PROGRAM 1 TITLE ALL CLEAR 2 TITLE 3 TITLE 4 TITLE 5 TITLE 6 TITLE 7 TITLE T 01 02 03 04 05 Tracks or titles record...

Страница 45: ...Program Play 2 In Step 4 select the program number of the title chapter or track you want to change or cancel using X x and press c 3 Follow Step 5 for new programming To cancel a program select under T then press ENTER To cancel all the titles chapters or tracks in the programmed order 1 Follow Steps 1 through 3 of Creating your own program Program Play 2 Press X and select ALL CLEAR 3 Press ENTE...

Страница 46: ...y and plays them in random order 4 Press ENTER To return to normal play Press CLEAR or select OFF in Step 3 To turn off the Control Menu Press DISPLAY repeatedly until the Control Menu is turned off z You can set the player to shuffle in stop mode as well After pressing SHUFFLE to select the item you want to set press H Shuffle Play starts z You can select SHUFFLE directly by pressing SHUFFLE Each...

Страница 47: ...TRACK Repeats the current track x When playing ATRAC3 audio tracks on an MG Memory Stick ALL Repeats all of the tracks TRACK Repeats the current track x During Program Play or Shuffle Play ON Repeats Program Play or Shuffle Play 4 Press ENTER To return to normal play Press CLEAR or select OFF in Step 3 To turn off the Control Menu Press DISPLAY repeatedly until the Control Menu is turned off z You...

Страница 48: ... Control Menu Press DISPLAY repeatedly until the Control Menu is turned off z You can select A B REPEAT directly by pressing A B Press the button once to set the point A and press it again to set the point B Notes You can set A B Repeat Play for only one specific section When you set A B Repeat Play the settings for Shuffle Play Repeat Play and Program Play are canceled A B Repeat Play does not wo...

Страница 49: ...eds are available With each press the indication changes as follows Playback direction x2B DVD VIDEO CD only r FF1M r FF2M Opposite direction x2b DVD VIDEO only r FR1m r FR2m The x2B x2b playback speed is about twice the normal speed The FF2M FR2m playback speed is faster than FF1M FR1m z You cannot view JPEG image files in fast forward or fast reverse Watching frame by frame Slow motion Play Pres...

Страница 50: ...he search method x When playing a DVD VIDEO DVD RW TITLE CHAPTER or TIME TEXT Select TIME TEXT for Time search see below x When playing a VIDEO CD TRACK or INDEX x When playing a VIDEO CD with PBC Playback SCENE x When playing a CD TRACK or INDEX x When playing an audio on a DATA CD MP3 audio track or MG Memory Stick ATRAC3 audio track ALBUM DATA CD only or TRACK x When viewing a JPEG image file o...

Страница 51: ...TEXT T playing time of the current title is selected 2 Press ENTER T changes to T 3 Input the time code using X x c then press ENTER For example to find the scene at 2 hours 10 minutes and 20 seconds after the beginning just enter 2 10 20 z When the Control Menu display is turned off you can search for a chapter or track etc by pressing SEARCH MODE followed by X x c and ENTER Notes When you search...

Страница 52: ...r track of a CD or VIDEO CD using the front panel display page 11 Press TIME TEXT Each time you press TIME TEXT while playing the disc the display changes as shown in the following charts When playing a DVD VIDEO DVD RW TIME TEXT Playing time of the current title Remaining time of the current title Playing time of the current chapter Text Remaining time of the current chapter Current title and cha...

Страница 53: ...r TV screen See the following section Checking the Playing Time and Remaining Time for instructions on how to read this information Notes Depending on the type of disc being played and the playing mode the above mentioned disc information may not be displayed Playing time of MP3 audio track may not be displayed correctly Track playing time and the current track number Remaining time of the current...

Страница 54: ...g a VIDEO CD with PBC functions Playing time of the current scene minute second x When playing a VIDEO CD without PBC functions or CD T Playing time of the current track minute second T Remaining time of the current track D Playing time of the current disc D Remaining time of the current disc x When playing a DATA CD MP3 audio or MG Memory Stick ATRAC3 audio track Playing time of the current track...

Страница 55: ... the DVD layer that is being played While playing a disc an approximate bit rate of the playback picture is always displayed as Mbps Mega bit per second and the audio as kbps kilo bit per second Checking the play information of DVD ADVANCED 1 Press DISPLAY during playback The Control Menu is displayed 2 Press X x to select ADVANCED then press ENTER The options for ADVANCED appear TIME TEXT BRAHMS ...

Страница 56: ...t of data When the bit rate level is high there is a large amount of data However this does not always mean that you can get higher quality pictures or sounds LAYER Indicates the approximate point where the disc is playing If it is a dual layer DVD the player indicates which layer is being read Layer 0 or Layer 1 For details on the layers see page 97 DVD VIDEO Checking the play information of DATA...

Страница 57: ... x to select AUDIO then press ENTER The options for AUDIO appear 3 Press X x to select the desired audio signal x When playing a DVD VIDEO Depending on the DVD VIDEO the choice of language varies When 4 digits are displayed they represent the language code Refer to the language code list on page 101 to see which language the code represents When the same language is displayed two or more times the...

Страница 58: ...er PCM DTS or DOLBY DIGITAL is displayed In the case of DOLBY DIGITAL the channels in the playing track are displayed by numbers as follows For Dolby Digital 5 1ch The letters in the program format display mean the following sound component The display examples are as follows PCM stereo Dolby Surround DVD VIDEO 1 ENGLISH 1 8 3 4 1 2 2 7 T 1 3 2 5 5 L R C DOLBY DIGITAL 3 2 1 PROGRAM FORMAT LFE LS R...

Страница 59: ...oy surround sound effects by using sound imaging to create virtual rear speakers from the sound of the front speakers L left R right without using actual rear speakers This function is designed to work with the AUDIO OUT L R jacks Note that if you select one of the TVS settings while playing a DVD the player does not output the Dolby Digital signals from the DIGITAL OUT OPTICAL jack when you set D...

Страница 60: ... speakers from the sound of the front speakers L R without using actual rear speakers The virtual speakers are reproduced as shown in the illustration below This gives the sound an expanded effect that fills the area surrounding the listener This mode is effective when the distance between the front L and R speakers is short such as with built in speakers on a stereo TV TVS NIGHT The large sounds ...

Страница 61: ...t to hear When you select one of the TVS modes turn off the surround setting of the connected TV or amplifier receiver Make sure that your listening position is between and at an equal distance from your speakers and that the speakers are located in similar surroundings Otherwise the TVS effect may be hard to discern TVS NIGHT works only with Dolby Digital audio However not all discs will respond ...

Страница 62: ...X x to select ANGLE The number of the angle appears The number in parentheses indicates the total number of angles 3 Press c or ENTER The number of the angle changes to 4 Select the angle number using X x then press ENTER The scene changes to the selected angle To turn off the Control Menu Press DISPLAY repeatedly until the Control Menu is turned off z You can select the angle directly by pressing...

Страница 63: ...ng x When playing a DVD VIDEO Select the language Depending on the DVD VIDEO the choice of language varies When 4 digits are displayed they indicate the language code Refer to the language code list on page 101 to see which language the code represents x When playing a DVD RW Select ON 4 Press ENTER To cancel the SUBTITLE setting Select OFF in Step 3 To turn off the Control Menu Press DISPLAY repe...

Страница 64: ...s the block noise 2 reduces the block noise more than 1 3 reduces the block noise more than 2 4 Press ENTER The disc plays with the setting you selected To cancel the BNR setting Select OFF in Step 3 To turn off the Control Menu Press DISPLAY repeatedly until the Control Menu is turned off z You can select BNR directly by pressing BNR Each time you press the button the level changes Notes If the o...

Страница 65: ...sions If audio tracks and images in Music CD format or Video CD format are recorded in the first session only the first session will be played back Note Since the player cannot play the discs created in the Packet Write format you cannot view the JPEG images recorded using the following Sony products as of February 2002 Digital Photo Printer DPP SV88 Digital Still Camera MVC CD1000 MVC CD200 MVC C...

Страница 66: ...the front of the track file names when you store the tracks or files in a disc the tracks and files will be played in that order z Since a disc with many trees takes longer to start playback place your albums within the first two trees when you store the tracks or files in a disc Notes Depending on the software you use to create the DATA CD the playback order may differ from the above illustration...

Страница 67: ...e 46 AUDIO page 57 and TVS page 59 z You can also use or on the player to select AUDIO in Step 2 z If you want to view JPEG image files after playing MP3 audio tracks press DISPLAY to display the Control Menu Select using X x then press ENTER Follow from Step 2 of Viewing a JPEG Image File on page 68 Note The ID3 tag which is the memory area partitioned in MP3 audio for inputting music titles etc ...

Страница 68: ...r characters appear as an asterisk Viewing a JPEG Image File JPEG image files recorded on DATA CDs CD ROM CD R CD RW can be viewed on this player Note however that you can view only the JPEG image files which conform to the DCF image file format 1 Insert a DATA CD into the disc slot If the MS indicator on the player is lit press MS to turn it off in stop mode The Control Menu appears if an MP3 aud...

Страница 69: ...ms recorded on the DATA CD appear When an album is being played its title is shaded 2 Press X x to select the album you want to play then press ENTER Files in the album appear When a file is being played its title is shaded 3 Press X x to select the file then press ENTER The player starts playing the selected file To go to the next or previous page Press c or C To return to the previous display Pr...

Страница 70: ...an image by 90 degrees Press C c while viewing an image Each time you press c the image rotates clockwise by 90 degrees Each time you press C the image rotates counterclockwise by 90 degrees Example of when you press c once Rotating direction ...

Страница 71: ...ging data do not remove the Memory Stick or disconnect the power cord while playing it use the Memory Stick in a location subject to static electricity or electric noise On handling the Memory Stick The tactile protrusion on the rear surface of a MG Memory Stick distinguishes it from an ordinary Memory Stick B To prolong the life of the Memory Stick use the storage case supplied with the Memory St...

Страница 72: ...lot Notes Observe the side and direction carefully when inserting a Memory Stick Insert the Memory Stick with the v mark facing up and in the direction of the v Otherwise the slot may be damaged Do not insert any objects other than a Memory Stick into the slot Doing so may cause a malfunction To take out the Memory Stick While the player is stopped push and release the Memory Stick Note When you t...

Страница 73: ...age 57 and TVS page 59 z You can also use or on the player to select AUDIO in Step 3 z If you want to view JPEG image files after playing ATRAC3 audio tracks press DISPLAY to display the Control Menu Select using X x then press ENTER Follow from Step 3 of Viewing a JPEG Image File on page 75 Selecting a track 1 After Step 4 in Playing an ATRAC3 Audio Track press MENU The audio tracks recorded on t...

Страница 74: ... Menu appears 2 Press X x to select SETUP then press ENTER 3 Press X x to select CUSTOM then press ENTER The Setup Display appears 4 Press X x to select CUSTOM SETUP then press ENTER The CUSTOM SETUP display appears 5 Press X x to select DATE TIME SETUP t then press ENTER The DATE TIME SETUP display appears 6 Press X x to select a figure then press c The Y year is set and the next item M month wil...

Страница 75: ...G Memory Stick or a Memory Stick Note however that the player can display JPEG image files recorded using a digital camera only if the image file format and the directory structure are DCF compliant Make sure the MS indicator is lit MS mode when you play an MG Memory Stick or Memory Stick 1 Insert a Memory Stick into the MEMORY STICK slot page 72 MS H DISPLAY MENU C X x c ORETURN ENTER continued ...

Страница 76: ...iles which do not fit the screen will be reduced so they can be displayed properly Selecting an album and file 1 After Step 4 in Viewing a JPEG Image File press MENU A list of the albums saved on the Memory Stick appears When an album is being played its title is shaded 2 Press X x to select an album then press ENTER The files in the album appear When a file is being played its title is shaded 3 P...

Страница 77: ...the album file names can be displayed Other characters appear as an asterisk MS mode will be released when the player enters standby mode the power cord is disconnected Rotating a JPEG image You can rotate an image by 90 degrees Press C c while viewing an image Each time you press c the image rotates clockwise by 90 degrees Each time you press C the image rotates counterclockwise by 90 degrees Exa...

Страница 78: ...ert the disc you want to lock If the disc is playing press x to stop playback 2 Press DISPLAY while the player is in stop mode The Control Menu is displayed 3 Press X x to select PARENTAL CONTROL then press ENTER The options for PARENTAL CONTROL appear 4 Press X x to select ON t then press ENTER x If you have not entered a password The display for registering a new password appears Enter a 4 digit...

Страница 79: ...ayer is ready for playback z If you forget your password enter the 6 digit number 199703 when the CUSTOM PARENTAL CONTROL display asks you for your password then press ENTER Press c after the 4th digit to allow the entire 6 digit number to be entered The display will ask you to enter a new 4 digit password Parental Control limiting playback by children Playback of some DVD VIDEOs can be limited ac...

Страница 80: ...5 Press X x to select STANDARD then press ENTER The selection items for STANDARD are displayed 6 Press X x to select a geographic area as the playback limitation level then press ENTER The area is selected When you select OTHERS t select and enter the standard code in the table on page 81 using X x 7 Press X x to select LEVEL then press ENTER The selection items for LEVEL are displayed 8 Select th...

Страница 81: ...VIDEOs which do not have the Parental Control function playback cannot be limited on this player Depending on the DVD VIDEO you may be asked to change the parental control level while playing the disc In this case enter your password then change the level If the Resume Play mode is canceled the level returns to the original level Area Code Changing the password 1 Press DISPLAY while the player is ...

Страница 82: ...ring your password Press C before you press ENTER and input the correct number If you make a mistake Press ORETURN To turn off the Control Menu Press DISPLAY repeatedly until the Control Menu is turned off Operation Sound Effects Sound Feedback The player beeps when the following operations are performed The default setting of the Sound Feedback function is set to off Operation Operation sound Pow...

Страница 83: ...function is turned off Controlling Your TV etc with the Supplied Remote By adjusting the remote signal you can control your TV or Sony Active Speaker System SA F21 not supplied with the supplied remote Notes Depending on the units being connected you may not be able to control your TV or Sony AV amplifier receiver using some of the buttons below If you enter a new TV code the code previously enter...

Страница 84: ... you can adjust the volume with the supplied remote By pressing You can 1 Turn the TV on or off VOL volume Adjust the volume of the TV TV VIDEO Switch the TV s input source between the TV and other input sources WIDE MODE Switch to or from the wide mode of a Sony wide TV Manufacturer Press C X x c to input code Sony default XX Fisher Xx General Electric XC JVC xX Magnavox Xc Panasonic cc Philips X...

Страница 85: ...e Control Menu appears 2 Press X x to select SETUP then press ENTER The options for SETUP appear 3 Press X x to select CUSTOM then press ENTER The Setup Display appears 4 Press X x to select the setup item from the displayed list LANGUAGE SETUP SCREEN SETUP CUSTOM SETUP or AUDIO SETUP Then press ENTER The selected setup item appears Example SCREEN SETUP 5 Select an item using X x then press ENTER ...

Страница 86: ... to set various languages for the on screen display or sound track Select LANGUAGE SETUP in the Setup Display For details on using the display see Using the Setup Display page 85 xOSD On Screen Display Switches the display language on the screen Selects the language from the displayed list xMENU DVD VIDEO only You can select the desired language for the menu Selects the language from the displayed...

Страница 87: ... the TV to be connected Select SCREEN SETUP in the Setup Display For details on using the display see Using the Setup Display page 85 The default settings are underlined xTV TYPE Selects the aspect ratio of the connected TV 4 3 standard or wide 4 3 LETTER BOX Select this when you connect a 4 3 screen TV Displays a wide picture with bands on the upper and lower portions of the screen 4 3 PAN SCAN S...

Страница 88: ... to turn off the screen saver xBACKGROUND Selects the background color or picture on the TV screen in stop mode or while playing a CD DATA CD MP3 audio track MG Memory Stick ATRAC3 audio track ON Turns on the screen saver OFF Turns off the screen saver 4 3 LETTER BOX 4 3 PAN SCAN 16 9 JACKET PICTURE The jacket picture still picture appears in the background but only when the jacket picture is alre...

Страница 89: ...r DEMO2 to start playback TIMER Starts playing when the player is turned on A CD DVD VIDEO or VIDEO CD can be played at any time when the player is connected to a timer not supplied DEMO1 Starts playing the first demonstration automatically DEMO2 Starts playing the second demonstration automatically CUSTOM SETUP DIMMER PAUSE MODE BRIGHT AUTO OFF TRACK SELECTION DATE TIME SETUP OFF AUTO PLAY BRIGHT...

Страница 90: ...back period restriction DATE TIME SETUP in Playing an ATRAC3 Audio Track on page 74 Settings for the Sound AUDIO SETUP AUDIO SETUP allows you to set the sound according to the playback and connection conditions Select AUDIO SETUP in the Setup Display For details on using the display see Using the Setup Display page 85 The default settings are underlined xAUDIO ATT attenuation If the playback sound...

Страница 91: ...ver with digital input jack AV amplifier receiver with a built in DTS or DOLBY DIGITAL decoder MD or DAT deck For connection details see page 26 Select DOLBY DIGITAL and DTS after setting DIGITAL OUT to ON STANDARD Normally select this position TV MODE Makes the low sounds clear even if you turn the volume down It is especially recommended when you listen to the sound using the speakers of the TV ...

Страница 92: ...this when the player is connected to an audio component with a built in Dolby Digital decoder If the player is connected to an audio component lacking a built in Dolby Digital decoder do not set this Otherwise when you play the Dolby Digital sound track a loud noise or no sound will come out from the speakers affecting your ears or causing the speakers to be damaged OFF Select this when the player...

Страница 93: ...r to your TV s S video input page 22 Even though you set the aspect ratio in TV TYPE of SCREEN SETUP the picture does not fill the screen The aspect ratio of the disc is fixed on your DVD Sound There is no sound The connecting cord is not connected securely The connecting cord is damaged The player is connected to the wrong input jack on the amplifier receiver page 26 28 30 The amplifier receiver ...

Страница 94: ... ATRAC3 audio track JPEG image file you want to play is broken You are trying to view the following data JPEG image recorded by a digital camera that image file format and directory structure are not DCF compliant page 75 JPEG image edited by a computer has the extension JPG but not in JPEG format Memory Stick type error The Memory Stick is not compatible with the player for instance the Memory St...

Страница 95: ...s playing the disc automatically The disc features an auto playback function AUTO PLAY in CUSTOM SETUP is set to TIMER page 89 Playback stops automatically Some discs may contain an auto pause signal While playing such a disc the player stops playback at the auto pause signal You cannot perform some functions such as stop Scan Slow motion Play Repeat Play Shuffle Play or Program Play Depending on ...

Страница 96: ...cal authorized Sony service facility Self diagnosis Function When letters numbers appear in the display When the self diagnosis function is activated to prevent the player from malfunctioning a five character service number e g C 13 00 with a combination of a letter and digits appears on the screen and the front panel display In this case check the following table First three characters of the ser...

Страница 97: ... rear signals The rear channel is monaural DTS page 24 92 Digital audio compression technology that Digital Theater Systems Inc developed This technology conforms to 5 1 channel surround sound The rear channel is stereo and there is a discrete subwoofer channel in this format DTS provides the same 5 1 discrete channels of high quality digital audio Good channel separation is realized because all o...

Страница 98: ... can also play discs with the mark Even when the region code is not shown on the DVD the region limit may still be activated SDMI SDMI which stands for Secure Digital Music Initiative is a forum that consists of over 130 companies in the fields of recorded audio content computers and consumer electronics dedicated to developing an integrated method of copyright protection technology that can be us...

Страница 99: ... kHz sampling frequency the output signal from the DIGITAL OUT OPTICAL jack is converted to 48 kHz sampling frequency Outputs General Power requirements DC 10 5 V See page 3 for further information Power consumption 12 W Dimensions approx 252 60 183 mm 10 2 3 8 7 1 4 in width height depth including projecting parts Mass approx 1 5 kg 3 lb 5 oz Operating temperature 5 C to 35 C 41 F to 95 F Operati...

Страница 100: ...F to 95 F Storage temperature 20 C to 60 C 4 F to 140 F Supplied accessories See page 17 Optional accessory Active Speaker System SA F21 Specifications and design are subject to change without notice ENERGY STAR is a U S registered mark As an ENERGY STAR Partner Sony Corporation has determined that this product meets the ENERGY STAR guidelines for energy efficiency ...

Страница 101: ...iddish 1283 Javanese 1287 Georgian 1297 Kazakh 1298 Greenlandic 1299 Cambodian 1300 Kannada 1301 Korean 1305 Kashmiri 1307 Kurdish 1311 Kirghiz 1313 Latin 1326 Lingala 1327 Laothian 1332 Lithuanian 1334 Latvian Lettish 1345 Malagasy 1347 Maori 1349 Macedonian 1350 Malayalam 1352 Mongolian 1353 Moldavian 1356 Marathi 1357 Malay 1358 Maltese 1363 Burmese 1365 Nauru 1369 Nepali 1376 Dutch 1379 Norweg...

Страница 102: ...SH FRENCH SPANISH PORTUGUESE GERMAN ITALIAN DUTCH CHINESE JAPANESE DANISH SWEDISH FINNISH NORWEGIAN RUSSIAN OTHERS t AUDIO ORIGINAL All other selections are same as the MENU language SUBTITLE AUDIO FOLLOW All other selections are same as the MENU language TV TYPE 4 3 LETTER BOX 4 3 PAN SCAN 16 9 SCREEN SAVER ON OFF BACKGROUND JACKET PICTURE GRAPHICS BLUE BLACK ...

Страница 103: ...UTO PLAY OFF TIMER DEMO1 DEMO2 DIMMER BRIGHT DARK OFF AUTO PAUSE MODE AUTO FRAME TRACK SELECTION OFF AUTO DATE TIME SETUP AUDIO ATT OFF ON AUDIO DRC STANDARD TV MODE WIDE RANGE DOWNMIX DOLBY SURROUND NORMAL DIGITAL OUT ON DOLBY DIGITAL D PCM DOLBY DIGITAL DTS OFF ON OFF ...

Страница 104: ...8 97 DVD s menu 41 F Fast forward 49 Fast reverse 49 FILE 69 76 File 98 Front Panel Display 11 H Handling discs 9 Hooking up 21 I INDEX 50 Index 98 J JPEG 65 68 75 L LANGUAGE SETUP 86 Locating a specific point by watching the TV screen 49 M MEMORY STICK 73 75 MENU 41 86 MP3 65 67 MS mode 73 O On screen display Control Menu Display 14 Setup Display 85 ORIGINAL 41 ORIGINAL PLAY LIST 41 OSD 86 P PARE...

Страница 105: ...105 U Usable discs 7 V VIDEO CD 38 W Wall installation 33 ...

Страница 106: ......

Страница 107: ......

Страница 108: ...Sony Corporation Printed in Japan ...

Отзывы: