background image

72

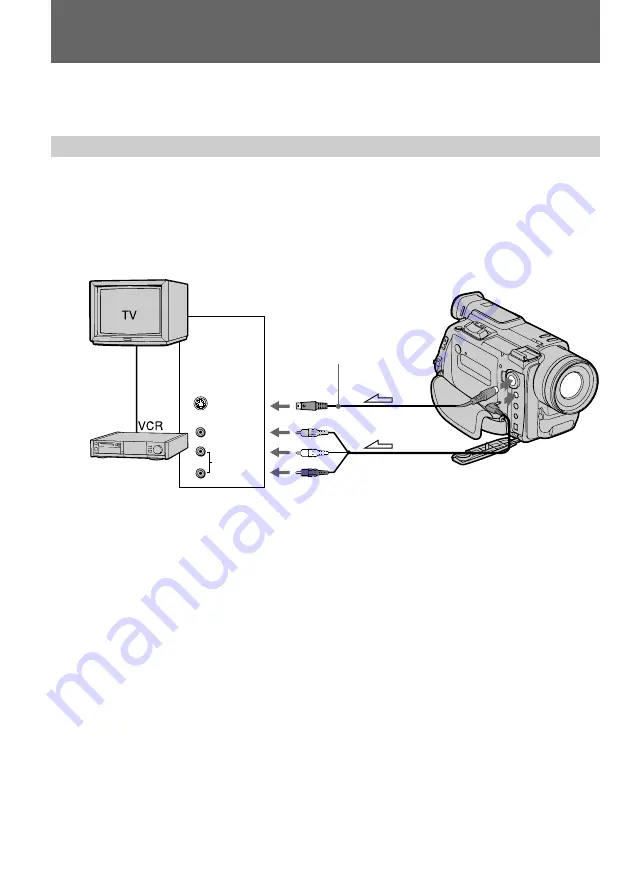
Connect the camcorder to your TV or VCR to watch the playback picture on the TV screen.
When monitoring the playback picture by connecting the camcorder to your TV, we
recommend you to use house current (mains) for the power source.

Connecting directly to a TV or VCR with Audio/Video input jacks

Open the jack cover and connect the camcorder to the inputs on the TV by using the
supplied A/V connecting cable. Set the TV/VCR selector on the TV to VCR.
Turn down the volume of the camcorder.
To get higher quality pictures in DVCAM format, connect the camcorder to your TV using
the S video connecting cable (not supplied).
If you are going to connect the camcorder using the S video connecting cable (not supplied)

[a]

, you do not need to connect the yellow (video) plug of the A/V connecting cable 

[b]

.

If your VCR or TV is a monaural type

Connect only the white plug for audio on both the camcorder and the VCR or the TV. If you
connect the white plug, the sound is L (left) signal. If you connect the red plug, the sound is
R (right) signal.

When you adjust the TV screen

Set COLOR BAR (COLOUR BAR) to ON in the menu system. The color bar is displayed on
the TV screen.

Watching on a TV screen

(not supplied)

S VIDEO

AUDIO/VIDEO

Ç

 : Signal flow

S VIDEO

VIDEO

AUDIO

IN

[a]

[b]

Содержание DVCAM DSR-PD100A

Страница 1: ...is manual thoroughly and retain it for future reference Owner s Record The model and serial numbers are located on the bottom Record the serial number in the space provided below Refer to these numbers whenever you call upon your Sony dealer regarding this product Model No DSR Model No AC Serial No Serial No DSR PD100A PD100AP SERIES TM ...

Страница 2: ...talled and used in accordance with the instructions may cause harmful interference to radio communications However there is no guarantee that interference will not occur in a particular installation If this equipment does cause harmful interference to radio or television reception which can be determined by turning the equipment off and on the user is encouraged to try to correct the interference ...

Страница 3: ...ice station Voor de klanten in Nederland Bij dit product zijn batterijen gelevered Wanneer deze leeg zijn moet u ze niet weggooien maar inleveren als KCA IBM PC AT is a registered trademark of International Business Machines Corporation of the U S A MS DOS and Windows are registered trademarks licensed to Microsoft Corporation registered in the U S A and other countries Macintosh is a trademark li...

Страница 4: ...icture effect 73 Viewing the picture with the digital effect 74 Searching the boundaries of recorded tape with date date search 75 Searching the boundaries of recorded tape with title title search 77 Searching for a photo photo search photo scan 78 Displaying recording data data code function 81 Editing onto another tape 82 Editing partially on a mini DVCAM tape DV synchro editing 84 Recording fro...

Страница 5: ...ou can only use mini DVCAM cassettes with this camcorder We recommend you to use a tape with cassette memory The functions which depend on whether the tape has the cassette memory or not are End Search p 22 25 Date Search p 75 Photo Search p 78 The functions you can operate only with the cassette memory are Title Search p 77 Superimposing a title p 65 Making a custom title p 68 Labeling a cassette...

Страница 6: ... the viewfinder These points are normal in the manufacturing process and do not affect the recorded picture in any way Over 99 99 are operational for effective use Do not let the camcorder get wet Keep the camcorder away from rain and sea water Letting the camcorder get wet may cause the unit to malfunction and sometimes this malfunction cannot be repaired a Never leave the camcorder exposed to te...

Страница 7: ... NP F330 battery pack 1 p 8 4 Size AA R6 battery for Remote Commander 2 p 142 5 PC card adaptor 1 PC card adaptor case 1 p 92 6 Memory Stick 1 label 1 p 92 7 XLR adaptor 1 p 63 2 0 6 1 3 4 7 9 8 Pouch for XLR adaptor 1 When not using the XLR adaptor put the adaptor into the pouch 9 A V connecting cable 1 p 72 82 0 Shoulder strap 1 p 143 Lens cap 1 p 13 Lens hood 1 p 15 Wide conversion lens 1 wide ...

Страница 8: ...HIUM is a trademark of Sony Corporation Installing the battery pack 1 Lift up the viewfinder 2 Insert the battery pack in the direction of the mark on the battery pack Slide the battery pack down until it is locked Attach the battery pack to the camcorder securely Note on installing the NP F730 F730H F750 F930 F950 F960 battery pack Use the camcorder while stretching out the viewfinder Note on the...

Страница 9: ...ptor to the DC IN jack with the plug s 4 mark up 2 Connect the power cord to the AC power adaptor 3 Connect the power cord to a wall outlet 4 Set the POWER switch to OFF Remaining battery time is indicated by the minutes on the display window Charging begins When the remaining battery indicator becomes ı normal charge is completed For full charge which allows you to use the battery longer than usu...

Страница 10: ...440 395 240 210 550 495 Numbers in parentheses indicate the time when you use a normally charged battery Battery life will be shorter if you use the camcorder in a cold environment Approximate continuous recording time indoors Approximate minutes when recording while you repeat recording start stop zooming and turning the power on off The actual battery life may be shorter NP F730H is sold only in...

Страница 11: ...or in the viewfinder However the indication may not be displayed properly depending on using conditions and circumstances When you close the LCD panel or open it it takes about 1 minute for the correct remaining time to be displayed To remove the battery pack Lift up the viewfinder While pressing BATT RELEASE slide the battery pack in the direction of the arrow BATT RELEASE ...

Страница 12: ... compartment by pressing the PUSH mark on the cassette compartment is a trademark To eject the cassette While pressing the small blue button on the EJECT switch slide it in the direction of the arrow To prevent accidental erasure Slide and open the tab on the cassette to expose the red mark If you try to record with the red mark exposed the L and 6 indicators flash on the LCD screen or in the view...

Страница 13: ...sing the small green button on the POWER switch set it to CAMERA The camcorder is set to Standby mode 3 Press START STOP The camcorder starts recording REC appears on the LCD screen or in the viewfinder The camera recording lamp on the front of the camcorder also lights up To stop recording momentarily a Press START STOP The STBY indicator appears on the LCD screen or in the viewfinder Standby mod...

Страница 14: ...he lock knob to the left position the POWER switch will not be set to MEMORY accidentally Notes on the time code The time code indicates the recording or playback time 0 00 00 hours minutes seconds in CAMERA mode and 0 00 00 00 hours minutes seconds frames in VTR mode Be sure not to make a blank portion when recording because the time code will start from 0 00 00 00 again You can select the drop f...

Страница 15: ... technique that lets you change the size of the subject in the scene For more professional looking recordings use the zoom function sparingly T side for telephoto subject appears closer W side for wide angle subject appears farther away Zooming speed Variable speed zooming Press the power zoom lever a little for a relatively slow zoom press it still more for a high speed zoom When you shoot a subj...

Страница 16: ...oking at the LCD screen When using the LCD screen the viewfinder turns off automatically except in mirror mode You cannot monitor the sound from the speaker during recording 1 While pressing OPEN open the LCD panel 2 Adjust angle of the LCD panel The LCD panel moves about 90 degrees to this side and about 180 degrees to the other side To adjust the brightness of the LCD screen press LCD BRIGHT or ...

Страница 17: ...t difficult to view the LCD screen due to glare when using the camcorder outdoors Letting the subject monitor the shot You can turn the LCD panel over so that it faces the other way and you can let the subject monitor the shot while shooting with the viewfinder Turn the LCD panel up vertically When you turn the LCD panel 180 degrees the indicator appears on the LCD screen mirror mode and the time ...

Страница 18: ...an record yourself while watching yourself on the LCD screen The picture on the LCD screen looks like a mirror image while recording in mirror mode The STBY indicator appears as Pr and REC as r Other indicators appear as mirror image Some indicators may not appear in mirror mode While recording in mirror mode you cannot operate the following functions MENU TITLE ...

Страница 19: ...faster then recording starts automatically at the time you set To stop self timer recording Press START STOP Use the Remote Commander for convenience To record still pictures using the self timer Press PHOTO in step 2 To cancel self timer recording Press so that the indicator disappears from the LCD or viewfinder screen while the camcorder is in Standby mode Self timer recording mode is canceled w...

Страница 20: ...t it Place your eye against the viewfinder eyecup Be sure not to touch the built in microphone Use the LCD panel frame or the viewfinder frame as a guide to determine the horizontal plane You can also record in a low position to get an interesting angle Lift the viewfinder up for record from a low position b You can also record in a low position or even in a high position using the LCD panel c Whe...

Страница 21: ...of the tripod screw is less than 6 5 mm 9 32 inch Otherwise you cannot attach the tripod securely and the screw may damage the camcorder Cautions on the LCD panel and on the viewfinder Do not pick up the camcorder by the viewfinder or the LCD panel d Do not place the camcorder so as to point the viewfinder or the LCD panel toward the sun The inside of the viewfinder or the LCD panel may be damaged...

Страница 22: ...hold down the side Edit Search To stop playback Release EDITSEARCH To go back to the last recorded point END SEARCH Press END SEARCH The last recorded point is played back for about 5 seconds and stops Note that when you use a tape without cassette memory this function does not work once you eject the cassette after recording To begin re recording Press START STOP Re recording begins from the poin...

Страница 23: ... tape press 0 To fast forward the tape rapidly press Using the Remote Commander You can control playback using the supplied Remote Commander Before using the Remote Commander insert the size AA R6 batteries To display the LCD screen viewfinder screen indicators Press DISPLAY To erase the indicators press again Notes on screen indicators The screen indicator disappears when the title is displayed W...

Страница 24: ...during playback For slow playback in reverse direction press then press To resume normal playback press To view the picture at double speed For double speed playback in the reverse direction press then press 2 on the Remote Commander during playback For double speed playback in the forward direction press then press 2 during playback To resume normal playback press To view the picture frame by fra...

Страница 25: ... LCD panel and press END SEARCH during recording standby This function works when the POWER switch is set to CAMERA or VTR Notes on End Search When you use a tape without cassette memory the End Search function does not work once you eject the cassette after recording When you use a tape with cassette memory the End Search function works once you eject the cassette When you play back a tape which ...

Страница 26: ...order Place Power source Accessory to be used Indoors House current Mains Supplied AC power adaptor Outdoors Battery pack Battery pack NP F330 supplied NP F530 NP F550 NP F730 NP F730H NP F750 NP F930 NP F950 NP F730H is sold only in the U S A Note on power sources Disconnecting the power source or removing the battery pack during recording or playback may damage the inserted tape If this happens ...

Страница 27: ...ord mains lead to the AC power adaptor 3 Connect the power cord mains lead to a wall outlet mains WARNING The power cord mains lead must be changed only at a qualified service shop PRECAUTION The set is not disconnected from the AC power source house current mains as long as it is connected to the power cord mains lead even if the set itself has been turned off Note Keep the AC power adaptor away ...

Страница 28: ...Menu items differ depending on the setting of the POWER switch to VTR CAMERA or MEMORY While recording in mirror mode you cannot operate the menu system Changing the mode settings Illustration DSR PD100A O T H E R S B E E P M E L O D Y C OMM A N D E R N O RM A L D I S P L A Y O F F D V E D I T I N G R E T U R N 1 5 CAMERA 2 3 4 MEMORY VTR MENU MENU M A N U A L S E T A U T O S H T R P R OG S C A N ...

Страница 29: ...item to record a 16 9 wide picture See page 39 for details STEADYSHOT ON OFF Normally select ON Select OFF when you do not have to worry about camera shake AE SHIFT Adjust the setting level of AE Automatic Exposure See page 52 for details GAIN SHIFT 0dB 3dB Set the gain value to 0dB Set the gain value to 3dB FRAME REC OFF ON Normally select OFF Select ON for cut recording See page 61 for details W...

Страница 30: ...viewfinder The viewfinder becomes brighter when you turn the control dial up and darker when you turn it down Items for the MEMORY SET menu CONTINUOUS OFF ON MULTI SCRN Select OFF not to record continuously Select ON to record 2 to 4 pictures continuously Select MULTI SCRN to record nine pictures continuously QUALITY STANDARD FINE SUPER FINE Select STANDARD to record still pictures in the standard...

Страница 31: ...ct AUTO to adjust the recording level automatically Select MANUAL to adjust the recording level manually ÒREMAIN AUTO ON Select AUTO to display the remaining time of the tape in the following cases With the power on or a tape inside for eight seconds after the remaining time of the tape becomes certain For eight seconds after the or DISPLAY button is pressed During rewinding fast forwarding and se...

Страница 32: ...EDITING Select this item when editing a tape on another equipment connected with the i LINK cable DV connecting cable See page 84 for details These settings return to the default 5 minutes or more after the power source is disconnected or battery is removed As far as the other items without an asterisk are concerned their settings are retained even when the power source is disconnected or battery ...

Страница 33: ... picture However you cannot select other still pictures by using this button 3 Press PHOTO deeper The still picture on the LCD screen or in the viewfinder is recorded for about seven seconds The sound during those seven seconds is also recorded To record a still picture while normal recording press PHOTO deeper Then the still picture is recorded for about seven seconds and the camcorder returns to...

Страница 34: ...ting cable not supplied Refer to the operating instruction of the video printer as well If the video printer is not equipped with S VIDEO input Use the supplied A V connecting cable Connect it to the AUDIO VIDEO jack and connect the yellow plug of the cable to the VIDEO input of the video printer Photo recording AUDIO VIDEO S VIDEO Ç Signal flow Video printer not supplied ...

Страница 35: ...d DSR PD100A or 1 50 of a second DSR PD100AP Thus the actual image displayed in an instant covers only half of the apparent image area Displaying the whole image simultaneously on a full screen is called Progressive mode In this mode the picture is clearer than one in normal mode but moving objects appear jerky since the picture is read output every 1 15 second DSR PD100A or 1 12 5 second DSR PD10...

Страница 36: ... fading out the picture gradually changes from color to black and white When fading in a 1 While the camcorder is in Standby mode press FADER until the desired indicator flashes 2 Press START STOP to start recording The fade indicator stops flashing When fading out b 1 During recording press FADER until the desired indicator flashes 2 Press START STOP to stop recording The fade indicator stops fla...

Страница 37: ...ctive in the following situations A big change of scene FADE IN FADE OUT The beginning of a story FADE IN The end of a day FADE OUT Change the scene while leaving the trace of the previous scene If you use the fader function repeatedly The situation the subject is in cannot be seen clearly thus making the picture difficult to enjoy When the OVERLAP indicator appears The camcorder automatically mem...

Страница 38: ...GHT again The c indicator disappears Otherwise the picture will be too bright under normal lighting condition This function is also effective under the following conditions A subject with a light source nearby or a mirror reflecting light A white subject against a white background Especially when you shoot a person wearing shiny clothes made of silk or synthetic fiber his or her face tends to beco...

Страница 39: ...rded in 16 9WIDE mode set it to full mode For details refer to the operating instruction of your TV Note that the picture recorded in 16 9WIDE mode looks compressed on a normal TV Notes on wide mode In wide mode you cannot select the old movie function with DIGITAL EFFECT You cannot select or cancel the wide mode during recording You cannot use the wide mode function when you set PROG SCAN to ON U...

Страница 40: ...ure Effect function NEG ART a The color of the picture is reversed SEPIA The picture is sepia B W The picture is monochrome black and white SOLARIZE b The light intensity is clearer and the picture looks like an illustration SLIM c The picture expands vertically STRETCH d The picture expands horizontally a b d c ...

Страница 41: ...TURE EFFECT so that the indicator disappears Notes on the picture effect When you turn the power off the camcorder returns automatically to normal mode You cannot select SLIM and STRETCH when you set PROG SCAN to ON While using the picture effect function you cannot select the old movie function with DIGITAL EFFECT Enjoying picture effect SEPIA NEG ART B W SOLARIZE SLIM STRETCH 1 2 PICTURE EFFECT ...

Страница 42: ...the wide mode to 16 9WIDE picture effect to SEPIA and the appropriate shutter speed 1 While in Standby mode or Recording mode press DIGITAL EFFECT The digital effect indicator flashes 2 Turn the control dial to select the desired digital effect mode 3 Press the control dial The digital effect indicator lights up and the bars appear The bar does not appear in the OLD MOVIE mode The still picture is...

Страница 43: ...utton Functions using the PHOTO button When you set the POWER switch to OFF the digital effect will be canceled automatically Notes on the OLD MOVIE mode You cannot use the following functions in the OLD MOVIE mode Functions using the PROGRAM AE button 16 9WIDE mode Functions using the PICTURE EFFECT button Recording with various effects digital effect FLASH STILL LUMI TRAIL OLD MOVIE 1 2 3 DIGITA...

Страница 44: ...age 57 AUTO LOCK selector Set the selector as shown below to maintain or release the settings of the functions AUTO LOCK a Select this position to let the unit adjusts all the functions automatically HOLD b Select this position after setting the functions manually to maintain the settings Manual position c Select this position to adjust manually the functions listed above Adjusting exposure Adjust...

Страница 45: ...to lock release position while the camcorder is in Standby mode 2 Press SHUTTER SPEED The shutter speed indicator appears on the LCD screen or in the viewfinder 3 Turn the control dial to select the desired speed The available shutter speed ranges from 1 4 to 1 10000 DSR PD100A or from 1 3 to 1 10000 DSR PD100AP To return to automatic shutter speed mode Set AUTO LOCK selector to AUTO LOCK or press...

Страница 46: ...appears on the LCD screen or in the viewfinder 3 Turn the control dial to select the appropriate white balance mode under the following conditions As you turn the dial the display changes as follows One push white balance w Outdoor e Indoor Display Shooting conditions Adjusting the white balance according to the light source This operation is not available during recording Follow the steps describ...

Страница 47: ... is not adjusted Fast flashing white balance is being adjusted Lights up white balance has been adjusted When the indicator remains flashing even if you press the control dial shoot in automatic white balance mode Notes on white balance When you shoot with studio lighting or video lighting use the e indoor mode When you shoot with fluorescent lighting use automatic white balance mode If you use th...

Страница 48: ...microphone level automatically Select AUTO in step 5 then press the control dial Notes on the adjustment The sound level setting is retained as long as the power is on and for about five minutes after removing the battery Sound level indicator appears at the lower right on the LCD screen or in the viewfinder The sound input through the AUDIO VIDEO jack You cannot adjust the recording level of the ...

Страница 49: ...oing out of focus under bright conditions When ND ON flashes on the LCD screen or in the viewfinder The ND filter is necessary Press ND FILTER so that the ND ON indicator appears The ND filter is now activated When ND OFF flashes on the LCD screen or in the viewfinder The ND filter is not necessary Press ND FILTER so that the ND OFF indicator stops flashing The ND filter is now deactivated ND FILT...

Страница 50: ... Set the ZEBRA selector to 70 or 100 To erase the zebra pattern Set the ZEBRA selector to OFF Settings of the ZEBRA selector Setting Meaning 70 The zebra pattern appears in the portion of the picture on the LCD screen or in the viewfinder with a subject whose brightness is about 70 IRE 70 100 The zebra pattern appears in the portion of the picture on the LCD screen or in the viewfinder with a subj...

Страница 51: ...hen press the control dial Notes on the Steady Shot function The Steady Shot function will not correct excessive camera shake If you use a tele conversion lens or a wide conversion lens the Steady Shot function may not be fully effective Shooting with manual adjustment C A M E R A S E T D Z OOM 1 6 9 W I D E S T E A D Y S H O T O F F A E S H I F T G A I N S H I F T F R A M E R E C I N T R E C R E ...

Страница 52: ...nter in step 5 then press the control dial When you adjust AE shift The 4 to 4 indicator is displayed on the LCD screen or in the viewfinder The number varies corresponding to the AE shift level Shooting with manual adjustment C A M E R A S E T D Z OOM 1 6 9 W I D E S T E A D Y S H O T A E S H I F T G A I N S H I F T F R A M E R E C I N T R E C M E N U E N D C A M E R A S E T D Z OOM 1 6 9 W I D E...

Страница 53: ...ictures with less noises in a bright condition In dark conditions the unit operates as usual When you adjust gain shift The indicator is displayed on the LCD screen or in the viewfinder C A M E R A S E T D Z OOM 1 6 9 W I D E S T E A D Y S H O T A E S H I F T G A I N S H I F T 0 d B F R A M E R E C 3 d B I N T R E C R E T U R N M E N U E N D C A M E R A S E T D Z OOM 1 6 9 W I D E S T E A D Y S H ...

Страница 54: ...r speed priority mode Selecting the shutter speed manually The exposure value changes in accordance with the selected shutter speed Sports lesson mode Capturing high speed action in sports such as golf or tennis Sunset Moon mode Recording sunset night views fireworks or neon signs Low lux mode For recording a subject in insufficient light Subject becomes bright Notes on focus setting In the Sports...

Страница 55: ...ntrol dial to select the desired aperture value As you turn the dial the F value changes between F1 6 and F11 For a smaller aperture select a higher value Gain and the shutter speed change in accordance with the selected aperture value Shutter speed priority mode Turn the control dial to select the desired shutter speed As you turn the dial shutter speed changes between 1 60 and 1 10000 DSR PD100A...

Страница 56: ...nd the focal length Lowering the F value large iris reduces the depth of field Raising the F value small iris provides a larger depth of field Zooming in telephoto position offers a smaller depth of field while the depth of field in wide angle position is greater The depth of field Shallow Deep Iris Open Low F value Close High F value Zoom Telephoto T Wide W Using the PROGRAM AE function ...

Страница 57: ...ts by adjusting the focus manually Insufficient light a Subjects with little contrast walls sky etc b Too much brightness behind the subject c Horizontal stripes d Subjects through frosted glass Subjects beyond nets etc Bright subject or subject reflecting light Shooting a stationary subject when using a tripod a b c d ...

Страница 58: ...er subject is focused automatically and you want to focus on a faraway subject To shoot with auto focusing momentarily Press PUSH AUTO The auto focus functions while you are pressing PUSH AUTO Use this button to focus on one subject and then another with smooth focusing When you release PUSH AUTO manual focusing resumes To return to the autofocus mode Slide FOCUS up to AUTO to turn off f or indica...

Страница 59: ...ess START STOP to start interval recording The interval recording indicator lights up Interval recording C A M E R A S E T I N T R E C I N T E R V A L 3 0 S E C R E C T I M E R E T U R N M E N U E N D 1 2 8 POWER OFF CAMERA MEMORY VTR MENU 6 7 C A M E R A S E T D Z OOM 1 6 9 W I D E S T E A D Y S H O T A E S H I F T G A I N S H I F T F R A M E R E C I N T R E C M E N U E N D C A M E R A S E T D Z ...

Страница 60: ...u can perform the normal recording only once To cancel the normal recording press START STOP again During the interval recording mode The INTERVAL indicator appears Notes on interval recording You cannot do interval recording with photo recording You cannot perform interval recording in the MEMORY mode There may be a discrepancy in recording time of up to 6 frames from the selected time Interval r...

Страница 61: ...rding The camcorder makes a recording for about six frames and returns to recording standby 8 Move the subject and repeat step 7 Cut recording C A M E R A S E T D Z OOM 1 6 9 W I D E S T E A D Y S H O T A E S H I F T G A I N S H I F T F R A M E R E C O F F I N T R E C O N R E T U R N M E N U E N D C A M E R A S E T D Z OOM 1 6 9 W I D E S T E A D Y S H O T A E S H I F T G A I N S H I F T F R A M E...

Страница 62: ...REC to OFF in the menu system Set the POWER switch to OFF VTR or MEMORY Notes on cut recording The last recorded cut is longer than other cuts The proper remaining tape time is not indicated if you use this function continuously Cut recording ...

Страница 63: ...LR adaptor using a microphone cable not supplied 6 Set the 48V switch to ON To use the LEVEL selector Set this selector to appropriate positions according to your conditions STD Normally set to this position ATT When the sound level to be recorded is too high This reduces the sound level GAIN When using a low sensitivity microphone or when the sound level is too low Notes When you use a wind scree...

Страница 64: ...nversion lens When the wide conversion lens is attached to the camcorder the Steady Shot function may not be fully effective To attach the wide conversion lens securely Turn the ring of the lens while lightly pressing the wide conversion lens down on the camcorder Note on the wide conversion lens hood When the hood is attached to the wide conversion lens you cannot attach a filter etc If you need ...

Страница 65: ...control dial again to complete the setting 8 When you want to stop recording the title press TITLE To superimpose the title from beginning After step 7 press START STOP to start recording To superimpose the title while you are recording After pressing START STOP to start recording start from step 1 In this case beep or melody is not heard To use the custom title When you want to use the custom tit...

Страница 66: ...When you select the title size LARGE you can choose 8 positions Notes on the title Depending on size or position of the title both of date and time or either of them is not displayed If you input 13 characters or more for a LARGE title the title is automatically reduced into a SMALL size after the position is set When the title is displayed LCD BRIGHT and microphone level indicators do not appear ...

Страница 67: ...cassette tape set to prevent accidental erasure you cannot erase the title Slide the protect tab so that the red portion is not visible Superimposing a title M E N U E R A S E O K 1 S C E N E 1 2 S C E N E 2 3 S C E N E 3 4 S C E N E 4 5 S C E N E 5 6 S C E N E 6 E X E C D E L E T E M E N U E N D 2 3 4 5 1 6 MENU CM S E T CM S E A R C H T I T L E E R A S E T I T L E D S P L T A P E T I T L E E R A...

Страница 68: ...to select SET then press the dial Making a custom title T I T L E S E T S UMM E R C A M P I N L A K E A B C D E 1 2 3 4 5 F G H I J 6 7 8 9 0 K L MN O P Q R S T U VWX Y S E T Z T I T L E E N D T I T L E S E T A B C D E 1 2 3 4 5 F G H I J 6 7 8 9 0 K L MN O P Q R S T U VWX Y S E T Z T I T L E E N D T I T L E S E T A B C D E 1 2 3 4 5 F G H I J 6 7 8 9 0 K L MN O P Q R S T U VWX Y S E T Z T I T L E...

Страница 69: ...take 5 minutes or longer to enter characters while a cassette is in the camcorder The power goes off automatically Characters you have entered remain Set the POWER switch to OFF once then to CAMERA then proceed from step 1 To erase a character In step 4 turn the control dial to select M then press the dial The last character is erased Repeat this step until all characters are deleted ...

Страница 70: ... press the dial M E N U T A P E T I T L L M A B C D E 1 2 3 4 5 F G H I J 6 7 8 9 0 K L MN O P Q R S T U VWX Y S E T Z M E N U E N D M E N U T A P E T I T L L A B C D E 1 2 3 4 5 F G H I J 6 7 8 9 0 K L MN O P Q R S T U VWX Y S E T Z M E N U E N D M E N U T A P E T I T L L A B C D E 1 2 3 4 5 F G H I J 6 7 8 9 0 K L MN O P Q R S T U VWX Y S E T Z M E N U E N D M E N U T A P E T I T L L A B C D E 1...

Страница 71: ...full If you erase the title in the cassette you can label it If you have superimposed titles in the cassette When the label is displayed up to 4 titles also appear Note on indicator displayed on the LCD screen or in the viewfinder The indicates the number of characters you can select for the label When the indicator has fewer than 10 spaces the cassette memory is full Note on the cassettes If you ...

Страница 72: ...n DVCAM format connect the camcorder to your TV using the S video connecting cable not supplied If you are going to connect the camcorder using the S video connecting cable not supplied a you do not need to connect the yellow video plug of the A V connecting cable b If your VCR or TV is a monaural type Connect only the white plug for audio on both the camcorder and the VCR or the TV If you connect...

Страница 73: ...ng playback press PICTURE EFFECT See page 40 for details on the picture effect To return to normal mode Press PICTURE EFFECT so that the indicator disappears If you turn the power off or stop playing back The picture effect is automatically canceled The picture you apply picture effects to The picture with the picture effect is not output through the DV IN OUT jack 1 PICTURE EFFECT N E G A R T ...

Страница 74: ...indicator lights up and the bars appear The still picture is stored in memory in the STILL or LUMI mode 4 Turn the control dial to adjust the effects See page 42 for details on the digital effect To return to normal mode Press DIGITAL EFFECT so that the indicator disappears If you turn the power off or stop playing back The digital effect is automatically canceled The picture you apply digital eff...

Страница 75: ...ears 6 Press or to select the date for playback Playback starts from the beginning of the selected date automatically To stop searching Press p Notes The interval of the boundaries between the dates needs more than two minutes The camcorder may not search if the beginning of the recorded date is too close to the next one The black cursor on the screen indicates the date that was selected previousl...

Страница 76: ... When the current position is b press to search towards a or press to search towards c Each time you press or the camcorder searches for the previous or next date Playback starts automatically when date changed To stop searching Press p JUL 5 1999 JUL 4 1999 DEC 31 1999 a b c 5 7 1999 4 7 1999 31 12 1999 a b c CM S E T CM S E A R C H O N T I T L E E R A S E O F F T I T L E D S P L T A P E T I T L ...

Страница 77: ... 5 Press SEARCH MODE on the Remote Commander repeatedly until the title search indicator appears 6 Press or to select the title for playback Playback starts from the scene of the selected title automatically To stop searching Press p Notes You cannot superimpose or search a title if you use a cassette tape without cassette memory The camcorder may not search if a tape has a blank portion in the be...

Страница 78: ...ress MENU to display the menu 3 Turn the control dial to select CM SEARCH in then press the dial 4 Turn the control dial to select ON then press the dial 5 Press SEARCH MODE on the Remote Commander repeatedly until the photo search indicator appears 6 Press or to select the date for playback Playback starts from the photo of the selected date automatically Illustration DSR PD100A CM S E T CM S E A...

Страница 79: ... menu 3 Turn the control dial to select CM SEARCH in then press the dial 4 Turn the control dial to select OFF then press the dial 5 Press SEARCH MODE on the Remote Commander repeatedly until the photo search indicator appears 6 Press or to select the photo for playback Each time you press or the camcorder searches for the previous or next scene Playback starts from the photo automatically To stop...

Страница 80: ... VTR 2 Press SEARCH MODE on the Remote Commander repeatedly until the photo scan indicator displayed on the LCD screen 3 Press or Each photo is displayed for about 5 seconds automatically To stop scanning Press p Searching for a photo photo search photo scan 1 2 3 SEARCH MODE P H O T O 0 0 S C A N POWER OFF CAMERA MEMORY VTR ...

Страница 81: ... is selected date n various settings SteadyShot OFF PROGRAM AE shutter speed white balance aperture value gain n no indicator When DATE is selected date n no indicator When you record a picture with adjusting the exposure to the darkest manually CLOSE appears at the position of the iris indicator on the LCD screen or in the viewfinder When bars appear A blank portion of the tape is being played ba...

Страница 82: ...pplied b Set the input selector on the VCR to LINE Notes on editing when using the A V connecting cable Press DATA CODE SEARCH MODE on the Remote Commander or DISPLAY to turn off the display indicators Otherwise the indicators will be recorded on the tape If your TV or VCR is a monaural type connect the yellow plug of the A V connecting cable for video to the TV or VCR Connect only the white or re...

Страница 83: ... the picture may jitter You can also use the camcorder as a recorder with this connection In this case DV IN indicator appears on the screen When you use the camcorder as a recorder the color balance may be incorrect on the monitor screen But this is not recorded on the tape To perform a more precise editing Use DV synchro editing function see page 84 Starting editing 1 Insert a blank tape or a ta...

Страница 84: ... 6 Turn the control dial to select DV EDITING then press the dial 7 Using the tape transport buttons locate the point where you want to start editing then press P to set the camcorder in playback pause mode 8 Press the control dial or MARK on the Remote Commander to set DV EDITING IN 9 Using the tape transport buttons locate the point where you want to end editing then press P to set the camcorder...

Страница 85: ...h DV jack the range of errors is within 5 frames The range may become wider in the following conditions The interval between DV EDITING IN and OUT is less than five seconds DV EDITING IN is set at the beginning of the tape DV synchro editing is performed repeatedly If you do not make connections with i LINK cable DV connecting cable The screen shows NOT READY and you cannot select DV EDITING Editi...

Страница 86: ... the white or red plug for audio to the TV or VCR If you connect the white plug the sound is L left signal If you connect the red plug the sound is R right signal If you are going to connect the camcorder using the S video cable not supplied a you do not need to connect the yellow video plug of the A V connecting cable b Notes If the S video plug is not provided on your TV or VCR do not connect th...

Страница 87: ...can check the recorded picture and sound by connecting the AUDIO VIDEO jack to a TV The recorded sound is not output from a speaker Check the sound by using the TV or headphones Connecting the microphone with the intelligent accessory shoe using the XLR adaptor Connection is the same as shown in page 63 Note You can check the recorded picture and sound by connecting the AUDIO VIDEO jack to a TV Th...

Страница 88: ...er or headphones Dubbing with the built in microphones No connection is necessary Adding an audio sound on a recorded tape 1 Insert your recorded tape into the camcorder 2 Set the POWER switch to VTR 3 On the camcorder locate the point where the recording should begin by pressing 0 or Then press P to set it to playback pause mode 4 Press AUDIO DUB on the Remote Commander 5 Press P on the Remote Co...

Страница 89: ...O jack Built in microphone If an i LINK cable DV connecting cable is connected to this unit You cannot add a sound to a recorded tape If you disconnect or connect a cable to the camcorder during recording The recording may stop Notes on audio dubbing A new sound cannot be recorded on a tape already recorded in the FS48K 16 bit mode 32 kHz 44 1 kHz or 48 kHz When an external microphone is not conne...

Страница 90: ... card adaptor Do not strike bend or drop the Memory Stick or PC card adaptor Do not disassemble or convert the Memory Stick or PC card adaptor Do not wet the Memory Stick or PC card adaptor Do not use or store the Memory Stick or PC card adaptor in the following areas Hot locations such as the inside of a car or the outdoors under hot weather Locations exposed to direct sunlight Humid or corrosive...

Страница 91: ... operating conditions Especially when using the memory card slot the correct remaining time may not be indicated due to increased power consumption This is not a malfunction Power supply When using a video light not supplied or similar equipment connected to the intelligent accessory shoe of the camcorder recording an image to a Memory Stick or PC card may result in a temporary power shortage in t...

Страница 92: ...r side of the connector facing the LCD panel insert the PC card adaptor or PC card until it clicks To eject the PC card adaptor or PC card Slide the MEMORY RELEASE lever in the direction of the arrow as illustrated below When the access lamp is flashing Never shake or strike the unit Do not turn the power off eject a PC card adaptor PC card or remove the battery pack Otherwise the image data break...

Страница 93: ...ails refer to READ ME on the CD ROM To eject the PC card PC card adaptor Press the eject button Notes on the connection Select the one from the two DIN connectors that matches the keyboard connector of the computer and use this connector to connect the computer When connecting the PC card parallel port adaptor not supplied and the keyboard make sure sizes of the DIN connector of the keyboard and p...

Страница 94: ...this camcorder The number of still images you can record is less than FINE The image is compressed to about 1 4 FINE FIN Use this mode when you want to record high quality images The image is compressed to about 1 6 STANDARD STD This is the standard image quality The image is compressed to about 1 10 Using the memory card slot introduction M E MO R Y S E T C O N T I N U O U S Q U A L I T Y S U P E...

Страница 95: ...bout 100 KB STANDARD About 60 KB Approximate numbers of images you can record on a Memory Stick The number of images you can record is different depending on which image quality mode you select and the complexity of the subject Memory Stick SUPER FINE SFN FINE FIN STANDARD STD 4 MB About 20 images About 39 images About 65 images 8 MB About 41 images About 78 images About 131 images 16 MB About 82 ...

Страница 96: ... E T C O N T I N U O U S Q U A L I T Y P R O T E C T S L I D E S H OW D E L E T E A L L F O RM A T M E N U E N D M E MO R Y S E T C O N T I N U O US O F F Q U A L I T Y P R O T E C T S L I D E S H OW D E L E T E A L L F O RM A T R E T U R N M E N U E N D M E MO R Y S E T C O N T I N U O U S Q U A L I T Y P R O T E C T S L I D E S H OW D E L E T E A L L F O RM A T R E A D Y R E T U R N M E N U E N ...

Страница 97: ...camcorder is not compatible with DCF standards Format Memory Stick s with this camcorder before using Memory Stick s can be used as an external memory device of personal computers in the default format However if you format Memory Stick s with your personal computer check the following Memory Stick s formatted by Windows OS computers do not have a guaranteed compatibility with this camcorder If yo...

Страница 98: ...tch to VTR 2 Press The picture recorded on the mini DVCAM tape is played back 3 Keep pressing PHOTO lightly until a picture from the mini DVCAM tape freezes CAPTURE appears on the LCD screen or in the viewfinder Recording does not start yet 4 Press PHOTO deeper The image displayed on the screen will be recorded on a Memory Stick or a PC card The recording is complete when the bar scroll indicator ...

Страница 99: ...Recording a still image from other equipment When recording the image through the DV IN OUT jack When recording the image through the AUDIO VIDEO jack You can record only from a PAL system based TV when you use this function DSR PD100AP only 1 Set the POWER switch to VTR and set DISPLAY to LCD in the menu system 2 Play back the recorded tape or turn the TV on to see the desired program 3 Follow th...

Страница 100: ...rom the mini DVCAM tape is recorded on a Memory Stick or PC card The number of still images copied is displayed END is displayed when copying is completed To cancel copying Press MENU to stop copying When the memory of the Memory Stick or PC card is full MEMORY FULL appears on the screen and the copying stops Insert another Memory Stick or PC card and repeat the procedure from step 1 1 2 POWER OFF...

Страница 101: ... remove the battery pack Otherwise the image data breakdown may occur To record all the images recorded on the mini DVCAM tape Rewind the tape all the way and start copying When you change Memory Stick s in the middle of copying The unit resumes copying from the last image recorded on the previous Memory Stick Copying still images from a mini DVCAM tape photo save ...

Страница 102: ... PC card The recording is complete when the bar scroll indicator disappears When the POWER switch is set to MEMORY The following functions do not work digital zoom more than 12x wide TV mode digital effect picture effect title When you are recording a still image You can neither turn off the power nor press PHOTO When you press the PHOTO button on the Remote Commander The camcorder immediately rec...

Страница 103: ...nuous mode a You can record from 2 to 4 pictures continuously Multi screen mode b You can record 9 still pictures continuously on a single page Note on the video flash light You cannot use the video flash light not supplied during continuous or multi screen mode a b Recording still images on Memory Stick s or PC cards memory photo recording ...

Страница 104: ...M E MO R Y S E T C O N T I N U O U S O N Q U A L I T Y P R O T E C T S L I D E S H OW D E L E T E A L L F O RM A T R E T U R N M E N U E N D M E MO R Y S E T C O N T I N U O U S O F F Q U A L I T Y P R O T E C T S L I D E S H OW D E L E T E A L L F O RM A T R E T U R N M E N U E N D M E MO R Y S E T C O N T I N U O U S O F F Q U A L I T Y O N P R O T E C T MU L T I S C R N S L I D E S H OW D E L E...

Страница 105: ...revious image press MEMORY To see the next image press MEMORY To stop memory photo playback Press MEMORY PLAY again Otherwise the image through the lens will not appear on the screen To play back recorded images on a TV screen Connect this camcorder to the TV with the supplied A V connecting cable before operation When operating memory photo playback on a TV or the LCD screen the image quality may...

Страница 106: ...images keep pressing MEMORY To display the previous 6 images keep pressing MEMORY To return to the normal playback screen single screen Press MEMORY to move the mark to the image you want to display on full screen then press MEMORY PLAY Viewing a still picture memory photo playback S F N 6 1 0 0 M V C 0 0 0 0 6 M E MO R Y P L A Y PICTURE EFFECT DIGITAL EFFECT TITLE MENU PLAY MEMORY INDEX DELETE 1 ...

Страница 107: ...er The image data recorded with this camcorder is compressed in the JPEG format If your personal computer has an application software that allows you to see JPEG images you can see images recorded on a Memory Stick or PC card on a computer screen For detailed instructions on operation refer to the operating instruction supplied with the application software Examples of recommended OS application s...

Страница 108: ... image Select OFF in step 5 then press the control dial Note Formatting erases all information on the Memory Stick or PC card including the protected image data Check the contents of the Memory Stick or PC card before formatting 2 6 MENU 3 4 5 M E MO R Y S E T C O N T I N U O U S Q U A L I T Y P R O T E C T S L I D E S H OW D E L E T E A L L F O RM A T M E N U E N D M E MO R Y S E T C O N T I N U ...

Страница 109: ...selected image is deleted To cancel deleting an image Press MEMORY in step 3 To delete an image displayed on the index screen Press MEMORY to move the indicator to the desired image and follow steps 2 and 3 Notes To delete protected image cancel their protection first Once you delete an image you cannot restore it Check the images to delete carefully before deleting them Deleting images 2 3 DELETE...

Страница 110: ...E S H OW D E L E T E A L L F O RM A T M E N U E N D M E MO R Y S E T C O N T I N U O U S Q U A L I T Y P R O T E C T S L I D E S H OW D E L E T E A L L C OM P L E T E F O RM A T R E T U R N M E N U E N D M E MO R Y S E T C O N T I N U O U S Q U A L I T Y P R O T E C T S L I D E S H OW D E L E T E A L L R E A D Y F O RM A T R E T U R N M E N U E N D M E MO R Y S E T C O N T I N U O U S Q U A L I T ...

Страница 111: ...ot operations To cancel deleting all the images on the Memory Stick or PC card Select RETURN in step 4 then press the control dial While DELETING appears Do not turn the POWER switch or press any buttons Deleting images ...

Страница 112: ...ng the tape transport buttons search a point where you want to record the desired still image Set the mini DVCAM tape to playback pause mode 3 Press r REC to set the mini DVCAM tape to recording pause mode 4 Play back the still image you want to copy 5 Press P to start recording and press P again to stop 6 If you have more to copy repeat steps 4 and 5 To stop copying in the middle Press π During c...

Страница 113: ...DISPLAY button in Standby or Recording mode You can see memory playback and the file name indicators in addition to the indicators pertinent to mini DVCAM tapes such as the time code indicator Image data modified with personal computers or shot with other equipment You may not be able to make copies of those data Copying the image recorded with the memory card slot to mini DVCAM tapes ...

Страница 114: ...l the images have been played back the display shows the first image again and the slide show ends To cancel the slide show Press MENU to stop the slide show To pause during a slide show Press MEMORY PLAY to set it in a pause To start the slide show from a particular image Select the desired image using MEMORY buttons before step 2 To view the recorded images on TV Connect this camcorder to a TV w...

Страница 115: ... of the slide show on a mini DVCAM tape If you change the Memory Stick or PC card during operation The slide show does not operate If you change the Memory Stick or PC card be sure to follow the steps again from the beginning Playing back images in a continuous loop SLIDE SHOW ...

Страница 116: ...mooth transition during audio editing Mini DVCAM and mini DV cassettes Both mini DVCAM and mini DV cassettes can be used on mini DVCAM or mini DV video equipment The recording format of picture is defined according to recorder s format as described below Recorder s format Cassette s format Recording format DVCAM DVCAM DVCAM DV DVCAM DV DVCAM DV DV DV This digital camcorder complies with DVCAM form...

Страница 117: ... the tape is to be dubbed is DVCAM formatted tape as in 1 the tape produced will be in DVCAM format as follows Audio recording mode will be unlock mode The time code format will be partly maladjusted 3 Depending on signal conditions of the source tape you may not be able to edit the tape using the DV connectors 4 Audio recording mode of the edited tape is lock mode 5 Some mini DV video equipment m...

Страница 118: ...d from the beginning to the end of the tape concerning above The same result may occur when you record using a digital video camera recorder without a cassette memory function on a tape recorded by one with the cassette memory function Tapes with cassette memory have Cassette Memory mark Sony recommends that you use a tape having mark to enjoy this camcorder fully When you play back Copyright sign...

Страница 119: ...corder with the POWER switch turned off for more than 24 hours Or install the fully charged battery pack in the camcorder and leave the camcorder with the POWER switch turned off for more than 24 hours Notes on the mini DVCAM cassette To prevent accidental erasure Slide out the protect tab on the cassette so that the red portion is visible a When affixing a label on the mini DVCAM cassette Be sure...

Страница 120: ...t the factory Set the time according to the local time in your country If you do not use the camcorder for about a year the date and time settings may be released bars may appear because the vanadium lithium battery installed in the camcorder will have been discharged In this case first charge the vanadium lithium battery then reset the date and time 1 Set the POWER switch to CAMERA 2 Press MENU t...

Страница 121: ...rn the control dial to set a time difference and press the dial The hour of clock changes in relation to a time difference which you set 5 Press MENU to erase the menu display Note on WORLD TIME If the clock is not set WORLD TIME does not work 1999 2029 2001 2000 1 5 2 3 4 O T H E R S WO R L D T I M E B E EP C OMM A N D E R D I S P L A Y R E C L A M P C O L O R B A R M E N U E N D O T H E R S WO R...

Страница 122: ...e remaining battery indicator reaches the lowest point the i indicator appears and starts flashing on the LCD screen or in the viewfinder When the i indicator on the LCD screen or in the viewfinder changes from slow flashing to rapid flashing while you are recording set the POWER switch to OFF on the camcorder and replace the battery pack Leave the tape in the camcorder to obtain a smooth transiti...

Страница 123: ... the autofocusing is working on or not While checking the condition of the camcorder the InfoLITHIUM battery pack measures the battery consumption and calculates the remaining battery power If the condition changes drastically the remaining battery indication may suddenly decrease or increase by more than 2 minutes Even if 5 to 10 minutes is indicated as the battery remaining time on the LCD scree...

Страница 124: ...harge lamp of the AC power adaptor goes off Notes on charging A brand new battery pack A brand new battery pack is not charged Before using the battery pack charge it completely Recharge the battery pack whenever you like You do not have to discharge it before recharging If you charged the battery pack fully but you did not use it for a long time it becomes discharged Then recharge the battery pac...

Страница 125: ...ses on the lens no indicator appears but the picture becomes dim Turn off the power and do not use the camcorder for about 1 hour How to prevent moisture condensation When bringing the camcorder from a cold place to a warm place put the camcorder in a plastic bag and allow it to adapt to room conditions over a period of time 1 Be sure to tightly seal the plastic bag containing the camcorder 2 Remo...

Страница 126: ...ything in the small holes on the cassette Do not open the tape protect cover or touch the tape Avoid touching or damaging the terminals To remove dust clean the terminals with a soft cloth Camcorder care When the camcorder is not to be used for a long time disconnect the power source and remove the tape Periodically turn on the power operate the camera and player sections and play back a tape for ...

Страница 127: ...op the unit While the unit is in use particularly during charging keep it away from AM receivers and video equipment because it will disturb AM reception and video operation The unit becomes warm while in use This is normal Do not place the unit in locations that are Extremely hot or cold Dusty or dirty Very humid Vibrating Note on dry batteries To avoid possible damage from battery leakage or cor...

Страница 128: ...PD100AP is a PAL system based camcorder If you want to view the playback picture on a TV it must be a PAL system based TV Check the following list NTSC system Bahama Islands Bolivia Canada Central America Chile Colombia Ecuador Jamaica Japan Korea Mexico Peru Surinam Taiwan the Philippines the U S A Venezuela etc PAL system Australia Austria Belgium Czech Republic China Denmark Finland Germany Gre...

Страница 129: ... it to CAMERA p 13 The tab on the cassette is out red m Use a new tape or slide the tab p 12 The AC power adaptor is not connected to a wall outlet mains m Connect the AC power adaptor to a wall outlet mains p 27 The battery is dead m Use a charged battery pack or the AC power adaptor p 9 27 Moisture condensation has occurred m Remove the cassette and leave the camcorder for at least 1 hour p 125 ...

Страница 130: ... Erase another title p 67 The tape is set to prevent accidental erasure m Slide the protect tab so that red portion is not visible p 12 Nothing is recorded in that position on the tape m Superimpose the title to the recorded position p 65 The tape has no cassette memory m Use a tape with cassette memory p 70 The cassette memory is full m Erase some titles p 67 The tape is set to prevent accidental...

Страница 131: ...assette memory p 77 CM SEARCH is set to OFF in the menu system m Set it to ON p 77 There is no title in the tape m Superimpose the titles p 65 The gold plated connector of the tape is dirty or dusty m Clean the gold plated connector p 119 The tape has a blank portion between the recorded portions p 118 BEEP is set to OFF in the menu system m Set it to MELODY or NORMAL P 32 Operation Symptom The ti...

Страница 132: ... Memory Stick or PC card is inserted m Format the Memory Stick or PC card The protect switch on the Memory Stick is set to LOCK position m Slide the protect switch to write The image is protected m Cancel the protect Cause and or corrective actions Remove the i LINK cable DV connecting cable and connect it again If the power of the camcorder is on for a long time it becomes warm which is not malfu...

Страница 133: ...If you press the RESET button all the settings including the date and time return to the default p 138 The input selector on the VCR is not set correctly m Set the selector to DV input position If you use another DVCAM camcorder set the power switch to VTR The camcorder is connected to DVCAM equipment of other than Sony m Operate normal editing Setting program on a blank portion of the tape is att...

Страница 134: ...r Sony dealer or local authorized Sony service facility and inform them of the five digits example E 61 10 Self diagnosis function If you are unable to resolve the problem contact your Sony dealer or local authorized Sony service facility The camcorder has a self diagnosis display This function displays the camcorder s condition with five digits a combination of a letter and figures on the LCD scr...

Страница 135: ...put 4 pin special connector Headphones Stereo minijack ø 3 5 mm MIC input Stereo minijack ø 3 5mm 0 388mV DC2 5V Input impedance 6 8 kilohms lLANC jack Stereo miniminijack ø 2 5 mm General Peak inrush current 1 Hot switching inrush current measured in accordance with European standard EN55103 1 6 3 A 230 V Power requirements 7 2 V battery insertion input 8 4 V DC IN jack Average power consumption ...

Страница 136: ...n p 11 SHUTTER SPEED button p 45 WHT BAL white balance button p 46 PROGRAM AE button p 55 EXPOSURE button p 44 Memory card slot p 90 3 2 1 8 º 9 4 7 5 6 1 EDITSEARCH buttons p 22 2 BACK LIGHT button p 38 3 FADER button p 36 4 ND FILTER button p 49 5 AUTO LOCK selector p 44 6 OPEN switch p 16 23 7 Control dial p 28 ...

Страница 137: ...s p 23 π STOP stop 0 REW rewind PLAY playback FF fast forward P PAUSE pause r REC record Focus ring p 58 Remote sensor p 143 ª Built in microphone º ª º Power zoom lever p 15 TC RESET button p 14 Viewfinder p 14 Display window p 145 FOCUS switch p 58 PUSH AUTO button p 58 ...

Страница 138: ...itch p 13 23 ZEBRA selector p 50 END SEARCH button p 22 25 ª º PICTURE EFFECT DIGITAL EFFECT TITLE MENU PLAY MEMORY INDEX DELETE ª º DISPLAY button p 23 MEMORY INDEX button p 106 MEMORY PLAY button p 105 ª PICTURE EFFECT button p 41 º DIGITAL EFFECT button p 42 MEMORY DELETE button p 109 MEMORY button p 105 109 MEMORY button p 105 109 TITLE button p 65 68 MENU button p 28 ...

Страница 139: ...the shoe Refer to the operating instruction of the accessory for further information To connect an accessory press down and push it to the end and then tighten the screw To remove an accessory loosen the screw and then press down and pull out the accessory Access lamp p 92 DC IN jack p 9 Hooks for shoulder strap p 143 ª Intelligent accessory shoe º EJECT switch p 12 PUSH button p 12 Grip strap p 2...

Страница 140: ... agreement with IEEE 1394 1995 specifications and their revisions The DV IN OUT jack is i LINK compatible Tripod receptacle p 21 Make sure that the length of the tripod screw is less than 6 5 mm 9 32 inch Otherwise you cannot attach the tripod securely and the screw may damage the camcorder Identifying the parts º ª XLR adaptor 4 MIC IN connector p 63 5 Cable holder 6 Screw p 63 MEMORY RELEASE lev...

Страница 141: ...tional information PC card adaptor and Memory Stick Identifying the parts 1 Connector p 90 2 Eject button p 92 3 Memory Stick slot p 90 2 1 3 4 6 5 4 Terminal p 90 5 Write protect switch p 90 6 Label space p 90 ...

Страница 142: ...o prepare the Remote Commander To use the Remote Commander you must insert two size AA R6 batteries Use the supplied size AA R6 batteries 1 Remove the battery cover from the Remote Commander 2 Insert both of the size AA R6 batteries with correct polarity 3 Put the battery cover back onto the Remote Commander 1 2 3 8 buttons p 75 77 78 9 Power zoom button p 15 º ZERO SET MEMORY button This button d...

Страница 143: ...ommander may not activate the camcorder Notes on the Remote Commander Keep the remote sensor away from strong light sources such as direct sunlight or illumination Otherwise the remote control may not be effective Be sure that there is no obstacle between the remote sensor on the camcorder and the Remote Commander This camcorder works in commander mode VTR 2 The commander modes 1 2 and 3 are used ...

Страница 144: ...4 ND filter indicator p 49 Video flash ready indicator p 33 Self timer indicator p 19 1 Cassette memory indicator p 118 2 Remaining battery indicator p 122 3 Zoom indicator p 15 Exposure indicator p 45 Data file name indicator p 91 4 Digital effect indicator p 43 5 PROG SCAN indicator p 35 16 9WIDE indicator p 39 6 Picture effect indicator p 41 7 White balance indicator p 46 8 Gain shift indicator...

Страница 145: ...mation 1 Remaining time in minutes indicator p 9 Tape counter p 14 Memory counter p 106 Time code indicator p 14 Identifying the parts 1 3 2 Display window 2 FULL charge indicator p 9 3 Remaining battery indicator p 9 122 ...

Страница 146: ...here are 5 to 10 minutes remaining 2 The tape is near the end The flashing is slow 3 The tape has run out The flashing becomes rapid 4 No tape has been inserted 5 The tab on the tape is out red 6 Moisture condensation has occurred p 125 7 The video heads may be contaminated p 125 8 The clock is not set When this message appears though you set the date and time the vanadium lithium battery is disch...

Страница 147: ...M type The tape has no cassette memory p 5 The file cannot be read properly The image data file is protected The flashing is slow The tape has no memory left or cannot use the memory The protect tab is set to prevent accidental erasure Warning indicators º MVC0001 ...

Страница 148: ...Title superimposition 65 Title search 77 Tripod mounting 21 VOLUME 23 A B Audio mode 31 AUTO SHTR 29 Battery release 11 BEEP 32 C Cassette memory 5 Charging battery pack 9 Charging vanadium lithium battery 119 Cleaning video heads 125 Clock set 120 Color TV system 5 128 Connection 72 82 Continuous 103 COPY INHIBIT 118 Cut recording 61 D E Data Code 81 Date search 75 DISPLAY 23 Digital zoom 16 DV c...

Отзывы: