— 40 —
DV MECHANICAL ADJUSTMENT MANUAL VII
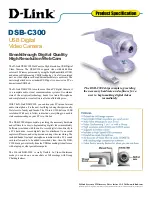
3-29.M Slider Assy (1)
1.
Removal procedure
1)
Remove an end of the tension spring (pinch)
1
from the round
hole of the M slider.
2)
Remove another end of the tension spring (pinch)
1
from the
pinch driving arm
2
.
3)
Rotate the rotary encoder in the direction of the arrow
E
, and
align the
v
mark of ratary encoder with the tooth bottom
between second and third teeth
F
. Move by hand in the
direction of the arrow
A
until the cam gear shaft and M slider
shaft match with the shaft hole of the M slider assy
3
.
4)
Push in the direction of the arrow
B
until the GL driving arm
4
gets in contact with the conversion gear shaft.
(to be continued to next items 5) through 7) on next page)
2.
Attachment procedure
(continued from the previous items 1) through 5) on next page)
6)
Move the conversion gear shaft in the direction opposite tot he
arrow mark
B
as far as it can go.
7)
Rotate the rotary encoder in the direction of the arrow
C
until
the
v
mark arrives at the position
D
.
8)
Install an end of the tension coil spring (pinch)
1
on the pinch
driving arm
2
(in the way that spring hook faces upward).
9)
Install another end of the tension coil spring (pinch)
1
on the
round hole of the M slider (in the way that spring hook faces
upward).
3
Move the M slider assy
in the direction of the arrow
A
.
C
E
D
2
Pinch driving arm
4
GL driving arm
Cam gear
shaft
Rotary encoder
Rotary encoder
Cam gear
M slider shaft
The spring hook
faces upward
Round hole
The spring hook faces upward
Conversion
gear shaft
A
B
• Confirm that the GL driving arm is in contact
with the conversion gear shaft.
• Confirm that the tension coil spring (pinch)
1
does not have any deformation, elongation and
open.
• Confirm that the spring hook of the tension coil
spring (pinch)
1
is facing upward.
1
Extension spring
(pinch)
ROTARY ENCODER
Key Points
in Re-assembling
Points to be noted
Points to be noted
F
Содержание DCR-PC350 - Digital Handycam Camcorder
Страница 3: ... 3 DCR PC350 PC350E ENGLISH JAPANESE ENGLISH JAPANESE ...
Страница 5: ... 5 DCR PC350 PC350E ENGLISH JAPANESE ENGLISH JAPANESE ...
Страница 12: ...1 6 DCR PC350 PC350E SECTION 1 SERVICE NOTE ENGLISH JAPANESE ENGLISH JAPANESE ...
Страница 13: ...1 7 DCR PC350 PC350E ENGLISH JAPANESE ENGLISH JAPANESE ...
Страница 14: ...1 8 DCR PC350 PC350E ENGLISH JAPANESE ENGLISH JAPANESE ...
Страница 15: ...1 9 DCR PC350 PC350E ENGLISH JAPANESE ENGLISH JAPANESE ...
Страница 16: ...1 10E DCR PC350 PC350E ENGLISH JAPANESE ENGLISH JAPANESE ...
Страница 72: ...5 14 5 REPAIR PARTS LIST 5 REPAIR PARTS LIST DCR PC350 PC350E J MODEL ...
Страница 79: ...ENGLISH JAPANESE ENGLISH JAPANESE ...
Страница 153: ...ENGLISH JAPANESE ENGLISH JAPANESE ...
Страница 161: ... 7 DV MECHANICAL ADJUSTMENT MANUAL VII J 1 J 2 J 3 J 4 J 5 J 6 J 7 J 8 J 9 J 10 J 11 J 12 J 13 Fig 2 2 ...
Страница 217: ...DV MECHANICAL ADJUSTMENT MANUAL VII 60 Sony EMCS Co 2003A1600 1 2003 1 Published by DI Customer Center 9 876 210 11 ...
Страница 218: ...Revision History 987621011 pdf Reverse Ver 1 0 Date 2003 01 History Official Release Contents S M Rev issued ...