background image

74

GB

On power sources

• AC power cord (mains lead) must be changed only at 

the qualified service shop.

On placement

• Place the system in a location with adequate 

ventilation to prevent heat build-up in the system.

• At high volume, over long periods of time, the cabinet 

becomes hot to the touch. This is not a malfunction. 
However, touching the cabinet should be avoided. Do 
not place the unit in a confined space where 
ventilation is poor as this may cause overheating.

• Do not block the ventilation slots by putting anything 

on the system. The system is equipped with a high 
power amplifier. If the ventilation slots are blocked, 
the unit can overheat and malfunction.

• Do not place the system on a soft surface such as a rug 

and do not block the ventilation holes.

• Do not place the system in a location near heat 

sources, or in a place subject to direct sunlight, 
excessive dust, or mechanical shock.

On operation

• If the system is brought directly from a cold to a warm 

location, or is placed in a very damp room, moisture 
may condense on the lenses inside the system. Should 
this occur, the system may not operate properly. In 
this case, remove the disc and leave the system turned 
on for about half an hour until the moisture 
evaporates.

• When you move the system, take out any disc. If you 

don’t, the disc may be damaged.

On adjusting volume

• Do not turn up the volume while listening to a section 

with very low level inputs or no audio signals. If you 
do, the speakers may be damaged when a peak level 
section is suddenly played.

On cleaning

• Clean the cabinet, panel, and controls with a soft cloth 

slightly moistened with a mild detergent solution. Do 
not use any type of abrasive pad, scouring powder or 
solvent such as alcohol or benzine.
If you have any questions or problems concerning 
your system, please consult your nearest Sony dealer.

On cleaning discs

• Do not use a commercially available CD/DVD 

cleaning disc. It may cause a malfunction.

On your TV’s color

• If the speakers should cause the TV screen to have 

color irregularity, turn off the TV then turn it on after 
15 to 30 minutes. If color irregularity should persist, 
place the speakers farther away from the set.

On moving the system

When you carry the system, use the following 
procedure to protect the inner mechanism.

1

Press FUNCTION repeatedly to select 
“DVD.”

2

Make sure that all discs are removed from 
the system.

3

Press 

x

 and 

"

/

1

 simultaneously. 

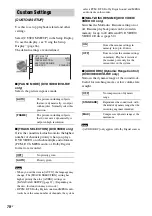
“MECHA LOCK” appears in the front panel 
display after “STANDBY.”

4

Remove the AC power cord (mains lead) 
from the wall outlet (mains).

Additional Information

Precautions

IMPORTANT NOTICE

Caution: This system is capable of holding a still 
video image or on-screen display image on your 
television screen indefinitely. If you leave the still 
video image or on-screen display image displayed 
on your TV for an extended period of time you risk 
permanent damage to your television screen. 
Projection televisions are especially susceptible to 
this.

Содержание DAV-DZ100 - Dvd Home Theater System

Страница 1: ... 2005 Sony Corporation 2 590 880 12 1 DVD Home Theatre System Operating Instructions DAV DZ100 ...

Страница 2: ...d found to comply with the limits for a Class B digital device pursuant to Part 15 of the FCC Rules These limits are designed to provide reasonable protection against harmful interference in a residential installation This equipment generates uses and can radiate radio frequency energy and if not installed and used in accordance with the instructions may cause harmful interference to radio communi...

Страница 3: ...in a place subject to direct sunlight excessive dust mechanical vibration or shock Do not install the unit in an inclined position It is designed to be operated in a horizontal position only Keep the unit and discs away from equipment with strong magnets such as microwave ovens or large loudspeakers Do not place heavy objects on the unit If the unit is brought directly from a cold to a warm locati...

Страница 4: ... A V SYNC Searching for a Particular Point on a Disc 42 Scan Slow motion Play Freeze Frame Searching for a Title Chapter Track Scene etc 43 Searching by Scene 45 Picture Navigation Viewing Information About the Disc 46 Sound Adjustments Changing the Sound 49 Enjoying Surround Sound by Using Sound Field 51 Enjoying TV or VCR Sound from All Speakers 53 Using the Sound Effect 53 Using Various Additio...

Страница 5: ...tes about the Discs 75 Troubleshooting 75 Self diagnosis Function 78 When letters numbers appear in the display Specifications 79 Glossary 80 Language Code List 83 Index to Parts and Controls 84 DVD Setup Display List 88 AMP Menu List 90 Index 91 ...

Страница 6: ...racks and JPEG image files of format conforming to ISO 9660 Level 1 Level 2 or its extended format Joliet Example of discs that the system cannot play The system cannot play the following discs CD ROMs CD Rs CD RWs other than those recorded in the formats listed on page 6 CD ROMs recorded in PHOTO CD format About This Manual Symbol Meaning Functions available for DVD VIDEOs DVD Rs DVD RWs in video...

Страница 7: ...r side However since the audio material side does not conform to the Compact Disc CD standard playback on this product is not guaranteed Note on PBC Playback Control VIDEO CDs This system conforms to Ver 1 1 and Ver 2 0 of VIDEO CD standards You can enjoy two kinds of playback depending on the disc type About Multi Session CD This system can play Multi Session CDs when an MP3 audio track is contai...

Страница 8: ...copyright protection technology that is protected by U S patents and other intellectual property rights Use of this copyright protection technology must be authorized by Macrovision and is intended for home and other limited viewing uses only unless otherwise authorized by Macrovision Reverse engineering or disassembly is prohibited This system incorporates with Dolby 1 Digital and Dolby Pro Logic...

Страница 9: ... display as follows Control Menu display The Control Menu display 1 and 2 will show different items depending on the disc type For details about each item see the pages in parentheses Guide to the Control Menu Display DISPLAY Control Menu display 1 m Control Menu display 2 appears for certain discs only m Control Menu display off continued ...

Страница 10: ...APTER page 43 INDEX page 43 Selects the chapter or index to be played TRACK page 43 Selects the track to be played ORIGINAL PLAY LIST page 34 Selects the type of titles DVD RW to be played the ORIGINAL one or an edited PLAY LIST TIME TEXT page 44 Checks the elapsed time and the remaining playback time Input the time code for picture and music searching Displays the DVD CD text or the MP3 track nam...

Страница 11: ...66 QUICK Setup page 26 Use Quick Setup to choose the desired language of the on screen display the aspect ratio of the TV and the size of the speakers you are using CUSTOM Setup In addition to the Quick Setup setting you can adjust various other settings RESET Returns the settings in SETUP to the default setting ALBUM page 43 Selects the album to be played FILE page 43 Selects the JPEG image file ...

Страница 12: ...6 batteries by matching the 3 and ends on the batteries to the markings inside the compartment When using the remote point it at the remote sensor on the system Do not leave the remote in an extremely hot or humid place Do not use a new battery with an old one Do not drop any foreign object into the remote casing particularly when replacing the batteries Do not expose the remote sensor to direct l...

Страница 13: ...okup page 24 Step 5 Connecting the AC Power Cord Mains Lead page 25 Step 6 Turning off the Demonstration page 25 Step 7 Performing the Quick Setup page 26 Video signal is sent to the TV and is output from the TV screen audio signals are processed by this system and output from the speakers of this system You can also enjoy sound of other sources such as TV programs in addition to DVDs or CDs Hooku...

Страница 14: ... speakers other than those supplied with this system To obtain the best possible surround sound specify the speaker parameters distance level etc on page 71 Required cords Speaker cords The connector and the color tube of the speaker cords are the same color as the label of the jacks to be connected Step 1 Speaker System Hookup Color tube Black Gray ...

Страница 15: ...that are attached with the speakers on a specially treated waxed oiled polished etc floor as staining or discoloration may result Do not use any type of abrasive pad scouring powder or solvent such as alcohol or benzine Note SPEAKER COAXIAL FM 75 Y R L AUDIO IN PB CB PR CR DVD ONLY COMPONENT VIDEO OUT VIDEO SAT AM VIDEO S VIDEO DVD ONLY MONITOR OUT FRONT R FRONT L SURR R SURR L CENTER WOOFER Front...

Страница 16: ...speakers are connected correctly For details on outputting a test tone see page 72 If no sound is heard from a speaker while outputting a test tone or a test tone is output from a speaker other than the one currently displayed on the Setup Display the speaker may be short circuited If this happens check the speaker connection again Be sure to match the speaker cord to the appropriate terminal on t...

Страница 17: ... beam and fasten them to the wall Install the speakers on a vertical and flat wall where reinforcement is applied Contact a screw shop or installer regarding the wall material or screws to be used Sony is not responsible for accident or damage caused by improper installation insufficient wall strength or improper screw installation natural calamity etc Note 5 to 7 mm 7 32 to 9 32 inch 4 6 mm 3 16 ...

Страница 18: ...necting the FM wire antenna aerial keep it as horizontal as possible When you connect the supplied AM loop antenna aerial cord A or cord B can be connected to either terminal If you have poor FM reception use a 75 ohms coaxial cable not supplied to connect the system to an outdoor FM antenna aerial as shown below Step 2 Antenna Aerial Hookup Note Tip AM loop antenna aerial FM wire antenna aerial A...

Страница 19: ...B To connect to a TV with the S VIDEO IN jack Connect an S video cord not supplied When using the S video jack instead of the video jacks your TV monitor must also be connected via an S video jack S video signals are on a separate bus from the video signals and will not be output through the video jacks Step 3 TV Hookup Y PB CB PR CR VIDEO IN S VIDEO IN SPEAKER COAXIAL FM 75 Y R L AUDIO IN PB CB P...

Страница 20: ...rogressive is the method for displaying TV images which reduces flickering and sharpens the image To display using this method you need to connect to a TV that accepts progressive signals P AUTO or P VIDEO appears in the front panel display when the system outputs progressive signals 1 Press FUNCTION repeatedly to select DVD 2 Press PROGRESSIVE Each time you press PROGRESSIVE the display changes a...

Страница 21: ...d the conversion method DVD software can be divided into 2 types film based software and video based software Video based software is derived from TV such as dramas and sit coms and displays images at 30 frames 60 fields per second Film based software is derived from film and displays images at 24 frames per second Some DVD software contains both video and film In order for these images to appear ...

Страница 22: ...NCTION For details see page 53 When you want to output the TV sound or stereo sound of a 2 channel source from the 6 speakers select the Dolby Pro Logic Dolby Pro Logic II MOVIE or Dolby Pro Logic II MUSIC sound field page 51 When you select the NIGHT sound field page 51 the sound is output from the front speakers only To change the color system PAL or NTSC Asian Australian and Middle Eastern mode...

Страница 23: ...tem by pressing 1 while pressing X on the system You need to hold X until the set powers on To reset to NTSC turn off the system and then turn on again by pressing 1 while pressing and holding X on the system If the color system of the TV is NTSC Do the same operation above to set the system to NTSC from PAL ...

Страница 24: ...g a cord be sure to match the color coded sleeves to the appropriate jacks on the components Be sure to make connections securely to avoid hum and noise If using the VIDEO SAT jacks distorts the sound change the attenuate setting page 62 When you connect a VCR or digital satellite receiver to the VIDEO SAT jacks of this system change the function by pressing FUNCTION repeatedly to select VIDEO or ...

Страница 25: ...ote the demonstration turns off When you press 1 on the system the demonstration does not turn off When you set the demonstration mode in the AMP menu to on the demonstration does not turn off even though you press 1 on the remote To turn off the demonstration set the demonstration mode to off then press 1 on the remote Setting the demonstration mode on off 1 Press AMP MENU 2 Press X x repeatedly ...

Страница 26: ...5 Press X x to select a language The system displays the menu and subtitles in the selected language The selectable language is different depending on the area 6 Press ENTER The Setup Display for selecting the aspect ratio of the TV to be connected appears 7 Press X x to select the setting that matches your TV type x If you have a 4 3 standard TV 4 3 LETTER BOX or 4 3 PAN SCAN page 68 x If you hav...

Страница 27: ... DISPLAY in any Step If you want to change each setting see Using the Setup Display page 66 To recall the Quick Setup display 1 Press DISPLAY when the system is in stop mode The Control Menu appears 2 Press X x to select SETUP then press ENTER The options for SETUP appear 3 Press X x to select QUICK then press ENTER The Quick Setup display appears Note Note SPEAKER SETUP TEST TONE LEVEL FRONT LEVE...

Страница 28: ... from the listening position than the front speakers If you encounter color irregularity on a nearby TV screen The front and center speakers and the subwoofer are magnetically shielded to allow it to be installed near a TV set However color irregularities may still be observed on certain types of TV sets As the surround speakers are not magnetically shielded we recommend that you place the surroun...

Страница 29: ...appear on the TV screen You can play the disc interactively by following the instructions on the menu DVD page 33 VIDEO CD page 34 To save the power in standby mode Press 1 while the system turns on To cancel standby mode press 1 once Additional operations Playing Discs Playing Discs 1 FUNCTION Adjust the volume H Disc tray A 1 FUNCTION x H X MUTING VOLUME REPEAT X x c ENTER DISPLAY ALBUM Note Tip...

Страница 30: ... Setup Display you change the function by pressing FUNCTION you disconnect the AC power cord mains lead For DVD RWs in VR mode CDs and DATA CDs the system remembers the resume playback point for the current disc The resume point is cleared when you eject the disc the system enters standby mode DATA CD only Resume Play does not work during Program Play and Shuffle Play This function may not work wi...

Страница 31: ...l play Press CLEAR or select OFF in Step 2 To play the same program again select ON in Step 3 and press ENTER To turn off the Control Menu Press DISPLAY repeatedly until the Control Menu is turned off To change or cancel a program 1 Follow steps 1 to 3 of Creating your own program Program Play 2 Select the program number of the track you want to change or cancel using X x If you want to delete the...

Страница 32: ... Press ENTER Shuffle Play starts To return to normal play Press CLEAR or select OFF in Step 2 To turn off the Control Menu Press DISPLAY repeatedly until the Control Menu is turned off You can set Shuffle Play while the system is stopped After selecting the SHUFFLE option press H Shuffle Play starts You cannot use this function with VIDEO CDs and Super VCDs with PBC playback Playing repeatedly Rep...

Страница 33: ... You cannot use this function with VIDEO CDs and Super VCDs with PBC playback When playing a DATA CD which contains MP3 audio track and JPEG image files and their playing time are not the same the audio sound will not match the image When MODE MP3 JPEG is set to IMAGE JPEG page 39 you cannot select TRACK A DVD is divided into a lot of sections which make up a picture or music feature These section...

Страница 34: ...ch functions and other such operations PBC playback allows you to play VIDEO CDs interactively by following the menu on the TV screen 1 Start playing a VIDEO CD with PBC functions The menu for your selection appears 2 Select the item number you want by the number buttons 3 Press ENTER 4 Follow the instructions in the menu for interactive operations Refer to the operation details supplied with the ...

Страница 35: ...tracks or files You can also play discs recorded in Multi Session See the instructions supplied with the CD R CD RW drives and the recording software not supplied for details on the recording format About the multi session disc If MP3 audio tracks or JPEG image files are recorded in the first session the system will also play MP3 audio tracks or JPEG image files in other sessions If audio tracks a...

Страница 36: ...e 37 the album names are arranged in the following order A t B t C t D t F t G Albums that do not contain tracks or files such as album E do not appear in the list If you add numbers 01 02 03 etc to the front of the track file names when you store the tracks or files in a disc the tracks and files will be played in that order Since a disc with many trees takes longer to start playback it is recomm...

Страница 37: ...ng to press after the last track on the first album but that you cannot return to the previous album by pressing To return to the previous album select the album from the album list To play the next or previous JPEG image file Press C c when the Control Menu is not displayed Note that you can select the next album by continuing to press c after the last image on the first album but that you cannot...

Страница 38: ...bum and press PICTURE NAVI Images of files in the album appear in 16 subscreens 3 Press C X x c to select the image you want to view and press ENTER To play the next or previous JPEG image file Press C c when the Control Menu is not displayed Note that you can select the next album by continuing to press c after the last image on the first album but that you cannot return to the previous album by ...

Страница 39: ...top image and press X You can also change the slide show duration page 40 and effect page 41 while playing JPEG image file You can play a slide show with sound by first placing both MP3 and JPEG files in the same album on a DATA CD When you play back the DATA CD select AUTO mode as explained below 1 Load a DATA CD 2 Press DISPLAY The Control Menu appears 3 Press X x to select MODE MP3 JPEG then pr...

Страница 40: ...o tracks and JPEG image files in the DATA CD the No audio data and No image data messages appear on the screen If you set MODE MP3 JPEG to IMAGE JPEG on a disc that contains MP3 tracks only or AUDIO MP3 on a disc that contains JPEG files only you may not able to change the MODE MP3 JPEG setting PICTURE NAVI does not work when AUDIO MP3 is selected If you play large MP3 track data and JPEG image da...

Страница 41: ...domly cycle through the effects MODE5 The next image slides over the previous image OFF Turns off this function 4 Press ENTER The selected setting takes effect When the sound does not match the pictures on the screen you can adjust the delay between the picture and sound 1 Press DISPLAY in stop mode The Control Menu appears 2 Press X x to select A V SYNC then press ENTER The options for A V SYNC a...

Страница 42: ...k speed is faster than 1M 1m Watching frame by frame Slow motion Play DVD DVD RW VIDEO CD only Press m or M when the system is in pause mode To return to the normal playback speed press H Each time you press m or M during Slow motion Play the playback speed changes Two speeds are available With each press the indication changes as follows Playback direction 2 y 1 Opposite direction DVD VIDEO only ...

Страница 43: ...er Or you can search for a scene using the time code 1 Press DISPLAY When playing a DATA CD with JPEG image files press DISPLAY twice The Control Menu appears 2 Press X x to select the search method x When playing a DVD VIDEO DVD RW TITLE CHAPTER TIME TEXT Select TIME TEXT to search for a starting point by inputting the time code x When playing a VIDEO CD Super VCD without PBC Playback TRACK INDEX...

Страница 44: ... 5 Press ENTER The system starts playback from the selected number To search for a scene using the time code DVD VIDEO only 1 In Step 2 select TIME TEXT T playing time of the current title is selected 2 Press ENTER T changes to T 3 Input the time code using the number buttons then press ENTER For example to find the scene at 2 hours 10 minutes and 20 seconds after the beginning just enter 2 10 20 ...

Страница 45: ...of each title chapter or track appears as follows 4 Press C X x c to select a title chapter or track and press ENTER Playback starts from the selected scene To return to normal play during setting Press O RETURN or DISPLAY If there are more than 9 titles chapters or tracks V is displayed at the bottom right of the screen To display the additional titles chapters or tracks select the bottom scenes ...

Страница 46: ...s or CD When playing an MP3 ViewingInformationAbout the Disc DISPLAY DISPLAY t Playing time and number of the current title r Remaining time of the current title r Playing time and number of the current chapter r Remaining time of the current chapter r Disc name r Title and chapter r The display returns to the top image after 2 seconds t Playing time of the current track r Remaining time of the cu...

Страница 47: ... you can check the frequency using the front panel display Press DISPLAY Each time you press DISPLAY the display changes as shown in the charts 1 This is displayed if you have entered a name for a preset station page 63 2 Returns to the original display when several seconds has elapsed Checking the Playing Time and Remaining Time You can check the playing time and remaining time of the current tit...

Страница 48: ...lay the name of the album track and the audio bit rate the amount of data per second of the current audio on your TV screen Appears when playing an MP3 audio track on DATA CDs Checking the date information JPEG only You can check the date information during playback when the Exif tag is recorded in the JPEG image data Press DISPLAY twice during playback The Control Menu appears Exchangeable Image ...

Страница 49: ...ode represents When the same language is displayed two or more times the DVD VIDEO is recorded in multiple audio formats x When playing a DVD RW The types of sound tracks recorded on a disc are displayed The default setting is underlined Example 1 MAIN main sound 1 SUB sub sound 1 MAIN SUB main and sub sound 2 MAIN 2 SUB 2 MAIN SUB 2 MAIN 2 SUB and 2 MAIN SUB do not appear when one audio stream is...

Страница 50: ...t audio signals Audio signals recorded in a disc contain the sound elements channels shown below Each channel is output from a separate speaker Front L Front R Center Surround L Surround R Surround Monaural This signal can be either the Dolby Surround Sound processed signals or the Dolby Digital sound s monaural Surround audio signals LFE Low Frequency Effect signal Note L R C LFE LS RS 1 ENGLISH ...

Страница 51: ...ces completely bypass the sound field processing Multi channel surround formats are downmixed to two channels This allows you to play any source using only the front left and right speakers and subwoofer Outputting 2 channel sources like CDs by 5 1channel x Dolby Pro Logic Dolby Pro Logic produces five output channels from 2 channel sources This mode performs Pro Logic decoding to the input signal...

Страница 52: ...s and surround speakers simultaneously The sound that is output from the surround speakers is same as the sound that is output from the front speakers When you select MULTI ST LINK lights up in the front panel display Selecting a sound field for music x ROCK POP JAZZ CLASSIC The each mode provided sound to suit the source Enjoying the sound at low volume x NIGHT You can enjoy sound effects or dial...

Страница 53: ...l display When you want to output the TV sound or stereo sound of a 2 channel source from the 6 speakers select the Dolby Pro Logic Dolby Pro Logic II MOVIE or Dolby Pro Logic II MUSIC sound field When you select the NIGHT sound field page 51 the sound is output from the front speakers only Reinforcing bass frequencies You can reinforce bass frequencies Press DSGX Bass frequencies are effectively ...

Страница 54: ...D VIDEO If subtitles are recorded on a disc you can turn the subtitles on or off while playing If multilingual subtitles are recorded on the disc you can change the subtitle language while playing or turn the subtitles on or off whenever you want You can select a language you are learning for example and turn on the subtitles for better understanding Press SUBTITLE during playback Each time you pr...

Страница 55: ...yback 2 Press DISPLAY while the system is in stop mode The Control Menu appears 3 Press X x to select PARENTAL CONTROL then press ENTER The options for PARENTAL CONTROL appear 4 Press X x to select ON t then press ENTER x If you have not entered a password The display for registering a new password appears Enter a 4 digit password using the number buttons then press ENTER The display for confirmin...

Страница 56: ...a predetermined level such as the age of the users The PARENTAL CONTROL function allows you to set a playback limitation level 1 Press DISPLAY while the system is in stop mode The Control Menu appears 2 Press X x to select PARENTAL CONTROL then press ENTER The options for PARENTAL CONTROL appear 3 Press X x to select PLAYER t then press ENTER x If you have not entered a password The display for re...

Страница 57: ... playback If you forget your password remove the disc and repeat steps 1 to 3 of Preventing playback of specific discs CUSTOM PARENTAL CONTROL When you are asked to enter your password enter 199703 using the number buttons then press ENTER The display will ask you to enter a new 4 digit password After you enter a new 4 digit password replace the disc in the system and press H When the display for ...

Страница 58: ... confirm your password re enter it using the number buttons then press ENTER If you make a mistake entering your password Press C before you press ENTER and input the correct number Standard Code number Argentina 2044 Australia 2047 Austria 2046 Belgium 2057 Brazil 2070 Canada 2079 Chile 2090 China 2092 Denmark 2115 Finland 2165 France 2174 Germany 2109 India 2248 Indonesia 2238 Italy 2254 Japan 2...

Страница 59: ...ing on the TV you may not be able to control your TV or to use some of the buttons above Other Operations Controlling the TV with the Supplied Remote By pressing You can TV 1 Turn the TV on or off TV VIDEO Switch the TV s input source between the TV and other input sources TV VOL while pressing the TV button Adjust the TV volume TV CH while pressing the TV button Select the TV channel Number butto...

Страница 60: ...e THEATRE SYNC function Point the remote to the direction of TV and this system then press THEATRE SYNC once If this function does not work change the transmit time The transmit time varies depending on the TV To change the transmit time Press and hold TV CH while entering the code for transmit time see the table using the number buttons The transmit time from the remote is selected Using the THEA...

Страница 61: ...connected to the VIDEO SAT jacks on the rear panel Refer to the operation manual supplied with the components for further information on the operation Press FUNCTION repeatedly until VIDEO or SAT appears in the front panel display Each time you press FUNCTION the mode of the system changes in the following sequence When ATTENUATE is set to ATT OFF DVD t TUNER FM t TUNER AM t VIDEO t DVD t When ATT...

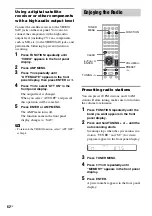
Страница 62: ...FF and press x this operation will be canceled 5 Press ENTER or AMP MENU The AMP menu turns off The function name in the front panel display changes to SAT To return to the VIDEO function select ATT OFF at Step 4 Presetting radio stations You can preset 20 FM stations and 10 AM stations Before tuning make sure to turn down the volume to minimum 1 Press FUNCTION repeatedly until the band you want a...

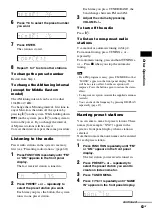
Страница 63: ...R BAND the band changes between FM and AM 3 Adjust the volume by pressing VOLUME To turn off the radio Press 1 To listen to non preset radio stations Use manual or automatic tuning in Step 2 For manual tuning press TUNING or repeatedly For automatic tuning press and hold TUNING or Press x when you stop the automatic tuning If an FM program is noisy press FM MODE so that MONO appears in the front p...

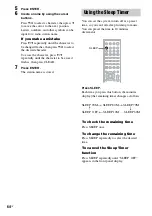
Страница 64: ...es then press CLEAR 7 Press ENTER The station name is stored You can set the system to turn off at a preset time so you can fall asleep listening to music You can preset the time in 10 minutes decrements Press SLEEP Each time you press this button the minutes display the remaining time changes as follows To check the remaining time Press SLEEP once To change the remaining time Press SLEEP repeated...

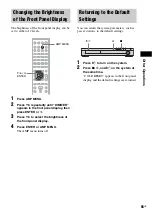
Страница 65: ...ess of the front panel display 4 Press ENTER or AMP MENU The AMP menu turns off You can return the system parameters such as preset stations to the default settings 1 Press 1 to turn on the system 2 Press x A and 1 on the system at the same time COLD RESET appears in the front panel display and the default settings are returned Changing the Brightness of the Front Panel Display AMP MENU X x c ENTE...

Страница 66: ...isplay appears 4 Press X x to select the setup item from the displayed list LANGUAGE SETUP SCREEN SETUP CUSTOM SETUP or SPEAKER SETUP Then press ENTER The Setup item is selected Example SCREEN SETUP 5 Select an item using X x then press ENTER The options for the selected item appear Example TV TYPE 6 Select a setting using X x then press ENTER The setting is selected and setup is complete Settings...

Страница 67: ...EO only You can select the desired language for the disc s menu x AUDIO DVD VIDEO only Switches the language of the sound track When you select ORIGINAL the language given priority in the disc is selected x SUBTITLE DVD VIDEO only Switches the language of the subtitle recorded on the DVD VIDEO When you select AUDIO FOLLOW the language for the subtitles changes according to the language you selecte...

Страница 68: ...e than 15 minutes The screen saver will help prevent your display device from becoming damaged ghosting Press H to turn off the screen saver Settings for the Display SCREEN SETUP 4 3 LETTER BOX Select this when you connect a 4 3 screen TV Displays a wide picture with bands on the upper and lower portions of the screen 4 3 PAN SCAN Select this when you connect a 4 3 screen TV Automatically displays...

Страница 69: ...e TV change the setting on your TV not the system This setting is effective only when P AUTO PROGRESSIVE AUTO or P VIDEO PROGRESSIVE VIDEO is selected by using PROGRESSIVE page 20 JACKET PICTURE The jacket picture still picture appears but only when the jacket picture is already recorded on the disc CD EXTRA etc If the disc does not contain a jacket picture the GRAPHICS picture appears GRAPHICS A ...

Страница 70: ...witches the Multi disc Resume setting on or off Resume playback point can be stored in memory for up to 40 different DVD VIDEO VIDEO CD discs page 30 x AUDIO DRC Dynamic Range Control DVD VIDEO DVD RW only Narrows the dynamic range of the sound track Useful for watching movies at low volume late at night AUDIO DRC only applies to Dolby Digital sources Custom Settings CUSTOM SETUP AUTO The picture ...

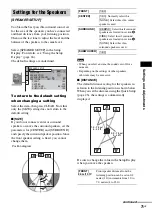
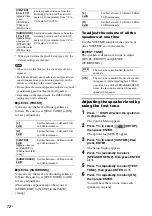
Страница 71: ... a moment Depending on the settings of other speakers subwoofer may be excessive x DISTANCE The default distance setting for the speakers in relation to the listening position is shown below When you set the distance using the Quick Setup page 26 the settings is automatically displayed Be sure to change the value in the Setup Display when you move the speakers Settings for the Speakers SPEAKER SET...

Страница 72: ...ear 3 Press X x to select CUSTOM then press ENTER The Setup Display appears 4 Press X x repeatedly to select SPEAKER SETUP then press ENTER or c 5 Press X x repeatedly to select TEST TONE then press ENTER or c 6 Press X x repeatedly to select ON then press ENTER You will hear the test tone from each speaker in sequence CENTER 3 0 m 10 ft appears when you set CENTER to YES in the SIZE setting Cente...

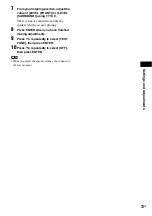
Страница 73: ...X x c The test tone is emitted from only the speaker which you are adjusting 8 Press ENTER when you have finished making adjustments 9 Press X x repeatedly to select TEST TONE then press ENTER 10Press X x repeatedly to select OFF then press ENTER When you adjust the speaker settings the sound cuts off for a moment Note ...

Страница 74: ...ening to a section with very low level inputs or no audio signals If you do the speakers may be damaged when a peak level section is suddenly played On cleaning Clean the cabinet panel and controls with a soft cloth slightly moistened with a mild detergent solution Do not use any type of abrasive pad scouring powder or solvent such as alcohol or benzine If you have any questions or problems concer...

Страница 75: ...appears alternately in the front panel display Immediately unplug the AC power cord mains lead and check the following items Are the and speaker cords short circuited Are you using only the specified speakers Is anything blocking the ventilation holes of the system After checking the above items and fixing any problems connect the AC power cord mains lead again and turn on the system If the cause ...

Страница 76: ...er connections and settings page 14 71 Depending on the DVD the output signal may not be the entire 5 1 channel It may be monaural or stereo even if the sound track is recorded in Dolby Digital or MPEG audio format The sound comes from the center speaker only Depending on the disc the sound may come from the center speaker only No sound is heard from the center speaker Check the speaker connection...

Страница 77: ...been selected During stop press x on the system or the remote and then start playback page 30 The title DVD or PBC menu automatically appears on the TV screen The system starts playing the disc automatically The DVD features an auto playback function Playback stops automatically Some discs may contain an auto pause signal While playing such a disc the system stops playback at the auto pause signal...

Страница 78: ... this case check the following table Self diagnosis Function When letters numbers appear in the display First 3 characters of the service number Cause and or corrective action C 13 The disc is dirty Clean the disc with a soft cloth page 75 C 31 The disc is not inserted correctly Restart the system then re insert the disc correctly E XX xx is a number To prevent a malfunction the system has perform...

Страница 79: ... format system North American Latin and Mexican models NTSC Other models NTSC PAL Frequency response at 2 CH STEREO mode DVD PCM 2 Hz to 22 kHz 1 0 dB CD 2 Hz to 20 kHz 1 0 dB Tuner section System PLL quartz locked digital synthesizer system FM tuner section Tuning range North American model 87 5 108 0 MHz 100 kHz step Other models 87 5 108 0 MHz 50 kHz step Antenna aerial FM wire antenna aerial A...

Страница 80: ... title on a DVD A title is composed of several chapters Dolby Digital This movie theater sound format for is more advanced than Dolby Surround Pro Logic In this format the surround speakers output stereo sound with an expanded frequency range and a subwoofer channel for deep bass is independently provided This format is also called 5 1 with the subwoofer channel designed as the 0 1 channel since i...

Страница 81: ...O The DVD RW has two different modes VR mode and Video mode DVD RWs created in Video mode have the same format as a DVD VIDEO while discs created in VR Video Recording mode allow the contents to be programmed or edited DVD RW A DVD RW plus RW is a recordable and rewritable disc DVD RWs use a recording format that is comparable to the DVD VIDEO format File A JPEG image recorded on a DATA CD File is...

Страница 82: ...creens moving pictures and still pictures are divided into sections called scenes Title The longest section of a picture or music feature on a DVD movie etc in video software or the entire album in audio software Track Section of a picture or a music piece on a VIDEO CD CD or MP3 An album is composed of several tracks MP3 only VIDEO CD A compact disc that contains moving pictures The picture data ...

Страница 83: ...russian 1059 Bulgarian 1060 Bihari 1061 Bislama 1066 Bengali Bangla 1067 Tibetan 1070 Breton 1079 Catalan 1093 Corsican 1097 Czech 1103 Welsh 1105 Danish 1109 German 1130 Bhutani 1142 Greek 1144 English 1145 Esperanto 1149 Spanish 1150 Estonian 1151 Basque 1157 Persian 1165 Finnish 1166 Fiji 1171 Faroese 1174 French 1181 Frisian 1183 Irish 1186 Scots Gaelic 1194 Galician 1196 Guarani 1203 Gujarati...

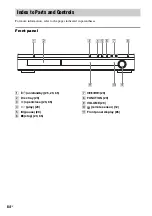
Страница 84: ...ges indicated in parentheses Front panel A 1 on standby 25 29 65 B Disc tray 29 C A open close 29 65 D H play 29 E X pause 29 F x stop 29 65 G 29 H FUNCTION 29 I VOLUME 29 J remote sensor 12 K Front panel display 85 Index to Parts and Controls ...

Страница 85: ...ghts up when the time information of a title or chapter appears in the front panel display DVD only C Monaural Stereo effect Radio only 63 D Lights up when 2 channel source is output from the surround speakers 52 E Current sound effect 53 F Current surround format Except for JPEG 50 G Current mode DVD function only H Playing status DVD function only ...

Страница 86: ...PONENT VIDEO OUT jacks 19 D MONITOR OUT VIDEO S VIDEO jacks 19 E AM terminal 18 F FM 75Ω COAXIAL jack 18 SPEAKER COAXIAL FM 75 Y R L AUDIO IN PB CB PR CR DVD ONLY COMPONENT VIDEO OUT VIDEO SAT AM VIDEO S VIDEO DVD ONLY MONITOR OUT FRONT R FRONT L SURR R SURR L CENTER WOOFER ...

Страница 87: ... m SLOW TUNING 42 62 P H play 29 The H button has a tactile dot Q TV 59 R THEATRE SYNC 60 S 1 on standby 25 29 63 T AMP MENU 25 61 65 U DSGX 53 V FUNCTION 20 29 53 61 W SOUND FIELD 51 X DISPLAY 63 Y PICTURE NAVI 38 wh AUDIO 49 wj SUBTITLE 54 wk ANGLE 54 wl ALBUM 29 60 e MENU 33 ea MUTING 29 es VOLUME TV VOL 29 59 63 The VOLUME TV VOL button has a tactile dot ed DISPLAY 9 26 31 55 66 ef PRESET TV C...

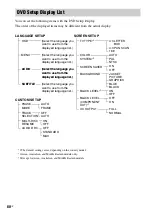
Страница 88: ...want to use from the displayed language list SCREEN SETUP TV TYPE 1 SCREEN SAVER BACKGROUND 16 9 4 3 LETTER 4 3 PAN SCAN ON OFF PICTURE BLUE BLACK JACKET CUSTOM SETUP TRACK SELECTION AUTO BOX MULTI DISC RESUME ON OFF GRAPHICS PAUSE MODE AUTO FRAME SUBTITLE Select the language you want to use from the displayed language list AUDIO OFF BLACK LEVEL 3 ON OFF BLACK LEVEL COMPONENT OUT 3 OFF ON 4 3 OUTP...

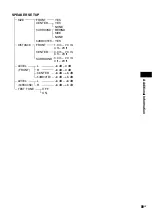
Страница 89: ...URROUND YES YES NONE BEHIND SUBWOOFER YES FRONT 1 0 m 7 0 m 4 ft 23 ft CENTER SURROUND LEVEL FRONT L CENTER 6 dB 6 dB TEST TONE OFF ON R 6 dB 0 dB SIDE NONE SUBWOOFER 6 dB 6 dB LEVEL SURROUND L 6 dB 6 dB R 6 dB 6 dB 6 dB 0 dB 0 0 m 7 0 m 0 ft 23 ft 0 0 m 7 0 m 0 ft 23 ft ...

Страница 90: ...90GB You can set the following items with AMP MENU on the remote AMP Menu List AMP menu DIMMER ATTENUATE DIMMER ON DIMMER OFF ATT ON ATT OFF DEMO DEMO ON DEMO OFF ...

Страница 91: ...software 81 Front Panel 84 Front panel display 46 85 H Handling discs 75 Hookup Overview 13 I INDEX 43 Installing the speakers on the wall 16 Instant Advance 29 Instant Replay 29 Interlace format 81 INTERVAL 40 J JPEG 35 37 L Language Code List 83 LANGUAGE SETUP 67 LEVEL FRONT 72 LEVEL SURROUND 72 Listening to other components 61 Listening to TV sound 53 Locating a specific point by watching the T...

Страница 92: ...w motion play 42 Sound Field 51 SPEAKER SETUP 71 Speaker setup 28 Speaker System Hookup 14 SUBTITLE 54 67 T TEST TONE 72 THEATRE SYNC 60 TIME TEXT 44 TITLE 43 Title 82 TRACK 43 Track 82 TRACK SELECTION 70 Troubleshooting 75 TUNER MENU 62 TV Hookup 19 TV TYPE 68 U Usable discs 6 V VIDEO CD 82 Sony Corporation Printed in China ...

Отзывы: