background image

7

US

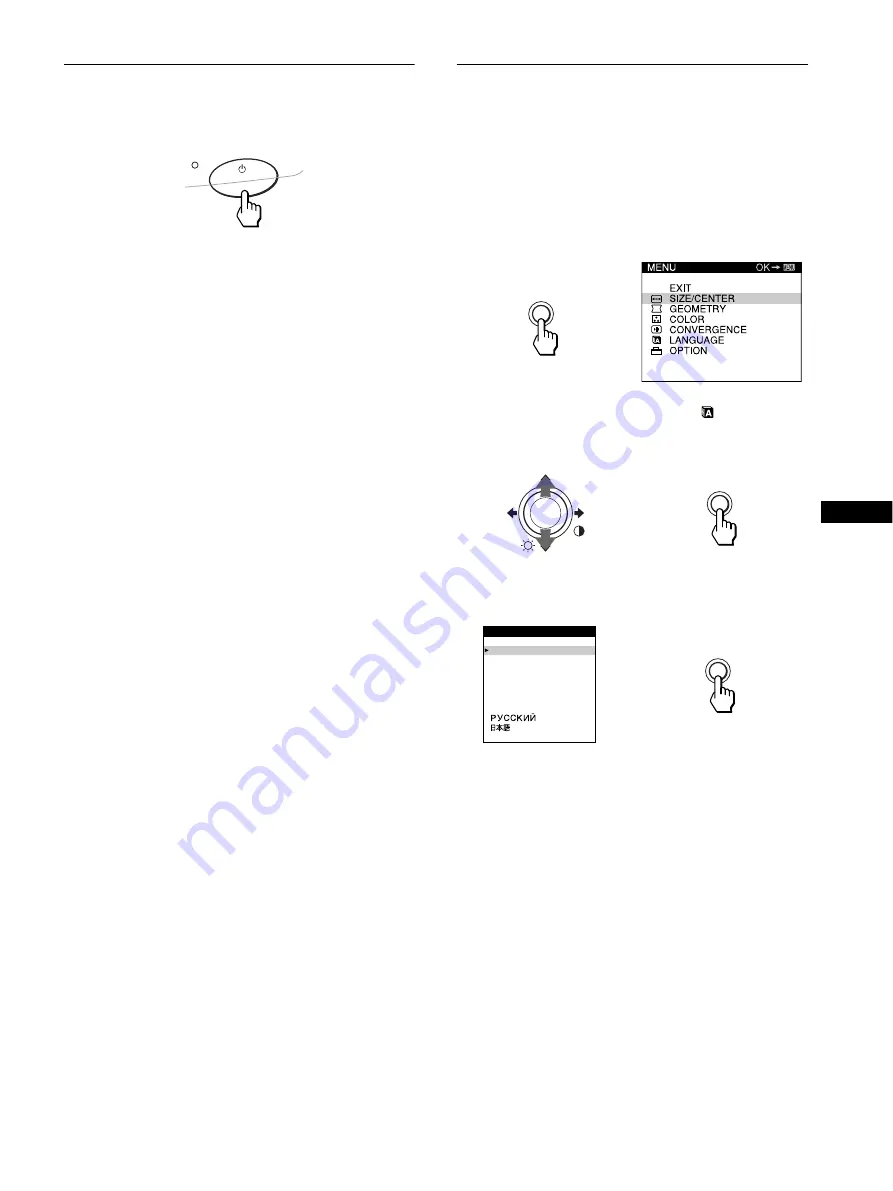
Step 3: Turn on the monitor and 

computer

First turn on the monitor, then turn on the computer.

The installation of your monitor is complete.
If necessary, use the monitor’s controls to adjust the picture.

If no picture appears on your screen

• Check that the monitor is correctly connected to the computer.
• If NO INPUT SIGNAL appears on the screen, confirm that the 

video signal cable is properly connected and all plugs are firmly 
seated in their sockets.

• If MONITOR IS IN POWER SAVE MODE appeared on the 

screen, try pressing any key on the computer keyboard.

• If you are replacing an old monitor with this model and OUT 

OF SCAN RANGE appears on the screen, reconnect the old 
monitor. Then adjust the computer’s graphic board so that the 
horizontal frequency is between 30 – 85 kHz, and the vertical 
frequency is between 48 – 170 Hz.

For more information about the on-screen messages, see “Trouble 
symptoms and remedies” on page 13.

Setup on Various OS (Operating System)

This monitor complies with the “DDC” Plug & Play standard and 
automatically detects all the monitor’s information. No specific driver 
needs to be installed to the computer. 
If you connect the monitor to your PC, and then boot your PC for the first 
time, the setup Wizard may be displayed on the screen. Click on “Next” 
several times according to the instructions from the Wizard until the Plug 
& Play Monitor is automatically selected so that you can use this monitor.

Adjusting the monitor’s resolution and color number

Adjust the monitor’s resolution and color number by referring to your 
computer’s instruction manual. The color number may vary according to 
your computer or video board. The color palette setting and the actual 
number of colors are as follows:
• High Color (16 bit) 

t

 65,536 colors

• True Color (24 bit) 

t

 about 16.77 million colors

In true color mode (24 bit), speed may be slower.

Selecting the on-screen menu 
language (LANGUAGE)

English, French, German, Spanish, Italian, Dutch, Swedish, 
Russian and Japanese versions of the on-screen menus are 
available. The default setting is English.

1

Press the MENU/OK button.

See page 9 for more information on using the MENU/OK 
button.

2

Move the joystick 

m

/

M

 to highlight 

 LANGUAGE 

and press the MENU/OK button.

3

Move the joystick 

m

/

M

 to select a language.

To close the menu

Press the MENU/OK once to return to the main MENU, and twice to 
return to normal viewing. If no buttons are pressed, the menu closes 
automatically after about 30 seconds.

MENU

MENU

b

ENGL I SH
FRANÇA I S
DEUT SCH
ESPAÑOL

I T A L I ANO

NEDER L ANDS
SVENSKA

L ANGUAGE

b

MENU

Содержание CPD-G220R/W

Страница 1: ...4 081 489 11 1 2000 Sony Corporation Trinitron Color Computer Display â Operating Instructions Mode d emploi Manual de instrucciones US FR ES CPD G220R CPD G220S ...

Страница 2: ...xtremely low frequency ELF INFORMATION Ce produit est conforme aux normes du Swedish National Council for Metrology de décembre 1990 MPR II en ce qui concerne les fréquences très basses VLF et extrêmement basses ELF INFORMACIÓN Este producto cumple las normas del Consejo Nacional Sueco para Metrología MPR emitidas en diciembre de 1990 MPR II para frecuencias muy bajas VLF y frecuencias extremadame...

Страница 3: ... Precautions 4 Identifying parts and controls 5 Setup 6 Step 1 Connect your monitor to your computer 6 Step 2 Connect the power cord 6 Step 3 Turn on the monitor and computer 7 Selecting the on screen menu language LANGUAGE 7 Customizing Your Monitor 8 Navigating the menu 8 Adjusting the brightness and contrast 9 Adjusting the size and the centering of the picture SIZE CENTER 9 Adjusting the shape...

Страница 4: ...nclosure Protection Do not put foreign objects into the monitor Disconnect the monitor if environment exceeds 60 C 140 F Ensure AC power cord is not trapped under furniture TV etc Do not overload wall outlets extension cords or convenience receptacles beyond their capacity Maintenance Clean the screen with a soft cloth If you use a glass cleaning liquid do not use any type of cleaner containing an...

Страница 5: ...o signals from your computer using headphones not supplied The speaker turns off when headphones are connected to the headphones jack Adjust the volume using the volume control 6 AUDIO IN input You can listen to music sounds and other audio files using the speaker in your monitor Connect the AUDIO IN jack to the audio out jack of your computer s sound card using the miniplug cord supplied 7 AC IN ...

Страница 6: ... Do not touch the pins of the video cable connector as this might bend the pins x Connecting to an IBM PC AT or compatible computer x Connecting to a Macintosh or compatible computer Please refer to the Notice of Macintosh adapter availability Step 2 Connect the power cord With the monitor and computer switched off first connect the power cord to the monitor then connect it to a power outlet AC IN...

Страница 7: ... and then boot your PC for the first time the setup Wizard may be displayed on the screen Click on Next several times according to the instructions from the Wizard until the Plug Play Monitor is automatically selected so that you can use this monitor Adjusting the monitor s resolution and color number Adjust the monitor s resolution and color number by referring to your computer s instruction manu...

Страница 8: ...ETRY menu to adjust the picture s rotation and shape 4 COLOR page 10 Select the COLOR menu to adjust the picture s color temperature You can use this to match the monitor s colors to a printed picture s colors 5 CONVERGENCE page 10 Select the CONVERGENCE menu to adjust the picture s horizontal and vertical convergence 6 LANGUAGE page 7 10 Select LANGUAGE to choose the on screen menu s language MEN...

Страница 9: ...ick m M to adjust the brightness and to adjust the contrast 6 If no adjustments are made the menu disappears automatically after about 3 seconds Adjusting the size and the centering of the picture SIZE CENTER 1 Press the MENU OK button The main MENU appears on the screen 2 Move the joystick m M to highlight SIZE CENTER and press the MENU OK button The SIZE CENTER menu appears on the screen 3 First...

Страница 10: ...E settings allow you to adjust the quality of the picture by controlling the convergence The convergence refers to the alignment of the red green and blue color signals If you see red or blue shadows around letters or lines adjust the convergence 1 Move the MENU OK button The main MENU appears on the screen 2 Move the joystick m M to highlight CONVERGENCE and press the MENU OK button The CONVERGEN...

Страница 11: ...e joystick m M to select MOIRE ADJUST Then move the joystick until the moire effect is at a minimum Moire is a type of natural interference which produces soft wavy lines on your screen It may appear due to interference between the pattern of the picture on the screen and the phosphor pitch pattern of the monitor Resetting the adjustments The RESET option erases your customized setting To restore ...

Страница 12: ...r a few seconds the monitor enters the power saving mode again If the horizontal or vertical sync signal is received by the monitor the power indicator lights in orange Troubleshooting Before contacting technical support refer to this section If thin lines appear on your screen damper wires The lines you are experiencing on your screen are normal for the Trinitron monitor and are not a malfunction...

Страница 13: ...ment Check that the video frequency range is within that specified for the monitor If you replaced an old monitor with this monitor reconnect the old monitor and adjust the frequency range to the following Horizontal 30 85 kHz Vertical 48 170 Hz If no message is displayed and the 1 power indicator is green or flashing orange Use the Self diagnosis function page 15 If using a Macintosh system Check...

Страница 14: ...ot fill the screen to the edges Edges of the image are curved Adjust the geometry page 10 Wavy or elliptical pattern moire is visible Select MOIRE ADJUST and adjust the moire cancellation effect page 11 xProblems caused by the connected computer or other equipment Change your desktop pattern Color is not uniform Degauss the monitor page 11 If you place equipment that generates a magnetic field suc...

Страница 15: ...ur authorized Sony dealer of the monitor s condition Be sure to note the model name and serial number of your monitor Also note the make and model of your computer and video board Specifications CRT 0 24 mm aperture grille pitch center 17 inches measured diagonally 90 degree deflection FD Trinitron Viewable image size Approx 328 242 mm w h 13 9 5 8 inches Viewing image 408 mm 16 1 inches Resolutio...

Страница 16: ......

Страница 17: ...cs of a computer such as energy consumption levels that are important from the viewpoints of both the work internal and natural external environments Since all methods of electricity generation have a negative effect on the environment e g acidic and climate influencing emissions radioactive waste it is vital to save energy Electronics equipment in offices is often left running continuously and th...

Страница 18: ...ding reproductive damage in fish eating birds and mammals due to the bio accumulative processes Flame retardants have been found in human blood and researchers fear that disturbances in foetus development may occur The relevant TCO 99 demand requires that plastic components weighing more than 25 grams must not contain flame retardants with organically bound bromine or chlorine Flame retardants are...

Страница 19: ...Sony Corporation Printed in U S A ...

Отзывы: