background image

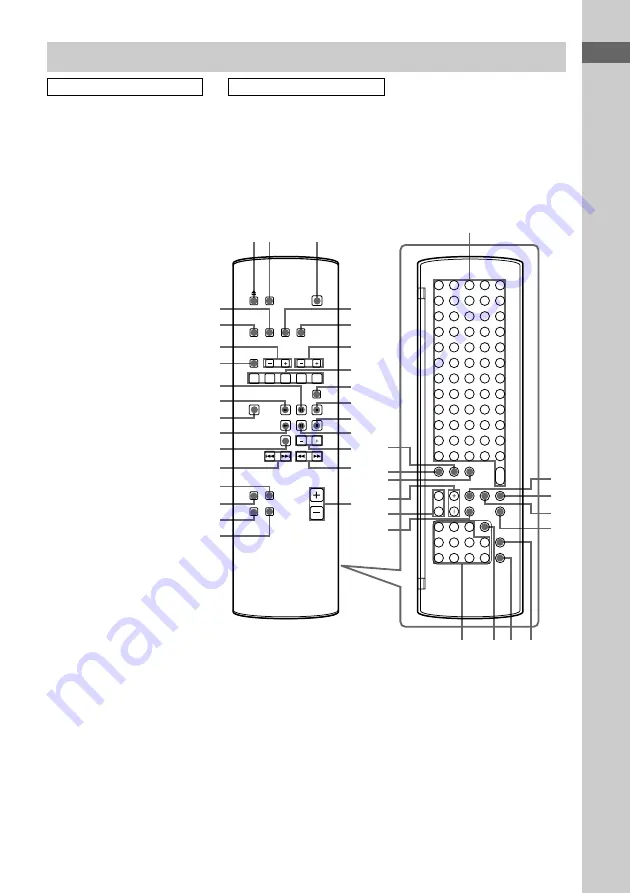
List of Button Locations and Reference Pages

7

GB

Remote control

ALPHABETICAL ORDER

ALBUM 

eh

 (19)

ALBUM FAVORITES 

7

 (22)

ALBUM MEMORY 

8

 (22)

ALBUM +/– 

6

 (18, 19, 21, 26)

CAPS 

rd

 (16, 31)

CD 

N


wa

 (14 - 16, 25)

CD 

X


qa

 (15)

CD 

x


q;

 (15, 16, 24, 25)

CLEAR 

es

 (15 - 17, 29, 31, 39)

CLOCK/TIMER SELECT 

eg

(41 - 43)

CLOCK/TIMER SET 

ef

 (13, 41,

42)

CURSOR 

T

/

t


el

 (13, 17, 20,

21, 31, 35, 42)

DIMMER 

5

 (44)

DISPLAY 

wk

 (39, 44, 45)

DSG 

qk

 (40)

ENTER/YES 

e;

 (13, 15 - 17,

19 - 21, 27 - 37, 39, 41 - 43, 57)

FM MODE 

qg

 (38)

FUNCTION 

ws

 (14 - 22, 25 - 28,

30, 32 - 35, 57)

HD 

wd

 (18, 20 - 22, 25, 26)

HD 

wf

 (18, 25, 26)

HD 

x


9

 (18, 25, 26, 30)

HIGHLIGHT


wg

 (21)

H/–


wh

 (22)

MENU/NO 

ek

 (17, 20, 27 - 39,

57)

MENU +/– 

r;

 (13, 17, 20, 21,

27 - 36, 41 - 43)

NAME 

rs

 (16, 39)

Numeric buttons for selecting an

album or track 

ej

 (15, 19, 38)

PLAYLIST 

ed

 (19, 20)

PLAY MODE 

qh

 (14 - 18, 21)

PRESET EQ 

qj

 (40)

REPEAT 

qg

 (15, 18)

SCROLL 

4

 (17, 45)

SEARCH 

ea

 (20)

SLEEP 

2

 (40)

SML 

ra

 (16, 31)

Text input buttons 

wl

 (16, 31)

TIME 

wj

 (16, 44, 45)

TUNER BAND 

w;

 (37, 38)

TUNING MODE 

qh

 (37, 38)

/– 

qs

 (37, 38)

VOL +/– 

qf

 (41)

BUTTON DESCRIPTIONS

@

/

1

 (power) 

3

 (11, 41, 42)

.

/

>


ql

 (15, 16, 18)

m

/

M


qd

 (15, 18)

Z


1

 (14, 15)

12

3

wl

wk

qk

wh

wj

wd
ws

qj
qh

ra

el
ek

r;

rs

rd

qg

wa
w;

ql

wf

wg

4

5

6

7
8

e;

ea
es
ed

ej

eheg ef

9
q;
qa
qs
qd

qf

Содержание CMT-L7HD - Micro Hi Fi Component System

Страница 1: ...nstructions 4 241 222 12 1 CMT L7HD Owner s Record The model and serial numbers are located on the rear of the unit Record the serial number in the space provided below Refer to them whenever you call upon your Sony dealer regarding this product Model No Serial No ...

Страница 2: ...hat provides guidelines for proper grounding and in particular specifies that the cable ground shall be connected to the grounding system of the building as close to the point of cable entry as practical WARNING This equipment has been tested and found to comply with the limits for a Class B digital device pursuant to Part 15 of the FCC Rules These limits are designed to provide reasonable protect...

Страница 3: ...d after it has been played back for details see page 24 Do not use the system in a place subject to extreme changes in temperature temperature gradient less than 10 C hour Do not change the hard disc or add another hard disc by yourself This may damage the system If the hard disc is damaged data cannot be restored or recovered For M crew Duplication of any or all of the contents of this software a...

Страница 4: ...y 20 Playing a registered album Album Favorites 22 Playing an album you listened to recently History 22 HD Recording Notes on recording 23 Recording a CD to the HD Auto Storage High Speed Synchro Storage 24 Recording to the HD manually Manual Recording 26 Recording tips Making tracks Smart Space Adjusting the recording level 26 HD Editing Labelling a track album or playlist Name Function 30 Erasin...

Страница 5: ...s 47 Installing the software 47 Connections 50 Setup procedure for your computer system 50 Installing LabelMaker 5 1 53 Uninstalling the software 53 Starting up the software 54 Quitting the software 54 Using the Help 54 Optional Components Hooking up optional components 56 Listening to audio from a connected component 57 Recording audio from a connected component 57 Recording on a connected compon...

Страница 6: ... 39 44 45 Display window 1 44 45 FUNCTION qh 14 22 25 28 30 32 35 57 HD u 9 18 20 22 25 26 HD x q 18 25 26 30 HIGH SPEED SYNC ql 25 P Z PHONES jack 7 REC w 26 28 Remote sensor 6 STORAGE MODE qk 14 25 26 TUNER BAND qd 37 38 TUNING qj 37 38 VOL qg 41 Illustration number r PLAY MODE qh 14 18 21 R R Name of button part Reference page 1 2 3 789q qaqsqd qg qh qj w qlqk 6 5 4 qf BUTTON DESCRIPTIONS 1 pow...

Страница 7: ...8 30 32 35 57 HD N wd 18 20 22 25 26 HD X wf 18 25 26 HD x 9 18 25 26 30 HIGHLIGHT wg 21 HISTORY wh 22 MENU NO ek 17 20 27 39 57 MENU r 13 17 20 21 27 36 41 43 NAME rs 16 39 Numeric buttons for selecting an album or track ej 15 19 38 PLAYLIST ed 19 20 PLAY MODE qh 14 18 21 PRESET EQ qj 40 REPEAT qg 15 18 SCROLL 4 17 45 SEARCH ea 20 SLEEP 2 40 SML ra 16 31 Text input buttons wl 16 31 TIME wj 16 44 ...

Страница 8: ... function allows you to listen to just a part of a single track in each album in order to find a specific album on the HD Album favorites By registering up to 5 albums on the HD to ALBUM FAVORITES A E on the remote you can play them easily at the press of a button History This system memorizes the 20 most recently played albums any of which can be selected for playback Labelling The supplied M cre...

Страница 9: ...your system using the supplied cords and accessories 1 Set the speaker cord into the speaker cord groove at the bottom of the speaker Otherwise the speaker cord could be damaged AM loop antenna Left speaker Right speaker FM antenna The rear cover Desktop stand Before attaching the system to the stand draw the wires under the horizontal bar of the stand Otherwise the wires could be damaged Overview...

Страница 10: ...he system as possible AM antenna FM antenna Jack type A FM antenna Jack type B FM antenna Jack type C 6 Attach the stand pads Attach the supplied stand pads to the bottom of the stand to stabilize the stand and to prevent it from slipping Note Use caution when placing the stand on a specially treated waxed oiled polished etc floor as staining or discoloration may result AM loop antenna White Exten...

Страница 11: ...lied joint connector to the speaker cord and then connect the supplied cord extension to the other end of the joint connector 2 Connect the cord extensions to the SPEAKER jacks 3 Secure the cord extensions with the speaker cord hooks at the bottom of the main unit Otherwise the cord extension could be damaged 4 Attach the system to the supplied desktop stand 5 Attach the supplied rear cover to the...

Страница 12: ...d the wall hanging bracket 0 6 kg have a combined weight of 8 5 kg Therefore for safety reasons the bracket should be attached securely to a wall made from materials capable of supporting a load of 50 kg or more When you hang the system on the wall make sure the left and right speakers are both attached or both detached Attaching one speaker without the other may cause the system to drop and injur...

Страница 13: ...emote The hour indication flashes 4 Press MENU or on the remote repeatedly to set the hour and then press ENTER YES or CURSORt on the remote The minute indication flashes 5 Press MENU or on the remote repeatedly to set the minute and then press ENTER YES on the remote If you make a mistake Press TCURSOR or CURSORt on the remote repeatedly until the indication you want to change day hour minute fla...

Страница 14: ...ing the CD Normal Play Shuffle Play Repeat Play This system lets you play CDs in different play modes The system is set to automatically start CD to HD recording at the start of CD playback 1 Press FUNCTION repeatedly until CD appears in the display 2 Press PLAY MODE on the remote in stop mode repeatedly until the mode you want appears in the display Select No display Normal Play SHUFFLE Shuffle P...

Страница 15: ...ack is programmed Step appears followed by the order number of the track just programmed Then the last programmed track number appears followed by the total playing time of the program If you have made a mistake you can clear the last programmed track from the program by pressing CLEAR on the remote 5 To program additional tracks repeat steps 3 and 4 6 Press CD u or CD N on the remote Selected tra...

Страница 16: ... Program Play stopped Press CLEAR on the remote in stop mode Each time you press the button the last programmed track is erased Labelling a CD Disc Memo You can label up to 100 CDs with titles of up to 20 symbols and characters Whenever you load a labelled CD the title appears in the display Note When labelling CDs for the first time be sure to erase all disc titles using the procedure Erasing a d...

Страница 17: ... on the remote repeatedly to select a disc title stored in the system memory between 001 and 100 To check the current disc title Press SCROLL on the remote in stop mode To pause the scrolling press SCROLL on the remote again Erasing a disc title 1 Press FUNCTION repeatedly until CD appears in the display If SHUFFLE or PROGRAM appears in the display press PLAY MODE on the remote repeatedly until bo...

Страница 18: ...s selected in the same manner All the tracks in the current album are played back in random order Do this Press HD x Press HD u or HD X on the remote Press again to resume playback Press or repeatedly until you find the desired track Turn ALBUM dial clockwise to go forward or counterclockwise to go backward or press ALBUM or on the remote repeatedly During playback press and hold down m or M until...

Страница 19: ... To enter 0 press 10 0 instead Playback starts automatically Example To enter album number L Album30 or F Album30 in the Library area or the Flexible area press ALBUM repeatedly then 10 0 3 and 10 0 To enter album number Playlist4 press ALBUM repeatedly then 10 0 and 4 Registering a track to a playlist Playlist Play By registering tracks on the HD to a playlist you can play back only the tracks yo...

Страница 20: ...page 19 Notes You cannot search for a playlist or for a track in a playlist with Keyword Search If you perform Keyword Search when Shuffle Play is selected the HD play mode automatically switches to Normal Play Locating a desired album or track Keyword Search Highlight Play Searching by keywords Keyword Search You can easily find desired albums or tracks on the HD if they have been named 1 Press F...

Страница 21: ...e or second indication flashes then press MENU or on the remote repeatedly Notes If the registration of the Highlight position has not been performed the beginning of the first track in the album becomes the Highlight position of the album Only one track can be selected as the representative track for each album During Highlight Play you cannot register a Highlight position register a track to a p...

Страница 22: ...recording or recording pause If a registered album is made blank the registration of that album is cleared Playing an album you listened to recently History This system memorizes the 20 most recently played albums any of which can be selected for playback 1 Press FUNCTION repeatedly until HD appears in the display 2 While the HD is stopped or playing press HISTORY or on the remote repeatedly To st...

Страница 23: ...ing to the HD Further recording is impossible because there is not enough recordable space on the HD or the maximum number of recordable tracks has been attained on the HD Erase any unnecessary albums or tracks to continue recording to the HD Guide to the Serial Copy Management System Digital audio components such as CDs MDs HDs and DATs let you copy music easily with high quality by processing mu...

Страница 24: ...em cannot record CD tracks when The remaining time on the HD is less than 240 minutes The remaining number of the tracks on the HD is less than 131 There is no blank album in the Library area If you erase an album from the Library area with the Erase function or move an album from the Library area to the Flexible area with the Move function the corresponding CD is restored to the Library area when...

Страница 25: ...he display and the system automatically starts recording in Normal Speed Synchro Storage Note that monitoring of the recorded signal is not possible when this occurs Switching Auto Storage mode on or off While the CD is stopped press STORAGE MODE LIBRARY and AUTO appear in the display Press again to cancel Auto Storage mode Tip Auto Storage mode is factory set to on Notes The system does not autom...

Страница 26: ... longer than 120 minutes cannot be recorded If the recording time has reached 120 minutes the track number increases by one automatically If the track number cannot be incremented recording ends If the selected album is one that contains 400 tracks at the time you press REC the sound source is recorded to the album that is closest in number with recording space CD text is not saved to the HD durin...

Страница 27: ...display 3 Press MENU or on the remote repeatedly until Setup flashes in the display then press ENTER YES on the remote 4 Press MENU or on the remote repeatedly until T Mark Off or T Mark LSync appears in the display then press ENTER YES on the remote 5 Press MENU or on the remote to select the setting then press ENTER YES on the remote To Turn on the Level Synchro Recording function Turn off the L...

Страница 28: ...lay then press ENTER YES on the remote 4 Press MENU or on the remote repeatedly until LS T XXdB appears in the display then press ENTER YES on the remote 5 Press MENU or on the remote repeatedly to select the level then press ENTER YES on the remote You can set the level at any value between 72 dB and 0 dB in 2 dB steps 6 Press MENU NO on the remote Marking track numbers at a specific point during...

Страница 29: ...tal recordings 1 Do steps 1 and 2 of Recording to the HD manually on page 26 2 Play the portion of the sound source with the strongest output 3 Press MENU NO on the remote Setup appears in the display 4 Press ENTER YES on the remote Setup Menu appears in the display 5 Press MENU or on the remote repeatedly until LevelAdjust appears in the display then press ENTER YES on the remote 6 Press MENU or ...

Страница 30: ...ave Off is selected the CD TEXT information is recorded automatically depending on the disc If CD TEXT information is not recorded the track numbers on the CD Tr are automatically recorded instead After recording Use Name function Name can consist of uppercase and lowercase letters numbers and symbols Up to 127 characters can be entered for each name Notes You cannot name an album or playlist duri...

Страница 31: ...s MENU or on the remote to select the item then press ENTER YES on the remote To Copy a title Copy an artist name 4 Press MENU or on the remote to select the item then press ENTER YES on the remote To Copy an album name Copy a track name 5 Press MENU or on the remote repeatedly to select the item then press ENTER YES on the remote To Copy a name to a track Copy a name to an album and all tracks in...

Страница 32: ...ght Play the first track of the album that contained the erased track becomes the registered track instead After the erasure of such a track the Highlight Play registration cannot be restored to the condition before the edit evin if you use the Undo function You cannot erase a track in the Library area 3 Press MENU or on the remote to select the item then press ENTER YES on the remote To Erase a t...

Страница 33: ...r MOVE Original tracks 1 Press FUNCTION repeatedly until HD appears in the display 2 Press MENU NO on the remote after selecting the album you want to edit Edit Menu appears in the display 3 Press MENU or on the remote repeatedly until Move flashes in the display then press ENTER YES on the remote 4 Press MENU or on the remote repeatedly until the track number you want to move flashes then press E...

Страница 34: ...ks in an album can be simultaneously moved to a blank album 1 Press FUNCTION repeatedly until HD appears in the display 2 Press MENU NO on the remote after selecting the album you want to edit Edit Menu appears in the display 3 Press MENU or on the remote repeatedly until Move flashes in the display then press ENTER YES on the remote 4 Press MENU or on the remote repeatedly until Album flashes the...

Страница 35: ...of tracks in the album decreases by one and all the tracks following the combined ones are renumbered You can also use this function to erase unnecessary track numbers Example Combining track 3 to track 1 1 2 1 2 4 3 3 A A C B D D C B Example Combining track 1 to track 4 1 2 1 2 4 3 3 4 5 A B C D A D C B 1 Press FUNCTION repeatedly until HD appears in the display 2 Press MENU NO on the remote afte...

Страница 36: ...t Undo Function You can undo the last edit operation and restore the contents of the HD to the condition that existed before the operation Note however that you cannot undo an edit operation if you perform any of the following operation after the edit Do another edit Start recording Perform a playlist or Highlight Play registration Turn off the system Disconnect the power cord 1 Press MENU NO on t...

Страница 37: ...preset stations 20 for FM and 10 for AM You can then tune in any of those stations simply by selecting the corresponding preset number There are two ways to store the preset stations To Automatically tune in all of the stations that can be received in your area and then store them manually Manually tune in and store the radio frequency of your favourite stations Setting presets through automatic t...

Страница 38: ...ly to select the desired preset station or station name or RDS station name The station name appears only if you have labelled the station see Labelling the preset stations on page 39 European model only To select a desired preset number using the numeric buttons on the remote Press numeric buttons instead of performing step 3 To enter preset number over 10 press 10 and enter the corresponding dig...

Страница 39: ...as from steps 2 to 6 on Labelling a CD see page 16 To cancel labelling Press MENU NO on the remote To erase the station name 1 Tune in the preset station 2 Press NAME on the remote 3 Press CLEAR on the remote repeatedly to erase the name 4 Press ENTER YES on the remote Using the Radio Data System RDS European model only What is the Radio Data System Radio Data System RDS is a broadcasting service ...

Страница 40: ...ic Sleep Timer The Sleep Timer function lets you specify a sleep time after which the system stops playing and turns off automatically You can thus fall asleep to music Press SLEEP on the remote repeatedly The sleep time changes cyclically as follows AUTO t 90min t 80min t 70min t t 10min t SLEEP OFF The system turns off automatically when playback of the current CD album or playlist finishes up t...

Страница 41: ...the system automatically turn on and off at specified times To use this function make sure that you have set the system clock correctly see Setting the clock on page 13 1 Prepare the music source you want to listen to when the system turns on CD Load a CD To start playing from a specific track make a program see Programing the CD tracks on page 15 HD Select the album that you want Radio Tune in th...

Страница 42: ...p 9 8 Press ENTER YES on the remote The hour indication flashes 9 Set the starting time Press MENU or on the remote repeatedly to set the hour and then press ENTER YES on the remote The minute indication begins flashing next Press MENU or on the remote repeatedly to set the minute and then press ENTER YES on the remote The day indication or the hour indication flashes again 10Set the stopping time...

Страница 43: ... the timer recording at the same time as the Sleep Timer the Sleep Timer setting has priority The volume is reduced to minimum during recording The system records from the radio to the Flexible area If two or more timer recording settings have the same starting time the timer setting with the smallest number has priority If one timer recording setting starts while another timer recording setting i...

Страница 44: ... track title appears during playback and the disc title appears when the system is stopped Display Turning off the display Power Saving Mode Even if the system is off the system consumes power to display the clock and to stay responsive to commands from the remote Power Saving mode reduces the amount of power consumed during standby In this mode the clock is not displayed Press DISPLAY or TIME on ...

Страница 45: ...me t Clock display t Preset Equalizer name t Volume The station name is skipped if the station is unlabelled To scroll a long name Press SCROLL on the remote The title appears scrolling in the display To pause the scrolling of the title press SCROLL on the remote again Tips If you press TIME on the remote in stop mode for a CD with CD text containing the artist name the artist name appears scrolli...

Страница 46: ...formation refer to the Readme txt file in the Start menu The Readme txt file is in the folder which this software is installed in Overview M crew for CMT L7HD allows you to control this system Through this software you can perform the functions listed below Playback Use the computer to operate the playback function on CD and HD Enjoy audio files stored on the computer Tune in radio stations using ...

Страница 47: ...ration of this software is not guaranteed on some computers even if they meet the requirements above The proper operation of this software is not guaranteed on computers that you constructed yourself or on computers with an operating system that you upgraded yourself Do not use a USB hub If multiple USB devices are connected to the hub this software may not operate the system connected to the comp...

Страница 48: ... restart your computer do not remove the CD ROM 4 Click Next 5 Select one of the setup type options and then click Next Complete All the M crew for CMT L7HD files on the CD ROM will be installed This option does not allow you to specify the folder to which the M crew for CMT L7HD files are installed Normally the files are installed in C Program Files M_crew L7HD folder Custom You can specify the f...

Страница 49: ...letes the setup process Be sure to restart the computer If not this software will not function properly Be sure to close the dialog box activated by executing InstallDlg exe before connecting the system to the computer After restarting the computer eject the CD ROM Now you can proceed to the next preparation steps connecting the system to the computer installing the USB drivers and then verifying ...

Страница 50: ...Windows Me if you turn off the system with a USB cable connected a warning message may appear in the display Some CMT L7HD functions are not supported by M crew for CMT L7HD If you use the same CMT L7HD with more than one computer in which this software has been installed CMT L7HD data may not be properly read in If this occurs click the Reload button refer to the Help Setup procedure for your com...

Страница 51: ... installed devices after you have installed thier drivers 1 Open the Control Panel In the Start menu point to Settings and click Control Panel 2 Double click the System icon The System Properties dialog box appears 3 Click the Device Manager tab Make sure that the following items are listed in the Device Manager dialog box SONY PCLK USB Driver Sony HDD Audio Recorder and Generic USB Hub under Univ...

Страница 52: ...y and will be terminated after completing installation If Found New Hardware Wizard should not appear skip step 3 3 Select Install the software automatically Recommended after confirming that the name of the device for which the drivers are to be installed is SONY LINK KIT 4 Turn on the system Found New Hardware Wizard appears 5 Select Install the software automatically Recommended 6 Click Next If...

Страница 53: ...d CMT L7HD 5 Click OK to close the System Properties dialog box Installing LabelMaker 5 1 Please note that if you install LabelMaker 5 1 onto the Windows XP preinstalled VAIO computer LabelMaker 5 0 installed on it may be overwritten by the new version Installing LabelMaker 5 1 will not overwrite any version of LabelMaker older than 5 0 such as included in PictureGear 4 x 1 Click 4 Setting up Labe...

Страница 54: ...oftware In the Start menu point to Programs and M crew for CMT L7HD and then click M crew This software starts up and the Main bar appears The bar below is displayed immediately after M crew for CMT L7HD is started up Note If you start up the software while recording to the HD you can stop the recording or cancel the software startup Quitting the software 1 Click on the Main bar A dialog box for q...

Страница 55: ...g box If the Topics Found dialog box appears select the appropriate topic and click Display Finding topics with a certain word or phrase 1 Click the Search tab in the above topic search dialog box 2 Enter a word or phrase that is related to the desired topic and then click List Topics The topics that are found appear in the Select Topics to display list box 3 Select the appropriate entry and click...

Страница 56: ...l optical cable square not supplied to connect an optional digital component such as an MD deck to this jack You can then output digital audio to that component from this system C MD TAPE IN jack Use an audio cord not supplied to connect an optional component such as an MD deck or a cassette deck to this jack You can then record or listen to analog audio from that component through this system D M...

Страница 57: ...listen to the connected tape deck do the following procedure 1 Turn on the system 2 Press FUNCTION repeatedly until MD appears 3 Press MENU NO on the remote TAPE appears 4 Press ENTER YES on the remote To switch back to MD do the procedure again Recording audio from a connected component Making a digital recording from a digital component to the HD The Serial Copy Management system see page 23 may...

Страница 58: ...Hooking up optional components on page 56 2 Start recording Refer to the operating instructions provided with connected component Making an analog recording on a component 1 Connect an audio cord See Hooking up optional components on page 56 2 Start recording Refer to the operating instructions provided with connected component ...

Страница 59: ...ll a noise filter commercially available to the power line The system makes sounds The following sounds are normal The sound of the HD operating The sound of the CD operating The sound of the cooling fan operating The timer cannot be set Set the clock again see page 13 The timer does not function Activate the timer see To check the settings Activate the timer on page 41 or 42 Check the set content...

Страница 60: ...HD Switch Auto Storage mode off see page 25 The HD does not edit Press PLAY MODE on the remote repeatedly until SHUFFLE disappears The sound has a lot of static Strong magnetism from a television or similar device is interfering with operations Move the system away from the source of strong magnetism Tuner There is severe hum or noise TUNED or STEREO flashes Set the proper band and frequency see p...

Страница 61: ...n the Option dialog box The system sounds warning alarm mail arrival notice are not heard The system sounds have been specified not to sound during M crew startup or the setting may have changed to OFF when this software was abnormally ended To restore the sounds restart this software and then quit the software normally Or double click the backup file reg0 reg to reg3 reg in the M crew for CMT L7H...

Страница 62: ...ROM The sound source is a copy of commercially available music software Cannot Edit You tried to edit in Shuffle Play or you tried to register a track to a playlist that already contains 400 tracks Cannot Play The system cannot play the track because of damage to the audio data Cannot Rec You tried to record to the HD with HD selected as the sound source You tried to perform manual recording from ...

Страница 63: ... on the remote during playback You pressed SEARCH on the remote during playback Rec Error Proper recording is not possible Rehearsal The HD is playing the specified dividing point for confirmation during the Divide function The HD is playing the specified Highlight position for confirmation during the Highlight Play function REMOTE The system is being connected to your computer Retry The system is...

Страница 64: ...ot operate properly Remove the CD and leave the system turned on for about an hour until the moisture evaporates If you have any questions or problems concerning your system please consult your nearest Sony dealer On the speaker system Although this speaker system is magnetically shielded there may be cases where the picture on some TV sets becomes magnetically distorted In such a case turn off th...

Страница 65: ... stereo minijack Accepts headphones with an impedance of 8 ohms or more DIGITAL CD OPTICAL OUT Supported sampling frequency 44 1 kHz CD player section System Compact disc and digital audio system Laser Semiconductor laser λ 795 nm Emission duration continuous Frequency response 2 Hz 20 kHz HD recorder section Capacity 20 GB Recording system ATRAC 3 Transfer rate 132 kbps Maximum recording time Abo...

Страница 66: ...40 V AC 50 60 Hz Power consumption European model See the nameplate 0 2 W at the Power Saving Mode Other models See the nameplate Dimensions w h d Approx 293 246 131 mm incl projecting parts and controls Mass Approx 4 3 kg Supplied accessories Remote commander 1 Size AAA R03 battery 2 AM loop antenna 1 FM wire antenna 1 Desktop stand 1 Stand pad 4 Rear cover 1 Wall hanging bracket 1 Joint connecto...

Страница 67: ...67GB Additional Information ...

Страница 68: ...Sony Corporation Printed in Malaysia ...

Отзывы: