background image

CMT-EH26/EH25.GB.3-874-279-11(1)

11

GB

G

etting S

tar

ted

 Antennas

Find a location and an orientation that 

provide good reception, and then set up 

the antenna.

Keep the antennas away from the speaker 

cords, the power cord and the USB cable 

to avoid picking up noise.

 Speakers

Insert only the stripped portion of the 

speaker cords into the SPEAKER jacks.

 Power

Connect the power cord to a wall socket.

If the plug does not fit the wall socket, 

detach the supplied plug adaptor (only 

for models equipped with an adaptor).

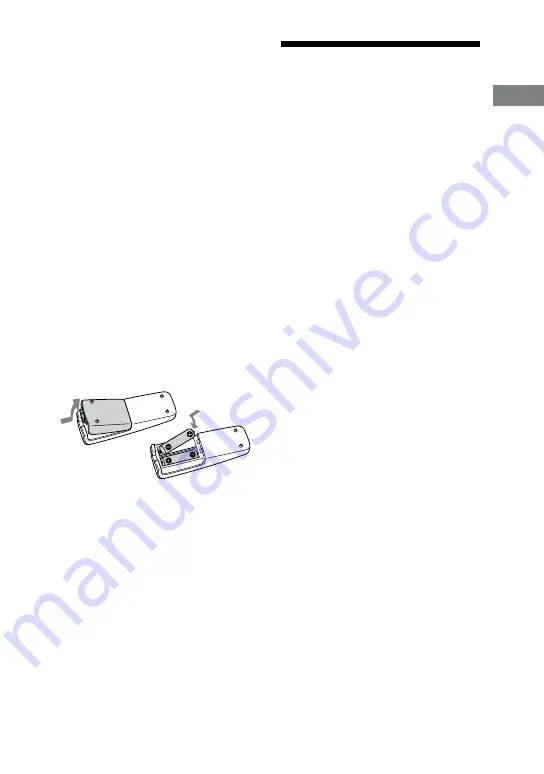
To use the remote

Slide and remove the battery 

compartment lid 

, and insert the two 

R6 (size AA) batteries (not supplied), 


side first, matching the polarities shown 

below.

Notes

 With normal use, the batteries should last for 

about six months.

 Do not mix an old battery with a new one or 

mix different types of batteries.

 If you do not use the remote for a long period 

of time, remove the batteries to avoid damage 

from battery leakage and corrosion.

Setting the clock

Use buttons on the remote to set the 

clock.

Press 

/


 to turn on the 

system.

Press CLOCK/TIMER SET 

.

The hour indication flashes in the 

display.

If “PLAY SET” flashes in the display, 

press 

/


 repeatedly to 

select “CLOCK” and then press 

ENTER 

.

Press 

/


 repeatedly 

to set the hour, and then press 
ENTER 

.

Use the same procedure to set 
the minutes.

The clock settings are lost when you 

disconnect the power cord or if a 

power failure occurs.

To display the clock when the system 

is off

Press DISPLAY 

. The clock is 

displayed for about 8 seconds.

Содержание CMT-EH25

Страница 1: ......

Страница 2: ...aring loss Notice for the customer in the countries applying EU Directives The manufacturer of this product is Sony Corporation 1 7 1 Konan Minato ku Tokyo 108 0075 Japan The Authorized Representative for EMC and product safety is Sony Deutschland GmbH Hedelfinger Strasse 61 70327 Stuttgart Germany For any service or guarantee matters please refer to the addresses given in separate service or guar...

Страница 3: ...e section on how to remove the battery from the product safely Hand the battery over to the applicable collection point for the recycling of waste batteries For more detailed information about recycling of this product or battery please contact your local Civic Office your household waste disposal service or the shop where you purchased the product Note on DualDiscs A DualDisc is a two sided disc ...

Страница 4: ...ng to the radio 13 Playing a tape 14 Recording onto a tape 15 Listening to music of an USB device 16 Using optional audio components 17 Adjusting the sound 18 Changing the display 18 Other Operations Creating your own program Program Play 19 Presetting radio stations 20 Using the Timers 21 Others Troubleshooting 22 Messages 26 Precautions 27 Specifications 29 Playable USB devices with this system ...

Страница 5: ...and controls Guide to parts and controls This manual mainly explains operations using the remote but the same operations can also be performed using the buttons on the unit having the same or similar names Unit Continued ...

Страница 6: ... folder Sound buttons page 18 Unit DSGX button Remote EQ button Press to select the sound effect PUSH OPEN CLOSE page 12 Press to open or close the CD compartment Remote sensor page 22 Playback buttons and function buttons Unit USB play pause button page 16 Press to select the USB function Press to start or pause playback of an optional USB device Remote USB button page 16 Press to select the USB ...

Страница 7: ...on rewind fast forward button stop eject button pause button page 14 15 Press to operate the tape functions PHONES jack Connect the headphones AUDIO IN jack page 17 Connect to an optional audio component STANDBY indicator page 18 22 Lights up when the system is turned off CLOCK TIMER SELECT button page 21 CLOCK TIMER SET button page 11 21 Press to set the clock and the Play Timer REPEAT FM MODE bu...

Страница 8: ...NER MEMORY button page 20 Press to preset the radio station PLAY MODE TUNING MODE button page 12 13 19 20 Press to select the play mode of a CD or MP3 disc Press to select the tuning mode DISPLAY button page 18 Press to change the information on the display SLEEP button page 21 Press to set the Sleep Timer ...

Страница 9: ... GB Guide to parts and controls Information on the display Timer page 21 Text information Play mode page 12 DSGX page 18 Tuner reception mode page 13 Tuner reception page 13 Audio format Play Pause ...

Страница 10: ...10GB Getting Started Hooking up the system securely FM lead antenna Extend it horizontally AM loop antenna Speaker cord Black Speaker cord Red Right speaker Left speaker Wall socket ...

Страница 11: ...es shown below Notes With normal use the batteries should last for about six months Do not mix an old battery with a new one or mix different types of batteries If you do not use the remote for a long period of time remove the batteries to avoid damage from battery leakage and corrosion Setting the clock Use buttons on the remote to set the clock 1 Press to turn on the system 2 Press CLOCK TIMER S...

Страница 12: ...n again Stop playback Select a folder on an MP3 disc Select a track or file Find a point in a track or file Hold down during playback and release the button at the desired point Select Repeat Play REPEAT repeatedly until REP or REP1 appears Tochangetheplaymode Press PLAY MODE repeatedly while the player is stopped You can select normal play for all MP3 files in the folder on the disc shuffle play ...

Страница 13: ...ecording device and recording media cannot be guaranteed Incompatible MP3 discs may produce noise or interrupted audio or may not play at all Notes on playing multisession discs If the disc begins with a CD DA or MP3 session it is recognized as a CD DA or MP3 disc and other sessions are not played back A disc with a mixed CD format is recognized as a CD DA audio disc Listening to the radio 1 Selec...

Страница 14: ...o reception Playing a tape Use buttons on the unit to play tape 1 Select the TAPE function Press FUNCTION repeatedly to select TAPE 2 Insert a tape Press and insert the tape into the cassette holder Make sure there is no slack in the tape to avoid damaging the tape or the tape deck 3 Start playback Press Otheroperations To Press Pause playback To resume play press again Stop playback Rewind or fas...

Страница 15: ... MODE repeatedly to select and then press repeatedly to select the desired folder To record only your favorite CD tracks or MP3 files in your desired order perform steps 2 to 5 of Creating your own program page 19 3 Start recording Press The CD starts playing automatically When recording from a connected USB device or audio component start playing desired recording sources manually To stop recordi...

Страница 16: ...ystem This system does not necessarily support all the functions provided in a connected USB device Listening to music of an USB device You can listen to music stored in the USB device The audio format that can be played back by this system is MP3 See Playable USB devices with this system page 31 for a list of USB devices that can be connected to this system Files with copyright protection Digital...

Страница 17: ...s audio files Folders that have no audio files are skipped The maximum number of audio files and folders that can be contained on a single USB device is 999 including the ROOT folder The maximum number of audio files and folders may vary depending on the file and folder structure The audio format that you can listen to with this system is MP3 with an mp3 file extension Note that even when file nam...

Страница 18: ...cters that cannot be displayed appear as _ The following are not displayed total playing time for a CD DA disc depending on the play mode total playing time and remaining playing time for an MP3 disc and USB device The following is not displayed correctly folder and file names that do not follow either the ISO9660 Level 1 Level 2 or Joliet in the expansion format The following are displayed ID3 ta...

Страница 19: ...cted track or file number 4 Press ENTER to add the track or file to the program appears when the total program time exceeds 100 minutes for a CD or when you select a CD track whose number is 21 or over or when you select an MP3 file 5 Repeat steps 3 through 4 to program additional tracks or files up to a total of 15 tracks or files 6 To play your program of tracks or files press The program remain...

Страница 20: ... preset number If another station is already assigned to the selected preset number the station is replaced by the new stations 4 Press ENTER 5 Repeat steps 1 through 4 to store other stations You can preset up to 20 FM and 10 AM stations The preset stations are retained for about half a day even if you disconnect the power cord or if a power failure occurs 6 To call up a preset radio station pres...

Страница 21: ... own program page 19 2 Press CLOCK TIMER SET 3 Press repeatedly to select PLAY SET and then press ENTER ON TIME appears and the hour indication flashes 4 Set the time to start playing Press repeatedly to set the hour and then press ENTER The minute indication flashes Use the procedure above to set the minutes 5 Use the same procedure as in step 4 to set the time to stop playing 6 Select the sound ...

Страница 22: ...Severe hum or noise Move the system away from sources of noise Connect the system to a different wall socket Install a noise filter available separately to the power cord The remote does not function Remove any obstacles between the remote and the remote sensor on the unit and position the unit away from fluorescent lights Point the remote at the system s sensor Move the remote closer to the syste...

Страница 23: ...ere is noise A distorted sound is output OVER CURRENT appears A problem has been detected with the level of electrical current from the USB port Turn off the system and remove the USB device from the USB port Make sure there is no problem with the USB device If this display pattern persists contact your nearest Sony dealer There is no sound The USB device is not connected correctly Turn off the sy...

Страница 24: ...evice page 31 The USB device does not work properly Refer to the USB device operation manual for how to deal with this problem If the problem persists contact your nearest Sony dealer Play does not start Turn off the system and reconnect the USB device then turn on the system Connect the supported USB device page 31 Press or USB on the unit to start play Files cannot be played back The MP3 file do...

Страница 25: ...interval is factory preset to 9 kHz or 10 kHz for some areas this function is not available on the European and Russian models Use buttons on the unit to change the AM tuning interval 1 Tune in any AM station and then turn off the system 2 Press to turn off the system 3 Press DISPLAY to display the clock 4 While the clock is displayed hold down TUNING and then press to turn on the system All the A...

Страница 26: ...c Some buttons are not available SET CLOCK You tried to select the timer when the clock is not set SET TIMER You tried to select the timer when the Play Timer is not set FULL You tried to program more than 15 tracks or files steps TIME NG The Play Timer start and end times are set to the same time USBdevice CANNOT PLAY You tried to play an unsupported track or file DEVICE ERROR The USB device coul...

Страница 27: ... CD R CD RW that have scratches or are dirty or CD R CD RW recorded with an incompatible recording device CD R CD RW which is finalized incorrectly Discs containing files other than MPEG 1 Audio Layer 3 MP3 files Discs of non standard shape for example heart square star Discs that have adhesive tape paper or sticker attached to them Rental or used discs with attached seals where the glue extends b...

Страница 28: ...Be careful when placing the unit or speakers on surfaces that have been specially treated for example with wax oil polish as staining or discoloration of the surface may result If the system is brought directly from a cold to a warm location or is placed in a very damp room moisture may condense on the lens inside the CD player and cause the system to malfunction In this situation remove the disc ...

Страница 29: ...sette s overwrite protection tab from side A or B as illustrated To later reuse the tape for recording cover the broken tab with adhesive tape About a tape longer than 90 minutes The use of the tape with more than 90 minutes of play time is not recommended except for long continuous recording or playback Cleaning the tape heads Use dry or wet type cleaning cassette available separately after every...

Страница 30: ...ng range Korean model 531 1 602 kHz with 9 kHz tuning interval 530 1 610 kHz with 10 kHz tuning interval Other models 531 1 602 kHz 9 kHz step Antenna AM loop antenna Intermediate frequency 450 kHz Speaker Speaker system Full range 8 cm dia cone type Nominal impedance 4 ohms Dimensions w h d Approx 148 241 135 5 mm Mass Approx 1 3 kg net per speaker General Power requirements Korean model 220 V AC...

Страница 31: ...o the system be sure to connect after the display Creating Library or Creating Database on the Walkman has disappeared Playable USB devices with this system You can use the following Sony USB devices on this system Other USB devices are not playable on this system VerifiedSonydigitalmusicplayer as ofMarch2008 Product name Model name Walkman NWD B103 B103F B105 B105F NWZ A815 A816 A818 NWZ S515 S51...

Страница 32: ...Printed in China ...

Отзывы: