background image

Oth

e

rs

29

 GB

Troubleshooting

Others

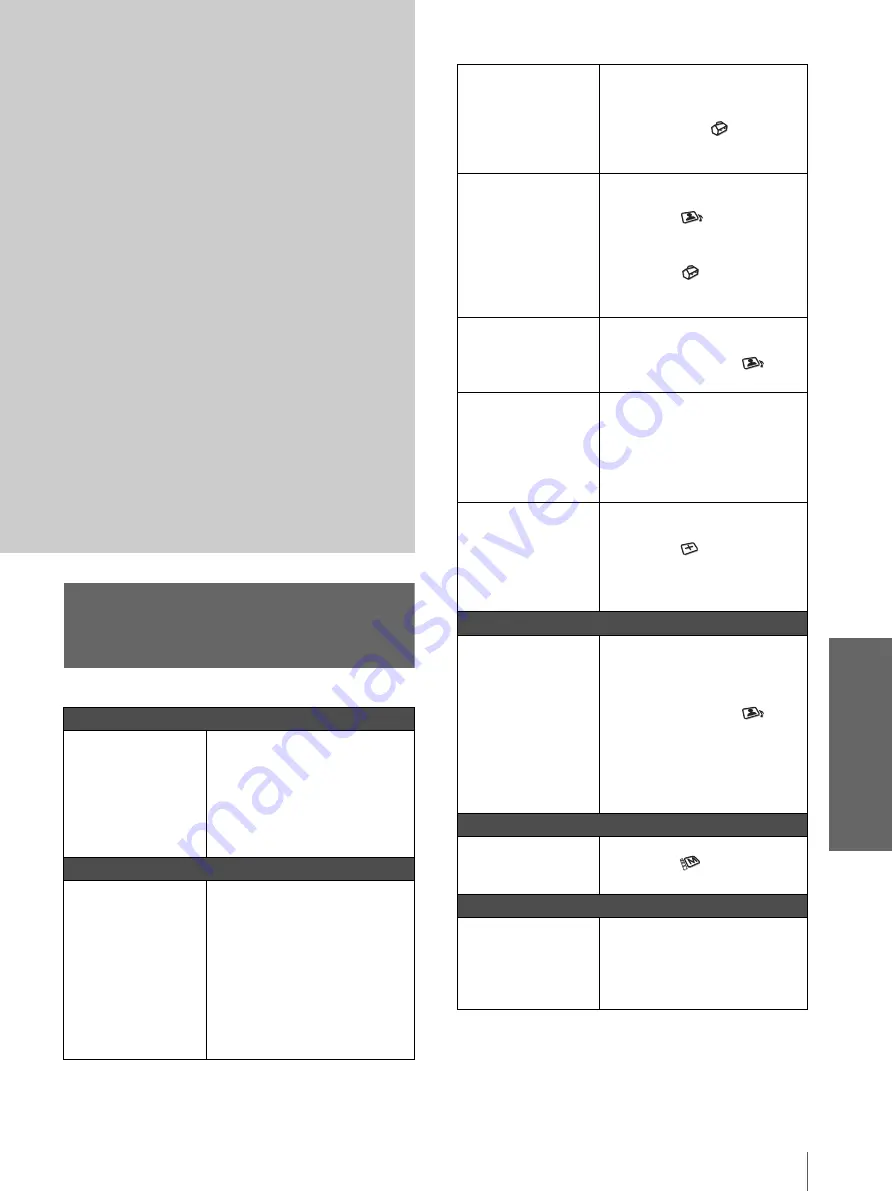
Troubleshooting

Power

The power is not 
turned on.

c

Wait for about one minute 
before turning on the power.
 (

1

 page 20)

c

Close the lamp cover securely.  
(

1

 page 31)

c

Close the air filter cover 
securely.  (

1

 page 32)

Picture

No picture.

c

Check that the proper 
connections have been made. 
 (

1

 page 10)

c

Select the input source correctly 
using the INPUT button. 
 (

1

 page 19)

c

Set the computer signal to output 
from an external monitor.

c

Set the computer signal to output 
only to an external monitor.

This section describes how to solve the 
problems, how to replace a lamp and air 
filter, etc.

The picture from the PJ 
MULTI connector is 
colored strange.

c

Select “Computer”, 
“Component” or “Video GBR” 
for “Input-A Signal Sel” in the 
SET SETTING 

 menu 

according to the input signal.   
(

1

 page 27)

Color balance is 
incorrect.

c

Adjust the picture in the “Adjust 
Picture ...” of the PICTURE 
SETTING  

menu 

 (

1

 page 25).

c

Set “Color System” in the SET 
SETTING 

 menu to match 

the color system being input. 
(

1

 page 27)

The picture is too dark.

c

Adjust the contrast or brightness 
in the “Adjust Picture ...” of the 
PICTURE SETTING 

 menu 

properly. (

1

 page 25)

The picture is not clear.

c

Adjust the focus with the 
FOCUS ring. (

1

 page 19)

c

Condensation has occurred on 
the lens. Leave the projector for 
about two hours with the power 
on.

The picture flickers.

c

Adjust “Dot Phase” for “Adjust 
Signal...” in the INPUT 
SETTING 

 menu properly. 

(

1

 page 26)

c

Press MUTING on the remote 
control.

Sound

No sound.

c

Check that connecting cables are 
properly connected. (

1

 page 

10)

c

Adjust “Volume” in the 
PICTURE SETTING 

 menu 

(

1

 page 25), or press 

 on the remote 
control.

c

Press MUTING on the remote 
control.

On-screen display

On-screen display does 
not appear.

c

Set “Status” in the MENU 
SETTING 

 menu to “On.” 

(

1

 page 27)

Remote control

The remote control 
does not work.

c

Batteries could be weak. 
Replace with new batteries. (

1


page 5)

c

Insert the batteries with correct 
polarities. (

1

 page 5)

Содержание Cineza VPL-HS2

Страница 1: ...536 14 1 Video Projector Operating Instructions __________________________________GB Mode d emploi ________________________________________FR Manual de instrucciones _________________________________ES 2002 Sony Corporation VPL HS2 ...

Страница 2: ...erference to radio or television reception which can be determined by turning the equipment off and on the user is encouraged to try to correct the interference by one or more of the following measures Reorient or relocate the receiving antenna Increase the separation between the equipment and receiver Connect the equipment into an outlet on a circuit different from that to which the receiver is c...

Страница 3: ...l Interface Unit 12 Step 3 Adjusting the Picture Size and Position 12 Step 4 Selecting the Menu Language 16 Projecting Projecting the Picture on the Screen 18 Selecting the Wide Screen Mode 20 Selecting the Picture Viewing Mode 22 Using the Menus Operation through the Menus 23 Menu Lists 25 Menu Configurations 25 Menu Items 25 About the Preset Memory No 28 Adjusting Picture Quality of a Signal fro...

Страница 4: ...even if the unit itself has been turned off Do not look into the lens while the lamp is on Do not place your hand or objects near the ventilation holes The air coming out is hot On preventing internal heat build up After you turn off the power with the I 1 on standby switch do not disconnect the unit from the wall outlet while the cooling fan is still running Caution The projector is equipped with...

Страница 5: ...nt 1 Cinema filter 1 Adjuster spacers 2 AC power cord 1 Operating Instructions 1 Inserting the batteries into the remote control This section describes how to install the projector and screen how to connect the equipment from which you want to project the picture etc Insert the batteries E side first as shown in the illustration Inserting them forcibly or with the polarities reversed may cause a s...

Страница 6: ...Shot 1 page 9 You can enjoy home entertainment with this projector in various situations Enjoying home theater Enjoying video games on a large screen Watching sports etc with your company Before Setting Up the Projector Do not place the projector in the following situations which may cause malfunction or damage to the projector Poorly ventilated Highly heated and humid Very dusty and extremely smo...

Страница 7: ...ng Use it according to preference To attach the Cinema Filter 1 Turn off the power and disconnect the power cord 2 Insert the Cinema Filter aligning its screw with the thread around the projector s lens then turn the Filter clockwise To remove the Cinema Filter turn it counterclockwise Using the Optional Conversion Lens You can install the optional VPLL CW20 Short Focused Conversion Lens on the pr...

Страница 8: ...the screen 1 Determine the installation position of the projector and screen a Minimum projection distance between the screen and the center of the projector s lens when you place the projector on the side Side Shot or when you place the projector with the center of the screen and the center of the lens aligned b Maximum projection distance between the screen and the center of the projector s lens...

Страница 9: ... signal are shown on page 35 Note If you project the picture using Side Shot only set V Keystone in the INSTALL SETTING menu to Manual and adjust the level to 0 When projecting from the center You can change the projection angle using the adjuster 1 page 13 Position the projector with the lens end within the area in the illustration by using the values a and b in the table below as a guide Unit m ...

Страница 10: ...e noise When pulling out a cable be sure to pull it out from the plug not the cable itself Refer to the operating instructions of the connected equipment When you connect your projector to PJ MULTI selecttheinput signalwith the Input A SignalSel setting in the SET SETTING menu 1 page 27 Connecting with Video Equipment Rear of the projector S Video or video audio cable not supplied with SONY logo u...

Страница 11: ...e SIC HS20 not supplied Rear of the projector to RGB component output Y PB CB PR CR Audio L S Video DVD player with component video connectors digital tuner etc to S video audio output Audio R Signal interface cable SIC HS40 not supplied Rear of the projector to S video or video output to component video output Active speakers AV amplifier Y PB CB PR CR Video S Video Rear of the projector Signal i...

Страница 12: ...ture Size and Position Tip The 1 on standby INPUT MENU and m M ENTER joystick buttons on the side panel of the projector have the same functions as those on the remote control to PJ multi output Rear of the projector Interface unit IFU HS1 not supplied VCR etc DVD player etc PJ multi cable supplied with the IFU HS1 Audio amplifier Active speakers TV INPUT LIGHT STANDARD CINEMA DYNAMIC USER 2 PICTU...

Страница 13: ... time you press the button the input indication changes 1 page 19 5 Adjust the focus roughly using the FOCUS ring 6 Adjust the size and position of the picture to fit the screen using the ZOOM ring and the adjuster Turn the ZOOM ring to adjust the picture size Adjusting the picture position using the adjuster Hold down and slide the adjuster lock lever to the right move the projector then return t...

Страница 14: ...cal distortion will be automatically corrected Note The V Keystone adjustment may not correct trapezoidal distortion perfectly depending on the room temperature or the screen angle In this case adjust the distortion manually 2 Adjust so that the left or right side of the picture fits that of the screen If you position the projector on the left side of the screen adjust so that the left side of the...

Страница 15: ...button For how to correct see step 3 in When projecting using both Side Shot and V Keystone adjustments When projecting from the center Adjust so that both the position and size of the bottom side of the picture fit those of the bottom side of the screen using the adjuster and the ZOOM ring If you set V Keystone in the INSTALL SETTING menu to Auto 1 page 27 the vertical distortion will be automati...

Страница 16: ... STANDBY indicator lights in red and the projector goes into standby mode 2 Press the 1 on standby switch to turn on the projector The ON STANDBY indicator lights in green 3 Press MENU The menu appears The menu presently selected is shown as a yellow button 4 Press M or m to select the MENU SETTING menu and press or ENTER The selected menu appears INPUT LIGHT STANDARD CINEMA DYNAMIC USER 2 PICTURE...

Страница 17: ...ep 4 Selecting the Menu Language 5 Press M or m to select Language and press or ENTER 6 Press M or m to select a language and press or ENTER The menu changes to the selected language To clear the menu Press MENU ENTER Input A or ENTER or ...

Страница 18: ...tandby mode This section describes how to operate the projector to view the picture from the equipment connected to the projector It also describes how to select the wide screen mode or the quality of the picture to suit your taste INPUT LIGHT STANDARD CINEMA DYNAMIC USER 2 PICTURE MODE USER 3 USER 1 DDE MENU APA MUTING VOLUME SIDE SHOT RESET WIDE MODE ENTER 2 4 MUTING button 7 ON STANDBY Lights i...

Страница 19: ...OOM ring to adjust the size of the picture 6 Turn the FOCUS ring to adjust the focus Adjust to obtain sharp focus 7 Press VOLUME or to adjust the volume To view the picture from Press INPUT to display Video equipment connected to VIDEO INPUT on the projector Video 1 Video equipment connected to S VIDEO INPUT on the projector S Video 1 RGB component equipment connected to PJ MULTI INPUT via the opt...

Страница 20: ...N STANDBY indicator with the 1 switch 3 Unplug the AC power cord from the wall outlet after the fan stops running and the ON STANDBY indicator lights in red You can turn off the projector by holding the 1 on standby switch for about one second instead of performing the above steps SelectingtheWide Screen Mode You can enjoy various wide screen mode according to the video signal received You can als...

Страница 21: ...splayed in the center of the screen Normal Through One to one mapping is done on a 4 3 normal aspect ratio picture It is displayed in the center of the screen Notes You can adjust the vertical position of the picture with V Position in the INPUT SETTING menu when Zoom or Subtitle is selected or when Full Through or Normal Through is selected for video 50Hz or progressive component 50p input signal...

Страница 22: ...ss when viewing the picture with DYNAMIC CINEMA Select for soft film like picture USER 1 2 and 3 You can adjust the quality of the picture to suit your taste and store the settings into the selected memory of the projector Press one of the USER 1 2 and 3 buttons then adjust the picture by using the menus The settings are stored and you can view the picture with the adjusted picture quality by pres...

Страница 23: ...guage on page 16 Display items Input signal indicator Shows the selected input channel is displayed when no signal is input You can hide this indicator using Status in the MENU SETTING menu Input signal setting indicator For Input A Shows Computer Component or Video GBR For Video S Video input Shows Auto or the Color System setting in the SET SETTING menu This section describes how to make various...

Страница 24: ...iginal screen To clear the menu Press MENU To reset items that have been adjusted Select the item you want to reset then press RESET Complete appears on the screen and the setting is reset to its factory preset value Items that can be reset are Contrast Brightness Color Hue Sharpness and RGB Enhancer in Adjust Picture of the PICTURE SETTING menu Dot Phase H Size and Shift in Adjust Signal of the I...

Страница 25: ...for enhanced picture contrast and sharpness Standard Recommended for normal viewing condition Also select to reduce roughness when viewing the picture with Dynamic Cinema Select for soft film like picture User 1 2 and 3 You can adjust the quality of the picture to suit your taste and store the settings Once the settings are stored you can view the picture with the adjusted picture quality by press...

Страница 26: ...tion Wide Mode You can select the 4 3 aspect ratio picture mode Normal and Normal Through and 16 9 aspect ratio picture mode Full Wide Zoom Zoom Subtitle and Full Through Full The 16 9 squeezed picture is diplayed with the correct aspect The 4 3 picture is enlarged horizontally to fit the 16 9 screen squeezed An original 16 9 aspect ratio picture is recorded horizontally compressed to be a 4 3 pic...

Страница 27: ...hen turning off the power and warning messages Language Selects the language used in the menu and on screen displays Available languages are English French German Italian Spanish Portuguese Japanese Chinese and Korean Menu Position Selects the display position from Top Left Bottom Left Center Top Right and Bottom Right Menu Color Selects the tone of the menu display from White or Black Item Descri...

Страница 28: ... H size Make fine adjustment by adjusting Shift Note When the aspect ratio of input signal does not match the screen size a part of the screen is displayed in black Adjusting Picture Quality of a Signal from the Computer You can automatically adjust to obtain the clearest picture when projecting a signal from the computer 1 Project a still picture from the computer 2 Press the APA Auto Pixel Align...

Страница 29: ...icture of the PICTURE SETTING menu 1 page 25 c Set Color System in the SET SETTING menu to match the color system being input 1 page 27 The picture is too dark c Adjust the contrast or brightness in the Adjust Picture of the PICTURE SETTING menu properly 1 page 25 The picture is not clear c Adjust the focus with the FOCUS ring 1 page 19 c Condensation has occurred on the lens Leave the projector f...

Страница 30: ...s unusually high Check to see if nothing is blocking the ventilation holes LAMP COVER and TEMP FAN light up c The electrical system breaks down Consult with qualified Sony personnel LAMP COVER TEMP FAN POWER SAVING ON STANDBY LAMP COVER Indicator TEMP FAN Indicator High temp Lamp off in 1 min c Turn off the power c Check to see if nothing is blocking the ventilation holes Frequency is out of range...

Страница 31: ...oving the lamp unit make sure it remains horizontal then pull straight up Do not tilt the lamp unit If you pull out the lamp unit while tilted and if the lamp is broken the pieces may scatter causing injury 1 Hold down the adjuster lock lever slide it to the right raise the rear of the projector then return the adjuster lock lever While keeping the screw on the bottom of the projector turned inwar...

Страница 32: ...e of a used projector lamp in the same way as a fluorescent lamp Replacing the Air Filter The air filter should be replaced periodically When Please replace the filter appears on the screen replace the air filter immediately Notes Replacing the air filter is very important to maintain the high efficiency of the projector and to prevent a malfunction When the replacement message appears on the scre...

Страница 33: ... N system switched automatically manually Acceptable video signals 15 kHz RGB component 50 60 Hz Progressive component 50 60 Hz DTV 480 60i 575 50i 480 60p 575 50p 720 60p 720 50p 1080 60i 1080 50i 1080 24PsF Composite video Y C video Acceptable computer signals fH 19 to 72 kHz fV 48 to 92 Hz Maximum resolution XGA 1024 768 fV 85 Hz Speaker Monaural speaker system 33 mm 1 5 16 inches diameter max ...

Страница 34: ...es Remote control RM PJHS2 1 Size AA R6 batteries 2 Signal interface cable SIC HS50 5 m 1 AC power cord 1 Air filter for replacement 1 Cinema Filter 1 Adjuster specers 2 Operating Instructions 1 Design and specifications are subject to change without notice Optional accessories Signal interface unit IFU HS1 Projector Lamp LMP H150 for replacement Air filter PK HS1FL for replacement Signal interfac...

Страница 35: ...ormat signal and computer s signal Unit m feet Screen size inches 40 60 80 100 120 150 a 1 6 5 2 2 5 8 2 3 3 10 8 4 1 13 5 5 0 16 4 6 2 20 3 b 1 9 6 2 2 9 9 5 3 9 12 7 4 8 15 7 5 8 19 0 7 3 24 0 c 0 08 0 2 0 1 0 3 0 2 0 7 0 2 0 6 0 3 1 0 0 3 1 0 d 0 2 0 7 0 3 1 0 0 4 1 3 0 5 1 6 0 6 2 0 0 8 2 6 ...

Страница 36: ...930 115 3 8 3520 138 5 8 4410 173 3 4 Maximum 1400 55 1 8 2130 83 7 8 2860 112 5 8 3580 141 4310 169 3 4 5400 212 5 8 b x 194 x 7 5 8 x 290 x 11 1 2 x 387 x 15 1 4 x 484 x 19 1 8 x 581 x 22 7 8 x 726 x 28 5 8 c x 291 x 11 1 2 x 387 x 15 1 4 x 484 x 19 1 8 x 581 x 22 7 8 x 678 x 26 3 4 x 823 x 32 1 2 a x b c Floor installation example Standard lens 23 mm 29 32 inches Center of the screen Wall Floor...

Страница 37: ...92666667 c x SS 5 92666667 97 SS inches 40 60 80 100 120 150 a Minimum 1410 55 5 8 2140 84 3 8 2860 112 7 8 3590 141 3 8 4320 170 1 8 5410 213 1 8 Maximum 1730 68 1 8 2620 103 1 4 3510 138 1 4 4390 172 7 8 5280 208 6620 260 3 4 b x 237 x 9 3 8 x 356 x 14 x 474 x 18 3 4 x 593 x 23 3 8 x 711 x 28 x 889 x 35 c x 334 x 13 1 4 x 453 x 17 7 8 x 571 x 22 1 2 x 690 x 27 1 4 x 808 x 31 7 8 x 986 x 38 7 8 ...

Страница 38: ... C7 2 YC 13L Cord type SPT 2 H03VVH2 F H03VVH2 F H03VVH2 F VCTFK Rated Voltage Current 10A 125V 2 5A 250V 2 5A 250V 2 5A 250V 7A 125V Safety approval UL CSA VDE BS SAA DENANHO Cord length max 4 5 m Item Input signal Video or S video Y C Component Video GBR Computer Contrast z z z z Brightness z z z z Color z except for B W z z Hue z NTSC3 58 4 43 only except for B W z z Sharpness z z z RGB Enhance...

Страница 39: ...1 72 809 SonG 832 14 VGA VESA 75Hz 37 500 75 000 H neg V neg 840 15 VGA VESA 85Hz 43 269 85 008 H neg V neg 832 16 800 600 SVGA VESA 56Hz 35 156 56 250 H pos V pos 1024 17 SVGA VESA 60Hz 37 879 60 317 H pos V pos 1056 18 SVGA VESA 72Hz 48 077 72 188 H pos V pos 1040 19 SVGA VESA 75Hz 46 875 75 000 H pos V pos 1056 20 SVGA VESA 85Hz 53 674 85 061 H pos V pos 1048 21 832 624 Macintosh 16 49 724 74 5...

Страница 40: ...EMP FAN POWER SAVING ON STANDBY MENU SIDE SHOT LAMP COVER indicator 1 page 30 Lens Ventilation holes exhaust 1 page 7 POWER SAVING indicator 1 page 27 ON STANDBY indicator 1 page 13 1 on standby switch 1 page 13 INPUT button 1 page 13 Adjuster lock lever 1 page 13 Front remote control detector 1 page 12 Joystick 1 page 16 MENU button 1 page 16 TEMP FAN indicator 1 page 30 SIDE SHOT button 1 page 1...

Страница 41: ...NPUT connector mini DIN 4 pin VIDEO INPUT jack phono type 1 page 10 AUDIO L R INPUT jacks phono type 1 page 10 AC IN socket PJ MULTI INPUT connector 32 pin multi 1 page 11 Lamp cover 1 page 31 Air filter cover 1 page 32 Speaker FOCUS ring 1 page 13 ZOOM ring 1 page 13 Adjuster 1 page 13 ...

Страница 42: ...ns on the remote control SIDE SHOT button 1 page 14 VOLUME button 1 page 19 Infrared transmitter DDE button 1 page 26 The button has the same function as DDE in the PICTURE SETTING menu 1 on standby switch 1 page 13 INPUT button 1 page 13 M m ENTER buttons 1 page 23 RESET button 1 page 24 MENU button 1 page 23 MUTING button 1 page 20 APA button 1 page 28 PICTURE MODE buttons 1 page 22 WIDE MODE bu...

Страница 43: ... 27 Installing the Projector and a Screen 8 L Lamp replacement 31 Lamp Timer 27 Language 27 Location of controls front 40 rear 41 remote control 42 M Menu clearing the menu display 24 operation 23 reset 24 Menu Color 27 Menu Position 27 MENU SETTING menu 27 Message caution 30 warning 30 O Optional accesories 34 P Picture Mode 25 Cinema 25 Dynamic 25 Standard 25 User 1 2 and 3 25 PICTURE SETTING me...

Страница 44: ...midité Afin d éviter tout risque d électrocution n ouvrez pas le châssis Confiez l entretien uniquement à un personnel qualifié Pour les utilisateurs au Canada Cet appareil numérique de la classe B est conforme à la norme NMB 003 du Canada AVERTISSEMENT La prise doit être près de l appareil et facile d accès ...

Страница 45: ...ce en option 12 Étape 3 Réglage de la taille et de la position de l image 12 Étape 4 Sélection de la langue de menu 16 Projection Projection de l image sur l écran 18 Sélection du mode d écran large 20 Sélection du mode de visualisation d image 22 Utilisation des menus Opérations de menu 23 Listes de menus 25 Configurations de menu 25 Options de menu 25 Numéros de mémoire de présélection 28 Réglag...

Страница 46: ...z pas dans l objectif lorsque la lampe est allumée Ne placez pas la main ou d autres objets à proximité des orifices de ventilation L air expulsé est brûlant Prévention de la surchauffe interne Après avoir mis l appareil hors tension au moyen de l interrupteur 1 marche veille ne le débranchez pas de la prise secteur tant que le ventilateur de refroidissement tourne Attention Le projecteur est équi...

Страница 47: ...t 1 Filtre cinéma 1 Entretoises de support réglable 2 Cordon d alimentation secteur 1 Mode d emploi 1 Mise en place des piles dans la télécommande Cette section indique comment installer le projecteur et l écran comment raccorder le matériel dont vous désirez projeter l image etc Insérez les piles avec le côté E en premier comme sur la figure Une insertion forcée ou avec une polarité inversée risq...

Страница 48: ...e de nombreuses possibilités d animation audiovisuelle à domicile dans de multiples situations Goûtez aux plaisirs du Home Cinema Redécouvrez vos jeux vidéo sur écran géant Regardez les sports etc entre amis Avant l installation du projecteur Ne placez pas le projecteur dans les conditions suivantes Il risquerait de mal fonctionner ou d être endommagé Mauvaise aération Exposition à la chaleur et à...

Страница 49: ...monter le filtre cinéma 1 Mettez le projecteur hors tension et débranchez le cordon d alimentation 2 Insérez le filtre cinéma en alignant son filetage sur celui de l objectif puis tournez le dans le sens des aiguilles d une montre Pour retirer le filtre cinéma tournez le dans le sens inverse des aiguilles d une montre Utilisation du convertisseur de focale en option Vous pouvez installer le conver...

Страница 50: ... s affiche pas correctement Installation du projecteur et d un écran La distance d installation entre le projecteur et l écran dépend de la taille de l écran 1 Déterminez la position d installation du projecteur et de l écran a Distance de projection minimale entre l écran et le centre de l objectif lorsque le projecteur est placé sur le côté Side Shot ou avec le centre de l objectif aligné sur le...

Страница 51: ...format 1080i 720p et d un signal d ordinateur sont indiquées à la page 36 Remarque Lors d une projection en utilisant le réglage Side Shot seulement placez Trapèze V sur Manuel dans le menu RÉGLAGE D INSTALLATION et réglez le niveau sur 0 Lors d une projection depuis le centre Vous pouvez régler l angle de projection à l aide du support réglable 1 page 13 Positionnez le projecteur avec l extrémité...

Страница 52: ...sont souvent à l origine de parasites Débranchez les câbles en les tenant par leur fiche Ne tirez pas sur le câble lui même Consultez le mode d emploi de l appareil raccordé Lorsque vous raccordez le projecteur à PJ MULTI sélectionnez le signal d entrée avec le paramètre Sél sign entr A du menu RÉGLAGE 1 page 27 Raccordement à un appareil vidéo Arrière du projecteur Câble S vidéo ou vidéo audio no...

Страница 53: ...B PR CR Y Lecteur DVD avec connecteurs vidéo composantes tuner numérique etc Audio L S vidéo Audio R Câble d interface signal SIC HS20 non fourni vers sortie RVB composantes vers sortie S vidéo audio Câble d interface signal SIC HS40 non fourni Arrière du projecteur vers sortie vidéo composantes Y PB CB PR CR Vidéo S vidéo Enceintes amplifiées Amplificateur AV vers sortie S vidéo ou vidéo Câble d ...

Страница 54: ... de l image Conseil Les touches 1 marche veille INPUT MENU et m M ENTER joystick du panneau latéral du projecteur ont les mêmes fonctions que celles de la télécommande vers sortie PJ multi Arrière du projecteur Périphérique d interface IFU HS1 non fourni Magnétoscope etc Lecteur DVD etc Câble PJ Multi fourni avec l IFU HS1 Amplificateur audio Enceintes amplifiées Téléviseur INPUT LIGHT STANDARD CI...

Страница 55: ...ur l écran À chaque pression sur la touche l indication d entrée change 1 page 19 5 Effectuez une mise au point approximative à l aide de la molette FOCUS 6 Réglez la taille et la position de l image aux dimensions de l écran à l aide de la molette ZOOM et du support réglable Tournez la molette ZOOM pour régler la taille de l image Réglage de la position de l image à l aide du support réglable Aba...

Страница 56: ...verticale de l image Si vous placez Trapèze V sur Auto dans le menu RÉGLAGE D INSTALLATION 1 page 27 la distorsion verticale est automatiquement corrigée Remarque Pour certaines températures ambiantes et angles d écran il se peut que le réglage du paramètre Trapèze V ne permette pas de corriger parfaitement la distorsion trapézoïdale Corrigez alors la distorsion manuellement 2 Réglez le côté droit...

Страница 57: ...l aide de la touche SIDE SHOT ou Pour la procédure correction voir l étape 3 sous Lors d une projection en utilisant les réglages Side Shot et Trapèze V Lors d une projection depuis le centre À l aide du support réglable et de la molette ZOOM réglez la position et la taille du bas de l image sur le bas de l écran Si vous placez Trapèze V sur Auto dans le menu RÉGLAGE D INSTALLATION 1 page 27 la di...

Страница 58: ...don d alimentation secteur à une prise murale L indicateur ON STANDBY s allume en rouge et le projecteur est mis en veille 2 Appuyez sur l interrupteur 1 marche veille pour mettre le projecteur sous tension Le témoin ON STANDBY s allume en vert 3 Appuyez sur MENU Le menu apparaît Le menu actuellement sélectionné est indiqué comme un bouton jaune INPUT LIGHT STANDARD CINEMA DYNAMIC USER 2 PICTURE M...

Страница 59: ... ou ENTER Le menu sélectionné apparaît 5 Appuyez sur M ou m pour sélectionner Language puis appuyez sur ou ENTER 6 Appuyez sur M ou m pour sélectionner une langue puis appuyez sur ou ENTER La langue de menu est remplacée par celle que vous avez sélectionnée Pour faire disparaître le menu Appuyez sur MENU ENTER Input A A ou ENTER Input A ou ENTER ou ...

Страница 60: ...is en veille Cette section indique comment utiliser le projecteur pour visionner l image de l appareil raccordé au projecteur Elle expliqueégalement comme sélectionner le mode d écran large ou la qualité de l image selon vos préférences INPUT LIGHT STANDARD CINEMA DYNAMIC USER 2 PICTURE MODE USER 3 USER 1 DDE MENU APA MUTING VOLUME SIDE SHOT RESET WIDE MODE ENTER 2 4 7 Touche MUTING ON STANDBY S a...

Страница 61: ...e 6 Tournez la molette FOCUS pour régler la mise au point Réglez pour que l image soit nette 7 Appuyez sur VOLUME ou pour régler le volume Pour visionner l image d un Appuyez sur INPUT pour afficher appareil vidéo raccordé à VIDEO INPUT du projecteur Video 1 appareil vidéo raccordé à S VIDEO INPUT du projecteur S video 1 appareil RVB composantes raccordé à PJ MULTI INPUT à l aide du câble d interf...

Страница 62: ... 1 3 Attendez que le ventilateur s arrête et que l indicateur ON STANDBY s allume en rouge avant de débrancher le cordon d alimentation secteur de la prise murale Vous pouvez mettre le projecteur hors tension en appuyant sur l interrupteur 1 marche veille pendant une seconde environ au lieu d effectuer les opérations ci dessus Sélectiondumode d écran large Vous avez le choix entre plusieurs modes ...

Страница 63: ...ffichée au centre de l écran Direct normal Un mappage un à un est effectué sur une image au format normal 4 3 L image est affichée au centre de l écran Remarques Vous pouvez régler la position verticale de l image avec Position V du menu RÉGLAGE DE L ENTRÉE lorsque Zoom ou Sous titres est sélectionné ou Direct plein ou Direct normal est sélectionné pour un signal d entrée vidéo 50 Hz ou composante...

Страница 64: ... réduire la rugosité lorsque vous visualisez l image en mode DYNAMIC CINEMA Sélectionnez ce mode pour des images peu contrastées telles que celles des films USER 1 2 et 3 Vous pouvez régler la qualité de l image selon vos préférences et enregistrer les paramètres dans l une des mémoires du projecteur Appuyez sur l une des touches USER 1 2 ou 3 puis réglez l image avec les menus Les paramètres sont...

Страница 65: ...Indicateur de signal d entrée Indique le canal d entrée sélectionné s affiche lorsqu il n y a pas d entrée de signal Vous pouvez masquer cet indicateur avec État du menu RÉGLAGE DE MENU Indicateur de sélection du signal d entrée Pour l entrée A Affiche Ordinateur Composant ou Video GBR Pour l entrée Video S Video Affiche Auto ou le Standard coul sélectionné dans le menu RÉGLAGE Cette section indiq...

Страница 66: ... sur MENU Pour réinitialiser les paramètres modifiés Sélectionnez le paramètre à réinitialiser puis appuyez sur RESET Effectué apparaît à l écran et le paramètre est réinitialisé à sa valeur d usine Les paramètres pouvant être réinitialisés sont Contraste Lumière Couleur Teinte Netteté et Optimiseur RVB de Réglez l image dans le menu PARAMÉTRAGE DE L IMAGE Phase des points Amplification H et Dépla...

Страница 67: ... accentuer le contraste et la netteté de l image Standard Recommandé pour des conditions normales de visualisation Sélectionnez également ce mode pour réduire la rugosité lorsque vous visualisez l image en mode Dynamique Cinéma Sélectionnez ce mode pour des images peu contrastées telles que celles des films Utilisateur 1 2 et 3 Vous pouvez régler la qualité de l image selon vos préférences et mémo...

Страница 68: ...ible plus l image est étroite Paramètre Description Déplacement Lorsque la valeur de H horizontal augmente l image se déplace vers la droite lorsque la valeur de réglage diminue l image se déplace vers la gauche Utilisez ou pour régler la position horizontale Lorsque la valeur de réglage de V vertical augmente l image se déplace vers le haut lorsque la valeur de réglage diminue l image se déplace ...

Страница 69: ...N NTSC3 58 PAL N Règle le standard couleur sur celui qui a été sélectionné manuellement Paramètre Description Mode économique Lorsque ce paramètre est sur On le témoin POWER SAVING s allume Le projecteur passe en mode d économie d énergie s il ne reçoit aucun signal pendant 10 minutes La lampe s éteint alors mais le ventilateur de refroidissement continue de tourner En mode d économie d énergie le...

Страница 70: ... en réglant Amplification H Effectuez un réglage fin avec Déplacement Remarque Lorsque le format d image du signal d entrée ne correspond pas à la taille de l écran il y a des bandes noires sur l écran Side Shot Corrige la distorsion trapézoïdale horizontale de l image Lorsque vous réglez l image en utilisant Trapèze V seulement réglez le niveau sur 0 Symétrie Fait basculer l image sur son axe hor...

Страница 71: ...atiquement activée Appuyez sur la touche APA alors que l image couvre tout l écran de l ordinateur S il y a des bords noirs autour de l image la fonction APA ne fonctionnera pas correctement et il se peut que l image dépasse de l écran Après avoir changé de signal d entrée ou reconnecté l ordinateur appuyez à nouveau sur la touche APA pour obtenir une image correcte Pour faire réapparaître l écran...

Страница 72: ...ue que vers un moniteur externe L image via le connecteur PJ MULTI présente des couleurs anormales c Sélectionnez Ordinateur Composant ou Video GBR pour Sél sign entr A dans le menu RÉGLAGE en fonction du signal d entrée 1 page 27 La balance des couleurs est incorrecte c Réglez l image dans Réglez l image du menu PARAMÉTRAGE DE L IMAGE 1 page 25 c Placez Standard coul du menu RÉGLAGE sur le standa...

Страница 73: ...atteint une température élevée Attendez une minute que la lampe refroidisse et remettez le projecteur sous tension 1 page 20 TEMP FAN clignote c Le ventilateur est défectueux Consultez le service après vente Sony TEMP FAN s allume c La température à l intérieur du projecteur est anormalement élevée Vérifiez si les orifices de ventilation ne sont pas obstrués LAMP COVER et TEMP FAN s allument c Le ...

Страница 74: ...e de lampe maintenez le bien à l horizontale et tirez perpendiculairement N inclinez pas le module de lampe Si vous extrayez le module de lampe en l inclinant et si la lampe se brise il se peut que vous vous blessiez avec les éclats 1 Abaissez le levier de verrouillage du support réglable faites le glisser vers la droite soulevez l arrière du projecteur puis ramenez le levier sur sa position initi...

Страница 75: ... vous débarrasser d une lampe de projecteur usée de la même manière qu une lampe fluorescente Remplacement du filtre à air Le filtre à air doit être remplacé périodiquement Lorsque Remplacer le filtre s affiche à l écran remplacez immédiatement le filtre à air Remarques Le remplacement du filtre à air est très important pour la performance du projecteur et pour éviter les dysfonctionnements Lorsqu...

Страница 76: ... 2 Lampe Type UHP 150 W Dimensions de l image projetée Plage 40 à 150 pouces en diagonale Standard couleur NTSC3 58 PAL SECAM NTSC4 43 PAL M PAL N sélection automatique manuelle Signaux vidéo compatibles RVB 15 kHz composantes 50 60 Hz composantes progressif 50 60 Hz DTV 480 60i 575 50i 480 60p 575 50p 720 60p 720 50p 1080 60i 1080 50i 1080 24PsF vidéo composite vidéo Y C Signaux d ordinateur comp...

Страница 77: ...nviron Alimentation 100 à 240 V CA 2 1 1 1 A 50 60 Hz Consommation électrique Max 200 W Mode de veille 3 W Température de fonctionnement 0 à 35 ºC 32 à 95 ºF Humidité de fonctionnement 35 à 85 sans condensation Température de stockage 20 à 60 ºC 4 à 140 ºF Humidité de stockage 10 à 90 Accessoires fournis Télécommande RM PJHS2 1 Piles de format AA R6 2 Câble d interface signal SIC HS50 5 m 1 Cordon...

Страница 78: ...1 6 5 2 2 5 7 9 3 3 10 8 4 1 13 5 5 0 16 4 6 2 20 3 b 1 8 5 9 2 7 8 9 3 6 11 8 4 5 14 8 5 4 17 7 6 8 22 3 c 0 2 0 7 0 3 1 0 0 4 1 3 0 6 2 0 0 7 2 3 0 8 2 6 d 0 2 0 7 0 3 1 0 0 3 1 0 0 4 1 3 0 5 1 6 0 6 2 0 e 0 3 1 0 0 5 1 6 0 7 2 3 0 9 3 0 1 0 3 3 1 3 4 3 f 0 4 1 3 0 6 2 0 0 8 2 6 1 0 3 3 1 2 3 9 1 5 4 9 Taille d écran pouces 40 60 80 100 120 150 a 1 6 5 2 2 5 8 2 3 3 10 8 4 1 13 5 5 0 16 4 6 2 20...

Страница 79: ... 91 3 4 2930 115 3 8 3520 138 5 8 4410 173 3 4 Maximum 1400 55 1 8 2130 83 7 8 2860 112 5 8 3580 141 4310 169 3 4 5400 212 5 8 b x 194 x 7 5 8 x 290 x 11 1 2 x 387 x 15 1 4 x 484 x 19 1 8 x 581 x 22 7 8 x 726 x 28 5 8 c x 291 x 11 1 2 x 387 x 15 1 4 x 484 x 19 1 8 x 581 x 22 7 8 x 678 x 26 3 4 x 823 x 32 1 2 a x b c Exemple d installation au plancher Objectif standard 23 mm 29 32 pouces Centre de ...

Страница 80: ...x SS 5 92666667 c x SS 5 92666667 97 SS pouces 40 60 80 100 120 150 a Minimum 1410 55 5 8 2140 84 3 8 2860 112 7 8 3590 141 3 8 4320 170 1 8 5410 213 1 8 Maximum 1730 68 1 8 2620 103 1 4 3510 138 1 4 4390 172 7 8 5280 208 6620 260 3 4 b x 237 x 9 3 8 x 356 x 14 x 474 x 18 3 4 x 593 x 23 3 8 x 711 x 28 x 889 x 35 c x 334 x 13 1 4 x 453 x 17 7 8 x 571 x 22 1 2 x 690 x 27 1 4 x 808 x 31 7 8 x 986 x 3...

Страница 81: ... de cordon SPT 2 H03VVH2 F H03VVH2 F H03VVH2 F VCTFK Tension et intensités nominales 10 A 125 V 2 5 A 250 V 2 5 A 250 V 2 5 A 250 V 7 A 125 V Approbation de sécurité UL CSA VDE BS SAA DENANHO Longueur de cordon max 4 5 m Paramètre Signal d entrée Video ou S video Y C Composant Video GBR Ordinateur Contraste z z z z Lumière z z z z Couleur z sauf pour N B z z Teinte z NTSC3 58 4 43 seulement sauf p...

Страница 82: ... 13 VGA VESA 72 Hz 37 861 72 809 Sync sur V 832 14 VGA VESA 75 Hz 37 500 75 000 H nég V nég 840 15 VGA VESA 85 Hz 43 269 85 008 H nég V nég 832 16 800 600 SVGA VESA 56 Hz 35 156 56 250 H pos V pos 1024 17 SVGA VESA 60 Hz 37 879 60 317 H pos V pos 1056 18 SVGA VESA 72 Hz 48 077 72 188 H pos V pos 1040 19 SVGA VESA 75 Hz 46 875 75 000 H pos V pos 1056 20 SVGA VESA 85 Hz 53 674 85 061 H pos V pos 104...

Страница 83: ...OWER SAVING ON STANDBY MENU SIDE SHOT Indicateur LAMP COVER 1 page 31 Objectif Orifices de ventilation sortie d air 1 page 7 Indicateur POWER SAVING 1 page 27 Indicateur ON STANDBY 1 page 13 Interrupteur 1 marche veille 1 page 13 Touche INPUT 1 page 13 Levier de verrouillage du support réglable 1 page 13 Capteur de télécommande avant 1 page 12 Joystick 1 page 16 Touche MENU 1 page 16 Touche SIDE S...

Страница 84: ...N 4 broches prise VIDEO INPUT type Cinch 1 page 10 Prise AC IN Connecteur PJ MULTI INPUT multi connecteur 32 broches 1 page 11 Couvercle de lampe 1 page 32 Couvercle de filtre à air 1 page 33 Support réglable 1 page 13 Prises AUDIO L R INPUT type Cinch 1 page 10 Molette ZOOM 1 page 13 Molette FOCUS 1 page 13 Haut parleur ...

Страница 85: ... télécommande Touche SIDE SHOT 1 page 14 Touche VOLUME 1 page 19 Émetteur infrarouge Touche DDE 1 page 26 Cette touche a la même fonction que DDE dans le menu PARAMÉTRAGE DE L IMAGE Interrupteur 1 marche veille 1 page 13 Touche INPUT 1 page 13 Touches M m ENTER 1 page 23 Touche RESET 1 page 24 Touche MENU 1 page 23 Touche APA 1 page 29 Touches PICTURE MODE 1 page 22 Touche WIDE MODE 1 page 20 Touc...

Страница 86: ...GE DE MENU 27 Message avertissement 31 précaution 31 Mode d image 25 cinéma 25 dynamique 25 standard 25 utilisateur 1 2 et 3 25 Mode économique 27 Mode gamma 26 Mode large 26 N Netteté 26 Niveau du noir 26 O Optimiseur RVB 26 Orifices de ventilation prise d air 7 sortie d air 7 P Phase des points 26 Position de menu 27 Projection 18 R Raccordements amplificateur AV 11 appareil vidéo 10 lecteur DVD...

Страница 87: ......

Страница 88: ...o exponga la unidad a la lluvia ni a la humedad Para evitar recibir descargas eléctricas no abra el aparato Contrate exclusivamente los servicios de personal cualificado ADVERTENCIA La toma de corriente debe encontrarse cerca del equipo y ser de fácil acceso ...

Страница 89: ...sición de la imagen 12 Paso 4 Selección del idioma del menú 16 Proyección Proyección de la imagen en la pantalla 18 Selección del modo de pantalla ancha 20 Seleccionar el modo de visualización de la imagen 22 Uso de los menús Funcionamiento mediante los menús 23 Listas de menús 25 Configuraciones de menú 25 Elementos de menú 25 Acerca del nº de memoria preestablecida 28 Ajuste de la calidad de ima...

Страница 90: ...la unidad No mire al objetivo mientras la lámpara esté encendida No coloque la mano ni ningún objeto cerca de los orificios de ventilación El aire que sale es caliente Prevención del calentamiento interno Después de apagar la alimentación con el interruptor 1 encendido espera no desconecte la unidad de la toma mural mientras el ventilador de refrigeración esté en funcionamiento Precaución El proye...

Страница 91: ...ores del ajustador 2 Cable de alimentación de CA 1 Instrucciones de funcionamiento 1 Introducción de las pilas en el mando a distancia En esta sección se describe cómo instalar el proyector y la pantalla cómo conectar el equipo desde el cual desea proyectar la imagen etc Introduzca las pilas comenzando por el lado E como se muestra en la ilustración Si las introduce forzándolas o con las polaridad...

Страница 92: ...Side Shot 1 página 9 Con este proyector puede disfrutar de espectáculos en su propio hogar en diversas situaciones Cine en casa Videojuegos en pantalla grande Espectáculos deportivos etc en compañía Antes de configurar el proyector No ponga el proyector en las siguientes situaciones en las que puede sufrir daños o averías Ventilación escasa Calor y humedad excesivos Polvo y humo excesivo ...

Страница 93: ...1 Desconecte la alimentación y desenchufe el cable de alimentación 2 Inserte el Filtro de cine alineando el tornillo del filtro con la rosca del objetivo del proyector a continuación gire el filtro hacia la derecha Para quitar el filtro de cine gírelo hacia la izquierda Uso de la lente de conversión opcional Es posible instalar la lente de conversión de enfoque corto VPLL CW20 opcional en el proye...

Страница 94: ... la pantalla varía en función del tamaño de ésta 1 Determine la posición de instalación del proyector y la pantalla a Distancia de proyección mínima entre la pantalla y el centro del objetivo del proyector cuando se coloca el proyector de lado Side Shot o cuando se coloca el proyector con el centro de la pantalla y el centro del objetivo alineados b Distancia de proyección máxima entre la pantalla...

Страница 95: ...s de formato 1080i 720p y señales de ordenador Nota Si proyecta la imagen utilizando sólo Side Shot establezca la opción Trapezoide V del menú AJUSTE INSTALACIÓN en Manual y ajuste el nivel en 0 Proyección desde el centro Puede cambiar el ángulo de proyección mediante el ajustador 1 página 13 Sitúe el proyector de modo que el extremo del objetivo quede dentro del área de la ilustración utilice com...

Страница 96: ... ruido Cuando desconecte un cable asegúrese de tirar del enchufe no del cable Consulte las instrucciones de funcionamiento del equipo conectado Si conecta el proyector a la conexión PJ MULTI seleccione la señal de entrada con la configuración Sel señ ent A del menú AJUSTE 1 página 27 Conexión a un equipo de vídeo Parte trasera del proyector Cable S vídeo o vídeo audio no suministrado con el logoti...

Страница 97: ...VD con conectores para vídeo componente sintonizador digital etc S Vídeo Audio L Audio L Cable de interfaz de señales SIC HS20 no suministrado a la salida RGB componente a la salida de S vídeo o vídeo audio Cable de interfaz de señales SIC HS40 no suministrado Parte trasera del proyector a la salida de vídeo componente Y PB CB PR CR S Vídeo Altavoces activos Amplificador AV Vídeo a la salida de S ...

Страница 98: ...encia Los botones 1 encendido espera INPUT MENU y m M ENTER joystick del panel lateral del proyector funcionan igual que los del mando a distancia a la salida múltiple PJ Parte trasera del proyector Unidad de interfaz IFU HS1 no suministrada Videograbadora etc Reproductor de DVD etc Cable múltiple PJ suministrado con el IFU HS1 Amplificador de audio Altavoces activos TV INPUT LIGHT STANDARD CINEMA...

Страница 99: ...imagen en la pantalla Cada vez que pulse el botón la indicación de señal de entrada cambia 1 página 19 5 Ajuste el enfoque de forma aproximada con el anillo FOCUS 6 Ajuste el tamaño y la posición de la imagen de forma que se ajuste a la pantalla con el anillo ZOOM y el ajustador Gire el anillo ZOOM para ajustar el tamaño de la imagen Ajuste de la posición de la imagen utilizando el ajustador Mante...

Страница 100: ...hot y Trapezoide V 1 Ajuste la posición vertical mediante el ajustador Si establece la opción Trapezoide V del menú AJUSTE INSTALACIÓN en Auto 1 página 28 la distorsión vertical se corregirá automáticamente Nota Es posible que el ajuste Trapezoide V no corrija perfectamente la distorsión trapezoidal dependiendo de la temperatura de la habitación o el ángulo de la pantalla En este caso ajuste la di...

Страница 101: ...mismo tiempo el tamaño vertical del lado alineado de la imagen de modo que se ajuste a la pantalla 3 Realice el ajuste necesario para corregir la distorsión trapezoidal horizontal mediante el botón SIDE SHOT o Para ver cómo realizar la corrección consulte el paso 3 de Proyección con los ajustes Side Shot y Trapezoide V Proyección desde el centro Realice el ajuste de modo que tanto la posición como...

Страница 102: ... distancia 1 Enchufe el cable de alimentación CA a una toma mural El indicador ON STANDBY se iluminará en rojo y el proyector entrará en el modo de espera 2 Pulse el interruptor 1 encendido espera para encender el proyector El indicador ON STANDBY se iluminará en verde 3 Pulse MENU Aparecerá el menú El menú actualmente seleccionado se muestra como un botón amarillo INPUT LIGHT STANDARD CINEMA DYNA...

Страница 103: ...ión pulse o ENTER Aparecerá el menú seleccionado 5 Pulse M o m para seleccionar Language y a continuación pulse o ENTER 6 Pulse M o m para seleccionar un idioma y a continuación pulse o ENTER El menú aparecerá en el idioma seleccionado Para que el menú desaparezca Pulse MENU ENTER Input A A o bien ENTER Input A o bien ENTER o bien ...

Страница 104: ...or entrará en el modo de espera En esta sección se describe cómo utilizar el proyector para ver la imagen procedente del equipo conectado También describe cómo seleccionar el modo de pantalla ancha o la calidad de imagen que se desee INPUT LIGHT STANDARD CINEMA DYNAMIC USER 2 PICTURE MODE USER 3 USER 1 DDE MENU APA MUTING VOLUME SIDE SHOT RESET WIDE MODE ENTER 2 4 7 Botón MUTING ON STANDBY Se ilum...

Страница 105: ...Gire el anillo FOCUS para ajustar el enfoque Ajuste para obtener un enfoque nítido Para ver la imagen de Pulse INPUT para mostrar El equipo de vídeo conectado a la entrada VIDEO INPUT del proyector Video 1 El equipo de vídeo conectado a la entrada S VIDEO INPUT del proyector S Video 1 El equipo de vídeo RGB componente conectado a la entrada PJ MULTI INPUT mediante el cable de interfaz de señales o...

Страница 106: ...r ON STANDBY con el interruptor 1 3 Desenchufe el cable de alimentación de CA de la toma mural cuando el ventilador deje de funcionar y el indicador ON STANDBY se ilumine en rojo Puede apagar el proyector manteniendo pulsado el interruptor 1 encendido espera durante un segundo aproximadamente en lugar de realizar los pasos antes descritos Selección del modo de pantalla ancha Es posible disfrutar d...

Страница 107: ...estra en el centro de la pantalla Normal direc Se realiza una asignación uno a uno sobre una imagen de relación de aspecto normal 4 3 Se muestra en el centro de la pantalla Notas Es posible ajustar la posición vertical de la imagen con la opción Posición V del menú AJUSTE DE ENTRADA cuando esté seleccionado Zoom o Subtítulo o cuando esté seleccionado Completo direc o Normal direc para señal de ent...

Страница 108: ...ara reducir las irregularidades de la imagen cuando se esté viendo con el modo DYNAMIC CINEMA Selecciónelo para obtener una imagen más suave como la de las películas USER 1 2 y 3 Puede ajustar la calidad de la imagen a su gusto y guardar las configuraciones en la memoria que haya seleccionado del proyector Pulse uno de los botones USER 1 2 ó 3 y a continuación ajuste la imagen utilizando los menús...

Страница 109: ...de la pantalla Indicador de señal de entrada Muestra el canal de entrada seleccionado Cuando no hay señal de entrada se muestra Para ocultar este indicador utilice la opción Estado del menú AJUSTE DE MENÚ Indicador de configuración de señal de entrada Para ENTRAD A Muestra Ordenador Componente o Vídeo GBR Para la entrada Video S Video Muestra el ajuste Auto o Sistema de color en el menú AJUSTE Est...

Страница 110: ...eleccione el elemento que desea restablecer y a continuación pulse RESET En la pantalla aparecerá Completado y la configuración se restablecerá al valor preestablecido en fábrica Los elementos que es posible restablecer son los siguientes Contraste Brillo Color Tonalidad Nitidez y Potencia RVA en Ajustar imagen del menú CONFIGURACIÓN DE IMAGEN Fase Punto Tamaño H y Desplazamiento en Ajustar señal ...

Страница 111: ...ar más contraste y más nitidez a la imagen Estándar Recomendado para unas condiciones de visualización normales Selecciónelo también para reducir las irregularidades de la imagen cuando se esté viendo con el modo Dinámico Cine Selecciónelo para obtener una imagen más suave como la de las películas Usuario 1 2 y 3 Puede ajustar la calidad de la imagen a su gusto y guardar las configuraciones Una ve...

Страница 112: ...cha será la imagen Elementos Descripción Desplaza miento Al aumentar el valor de la configuración de H horizontal la imagen se desplazará a la derecha y al disminuirlo se desplazará a la izquierda Utilice o para ajustar la posición horizontal Al aumentar el valor de la configuración de V vertical la imagen se desplazará hacia arriba y al disminuirlo se desplazará hacia abajo Utilice M o m para aju...

Страница 113: ...rdenador Componente introduce la señal de vídeo componente o vídeo progresivo desde un reproductor de DVD un sintonizador digital etc Vídeo GBR Introduce la señal desde un sintonizador digital Sistema de color Selecciona el sistema de color de la señal de entrada Automático selecciona automáticamente el sistema de color de la señal de entrada entre NTSC PAL SECAM NTSC4 43 PAL M o PAL N NTSC3 58 PA...

Страница 114: ...blezca esta posición Manual establece un valor inferior dirección cuando la parte inferior del trapezoide es más larga que la superior Establece un valor superior dirección cuando la parte superior del trapezoide es más larga que la inferior Si proyecta la imagen utilizando sólo Side Shot establezca la opción en Manual y ajuste el nivel en 0 Nota Es posible que el ajuste Trapezoide V no corrija pe...

Страница 115: ...n Sí la función APA se activa automáticamente Pulse el botón APA cuando aparezca la imagen en todo el área de pantalla del ordenador Si hay bordes negros alrededor de la imagen la función APA no se activará correctamente y es posible que la imagen se extienda más allá de la pantalla Si cambia la señal de entrada o vuelve a conectar un ordenador pulse el botón APA de nuevo para obtener una imagen a...

Страница 116: ...CONFIGURACIÓN DE IMAGEN 1 página 25 c Establezca Sistema de color en el menú AJUSTE de modo que coincida con el sistema de color de la entrada 1 página 27 La imagen es demasiado oscura c Ajuste correctamente el contraste o el brillo en la opción Ajustar imagen del menú CONFIGURACIÓN DE IMAGEN 1 página 25 La imagen no es nítida c Ajuste el foco con el anillo FOCUS 1 página 19 c Se ha condensado hum...

Страница 117: ...umina c La temperatura interna es anormalmente alta Compruebe que nada bloquee los orificios de ventilación Los indicadores LAMP COVER y TEMP FAN se iluminan c Se ha producido una avería en el sistema eléctrico Consulte con personal especializado de Sony LAMP COVER TEMP FAN POWER SAVING ON STANDBY Indicador LAMP COVER Indicador TEMP FAN Temperatura alta Apag 1 min c Apague la alimentación c Compru...

Страница 118: ...izontal y a continuación tire hacia arriba No incline la unidad de lámpara Si tira de la unidad de lámpara para extraerla mientras está inclinada y si la lámpara se rompe los trozos pueden esparcirse causando heridas 1 Mantenga bajada la palanca de bloqueo del ajustador deslícela hacia la derecha alce la parte posterior del proyector a continuación retorne la palanca de bloqueo del ajustador Mient...

Страница 119: ...sadas deben recibir el mismo tratamiento que las lámparas fluorescentes Sustitución del filtro de aire El filtro de aire debe sustituirse periódicamente Cuando aparezca en pantalla el mensaje Por favor cambie el filtro sustituya el filtro de aire inmediatamente Notas La sustitución del filtro de aire es muy importante para mantener un alto rendimiento del proyector y para evitar averías Cuando apa...

Страница 120: ...tipo UHP Tamaño de imagen de proyección Margen 40 a 150 pulgadas medidas diagonalmente Sistema de color Sistema NTSC3 58 PAL SECAM NTSC4 43 PAL M PAL N de conmutación automática manual Señales de vídeo aceptables 15 kHz RGB componente 50 60 Hz Componente progresivo 50 60 Hz DTV 480 60i 575 50i 480 60p 575 50p 720 60p 720 50p 1080 60i 1080 50i 1080 24PsF Vídeo compuesto Vídeo Y C Señales de ordenad...

Страница 121: ...ho alto profundidad Masa Aprox 4 5 kg 9 lb 15 oz Requisitos de alimentación CA 100 a 240 V 2 1 1 1 A 50 60 Hz Consumo de energía Máx 200 W Modo de espera 3 W Temperatura de funcionamiento 0ºC a 35ºC 32ºF a 95ºF Humedad de funcionamiento 35 a 85 sin condensación Temperatura de almacenamiento 20ºC a 60ºC 4ºF a 140ºF Humedad de almacenamiento 10 a 90 Accesorios que se suministran Mando a distancia RM...

Страница 122: ... 4 1 13 5 5 0 16 4 6 2 20 3 b 1 8 5 9 2 7 8 9 3 6 11 8 4 5 14 8 5 4 17 7 6 8 22 3 c 0 2 0 7 0 3 1 0 0 4 1 3 0 6 2 0 0 7 2 3 0 8 2 6 d 0 2 0 7 0 3 1 0 0 3 1 0 0 4 1 3 0 5 1 6 0 6 2 0 e 0 3 1 0 0 5 1 6 0 7 2 3 0 9 3 0 1 0 3 3 1 3 4 3 f 0 4 1 3 0 6 2 0 0 8 2 6 1 0 3 3 1 2 3 9 1 5 4 9 Tamaño de la pantalla pulgadas 40 60 80 100 120 150 a 1 6 5 2 2 5 8 2 3 3 10 8 4 1 13 5 5 0 16 4 6 2 20 3 b 1 9 6 2 2 ...

Страница 123: ... 2330 91 3 4 2930 115 3 8 3520 138 5 8 4410 173 3 4 Máximo 1400 55 1 8 2130 83 7 8 2860 112 5 8 3580 141 4310 169 3 4 5400 212 5 8 b x 194 x 7 5 8 x 290 x 11 1 2 x 387 x 15 1 4 x 484 x 19 1 8 x 581 x 22 7 8 x 726 x 28 5 8 c x 291 x 11 1 2 x 387 x 15 1 4 x 484 x 19 1 8 x 581 x 22 7 8 x 678 x 26 3 4 x 823 x 32 1 2 a x b c Ejemplo de instalación en el suelo Objetivo estándar 23 mm 29 32 pulgadas Cent...

Страница 124: ...2 47 7234 b x SS 5 92666667 c x SS 5 92666667 97 SS pulgadas 40 60 80 100 120 150 a Mínimo 1410 55 5 8 2140 84 3 8 2860 112 7 8 3590 141 3 8 4320 170 1 8 5410 213 1 8 Máximo 1730 68 1 8 2620 103 1 4 3510 138 1 4 4390 172 7 8 5280 208 6620 260 3 4 b x 237 x 9 3 8 x 356 x 14 x 474 x 18 3 4 x 593 x 23 3 8 x 711 x 28 x 889 x 35 c x 334 x 13 1 4 x 453 x 17 7 8 x 571 x 22 1 2 x 690 x 27 1 4 x 808 x 31 7...

Страница 125: ...3L C7 2 YC 13L Tipo de cable SPT 2 H03VVH2 F H03VVH2 F H03VVH2 F VCTFK Corriente y tensión nominal 10A 125V 2 5A 250V 2 5A 250V 2 5A 250V 7A 125V Aprobación de seguridad UL CSA VDE BS SAA DENANHO Longitud del cable máx 4 5 m Elementos Señal de entrada Vídeo o S vídeo Y C Componente Vídeo GBR Ordenador Contraste z z z z Brillo z z z z Color z excepto para B N z z Tonalidad z sólo NTSC3 58 4 43 exce...

Страница 126: ...66 667 H neg V neg 864 13 VGA VESA 72Hz 37 861 72 809 SonG 832 14 VGA VESA 75Hz 37 500 75 000 H neg V neg 840 15 VGA VESA 85Hz 43 269 85 008 H neg V neg 832 16 800 600 SVGA VESA 56Hz 35 156 56 250 H pos V pos 1024 17 SVGA VESA 60Hz 37 879 60 317 H pos V pos 1056 18 SVGA VESA 72Hz 48 077 72 188 H pos V pos 1040 19 SVGA VESA 75Hz 46 875 75 000 H pos V pos 1056 20 SVGA VESA 85Hz 53 674 85 061 H pos V...

Страница 127: ...N STANDBY MENU SIDE SHOT Indicador LAMP COVER 1 página 31 Orificios de ventilación escape 1 página 7 Indicador POWER SAVING 1 página 27 Indicador ON STANDBY 1 página 13 Interruptor 1 encendido espera 1 página 13 Botón INPUT 1 página 13 Palanca de bloqueo del ajustador 1 página 13 Detector frontal de maudo a distancia 1 página 12 Joystick 1 página 16 Botón MENU 1 página 16 Botón SIDE SHOT 1 página ...

Страница 128: ...terminales toma VIDEO INPUT tipo fonográfico 1 página 10 Clavija AC IN Conector PJ MULTI INPUT múltiple de 32 terminales 1 página 11 Alatavoz Cubierta de la lámpara 1 página 32 Cubierta del filtro de aire 1 página 33 Anillo FOCUS 1 página 13 Anillo ZOOM 1 página 13 Ajustador 1 página 13 Tomas AUDIO L R INPUT tipo fonográfico 1 página 10 ...

Страница 129: ...stancia Botón SIDE SHOT 1 página 15 Botón VOLUME 1 página 20 Transmisor de infrarrojos Botón DDE 1 página 26 El botón tiene la misma función que DDE del menú CONFIGURACIÓN DE IMAGEN Interruptor 1 encendido espera 1 página 13 Botón INPUT 1 página 13 Botones M m ENTER 1 página 23 Botón RESET 1 página 24 Botón MENU 1 página 23 Botón MUTING 1 página 20 Botón APA 1 página 29 Botones PICTURE MODE 1 pági...

Страница 130: ...del proyector y de una pantalla 8 Inversion imagen 28 M Mando a distancia introducir las pilas 5 ubicación de los controles 43 Memoria preestablecida 28 40 Mensaje advertencia 31 precaución 31 Menú borrar la presentación del menú 24 funcionamiento 23 restablecer 24 Menú AJUSTE 27 Menú AJUSTE DE ENTRADA 26 Menú AJUSTE DE MENÚ 27 Menú AJUSTE INSTALACIÓN 28 Menú CONFIGURACIÓN DE IMAGEN 25 Modo amplio...

Страница 131: ......

Страница 132: ...Sony Corporation Printed in Japan Printed on 100 recycled paper using VOC Volatile Organic Compound free vegetable oil based ink ...

Отзывы: