background image

F:\Worker\SONY WAX3 D-series EN 
121\3212313121(052907)\060USE.fm

masterpage:Fitst Left

28

KDL-32XBR4/KDL-40D3000

Using TV Features

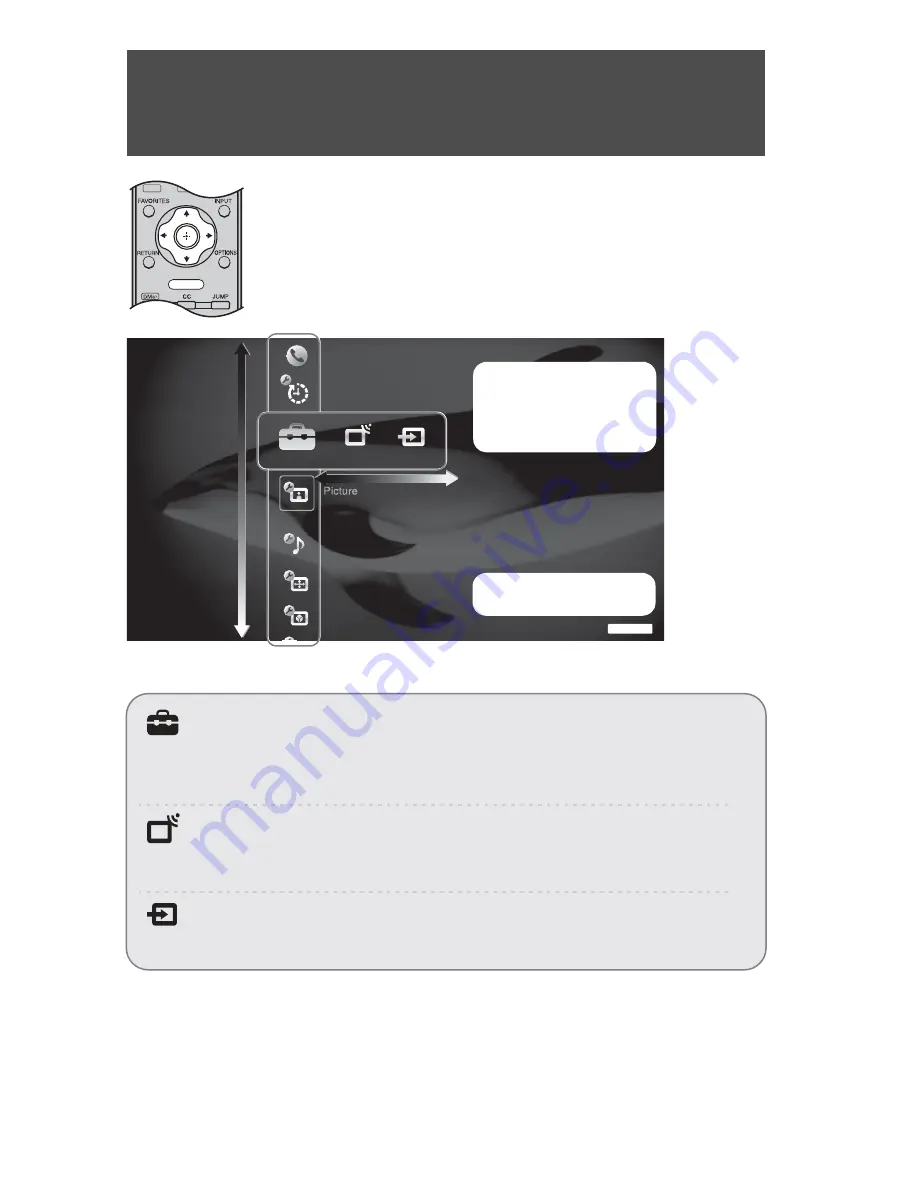
The 

HOME

 button allows you to access the 

TV Home Menu

 on the 

XMB


(XrossMediaBar) as well as a variety of TV features.

HOME

Prod

u

ct 

Su

pport

Clock/Timer

s

S

o

u

nd

S

creen

Video Option

s

TV

S

ettin

gs

Media Category Icons

TV

External 

Inputs

Settings

Adjust TV Settings

Customize the TV settings with various options.
Explanations of different 

Settings

 start from page 30.

• The available options vary depending on the situations and conditions applied. Unavailable options 

are grayed out or not displayed.

Watching TV

Select a channel.

• You can also select a TV channel using the number 

0-9

 or 

CH +/–

 buttons (see remote control 

section pages 23 and 25).

Access the equipment connected to your TV

Watch a movie, play a game, record a program or work on your PC.
Assign a label using the 

Label Inputs

 feature for your convenience, see page 39.

The 

XMB

 is shown here with 

Settings

 highlighted.

The 

XMB

 displays the Media 

Category icons (horizontally) 
and available features 
(vertically) within the 
highlighted icon.

Содержание BRAVIA KDL-32XBR4

Страница 1: ...07 Sony Corporation LCD Digital Color TV 3 212 313 12 1 KDL 32XBR4 KDL 40D3000 F Worker SONY WAX3 D series EN 121 3212313121 052907 010COV fm masterpage Right KDL 32XBR4 KDL 40D3000 Operating Instructions ...

Страница 2: ... excessive dust or mechanical vibration s Avoid operating the TV at temperatures below 41 F 5 C s If the TV is transported directly from a cold to a warm location or if the room temperature changes suddenly the picture may be blurred or show poor color due to moisture condensation In this case please wait a few hours to let the moisture evaporate before turning on the TV s To obtain the best pictu...

Страница 3: ...VHF UHF Antenna System 16 HD Cable Box HD Satellite Box 16 PC 18 Other Equipment 19 Using HDMI Control for BRAVIA Theatre Sync 20 Bundling the Connecting Cables 20 4 Setting Up the Channel List Initial Setup 21 Remote Control and TV Controls Indicators 22 Inserting Batteries into the Remote control 22 Remote Control 22 Indicators 26 How to Use P P and PIP Features 27 To display a picture in the Su...

Страница 4: ...resulting in a fire or an electric shock s Do not convert or damage the power cord s Do not allow anything to rest on or roll over the power cord s Do not move the TV with the power cord plugged in s Keep the power cord away from heat sources s When you disconnect the AC power cord disconnect it from the wall outlet first s Be sure to grasp the plug when disconnecting the power cord Do not pull th...

Страница 5: ...en wipe it gently with a soft cloth Stubborn stains may be removed with a cloth slightly dampened with a solution of mild soap and warm water Never use strong solvents such as thinner or benzine for cleaning If using a chemically pretreated cloth please follow the instruction provided on the package The ventilation holes can accumulate dust over time To ensure proper ventilation we recommend remov...

Страница 6: ...wall mount bracket s Be sure to follow the operating instructions supplied with the wall mount bracket when installing the TV s Be sure to attach the brackets supplied with the wall mount bracket s Do not hang the TV from the ceiling It may fall and cause serious injury Placement The TV should be installed near an easily accessible AC power outlet Observe the following in placing the TV Otherwise ...

Страница 7: ...nagement will improve this condition s Do not expose the LCD screen surface to direct sunlight Doing so may damage the LCD panel s Do not push or scratch the LCD screen or place objects on top of the TV The image may be uneven or the LCD panel may be damaged s If the TV is used in a cold place a smear may occur in the picture or the picture may become dark This does not indicate a failure These ph...

Страница 8: ... explains basic setup connections see page 16 The Quick Setup Guide enclosed separately illustrates how to connect other optional equipment Picture Quality and Aspect Ratio You can enjoy crisp clear images smooth movement and high impact visuals from 1080 HD signals When you compare a high definition signal to a standard analog signal you will notice a big difference The 1080 HD signals provide mo...

Страница 9: ...n control Settings timer picture sound screen and other options see page 30 for customization options TV Channels available channels are displayed on the vertical Category Object Bar External Inputs cable satellite VCR DVD players or other inputs can also be selected from the Category Object Bar for the External Inputs This manual is for the 32 class and 40 inch BRAVIA KDL XBR4 and D3000 models wi...

Страница 10: ......

Страница 11: ...ied using a coin etc 3 Adjust the length by pulling the support belt toward you while holding the Table Top Stand Be sure to take measures to prevent the TV from toppling over and causing injury The supplied wood screw may not be used depending on the type of TV stand In this case or when the securing strength is not enough use commercial screws 1 8 to 3 16 inch 3 to 4 mm diameter to fit to the TV...

Страница 12: ...emove any other screws from the TV Be sure to store the removed screws and Table Top Stand in a safe place until you are ready to reattach the Table Top Stand Keep the screws away from small children For bracket installation refer to the instruction guide provided by the Wall Mount Bracket model for your TV Sufficient expertise is required in installing this TV especially to determine the strength...

Страница 13: ...or video game equipment If you have mono equipment connect its audio output jack to the TV s L MONO audio input jack 3 HDMI IN 2 HDMI High Definition Multimedia Interface provides an uncompressed all digital audio video interface between this TV and any HDMI equipped audio video equipment such as a set top box DVD player Blu ray Disc player A V receiver as well as PC HDMI supports enhanced or high...

Страница 14: ...terpage Left 14 KDL 32XBR4 KDL 40D3000 Rear IN VIDEO IN AUDIO OUT VAR FIX VIDEO L MONO AUDIO R R AUDIO L S VIDEO DIGITAL OUT OPTICAL COMPONENT IN 1080p 1080i 720p 480p 480i PC IN L AUDIO R Y PB PR 1 3 1 3 1 2 VHF UHF CABLE DMex SERVICE AUDIO RGB 1 2 8 7 q 3 4 5 6 9 qa ...

Страница 15: ...f the picture is noisy flickering or not clear adjust Phase and Pitch of Screen settings on page 33 4 5 VIDEO IN 1 S VIDEO VIDEO IN 1 3 VIDEO L MONO AUDIO R Connects to the S VIDEO output jack of your VCR or other video equipment that has S VIDEO The S VIDEO provides better picture quality than composite video 5 See Auto S Video on page 39 Connects to the composite video and audio output jacks on ...

Страница 16: ...e air antenna programming as indicated below Be sure to set the Cable setting to On or Off in the Channel settings for the type of input signal you choose see page 35 You can also enjoy high definition programming by subscribing to a high definition cable service or a high definition satellite service For the best possible picture make sure you connect this equipment to your TV via the HDMI or com...

Страница 17: ...DIO R R AUDIO L S VIDEO COMPONENT IN 1080p 1080i 720p 480p 480i PC IN 1 3 1 3 1 2 AUDIO RGB L AUDIO R Y PB PR DIGITAL OUT OPTICAL Rear of TV AUDIO R red AUDIO L white Audio cable DVI to HDMI cable HD cable box HD satellite box CATV Satellite antenna cable IN VIDEO IN AUDIO OUT VAR FIX VIDEO L MONO AUDIO R R AUDIO L S VIDEO COMPONENT IN 1080p 1080i 720p 480p 480i PC IN 1 3 1 3 1 2 AUDIO RGB L AUDIO...

Страница 18: ...is TV s PC VGA input does not support interlaced signals For the best picture quality it is recommended to use the signals boldfaced in the above chart with a 60 Hz vertical frequency from a personal computer In plug and play signals with a 60 Hz vertical frequency will be detected automatically PC reboot may be necessary PC IN VIDEO IN AUDIO OUT VAR FIX VIDEO L MONO AUDIO R R AUDIO L S VIDEO DIGI...

Страница 19: ...UDIO L MONO VIDEO IN HDMI IN 2 2 IN VIDEO IN AUDIO OUT VAR FIX VIDEO R AUDIO L S VIDEO DIGITAL OUT OPTICAL COMPONENT IN 1080p 1080i 720p 480p 480i PC IN L AUDIO R L MONO AUDIO R Y PB PR 1 3 1 3 1 2 AUDIO RGB DVD player Personal computer Digital satellite receiver VHF UHF CABLE Digital audio equipment Analog audio equipment A V Receiver Home Theater Digital recorder VCR Headphones Camcorder Blu ray...

Страница 20: ...nce the supported equipment is connected the following operations are available Turn off the equipment automatically when you turn off the TV When the connected equipment is turned on by One Touch Play the TV will automatically turn on and select the respective HDMI input Automatically turn on equipment listed under the External Inputs on the XMB XrossMediaBar when selected see pages 9 and 28 When...

Страница 21: ...estart from the beginning when the TV is turned back on The Auto Program may be canceled while the channels are being scanned Press RETURN first then press either B b on the remote control highlight Yes to cancel or No to resume Auto Program s To Run Initial Setup Again or Auto Program at a Later Time Select the Initial Setup feature from the XMB XrossMediaBar or refer to the Initial Setup describ...

Страница 22: ... page 40 2 SLEEP Press repeatedly until the TV displays the time in minutes Off 15min 30min 45min 60min 90min or 120min that you want the TV to remain on before shutting off To cancel Sleep Timer press SLEEP repeatedly until Off appears 3 THEATER Press to turn on and off the Theater Mode The picture settings will be set for a cinema like experience and the audio will be switched to the audio outpu...

Страница 23: ...rites While tuned to the channel you want to add to the list press OPTIONS and highlight Add to Favorites then press A confirmation message of Channel added to Favorites will appear for a few seconds How to Remove from Favorites While tuned to a channel that exists in the Favorites list press OPTIONS and highlight Remove from Favorites then press A confirmation message of Channel removed from Favo...

Страница 24: ...e settings Wide Zoom Normal Full Zoom The Wide Mode settings can be also accessed in the Screen settings see page 32 Changing the Wide Screen Mode For PC timing see below When the TV receives a 720p 1080i or 1080p signal Normal cannot be selected Changing the Wide Screen Mode for PC timing Button Description qf qg qd qs qa 2 1 4 3 Original source Standard definition source 16 9 Original source Hig...

Страница 25: ...ontent ql CC Press to turn on and off the Closed Captions CC To change or customize the CC Display see page 36 w JUMP Press to jump back and forth between two channels The TV alternates between the current channel and the last channel that was selected wa CH Press to scan through channels To scan quickly through channels press and hold down either Button Description w wa qh qj qk ql Menu Item Refe...

Страница 26: ...ED Lights up in green when the Picture Off feature is activated Lights up in orange when the timer is set When the timer is set this LED will remain lit even if the TV is turned off For details see page 30 4 STANDBY LED Lights up in red when your TV is in PC standby mode If the LED blinks in red continuously this may indicate the TV needs servicing see contacting Sony information on the back cover...

Страница 27: ...dow To swap audio in P P mode use the B b button to swap the audio between the Main Window and Sub Window To swap audio in PIP mode press OPTIONS then press V v to highlight Audio Swap Press CH to change the channels or enter the channel number using the 0 9 numeric buttons 1 Press the OPTIONS 2 Press while Exit P P or Exit PIP depends on the mode your are in is highlighted You may also press RETU...

Страница 28: ...ferent Settings start from page 30 The available options vary depending on the situations and conditions applied Unavailable options are grayed out or not displayed Watching TV Select a channel You can also select a TV channel using the number 0 9 or CH buttons see remote control section pages 23 and 25 Access the equipment connected to your TV Watch a movie play a game record a program or work on...

Страница 29: ... Press or V v to select the highlighted item 6 Press RETURN or HOME to exit HOME Settings Available channels are listed under the TV icon Select inputs from Video1 3 Component 1 2 HDMI 1 3 PC under the External Inputs icon Available TV settings and features are listed under the Settings icon CC Product Support page 30 Clock Timers page 30 Picture page 30 Sound page 32 Screen page 32 Video Options ...

Страница 30: ...a scheduled time 1 Use the V v B b button to highlight the Timer icon and press 2 Press to select On to set the timer 3 Use the V v B b button to set the following Day of the Week Time Duration Channel and Volume 4 Press RETURN to display the confirmation screen 5 Select Yes or No to save changes you made Selecting Yes will save your settings and will light up the TIMER LED Exit the Timer setting ...

Страница 31: ...default values Black Corrector Enhances black areas of the picture for stronger contrast Advanced C E Advanced Contrast Enhancer Automatically optimizes the backlight and contrast This setting is especially effective for dark picture scenes It will increase the contrast distinction of the dark picture scenes Gamma Adjusts the balance between the light and dark areas of the picture Clear White Emph...

Страница 32: ...ncy sounds Select High or Low for the amount of boost you desire while in the Custom Sound Mode Selecting Off will bypass the emphasis The Sound Booster is automatically in the High position for Dynamic Sound Mode and Low position for Standard Sound Mode Steady Sound On Stabilizes the volume across all programs and commercials Off Turns off Steady Sound Volume Offset Adjusts the volume level of th...

Страница 33: ... changed set 4 3 Default to Off Display Area Normal Displays the picture in its original size 1 2 Enlarges the picture to hide the edge of the picture Screen Position Adjust the Vertical positioning by pressing the V v buttons Press the B b buttons to adjust the Horizontal positioning Screen Position option is available for standard definition signals only Vertical adjustment is available only whe...

Страница 34: ...able with certain videos or signals even if the mode has been changed The Motion Enhancer feature can be set separately for each input except PC IN The Motion Enhancer feature is automatically turned Off for Game Mode P P or a PC input For film based content set CineMotion to Auto1 to enjoy the full benefit of Motionflow CineMotion Automatically detects film based content and applies a reverse 3 2...

Страница 35: ...e Audio feature is available only for digital programs If the program you are watching is also available in other languages from the audio tracks and if that language is what you have selected in the Language setting your TV will automatically switch to the matching language with the Alternate Audio feature The Alternate Audio option may be accessed by pressing the OPTIONS button on the remote con...

Страница 36: ... to select the channel number to assign a label 2 Press V v to scroll through the label characters A Z 0 9 etc Press b to move to the next character Repeat to add up to 7 characters to the label Press to set it To assign labels to more channels repeat steps 1 2 Closed Captions CC Settings CC Display This option allows you to turn On or Off the Closed Captions CC feature Analog CC Select this optio...

Страница 37: ...tings manually U S See page 38 for details Canada See page 38 for details If you are not familiar with the parental guideline rating system you should select Child Youth or Young Adult to help simplify the rating selection To set more specific ratings select Custom Digital Rating Available only in U S A where advanced ratings exist Off Turn Digital Rating off No programs containing digital ratings...

Страница 38: ...7 Directed to children age 7 and older TV G General audience TV PG Parental guidance suggested TV 14 Parents strongly cautioned TV MA Mature audience only Content Based Ratings FV Fantasy violence D Suggestive dialogue L Strong language S Sexual situations V Violence To ensure maximum blocking capability set the Age Based Ratings English Rating C All children C8 Children 8 years and older G Genera...

Страница 39: ...iver DVR Game Camcorder PC Skip PC Skip indicates that no labels are assigned and displayed with the default labeling Auto S Video Video 1 is equipped with S VIDEO Select Auto to connect the S VIDEO cable instead of the composite video cable for auto video detection If you are using the composite video cable set the setting to Off The Off setting will disable the auto detect and allows composite c...

Страница 40: ...ting information on the banner Info Banner setting must be set to On Power Saving Reduces the power consumption by adjusting the backlight brightness This also enhances the black level Select from Off Low High and Picture Off Light Sensor Enables the automatic picture screen brightness control The Light Sensor measures the room brightness which allows the TV to automatically adjust the backlight b...

Страница 41: ...n General Settings see page 40 No picture from some video sources Check the connection between the optional video equipment and the TV Press INPUT on the remote control see page 25 Press HOME on the remote control Select your desired input from the External Inputs list Poor picture The quality of the images is not as good as what I saw at the store Picture quality depends on the signal content See...

Страница 42: ...rol set 4 3 Default to Off in the Screen settings see page 32 Check the Auto Wide option in the Screen settings see page 33 Suddenly the picture gets smaller The picture gets smaller during the commercials this is due to the method the provider broadcasts their contents When HD content channels switch to SD definition content commercials the picture may be small with a black border Black box on sc...

Страница 43: ...e is a delayed response time between the controller and the actual video Switch the Game Mode to On see page 34 Lost password Select the Password settings on the Parental Lock settings then enter the following master password 4357 The master password clears your previous password and allows you to enter a new password see page 37 How to reset the TV to factory settings Turn on the TV While holding...

Страница 44: ...16 20 and 24bits AUDIO HDMI IN 3 only 500 mVrms 100 modulation Impedance 47 kilohms AUDIO OUT 500 mVrms 100 modulation More than 1 Vrms at the maximum volume setting Variable More than 500 mVrms Fixed PC IN D sub 15 pin analog RGB 0 7 Vp p 75 ohms positive See the PC Input Signal Reference Chart on page 18 PC AUDIO INPUT Stereo mini jack 500 mVrms 1 kilohm Headphones Stereo mini jack Impedance 16 ...

Страница 45: ...T button 25 Installing the TV on a wall 12 J JUMP button 25 L Label Inputs 39 Language 40 Light Sensor Described 26 Setting 40 M Motion Enhancer 34 Movie Rating 38 MPEG Noise Reduction 31 MTS 35 MUTING button 24 N Noise Reduction 31 O OPTIONS button 25 P P P 27 Password 37 PC IN jack described 15 PC Power Management 40 Phase 33 PIC OFF TIMER LED 26 Picture 31 PICTURE button 23 Picture Mode 30 PIP ...

Страница 46: ...F Worker SONY WAX3 D series EN 121 3212313121 052907 010COVIX fm masterpage Blank KDL 32XBR4 KDL 40D3000 ...

Страница 47: ...F Worker SONY WAX3 D series EN 121 3212313121 052907 010COVIX fm masterpage Blank KDL 32XBR4 KDL 40D3000 ...

Страница 48: ...n manual and Quick Setup Guide z Experience difficulty operating your television Contact Sony Customer Support at http www sony com tvsupport or to speak with a support representative United States 1 800 222 SONY 7669 Canada 1 877 899 SONY 7669 Sony will work to resolve your questions more quickly than your retailer or place of purchase Please Do Not Return the Product to the Store Printed in U S ...

Отзывы: