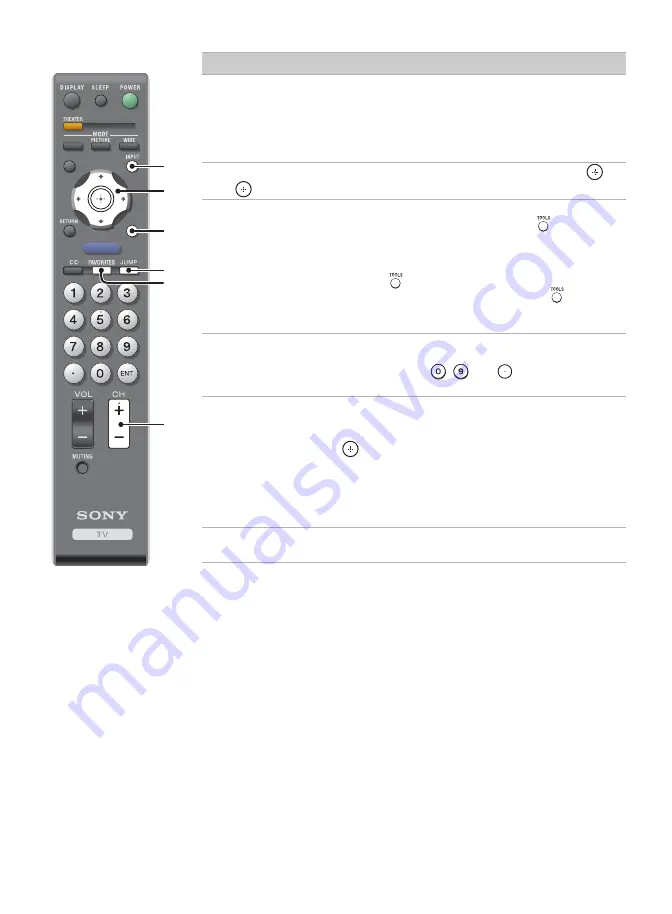
background image

26

qh

INPUT

Press to display the list of 

External Inputs

 and TV 

mode. Press repeatedly to toggle through the inputs.

~

• See page 38 (

Label Inputs

) on setting up the 

External Inputs

 labels.

qj

V

/

v

/

B

/

b

Press 

V

/

v

/

B

/

b

 to move the on-screen cursor. Press 

 to 

select/confirm an item.

qk

TOOLS

This button supports different functions depending on the 
condition. When PC input is active, press 


to view a 

channel at the same time as you work with your computer 
as a picture in picture screen (

PIP

). When antenna input 

is active and the broadcast includes Regional Digital 
Ratings, press 

 to view the list of special ratings. When 

HDMI controlled equipment is active, press 

 to access 

the equipment menu, if the equipment supports the 
function. 

ql

JUMP

Press to alternate between two channels. The TV will 
alternate between the current channel and the last channel 
tuned with the buttons

-

 and 

 on the remote 

control.

w;

FAVORITES

This feature lets you create and choose a list of up to eight 
favorite channels or inputs.
Press 

V

/

v

 to select the option 

Add to Favorites

 and 

press 


to add the current channel or input to your 

Favorites

 list.

~

• Your 

Favorites

 list will be cleared each time you run 

Auto Program

 (see pages 20 and 34).

wa

CH +/–

Press to change the channel. To scan quickly through 
channels, press and hold down 

+

 or 

.

Button

Description

SOUND

GUIDE

MENU

TOOLS

qh

qk

ql

w;

wa

qj

Содержание BRAVIA KDL-32L4010

Страница 1: ...ng Instructions Sony Customer Support U S A www sony com tvsupport Canada www sony ca support United States 1 800 222 SONY Canada 1 877 899 SONY Sony will work to resolve your questions more quickly than your retailer Please Do Not Return the Product to the Store ...

Страница 2: ...allation to a Sony dealer or licensed contractor and pay adequate attention to safety during the installation Licensing Information Macintosh is a trademark of Apple Inc registered in the U S and other countries HDMI the HDMI logo and High Definition Multimedia Interface are trademarks or registered trademarks of HDMI Licensing LLC Fergason Patent Properties LLC U S Patent No 5 717 422 U S Patent ...

Страница 3: ... Installing the Wall Mount Bracket 10 When Installing the TV against a wall or enclosed area 12 2 Locating Inputs and Outputs 13 Left side panel 13 Rear of TV 14 3 Connecting the TV 16 Cable system and or VHF UHF 16 HD cable box HD satellite box 16 PC 18 Other Equipment 19 4 Setting Up the Channel List Initial Setup 20 Exploring Fun Features Using BRAVIA Theatre Sync with Control for HDMI 21 Remot...

Страница 4: ...bscription HD satellite subscription Blu ray Disc player or other external equipment Contact your cable or satellite provider for information about upgrading to HD programming To learn more about HDTV visit U S A http www sony com HDTV Canada http www SonyStyle ca hd The Four Steps to a Stunning HD Experience Set Sound Source and Setup Along with your BRAVIA TV set a complete HD system requires an...

Страница 5: ...tios the width to height ratio of the image HDTV uses a wider screen than conventional standard definition TV You can use the Wide Mode function of the TV to adjust the 4 3 image to fit the entire screen see pages 25 and 33 This TV supports signals up to 1080i 16 9 high definition source Most HDTV signals use a wide screen aspect ratio of 16 9 The 16 9 fills your BRAVIA screen maintaining a crisp ...

Страница 6: ...ct it to shocks or excessive vibration Place your palm directly underneath the screen but make sure you do not exert pressure on the speakers The Table Top Stand for this product is packaged separately Attach the TV unit onto the Table Top Stand before performing the connection and setup 1 Unpack the Table Top Stand and get the three screws from the accessories bag Keep the screws away from childr...

Страница 7: ...pping over Unsecured TVs may topple and result in property damage serious bodily injury or even death Prevent the TV from tipping over s Secure the TV to a wall and or stand s Do not allow children to play or climb on furniture and TV sets s Avoid placing or hanging items on the TV s Never install the TV on Slippery unstable and or uneven surfaces Furniture that can easily be used as steps such as...

Страница 8: ...lt Kit Contact Sony Customer Support to obtain the optional Support Belt Kit by providing your TV model name For United States call 1 800 488 7669 or visit www sony com accessories For Canada call 1 877 899 7669 Attach the TV to the wall Use the hardware listed below not supplied Two M6 12 18 mm anchor bolts screw into the top most wall mount holes located on the rear of the TV Rope or chain attac...

Страница 9: ...g wall mount bracket only For bracket installation refer to the instructions on page 10 and the instruction guide provided by the Wall Mount Bracket model for your TV Sufficient expertise is required to install this TV especially to determine the strength of the wall that will withstand the TV s weight Be sure to store the removed screws and Table Top Stand in a safe place until you are ready to r...

Страница 10: ...g a Wall Mount Bracket sold separately See table on page 9 showing the Wall Mount Bracket model appropriate for your TV For product protection and safety Sony strongly recommends that wall mounting is performed by a Sony dealer or licensed contractor Do not attempt to install it yourself Sony is not liable for any damage or injury caused by mishandling or improper installation Please provide this ...

Страница 11: ... The wall must be strong enough to support at least four times the weight of the TV that you are installing Unit inches mm 3 Install the Base Bracket on the wall Refer to the instructions provided with your Wall Mount Bracket 4 Disconnect all cables and remove the Table Top Stand See page 10 for more details 5 Install Mounting Hooks on the TV See the diagram and table on next page for screw and ho...

Страница 12: ...h a stand Never install the TV set as follows Inadequate air circulation can lead to overheating of the TV This may cause damage to your TV or cause a fire TV Model Screw location Hook location KDL 32L4010 e g c Wall TV When Installing the TV against a wall or enclosed area 11 inches 30 cm 4 inches 10 cm 4 inches 10 cm 4 inches 10 cm 8 7 Leave at least this much space around the TV 30 cm 11 inches...

Страница 13: ...ideo cameras DVDs or video game consoles If you have monaural equipment connect the audio output jack to the L left audio input jack MONO of the TV 2 AUDIO OUT jack Connects to your headphones If the audio connector does not match the jacks use an appropriate audio jack adapter not supplied When the audio is connected the internal speakers of the TV are turned off VIDEO IN 2 VIDEO MONO AUDIO L R 2...

Страница 14: ...ow the HDMI IN 2 input jack the DVI connector has been designed for video signals only the AUDIO jacks support audio The HDMI input jack has been manufactured to comply with audio video equipment such as DVD players with 480i 480p 720p and 1080i signals Signals generated in a PC can not be converted as expected due to scaling issues For a better picture in your PC use PC IN RGB IN PC input Bear in...

Страница 15: ... player or digital cable box The component video offers a better picture quality than the S VIDEO 3 or the composite video 4 connections 7 PC IN RGB AUDIO Connects to a personal computer s video output connector using HD15 HD15 cable analog RGB not supplied See the PC Input Signal Reference Chart on page 18 for information about the signals that can be displayed Some Apple Macintosh computers may ...

Страница 16: ...inition cable service or high definition satellite service For the best possible picture connect these components to your TV via the HDMI or component video with audio input on the back of your TV Cable system and or VHF UHF Be sure to set Cable On or Off in the Channel menu for the type of input signal you choose see page 34 HD cable box HD satellite box 75 ohm coaxial cable not supplied Rear of ...

Страница 17: ... OUT FIX 2 1 1 1 2 CABLE ANTENNA VIDEO AUDIO AUDIO AUDIO MONO L R S VIDEO SERVICE ONLY Y PB PR L R L R RGB DIGITAL AUDIO OUT COAXIAL IN Rear of TV AUDIO R red AUDIO L white Audio cable DVI to HDMI cable HD cable box HD satellite box CATV Satellite antenna cable VIDEO IN PC IN COMPONENT IN 1080i 720p 480p 480i R L AUDIO AUDIO OUT FIX 2 1 1 1 2 CABLE ANTENNA VIDEO AUDIO AUDIO AUDIO MONO L R S VIDEO ...

Страница 18: ...als boldfaced in the above chart with a 60 Hz vertical frequency from a personal computer In plug and play signals with a 60 Hz vertical frequency will be detected automatically PC reboot may be necessary PC Resolution Horizontal frequency kHz Vertical frequency Hz Standard Signals Horizontal Pixel Vertical Line VGA 640 480 31 5 60 VGA 640 480 37 5 75 VESA SVGA 800 600 37 9 60 VESA Guidelines 800 ...

Страница 19: ...IDEO AUDIO AUDIO AUDIO MONO L R S VIDEO SERVICE ONLY Y PB PR L R L R RGB DIGITAL AUDIO OUT COAXIAL IN VIDEO IN 2 VIDEO MONO AUDIO L R Cable Antenna Digital audio equipment Digital recorder Video recorder Headphones Camcorder Game system DVD player Digital satellite receiver Blu ray Disc Player PS3 Digital cable box Audio system Personal computer Analog audio equipment A V Receiver Home Theater Rea...

Страница 20: ...PORTANT You must perform Auto Program after cable or antenna is connected If you cancel Auto Program before completion some channels may not be available 4 Follow the help text provided on the screen to run Auto Program The Auto Program will scan for available channels from the signal source directly connected to the TV s CABLE ANTENNA input 5 When the Auto Program is complete select OK to finish ...

Страница 21: ...perations are available once you connect the Sony equipment with Control for HDMI function to your TV Automatically turn off connected equipment when you turn off the TV The TV will automatically turn on and tune to the respective HDMI input when the connected equipment is turned on by One Touch Play Equipment listed under External Inputs will turn on automatically when selected When connecting a ...

Страница 22: ...trol Follow the guidelines below Point your remote control directly at the IR sensor located on the corner of your TV Make sure that no objects are blocking the path between the remote control and the IR sensor on your TV Fluorescent lamps can interfere with your remote control try turning off all fluorescent lamps If you are having trouble with the remote control reinsert or replace your batterie...

Страница 23: ...off the Theater Mode The picture settings will be set for a cinema like experience and the audio will be switched to the audio output of the attached speakers of your BRAVIA Theatre Sync audio system Your BRAVIA Theatre Sync audio system must be connected by an HDMI connection to your TV see page 16 for more information 4 SOUND Press repeatedly to step through the Sound Mode settings Dynamic Stand...

Страница 24: ...n and off the Closed Captions CC To change or customize the CC display see page 38 0 0 9 ENT Press to select a channel The channel will change after a few seconds Press to change the channel immediately qa Use with and to change channels immediately For example to enter 2 1 press and qs VOL Press to adjust the volume qd MUTING Press to mute the sound Press again or press VOL to restore the sound q...

Страница 25: ... can be also accessed in the Screen menu see page 33 Changing the Wide Screen Mode Normal is available with 480i or 480p sources only Button Description SOUND GUIDE MENU TOOLS qg 4 3 Original source Standard definition source 16 9 Original source High definition source m m Wide Zoom Wide Zoom Normal Normal This mode is not available Full Full Zoom Zoom Continued ...

Страница 26: ...ew the list of special ratings When HDMI controlled equipment is active press to access the equipment menu if the equipment supports the function ql JUMP Press to alternate between two channels The TV will alternate between the current channel and the last channel tuned with the buttons and on the remote control w FAVORITES This feature lets you create and choose a list of up to eight favorite cha...

Страница 27: ... lit even if the TV is turned off For details see page 39 If the LED blinks in red continuously this may indicate the TV needs servicing see contacting Sony information on the front cover Lights up in green when the Backlight feature is activated see page 32 for details 7 STANDBY LED Lights up in red when your TV is in PC standby mode 8 POWER LED Lights up in green when the TV is turned on 9 Infra...

Страница 28: ...eir content and rating levels use on the remote control to enter a four digit password The first time you create a password confirm the password by entering it again The Sound menu allows you to fine tune and change audio Select from Sound Mode Steady Sound Treble Bass Balance Speakers Backlight Alt Audio MTS or Reset The Setup menu provides you additional features like Closed Captions CC Info Ban...

Страница 29: ... or inputs Press V v to select the option Add to Favorites and press to add the current channel or input to your Favorites list You can also press to see your Favorites list Wide Mode This option is a direct shortcut to the Screen menu to adjust the picture size in the Wide Mode option see page 33 Wide Mode can also be accessed by pressing on the remote control See WIDE button description on page ...

Страница 30: ...t from PC PIP PC input 1 Press and select External Inputs on the Shortcuts menu 2 From External Inputs list select TV input to return to TV channels To exit PC PIP you can also select from the Shortcuts menu the list of favorite channels and select the channel you wish to tune or press to see the list of your favorite channels and select your desired option If you select the PC input signal while ...

Страница 31: ...h tint Neutral Gives the white colors a neutral tint Warm 1 2 Gives the white colors a reddish tint Sharpness Press B b to sharpen or soften the picture then press to set Advanced Settings Noise Reduction Reduces the noise level of connected equipment and of the CABLE ANTENNA input Black corrector Enhances black areas of the picture for stronger contrast Gamma Adjusts the balance between light and...

Страница 32: ...ress to set Speakers Select On or Off to turn on or off the internal speakers Backlight On The Backlight is turned on Off Turns off the backlight to reduce power consumption while the audio is left on Press any key to activate the backlight Alt Audio MTS Alternate audio MTS Mono Select for mono reception Use to reduce noise during weak stereo broadcasts Stereo Select for stereo reception when view...

Страница 33: ...es disturb you select Off Off Select to turn off the Auto Wide option Choose a screen mode from the Wide Mode option 4 3 Default Select the default screen mode to use for 4 3 sources Wide Zoom Select to enlarge the 4 3 picture to fill the 16 9 screen keeping as much of the original image as possible with minimal distortion Normal Select to display the 4 3 picture in its original size Full Select t...

Страница 34: ...the TV for all receivable channels digital and analog Before starting Auto Program be sure to select On or Off for the Cable option under the Channel menu When it is On the TV will search for cable channels when it is Off the TV will search for over the air signals with an antenna connection If you are using an A B RF switch not supplied to switch between cable or antenna connection be sure to sel...

Страница 35: ...V v Repeat to add up to 7 characters to the label Then select on screen to set it To assign labels to more channels repeat steps 1 2 To delete a character select on the screen To leave a space between characters select on the screen To exit press Diagnostics Allows to confirm the current channel signal performance Using the Parental Lock Rating Off Turn Parental Lock to Off No programs are blocked...

Страница 36: ...recasts Channel Block Allows you to block channels regardless of program ratings The password needs to be set up prior to blocking channels The blocked channel can only be viewed by entering the correct password To block a channel Press V v to go through the channels and press to Block or Allow a channel To view a blocked channel Press when tuned to a blocked program then enter the password To rea...

Страница 37: ... programs by their rating content or both Age Based Ratings TV Y All children TV Y7 Directed to children age 7 and older TV G General audience TV PG Parental guidance suggested TV 14 Parents strongly cautioned TV MA Mature audience only Content Based Ratings FV Fantasy violence D Suggestive dialogue L Strong language S Sexual situations V Violence To ensure maximum blocking capability set the Age ...

Страница 38: ...s Advanced Settings Customizes Closed Captions CC displays Closed Captions CC can be turned on and off by pressing the button on the remote control Info Banner Select On to display the program if the broadcaster offers this service The Info Banner is displayed for a few seconds when the channel is changed If you do not want to display the Info Banner select Off Label Inputs Allows you to identify ...

Страница 39: ...set the Current Time Current Time Select to set the current time day hour minutes and AM PM 1 Press to select Current Time 2 Press V v B b to set day hour minutes and AM PM 3 Press to exit Language Select the language of your choice for all the on screen settings English Español Spanish Français French Auto Sort Control Select On to sort the Shortcuts menu and Inputs list Shortcuts based on the mo...

Страница 40: ...he Auto Program to add receivable channels that are not presently in the TV s channel list page 34 IMPORTANT You must perform Auto Program after cable or antenna is connected If you cancel Auto Program before completion some channels may not be available TV is locked to one channel Perform the Auto Program to add available channels that are not presently in the TV s channel s list page page 34 The...

Страница 41: ...le not supplied Keep the antenna cable away from other connecting cords To avoid TV interference make sure to use an undamaged antenna cable PC Input No Picture No Signal Confirm the PC is correctly connected to the TV in the PC IN HD15 cable not supplied Ensure the output signal from the PC is one of the formats listed on page 18 Turn the PC off Confirm the PC connection and restart the PC Plug a...

Страница 42: ...de Mode to Wide Zoom or Zoom to fill the screen This setting will remain in effect until you change the channel or input or manually change the Wide Mode again Certain programs on DVD or other digital sources may experience a loss of detail especially during fast motion sequences or dark scenes The compression used by certain digital broadcasts and DVDs may cause your TV s screen to display less d...

Страница 43: ...linear PCM 32 44 1 and 48 kHz 16 20 and 24 bits AUDIO 500 mVrms 100 modulation Impedance 47 kilohms DIGITAL AUDIO OUT COAXIAL PCM 2 0 coaxial signal AUDIO OUT 500 mVrms modulation 100 More than 500 mVrms typical PC IN D sub 15 pin analog RGB 0 7 Vp p 75 ohms positive See the PC Input Signal Reference Chart on page 18 PC AUDIO INPUT Stereo mini jack 500 mVrms 47 kilohms Headphones Stereo mini jack ...

Страница 44: ...iver IR 27 INPUT button 26 27 Installing the TV on a wall 9 J JUMP button 26 L Label Channels 35 Label Inputs 38 Language 39 Light Sensor description 27 M Menu Channel 34 Parental Lock 35 Picture 31 Screen 33 Setup 38 Shortcuts 29 Sound 32 MENU button 24 27 Movie Rating 37 MUTING button 24 P Parental Lock 29 PC IN 15 PC PIP 30 Phase 33 PIC OFF TIMER LED 27 Picture 31 PICTURE button 23 Picture Mode...

Страница 45: ......

Страница 46: ......

Страница 47: ......

Страница 48: ...Printed in U S A 4 146 159 11 1 For Your Convenience Online Registration Be sure to register your TV United States Canada http productregistration sony com http www SonyStyle ca registration ...

Отзывы: