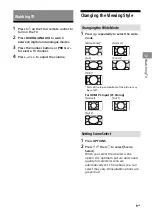
background image

11

GB

Naviga

ting thr

o

ugh Home Menu

GB

Note

• This TV does not have a battery powered backup for 

the clock. If there is a power failure or if you 
disconnect the power cord, the current date and time 
will reset automatically.

Duration

To save power, the TV continually plays back in 
Photo Frame Mode for up to 24 hours before 
powering off automatically. After automatic 
power off, do not use Photo Frame Mode for at 
least one hour to avoid panel burn-in. 
You can change the setting of the [Duration] in 
the [Photo Frame Settings] (page 17). 

To avoid panel burn-in, the position of the 
photo, clock and calendar are switched 
automatically every hour.
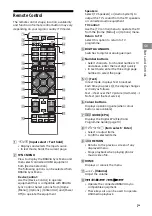
HOME


 [Applications] 

 [FM Radio]

Note

• Press 

PROG +/–

 to select an FM radio station. Press 


RETURN

 to exit FM Radio mode.

Presetting Radio Stations

When you use FM Radio function for the first 
time, press 

HOME

 and select [Settings] 


[System Settings] 

 [Channel Set-Up] 

 [FM 

Radio Set-up] 

 [Auto Tuning].

To change preset radio stations

1

Press 

OPTIONS

 in FM Radio mode. 

2

Press 

/

 then 

 to select [FM Radio 

Presets]. 

3

Press 

/

 then 

 to select the radio 

station you want to change. 

4

Press 

/

 then 

 to change the FM 

frequency then to edit FM Radio station 
name.

Note

• If the station has a noisy sound, you may be able to 

improve the sound quality by pressing 

/

.

• When an FM stereo programme has static noise, press 

AUDIO

 until [Mono] appears. There will be no stereo 

effect, but the noise will be reduced.

Media

You can enjoy photo/music/video files stored in 
a Sony digital still camera/camcorder/
smartphone (depending on models)* through a 
USB cable or USB storage device on your TV.

1

Connect a supported USB device to the 
TV. 

* Device needs to be in Media Transfer Mode (MTP).

2

Press 

HOME

.

3

Press 

/

 then 

 to select [Media].

4

Press 

/

 then 

 to select [Photo], 

[Music] or [Video].

5

Press 

/

/

/

 then 

 to select a file 

or folder.

Playback Options

Press the red button in thumbnail/list view to 
display the list of USB playback settings.

To adjust the picture and sound quality of 
USB media

Press 

OPTIONS

 during media playback then 

select [Picture] or [Sound].

Note

• Press 

/

/

/

 then 

 to select and adjust an item.

To play a photo as a slideshow (Photo)

1

Press the green button in thumbnail/list 
view to start slideshow.
To set [Slideshow Effect] and [Slideshow 
Speed], press 

OPTIONS


 [Playback 

Options]. 
To stop a slideshow, press 


RETURN.

Listening to FM Radio

Playback Photo/Music/Video via USB

Содержание BRAVIA 32R300E

Страница 1: ...KDL 40R350E 32R324E 32R300E 4 691 196 13 1 Television Operating Instructions Parts and Controls Watching TV Navigating through Home Menu Viewing Pictures from Connected Equipment Additional Information ...

Страница 2: ... List 10 Digital EPG 10 Applications 10 Using the TV as a Photo Frame Mode 10 Listening to FM Radio 11 Media 11 Playback Photo Music Video via USB 11 Settings 13 System Settings 13 Customer Support 20 Viewing Pictures from Connected Equipment Connection Diagram 21 Using Audio and Video Equipment 23 Additional Information Installing the TV to the Wall 24 Troubleshooting 27 Picture 27 Sound 27 Chann...

Страница 3: ...our existing television set is being retained and relocated the same considerations as above should be applied Installation Set up Install and use the TV set in accordance with the instructions below in order to avoid any risk of fire electric shock or damage and or injuries Apparatus connected to the protective earthing of the building installation through the mains connection or through other ap...

Страница 4: ...ts filled with liquids such as vases on the apparatus Do not install this equipment in a confined space such as a bookshelf or similar unit Please ensure that the AC power outlet mains socket is installed near the equipment and shall be easily accessible Be sure to use the supplied AC adapter and AC power cord mains lead Otherwise it may cause a malfunction Connect the AC adapter to an easily acce...

Страница 5: ... or more of the pixels are effective black dots may appear or bright points of light red blue or green may appear constantly on the LCD screen This is a structural property of the LCD screen and is not a malfunction Do not push or scratch the front filter or place objects on top of this TV set The image may be uneven or the LCD screen may be damaged If this TV set is used in a cold place a smear m...

Страница 6: ...ssing the CH INPUT button Sensors LED indicator Receives signals from the remote control Do not put anything over the sensor Doing so may affect its function Lights up in amber when the Sleep Timer or On Timer is set page 18 or the TV is in Photo Frame Mode page 10 Lights up in green when Power Saving is set to Picture Off page 20 Lights up in green when the TV is turned on Does not light up when ...

Страница 7: ...enu to operate the TV from the Home Menu or Options menu Return to TV Select this option to return to TV programme DIGITAL ANALOG Switches to digital or analogue input Number buttons Select channels For channel numbers 10 and above enter the next digit quickly In text mode enter the three digit page number to select the page Text In text mode displays Text broadcast Each time you press the display...

Страница 8: ...gramme input you are viewing Press again to remove the display from the screen In text mode reveals hidden information e g answers to a quiz OPTIONS Displays a list that contains shortcuts to some setting menus The listed options vary depending on the current input and content Jump Returns to the previous channel or input viewed more than 15 seconds PROG Selects the next or previous channel In tex...

Страница 9: ...atedly to select the wide mode For HDMI PC Input PC timing 1 Press OPTIONS 2 Press then to select Scene Select When you select the desired scene option the optimum picture and sound quality for selected scene are automatically set The options you can select may vary Unavailable options are greyed out Watching TV Changing the Wide Mode Wide Zoom Normal Full Zoom 14 9 Parts of the top and bottom of ...

Страница 10: ...igital EPG 1 Press GUIDE in digital mode 2 Press then to select a programme Applications Photo Frame Mode displays the clock and calendar at the same time as displaying a photo and listening to music or FM radio HOME Applications Photo Frame Mode To launch Photo Frame Mode while playback USB media 1 Press OPTIONS while playback a photo or music file 2 Press then to select Photo Frame Mode to launc...

Страница 11: ...u want to change 4 Press then to change the FM frequency then to edit FM Radio station name Note If the station has a noisy sound you may be able to improve the sound quality by pressing When an FM stereo programme has static noise press AUDIO until Mono appears There will be no stereo effect but the noise will be reduced Media You can enjoy photo music video files stored in a Sony digital still c...

Страница 12: ...ayed back USB Video format USB Music format LPCM wav MPEG1 audio layer3 mp3 WMA V8 wma USB Photo format JPEG jpg jpeg Note Playback of the above file formats is not guaranteed AVI avi Video Codec MPEG1 MPEG2 Xvid MPEG4 H 264 Motion JPEG Audio Codec PCM MPEG1 Layer1 2 MPEG2 AAC 2ch MPEG4 AAC 2ch MPEG4 HE AAC 2ch Dolby Digital 2ch Dolby Digital Plus 2ch WMA v8 MP3 ASF wmv asf Video Codec WMV v9 Xvid...

Страница 13: ...ges taken on film Select Auto to represent original film based content as it is Note If the image contains irregular signals or too much noise Cinema Drive is automatically turned off even if Auto is selected Advanced Settings Sets Picture settings in more detail Reset Resets all the advanced settings to the default settings Adv Contrast Enhancer Automatically adjusts Backlight and Picture to the ...

Страница 14: ...roadcast sound when Mono is selected Hint If you select other equipment connected to the TV set Dual Sound to Stereo Main or Sub Advanced Settings Dynamic Range Compensates for differences in the audio level between different channels Note The effect may not function or may vary depending on the programme regardless of the Dynamic Range setting HE AAC Audio Level Adjust the HE AAC audio sound leve...

Страница 15: ...stem Select the colour system according to the channel Signal Level Displays the signal level for programme currently being watched Programme Sorting Changes the order in which the channels are stored on the TV Digital Set up Digital Tuning Digital Auto Tuning Tunes in the available digital channels This option allows you to retune the TV after moving house or to search for new channels that have ...

Страница 16: ...nd store new digital services as they become available Service Replacement Select On to automatically change the channel when broadcaster changes transmission of the viewing programme to a different channel FM Radio Set up Presets up to 30 FM radio stations that can be received in your area Auto Tuning Allows you to automatically tune and store all the available channels FM Radio Presets Allows yo...

Страница 17: ...ricted 18 and above programmes No block No programmes need a password to view Digital Programme Block Locks a digital channel from being watched To view a blocked channel select Unblocked External Input Lock Locks an external input from being watched To view a blocked external input select Unblocked Note Entering the correct PIN code for blocked channel or external input will temporarily deactivat...

Страница 18: ...nguage in which the menus are displayed Start up Logo Select On to display the logo when the TV is turned on Select Off to disable it LED Indicator Select On to light up the LED indicator Select Off to disable it AV Set up Video Labels Assigns name to external equipment input Enable Select Auto to display names only when the equipment is connected or Always to display regardless of connection stat...

Страница 19: ...t is compatible with BRAVIA Sync Control is connected this setting is applied to the connected equipment automatically Auto Devices Off When set to On the connected equipment that is compatible with BRAVIA Sync Control turns off when your TV goes to standby mode Auto TV On When set to On the TV turns on when you turn on the connected equipment that is compatible with BRAVIA Sync Control BRAVIA Syn...

Страница 20: ... information of your TV External Inputs View Video Labels Allows you to view or manage the TV and external inputs Picture Check View Test Picture Allows you to check the picture condition on the display Software Update Select to perform system update Automatic Software Download Select On to download the software automatically Select Off to disable it Factory Settings Resets all settings to factory...

Страница 21: ... connected devices beside it When connecting a large USB device connect only 1 USB jack KDL 32R324E Viewing Pictures from Connected Equipment DVD player with component output Home Audio System Optical Input VCR Video game equipment DVD player Camcorder HDMI Device Home Audio System with ARC HDMI Device Headphone Home Audio System Subwoofer 12 mm 21 mm Digital still camera Camcorder USB storage med...

Страница 22: ...phone Home Audio System Subwoofer 12 mm 21 mm Digital still camera Camcorder USB storage media SD HD Picture Quality AV composite cable Antenna aerial cable Standard definition SD videos have picture signals with a vertical resolution of 480 NTSC or 576 PAL SECAM lines Component cable HDMI cable High definition HD videos have picture signals with a vertical resolution of 720 or 1 080 lines ...

Страница 23: ...utput digital sound When connecting with an HDMI cable be sure to use HighSpeed HDMI Cable with Cable Type Logo Recommended SONY Cable When connecting mono equipment connect the audio cable to the L mono jack Only on limited region country TV model To use BRAVIA Sync devices When connecting the TV to BRAVIA Sync compatible equipment you can control them together Be sure to perform the necessary se...

Страница 24: ...e Wall Mount Bracket Note If the Table Top Stand is attached to the TV detach the Table Top Stand beforehand See the Setup Guide and follow in reverse order the steps to detach the Table Top Stand Place the TV with its screen facing down on a level and stable surface covered with a thick and soft cloth when securing the Mounting Hook or when removing the Table Top Stand from the TV to prevent dama...

Страница 25: ...igures in the table may differ slightly depending on the installation When your TV is installed on the wall the upper side of the TV slightly leans forward 2 Remove screws from the rear of the TV Be sure to store the removed screws in a safe place keeping them away from children Model Name KDL Display dimensions Screen centre dimension Length for mounting Standard mounting 40R350E 924 550 84 201 1...

Страница 26: ...ce Standard mounting 4 Connect necessary cables to the TV Note You cannot access to any terminal after installing the TV to the wall 5 Install the TV to the Base Refer to 5 of Installation Guide and Installing the TV to the Wall of Operating Instructions supplied with the Wall Mount Bracket Refer to the instructions supplied with the Wall Mount Bracket for your model to install the TV on the wall ...

Страница 27: ...quipment When installing optional equipment leave some space between the optional equipment and the TV Check the antenna aerial cable connection Keep the antenna cable away from other connecting cables Picture or sound noise when viewing a TV channel Adjust AFT Automatic Fine Tuning to obtain better picture reception This function is for analogue TV channels only Tiny black points and or bright po...

Страница 28: ...he Idle TV Standby is activated page 20 Some input sources cannot be selected Select Video Labels and select Always of the input source page 18 The remote control does not function Replace the batteries HDMI equipment does not appear on BRAVIA Sync Device List Check that your equipment is compatible with BRAVIA Sync Control Cannot select Off in BRAVIA Sync Control If you have connected any audio s...

Страница 29: ...68 47 4 kHz 60 Hz 1 280 768 47 8 kHz 60 Hz 1 360 768 47 7 kHz 60 Hz 1 280 1 024 64 kHz 60 Hz 1 920 1 080 67 5 kHz 60 Hz The 1080p timing when applied to the HDMI input will be treated as a video timing and not PC timing For KDL 32R324E 32R300E 640 480 31 5 kHz 60 Hz 800 600 37 9 kHz 60 Hz 1 024 768 48 4 kHz 60 Hz 1 280 768 47 4 kHz 60 Hz 1 280 768 47 8 kHz 60 Hz 1 360 768 47 7 kHz 60 Hz Audio Two ...

Страница 30: ...crease when your TV is connected to the network Note Optional accessories availability depends on countries region TV model stock Design and specifications are subject to change without notice Notes on Digital TV function Any functions related to Digital TV will only work in countries or areas where DVB T DVB T2 MPEG 2 and H 264 MPEG 4 AVC digital terrestrial signals are broadcast Please confirm w...

Страница 31: ...ion GB This product contains technology subject to certain intellectual property rights of Microsoft Use or distribution of this technology outside of this product is prohibited without the appropriate license s from Microsoft ...

Страница 32: ... 2017 Sony Corporation Customer Support and Contact ...

Отзывы: