background image

20

US

Gettin

g

 Star

ted

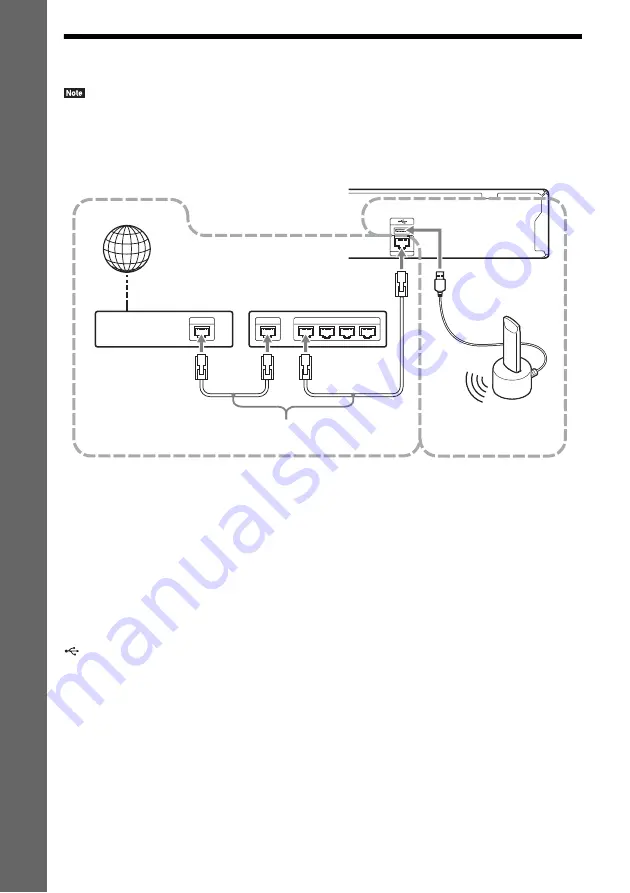
Step 3: Connecting to the Network

• To connect the system to your network, you need to make network settings that suit your usage environment and 

components. For details, see “Setting up the Network” (page 43) and “[Network Settings]” (page 51).

Select the method based on your LAN (Local Area Network) environment.

1

 Wired Setup

Use a LAN cable to connect to the LAN (100) terminal on the unit.

2

 USB Wireless Setup

Use a wireless LAN via the USB Wireless LAN Adapter (Sony UWA-BR100* only).
The USB Wireless LAN Adapter may not be available in some regions/countries.

* As of November 2010.

Turn the unit off before connecting the extension cable or inserting the USB Wireless LAN Adapter. 
After inserting the USB Wireless LAN Adapter to the base and connecting the extension cable to the 

 (USB) port (front or rear), turn the unit on again.

LAN 1

LAN 2

LAN 3

LAN 4

WAN

ETHER

LAN (100)

1

2

ADSL modem/
cable modem

Broadband router

LAN cable 
(not supplied)

Internet

Rear panel of the unit

USB 
Wireless LAN 
Adapter
(not supplied)

Содержание BDV-E280

Страница 1: ...BDV E280 BDV T28 4 265 162 11 1 Blu ray Disc DVD Home Theatre System Operating Instructions ...

Страница 2: ...cing instructions in the literature accompanying the appliance Owner s Record The model and serial numbers are located on the rear exterior of the unit Record these numbers in the space provided below Refer to them whenever you call upon your Sony dealer regarding this product Model No BDV E280 BDV T28 Serial No ______________ The following FCC statement applies only to the version of this model m...

Страница 3: ...m the mains as long as it is connected to the AC outlet even if the unit itself has been turned off As the main plug is used to disconnect the unit from the mains connect the unit to an easily accessible AC outlet Should you notice an abnormality in the unit disconnect the main plug from the AC outlet immediately On watching 3D video images Some people may experience discomfort such as eye strain ...

Страница 4: ...h are trademarks of Apple Inc registered in the U S and other countries Made for iPod and Made for iPhone mean that an electronic accessory has been designed to connect specifically to iPod or iPhone respectively and has been certified by the developer to meet Apple performance standards Apple is not responsible for the operation of this device or its compliance with safety and regulatory standard...

Страница 5: ...DVDs Super Audio CDs or CDs unless otherwise specified by the text or illustrations The instructions in this manual are for BDV E280 and BDV T28 BDV E280 is the model used for illustration purposes Any difference in operation is clearly indicated in the text for example BDV E280 only Some illustrations are presented as conceptual drawings and may be different from the actual products The items dis...

Страница 6: ...stening to the Radio 36 Other Operations Using the Control for HDMI Function for BRAVIA Sync 38 Setting the Speakers 39 Using the Sleep Timer 40 Deactivating the Buttons on the Unit 40 Controlling Your TV with the Supplied Remote 41 Changing the Brightness of the Front Panel Display 41 Saving Power in Standby Mode 41 Browsing Websites 42 Setting up the Network 43 Settings and Adjustments Using the...

Страница 7: ... U S and Canada models only Remote commander remote 1 R6 size AA batteries 2 HDMI cable 1 Mexican and Latin American models of BDV E280 and U S and Canada models of BDV T28 only HDMI cable 2 Mexican and Latin American models of BDV T28 only Dock for iPod iPhone TDM iP30 1 U S and Canada models only USB cable 1 U S and Canada models only Operating Instructions Quick Setup Guide Speaker Installation...

Страница 8: ...se page 27 Opens or closes the disc tray N play Starts or re starts playback resume play Plays a slideshow when a disc containing JPEG image files is inserted x stop Stops playback and remembers the stop point resume point The resume point for a title track is the last point you played or the last photo for a photo folder FUNCTION Selects the playback source VOLUME Adjusts the system s volume F 1 ...

Страница 9: ...Radio only D Lights up when the HDMI OUT jack is correctly connected to an HDCP High bandwidth Digital Content Protection compliant device with HDMI or DVI Digital Visual Interface input E Lights up when muting is on F Displays the system s status such as radio frequency etc G Lights up when outputting 720p 1080i 1080p video signals from the HDMI OUT jack Front panel display ...

Страница 10: ...LAN 100 terminal page 20 G HDMI IN 2 jack page 17 H HDMI IN 1 jack page 17 I HDMI OUT jack page 15 J VIDEO OUT jack page 15 Rear panel VIDEO OUT OPTICAL DIGITAL IN TV LAN 100 AUDIO IN R L AUDIO FM COAXIAL 75 ANTENNA FRONT R FRONT L SUBWOOFER CENTER SUR R ONLY FOR SS TSB105 SPEAKERS ONLY FOR SS WSB103 ONLY FOR SS CTB102 SUR L ONLY FOR SS TSB105 ARC OUT IN 1 IN 2 ...

Страница 11: ...d on a BD ROM DVD VIDEO C Color buttons yellow blue red green Short cut keys for selecting items on some BD menus can also be used for Java interactive operations on BDs D TOP MENU Opens or closes the BD s or DVD s Top Menu POP UP MENU Opens or closes the BD ROM s Pop up Menu or the DVD s menu OPTIONS pages 24 32 42 Displays the options menu on the TV screen or in the front panel display The locat...

Страница 12: ...ou played or the last photo for a photo folder Radio operation buttons See Tuner page 36 PRESET TUNING G MUTING Turns off the sound temporarily VOL page 36 Adjusts the volume TV VOL Adjusts the TV volume TV INPUT Switches the TV s input source between the TV and other input sources H DISPLAY pages 27 31 42 Displays playback and web browsing information on the TV screen Displays the preset radio st...

Страница 13: ... waxed oiled polished etc floor as staining or discoloration may result Do not lean or hang on a speaker as it may fall down You can install the speakers on a wall For details refer to the supplied Speaker Installation Guide Getting Started How to position the system A B D E C G F A Front speaker L left B Front speaker R right C Center speaker D Surround speaker L left E Surround speaker R right F...

Страница 14: ... a level where sound is not distorted To connect speaker cords to the unit Connect the speaker cords to match the color of the SPEAKERS jacks of the unit When connecting to the unit insert the connector until it clicks Connecting the speakers FRONT R FRONT L SUBWOOFER CENTER SUR R ONLY FOR SS TSB105 SPEAKERS ONLY FOR SS WSB103 ONLY FOR SS CTB102 SUR L ONLY FOR SS TSB105 Green Center speaker Purple...

Страница 15: ...nnections B and C 1 Audio Return Channel For details see About Audio Return Channel page 16 2 The HDMI cable is supplied with Mexican and Latin American models and BDV T28 only 3 Available only when your TV is compatible with the Audio Return Channel function Connecting the TV A B C HDMI cable2 Image quality Video connections Video cord not supplied Digital optical cord not supplied Audio connecti...

Страница 16: ...nnection for listening to TV sound For setting the Audio Return Channel function see Audio Return Channel page 51 B Video cord connection If your TV does not have an HDMI jack make this connection C Digital optical cord connection This connection sends an audio signal to the system from the TV To listen to TV sound via the system perform this connection With this connection the system receives a D...

Страница 17: ... sound via the HDMI IN 1 or HDMI IN 2 jack Video signals from the HDMI IN 1 2 jacks are sent to the HDMI OUT jack only when the HDMI1 or HDMI2 function is selected To send an audio signal from the HDMI IN 1 2 jacks to the HDMI OUT jack you may need to change the audio output setting For details see Audio Output in Audio Settings page 49 Connecting the other components HDMI OUT ARC OUT IN 1 IN 2 To...

Страница 18: ...ut of the component to the system If you make connection above set Control for HDMI in HDMI Settings of System Settings to Off page 51 You can enjoy component sound by selecting the AUDIO function page 23 System Signal flow TV Audio signal Video signal Component Video out Audio out AUDIO OUT L R AUDIO IN R L AUDIO To the audio out jacks of the VCR digital satellite receiver PlayStation or portable...

Страница 19: ...he FM wire antenna aerial keep it as horizontal as possible If you have poor FM reception use a 75 ohm coaxial cable not supplied to connect the unit to an outdoor FM antenna aerial Connecting the antenna aerial FM COAXIAL 75 ANTENNA or FM wire antenna aerial supplied Rear panel of the unit ...

Страница 20: ...ireless Setup Use a wireless LAN via the USB Wireless LAN Adapter Sony UWA BR100 only The USB Wireless LAN Adapter may not be available in some regions countries As of November 2010 Turn the unit off before connecting the extension cable or inserting the USB Wireless LAN Adapter After inserting the USB Wireless LAN Adapter to the base and connecting the extension cable to the USB port front or rea...

Страница 21: ...ve the USB Wireless LAN Adapter to a different position or place the USB Wireless LAN Adapter and the wireless LAN router closer to each other You can also get information for network settings from the following Sony support page For customers in the U S http www sony com support For customers in Canada English http www sony ca support French http fr sony ca support For customers in Mexico and Lat...

Страница 22: ...for OSD language selection appears 4 Perform the Easy Setup Follow the on screen instructions to make the basic settings using C X x c and Depending on the connection method page 15 perform the following setting HDMI cable connection Follow the instructions that are displayed on the TV screen Video cord connection Select 16 9 or 4 3 so that the picture is displayed correctly To recall the Easy Set...

Страница 23: ...device iPod iPhone or network device to be played by the system FM FM radio page 36 HDMI1 HDMI2 Component that is connected to the HDMI IN 1 or HDMI IN 2 jack on the rear panel page 17 TV Component TV etc that is connected to the TV DIGITAL IN OPTICAL jack on the rear panel or a TV compatible with the Audio Return Channel function that is connected to the HDMI OUT jack on the rear panel page 15 AU...

Страница 24: ...il the surround setting you want appears on the TV screen See the table below for surround sound setting descriptions 4 Press The setting is made Surround sound settings do not apply to Internet content When playing via the HDMI1 HDMI2 TV or AUDIO function 1 Press OPTIONS The option menu appears in the front panel display 2 Press X x repeatedly until SUR SET appears in the front panel display then...

Страница 25: ...and outputs sound from the 5 1 channel speakers by duplicating 2 channel source sound across each speaker Multi channel source The system outputs sound from the speakers depending on the number of channels of the source Dolby Pro Logic PRO LOGIC Dolby PL II Movie PLII MOVIE 2 channel source The system simulates surround sound from 2 channel sources and outputs sound from the 5 1 channel speakers D...

Страница 26: ...activated You can also select the surround setting in Surround Setting of Audio Settings page 49 For functions other than BD DVD you can check whether Dolby Pro Logic PRO LOGIC Dolby PL II Movie PLII MOVIE or the DTS Neo 6 mode is activated by pressing DISPLAY repeatedly so that the stream information decoding status appears in the front panel display ...

Страница 27: ... Internet Connection to Allow page 50 3 Insert a BD ROM with BONUSVIEW BD LIVE The operation method differs depending on the disc Refer to the operating instructions of the disc To delete data in the USB memory select Erase BD Data in Video and press All data stored in the buda folder will be deleted You can enjoy Blu ray 3D Discs with the 3D logo 1 Prepare for Blu ray 3D Disc playback Connect the...

Страница 28: ... on the connected USB device For playable types of files see Playable Types of Files page 61 1 Connect the USB device to the USB port on the unit Refer to the operating instructions of the USB device before connecting Mexican and Latin American models only 2 Press HOME The home menu appears on the TV screen 3 Press C c to select Video Music or Photo 4 For U S and Canada models Press X x to select ...

Страница 29: ...touch 1st generation iPhone 4 iPhone 3GS iPhone 3G iPhone To enjoy an iPod iPhone via the system 1 For U S and Canada models Connect the Dock for iPod iPhone supplied to the USB port on the unit then place the iPod iPhone onto the Dock for iPod iPhone When you play a video photo file connect the video out jack of the Dock for iPod iPhone to the video input jack of your TV with a video cord supplie...

Страница 30: ...e system U S and Canada models only To operate the iPod iPhone using the remote You can operate the iPod iPhone using the buttons on the remote The following table shows an example of buttons that can be used Depending on the iPod iPhone model the operation may be different For Video Music For Photo U S and Canada models only The iPod iPhone is charged when connected to the system while the system...

Страница 31: ... S and Canada Some Internet content requires registration via a PC before it can be played For further details visit the following website http www sony com bluraysupport 1 Prepare for BRAVIA Internet Video Connect the system to a network page 20 2 Press C c to select Video Music or Photo 3 Press X x to select an Internet content provider icon then press If the Internet content list has not been r...

Страница 32: ...s output regardless of this setting Video Settings Picture Quality Mode Selects the picture settings for different lighting environments FNR Reduces the random noise appearing in the picture BNR Reduces the mosaic like block noise in the picture MNR Reduces minor noise around the picture outlines mosquito noise Pause Pauses playback Top Menu Displays the BD s or DVD s Top Menu Menu Popup Menu Disp...

Страница 33: ...DIO function 1 Press OPTIONS The option menu appears in the front panel display 2 Press X x repeatedly until A V SYNC appears in the front panel display then press or c 3 Press X x to adjust the delay between the picture and sound You can adjust from 0 ms to 300 ms in 25 ms increments 4 Press The setting is made 5 Press OPTIONS The option menu in the front panel display turns off Slideshow BGM Off...

Страница 34: ... not be effective When you play a Super Audio CD this function does not work Selecting the Audio Format Multilingual Tracks or Channel When the system is playing a BD DVD VIDEO recorded in multiple audio formats PCM Dolby Digital MPEG audio or DTS or multilingual tracks you can change the audio format or language With a CD you can select the sound from the right or left channel and listen to the s...

Страница 35: ...x Broadcast Sound DUAL MONO You can enjoy multiplex broadcast sound when the system receives or plays a Dolby Digital multiplex broadcast signal To receive the Dolby Digital signal you need to connect a TV or other component to the unit with a digital optical cord page 15 If your TV is compatible with the Audio Return Channel function pages 15 51 you can receive a Dolby Digital signal via an HDMI ...

Страница 36: ...3 Press X x to select Monaural Stereo Stereo reception Monaural Monaural reception 4 Press The setting is made To turn off the radio Press 1 You can preset up to 20 stations Before tuning make sure to turn down the volume to minimum 1 Press FUNCTION repeatedly until FM appears in the front panel display 2 Press and hold TUNING until the auto scanning starts Scanning stops when the system tunes in ...

Страница 37: ...en and front panel display Each time you press the button the system tunes in one preset station You can select the preset station number directly by pressing the number buttons Each time you press DISPLAY the display in the front panel display changes as follows Frequency t Preset number t Stream information Decoding status t Frequency t Does not appear depending on the setting of Surround Settin...

Страница 38: ...s of the system When sound from the TV or other components is output via the speakers of the system you can change the speakers to which TV sound is output by pressing SPEAKERS TVyAUDIO When sound from the TV or other components is output via the speakers of the system you can adjust the volume and turn off the sound of the system by operating the TV While the TV is in PAP picture and picture mode...

Страница 39: ...es Center Yes Normally select this None Select this if no center speaker is used Surround Yes Normally select this None Select this if no surround speaker is used Subwoofer Yes x Distance When you move the speakers be sure to set the parameters of the distance A from the listening position to the speakers You can set the parameters from 0 to 23 feet 0 0 to 7 0 meters The speakers in the illustrati...

Страница 40: ...ut from the HDMI OUT jack To adjust the volume of all the speakers at one time press VOL Using the Sleep Timer You can set the system to turn off at a preset time so you can fall asleep listening to music The time can be preset in intervals of 10 minutes Press SLEEP Each time you press SLEEP the minutes display the remaining time in the front panel display changes by 10 minutes When you set the sl...

Страница 41: ...red code is not changed Re enter the code number Code numbers of controllable TVs If more than one code number is listed try entering them one at a time until you find the code that works with your TV Changing the Brightness of the Front Panel Display Press DIMMER Each time you press DIMMER the brightness of the front panel display is changed Saving Power in Standby Mode Check that the following s...

Страница 42: ... want to view then press The linked website is displayed C Page address D SSL icon Appears when the linked URL is secured E Signal strength indicator Appears when the system is connected to a wireless network F Progress bar Loading icon Appears when the page is being read or during file download transfer G Text input field Press then choose Input from the options menu to open the software keyboard...

Страница 43: ...sly displayed website by selecting the window Bookmark List Displays the bookmark list Character encoding Sets the character code Previous page Moves to a previously displayed page Next page Moves to the previously displayed next page Cancel loading Stops loading a page Reload Reloads the same page URL entry Allows you to enter a URL when the software keyboard is displayed Add to Bookmark Adds the...

Страница 44: ... network setting automatically and internet settings appear on the TV screen 3 Press c 4 Press X x to select Save Connect then press The system starts checking the network connection 5 Check that the message Internet Settings is now complete appears then press The setup is finished If the message does not appear follow the on screen messages Manual setting 1 Press X x to select Wired Setup on the ...

Страница 45: ...r 4 Check that the message Wi Fi Protected Setup was successful appears then press c Setup of wireless LAN connectivity and the IP address is finished Next enter the proxy server setting Follow Steps 4 to 7 of Manual setting in When connecting to the LAN with a LAN cable above When your wireless router is not compatible with the WPS function 1 Press X x to select USB Wireless Setup on the Internet...

Страница 46: ...ptible to interception To protect wireless communication this system supports various security functions Be sure to correctly configure the security settings in accordance with your network environment No Security Although you can easily make settings anyone can intercept wireless communication or intrude into your wireless network even without any sophisticated tools Keep in mind that there is a ...

Страница 47: ... in the U S http www sony com support For customers in Canada English http www sony ca support French http fr sony ca support Settings and Adjustments Icon Explanation Network Update page 47 Updates the software of the system Screen Settings page 48 Makes the screen settings according to the type of connecting jacks Audio Settings page 49 Makes the audio settings according to the type of connectin...

Страница 48: ... Changes the picture size to fit the screen size with the original picture aspect ratio x DVD Aspect Ratio Letter Box Displays a wide picture with black bands on the top and bottom Pan Scan Displays a full height picture on the entire screen with trimmed sides x Cinema Conversion Mode Auto Normally select this The unit automatically detects whether the material is video based or film based and swi...

Страница 49: ...onnected to the AUDIO AUDIO IN L R jacks You can prevent distortion by reducing the input level on the unit On Attenuates the input level The output level is changed Off Normal input level x Audio Output You can select the output method where the audio signal is output Speaker Outputs multi channel sound from the system s speakers only Speaker HDMI Outputs multi channel sound from the system s spe...

Страница 50: ...e the password for the Parental Control function A password allows you to set a restriction on BD ROM DVD VIDEO or Internet video playback If necessary you can differentiate the restriction levels for BD ROMs and DVD VIDEOs x Parental Control Area Code Playback of some BD ROMs or DVD VIDEOs can be limited according to the geographic area Scenes may be blocked or replaced with different scenes Foll...

Страница 51: ...On Shortens the startup time from standby mode You can operate the system quickly after turning it on Off The default setting x Auto Standby On Turns on the Auto Standby function When you do not operate the system for about 30 minutes the system enters standby mode automatically Off Turns off the function x Auto Display On Automatically displays information on the screen when changing the viewing ...

Страница 52: ...structions Resetting x Reset to Factory Default Settings You can reset the system settings to the factory default by selecting the group of settings All the settings within the group will be reset x Initialize Personal Information You can erase your personal information stored in the system ...

Страница 53: ...o not place heavy objects on the system On operation If the system is brought directly from a cold to a warm location or is placed in a very damp room moisture may condense on the lenses inside the unit Should this occur the system may not operate properly In this case remove the disc and leave the system turned on for about half an hour until the moisture evaporates When you move the system take ...

Страница 54: ...leave it in a car parked in direct sunlight as the temperature may rise considerably inside the car After playing store the disc in its case On cleaning Before playing clean the disc with a cleaning cloth Wipe the disc from the center out Do not use solvents such as benzine thinner commercially available cleaners or anti static spray intended for vinyl LPs This system can only play a standard circ...

Страница 55: ...fter several minutes Symptom Problems and solutions A new software version is available Please go to the Setup section of the menu and select Network Update to perform the update appears on the TV screen See Network Update page 47 to update the system to a newer software version PROTECTOR and PUSH PWR appear alternately in the front panel display Press 1 to turn off the system and check the follow...

Страница 56: ...ut at the same time set BD DVD ROM 1080 24p Output in Screen Settings to Off page 48 For BD ROMs check the BD DVD ROM 1080 24p Output settings in Screen Settings page 48 Picture noise appears Clean the disc If the picture output from your system goes through your VCR to get to your TV the copy protection signal applied to some BD DVD programs could affect picture quality If you still experience pr...

Страница 57: ...rrectly when connected to a set top box Set Audio Return Channel in HDMI Settings of System Settings to Off page 51 Severe hum or noise is heard Move your TV away from the audio components Clean the disc The sound loses stereo effect when you play a CD Select stereo sound by pressing AUDIO page 34 The sound comes from the center speaker only Depending on the disc the sound may come from the center...

Страница 58: ...ed Try using the BD s or DVD s menu Multi lingual tracks subtitles or multi angles are not recorded on the BD or DVD being played Bonus contents or other data that are contained in a BD ROM cannot be played Try the following 1 Remove the disc 2 Turn the system off 3 Remove and reconnect the USB device page 28 4 Turn the system on 5 Insert the BD ROM with BONUSVIEW BD LIVE Symptom Problems and solu...

Страница 59: ...ter may change automatically if you use the Wi Fi Protected Setup function before adjusting the settings of the router In this case change the wireless settings of your PC accordingly You cannot connect the system to your wireless LAN router Check if the wireless LAN router is on Depending on the usage environment including the wall material radio wave reception conditions or obstacles between the...

Страница 60: ...s system conforms to the NTSC color system Notes on discs This product is designed to play back discs that conform to the Compact Disc CD standard DualDiscs and some music discs encoded with copyright protection technologies do not conform to the Compact Disc CD standard Therefore these discs may not be compatible with this product Note on playback operations of a BD DVD Some playback operations o...

Страница 61: ...le tree Some USB devices may not work with this system The system can recognize Mass Storage Class MSC devices such as flash memory or an HDD Still Image Capture Devices SICDs and 101 key keyboards front USB port only Mexican and Latin American models only To avoid data corruption or damage to USB memory or other devices turn the system off before connecting or removing USB memory or other devices...

Страница 62: ...dio CD or DVD Audio For the LPCM 2ch format the supported sampling frequency of the digital signal is up to 96 kHz when using the HDMI1 or HDMI2 function and 48 kHz when using the TV function Function Format LPCM 2ch LPCM 5 1ch LPCM 7 1ch Dolby Digital Dolby TrueHD DolbyDigital Plus DTS DTS ES Discrete 6 1 DTS ES Matrix 6 1 DTS96 24 DTS HD High Resolution Audio DTS HD Master Audio BD DVD a a a a a...

Страница 63: ...eader digital still camera and digital video camera LAN Section LAN 100 terminal 100BASE TX Terminal FM Tuner Section System PLL quartz locked digital synthesizer Tuning range U S and Canada models 87 5 MHz 108 0 MHz 100 kHz step Other models 87 5 MHz 108 0 MHz 50 kHz step Antenna aerial FM wire antenna aerial Antenna aerial terminals 75 ohms unbalanced Speakers Front Surround SS TSB105 Dimensions...

Страница 64: ...64US Language Code List The language spellings conform to the ISO 639 1988 E F standard Parental Control Area Code List ...

Страница 65: ...net content 31 Internet Settings 43 51 Internet Video Parental Control 50 Internet Video Unrated 50 L Language Code List 64 M Multiplex broadcast sound 35 Music Settings 51 N Network Connection Diagnostics 51 Network Settings 51 Network Update 47 O OSD 51 Output Video Format 48 P Parental Control Area Code 50 Parental Control Settings 50 Password 50 Pause Mode 49 Play information 28 Playable discs...

Страница 66: ......

Страница 67: ......

Страница 68: ...le updates please visit the following URL For customers in the U S http www sony com support For customers in Canada English http www sony ca support French http fr sony ca support For customers in Mexico and Latin America http esupport sony com LA 2011 Sony Corporation Printed in Malaysia 1 ...

Отзывы: