background image

37

ES

Ut
ilización d

las funciones 

d

e toma 

d

e

 imág

enes

Toma de imágenes con desenfoque reducido

Se toma una serie de imágenes en ráfaga a alta velocidad mediante una presión total del 
botón del disparador y se aplica el procesamiento de imágenes para reducir el 
desenfoque y el ruido del motivo.

El sonido del disparador emite un pitido 6 veces y se graba una imagen.

La reducción del desenfoque es menos efectiva en las siguientes situaciones:
– Imágenes con movimiento imprevisible
– El motivo principal está demasiado cerca de la cámara
– Imágenes con un patrón de repetición como, por ejemplo, el cielo, una playa de arena o césped
– Imágenes con un cambio constante como, por ejemplo, olas o cascadas

1

Ajuste el dial de modo en 

 (Crepúsculo manual) o en 

 (Antidesenfoque de moción).

Seleccione 

 (Crepúsculo manual) cuando tome imágenes de escenas nocturnas 

sin trípode.
Seleccione 

 (Antidesenfoque de moción) cuando tome imágenes dentro de una 

habitación.

2

Pulse el botón del disparador.

Notas

Содержание 4-132-058-11(1)

Страница 1: ... vegetal exento de compuesto orgánico volátil COV Additional information on this product and answers to frequently asked questions can be found at our Customer Support Website En la página Web de atención al cliente puede encontrar información adicional sobre este producto y respuesta a las preguntas hechas con más frecuencia Digital Still Camera Cámara fotografía digital DSC HX1 Instruction Manua...

Страница 2: ...ck can burst cause a fire or even chemical burns Observe the following cautions Do not disassemble Do not crush and do not expose the battery pack to any shock or force such as hammering dropping or stepping on it Do not short circuit and do not allow metal objects to come into contact with the battery terminals Do not expose to high temperature above 60 C 140 F such as in direct sunlight or in a ...

Страница 3: ...itions 1 This device may not cause harmful interference and 2 this device must accept any interference received including interference that may cause undesired operation This Class B digital apparatus complies with Canadian ICES 003 UL is an internationally recognized safety organization This product has received UL Listing If you have any questions about this product you may call Sony Customer In...

Страница 4: ...apan The Authorized Representative for EMC and product safety is Sony Deutschland GmbH Hedelfinger Strasse 61 70327 Stuttgart Germany For any service or guarantee matters please refer to the addresses given in separate service or guarantee documents This product has been tested and found compliant with the limits set out in the EMC Directive for using connection cables shorter than 3 meters 9 8 fe...

Страница 5: ...o the applicable collection point for the recycling of electrical and electronic equipment For all other batteries please view the section on how to remove the battery from the product safely Hand the battery over to the applicable collection point for the recycling of waste batteries For more detailed information about recycling of this product or battery please contact your local Civic Office yo...

Страница 6: ...ognition 24 Selecting the focus method 26 Focusing on the face of the subject Face Detection 27 Shooting close ups Macro 28 Using the self timer 28 Selecting a flash mode 29 Changing the screen display 30 Selecting the image size to match the usage 31 Shooting with Program Auto 33 Shooting moving subjects with different effects Shutter Speed Priority Shooting 34 Adjusting background blur and shoot...

Страница 7: ...to other devices 49 Viewing images on a TV 49 Printing still images 50 Using the camera with a computer 52 Changing camera settings 56 Changing the operation sounds 56 Setting the custom button 57 Using the MENU items 58 Using the Settings items 62 Others 65 Learning more about the camera Cyber shot Handbook 65 List of icons displayed on the screen 66 Troubleshooting 69 Precautions 72 Specificatio...

Страница 8: ...malfunction and you may not be able to record images Furthermore the recording media may become unusable or image data may be damaged Clean the flash surface before use The heat of flash emission may cause dirt on the flash surface to become discolored or to stick to the flash surface resulting in insufficient light emission Notes on the LCD screen the LCD finder and lens The LCD screen is manufac...

Страница 9: ... camera utilizes MPEG 4 AVC H 264 Main Profile to record movies Therefore movies recorded using this camera cannot be played on devices that do not support MPEG 4 AVC H 264 Warning on copyright Television programs films videotapes and other materials may be copyrighted Unauthorized recording of such materials may be contrary to the provisions of the copyright laws No compensation for damaged conte...

Страница 10: ...ns cap strap 1 CD ROM 1 Cyber shot application software Cyber shot Handbook Cyber shot Step up Guide Instruction Manual this manual 1 xUsing the shoulder strap Attach the shoulder strap and lens cap strap to prevent the camera from being dropped and damaged xAbout HDMI adaptor When you connect the camera to the TV with an HDMI cable attach the HDMI adaptor supplied to the HDMI cable sold separatel...

Страница 11: ...shoot using the finder with the FINDER LCD button Adjust the finder adjustment dial to your eyesight so that the image appears clearly within the finder Face the camera toward the brighter area for easier adjustment KFINDER LCD button Switch the finder or LCD screen to view for shooting LHook for shoulder strap MDC IN jack DC IN jack cover You cannot charge the battery pack by connecting your came...

Страница 12: ...ok for shoulder strap WMENU button XControl button Menu on v V b B z Menu off DISP YSpeaker ZBattery insert slot wjBattery eject lever wk Memory Stick Duo media slot wlAccess lamp e Battery Memory Stick Duo media cover eaTripod receptacle Use a tripod with a screw less than 5 5 mm 7 32 inches long Otherwise you cannot firmly secure the camera and damage to the camera may occur esRESET button Press...

Страница 13: ...u continue charging the battery pack for about one more hour after the CHARGE lamp turns off the charge will last slightly longer Full charge CHARGE lamp Lit Charging Off Charging finished Normal charge 3When charging is finished disconnect the battery charger Battery pack CHARGE lamp For customers in the USA and Canada Plug CHARGE lamp Power cord mains lead For customers in countries regions othe...

Страница 14: ...umber of images you can record view The measurement method is based on the CIPA standard CIPA Camera Imaging Products Association The battery life and the number of still images may vary depending on the camera settings Full charge time Normal charge time Approx 256 min Approx 205 min Notes Battery life min No of Images Shooting still images LCD screen Approx 195 Approx 390 Finder Approx 200 Appro...

Страница 15: ... 2Insert the Memory Stick Duo media sold separately With the terminal side facing the lens insert the Memory Stick Duo media until it clicks into place 3Insert the battery pack Insert the battery with the v mark downward while pressing the battery eject lever in the direction of the arrow 4Close the cover ...

Страница 16: ...th the camera Memory Stick media You cannot use a Memory Stick media with the camera xTo remove the Memory Stick Duo media Never remove the Memory Stick Duo media battery pack when the access lamp is lit This may cause damage to data in the Memory Stick Duo media internal memory xWhen there is no Memory Stick Duo media inserted Images are stored in the camera s internal memory approximately 11 MB ...

Страница 17: ...rge indicator may not be correct under certain circumstances Battery capacity decreases over time and through repeated use When the operating time per charge decreases markedly the battery pack needs to be replaced Purchase a new battery pack If the camera is running on and you do not operate the camera for about three minutes the camera turns off automatically Auto power off function Notes Remain...

Страница 18: ...then press z Date Time Format Select the date and time display format Daylight Savings Select Daylight Savings On Off Date Time Sets the date and time 3Set the numeric value and desired settings with v V b B then press z Midnight is indicated as 12 00 AM and noon as 12 00 PM 4Select Go to next then press z 5Select your desired area with b B on the control button then press z ON OFF Power button Co...

Страница 19: ...feature for superimposing dates on images By using PMB in the CD ROM supplied you can print or save images with the date xSetting the date and time again Press the MENU button then select Settings t Clock Settings page 64 6Select OK then press z Note ...

Страница 20: ...rn Turn the W T Zoom lever slightly to zoom slowly and more to zoom quickly 3Press the shutter button halfway down to focus is displayed to indicate that SteadyShot is working When the image is in focus a beep sounds and the z indicator lights The shortest shooting distance is approximately 1 cm 13 32 inches W 150 cm 4 feet 11 1 8 inches T from the lens 4Press the shutter button fully down The ima...

Страница 21: ...older View page 47 xSelecting next previous image Select an image with B next b previous on the control button You can also select an image with the jog dial xDeleting an image 1 Press Delete button 2 Select This Image with v on the control button then press z xReturning to shooting images Press the shutter button halfway down xTurning off the camera Press ON OFF Power button Playback button Jog d...

Страница 22: ...arge or Small from Image Size Flash Press on the control button t Select Flash Auto or Flash Off Press MENU t Flash t Select Auto or Off zOn Easy Viewing mode When you press the Playback button with the mode dial set to Easy Shooting the playback screen text becomes larger and easier to see In addition the functions that can be used are limited Delete button You can delete the currently displayed ...

Страница 23: ...ess the Custom button again Smile Shutter ends If you press the shutter button during Smile Shutter the camera shoots the image then returns to Smile Shutter mode Custom button Face Detection frame Smile Detection Sensitivity indicator zHints for better capturing of smiles 1 Do not cover the eyes with the bangs 2 Try to orient the face in front of the camera and be as level as possible The detecti...

Страница 24: ...the camera at the subject When the camera recognizes a scene a Scene Recognition icon Twilight Twilight Portrait Twilight using a tripod Backlight Backlight Portrait Landscape Macro or Portrait is displayed on the LCD screen 3 Press the shutter button halfway down to focus on the subject then shoot images Scene Recognition icon ...

Страница 25: ...trait is recognized An image without closed eyes is automatically selected displayed and recorded First shot Second shot Shot in Slow Synchro mode Shot with the sensitivity increased to reduce blur Shot in Slow Synchro mode using the face most illuminated by the flash as the reference Shot with the sensitivity increased using the face most illuminated by the flash as the reference to reduce blur S...

Страница 26: ...f the finder frame automatically Flexible Spot AF Move the AF range finder frame to the desired spot and focuses on it Semi Manual Automatically and quickly focuses on the area around a set distance Manual Focus Allows you to focus on the subject manually FOCUS button zSelecting Flexible Spot AF Semi Manual or Manual Focus You can determine the focus position with the control button You can also a...

Страница 27: ...utomatically selects and focuses on a priority face Child Priority Detects and shoots with priority on a child s face Adult Priority Detects and shoots with priority on an adult s face Note MENU button zRegistering the priority face Selected face Memory 1 Press z on the control button during Face Detection The leftmost face is registered as the priority face and the frame changes to an orange colo...

Страница 28: ...ode Macro On This camera adjusts the focus with priority on close up subjects Set Macro On when shooting close subjects Note 1 Press Self Timer on the control button then select the desired mode with v V t z Self Timer Off Not using the self timer Self Timer 10sec Shooting starts after a 10 second delay Use this setting if you want to include yourself in the image To cancel press again Self Timer ...

Страница 29: ...uring burst or bracket shooting 1 Press Flash on the control button then select the desired mode with b B t z Flash Auto Flashes when there is insufficient light or backlight Flash On Flash always operates Slow Synchro Flash On Flash always operates The shutter speed is slow in a dark place to clearly shoot the background that is out of flash light Flash Off Flash does not operate Notes ...

Страница 30: ... Sets screen brighter and displays the information Normal Sets screen to standard brightness and displays the information zHistogram and brightness settings A histogram is a graph showing the brightness of an image The graph display indicates a bright image when skewed to the right side and a dark image when skewed to the left side If you view images in bright outside light adjust the screen brigh...

Страница 31: ...age size that matches the way you will view your images 1 Press the MENU button 2 Select Image Size with v V b B on the control button t desired size t z When shooting still images MENU button Image size Usage guidelines No of images Printing 3456 2592 For prints up to A3 size Less More Fine Rough 2592 1944 For prints up to A4 size 2048 1536 For prints up to L 2L size 640 480 For e mail attachment...

Страница 32: ...1 MB 256 MB 512 MB 1 GB 2 GB 4 GB 8 GB 16 GB 9M 2 51 108 221 448 885 1787 3634 5M 3 68 143 293 595 1174 2372 4821 3M 7 144 301 617 1253 2472 4991 10140 VGA 70 1383 2897 5924 12030 23730 47910 97390 3 2 8M 2 51 107 219 445 879 1774 3607 16 9 6M 2 51 107 219 445 879 1774 3607 16 9 2M 11 230 482 987 2005 3955 7986 16230 Panorama Wide horizontal 3 60 127 259 527 1040 2101 4271 Panorama Standard horizo...

Страница 33: ...u can change the aperture F value and shutter speed combination while keeping the exposure fixed 1 Press the jog dial 2 Turn the jog dial on the screen changes to and the shooting mode changes to program shift 3 Turn the jog dial to select the aperture F value and shutter speed combination 4 Press the shutter button To cancel program shift turn the jog dial to return the indication to 1 Set the mo...

Страница 34: ...al to select the shutter speed value You can select a shutter speed from 1 4000 to 30 seconds You can set the EV or ISO setting with the jog dial 4 Press the shutter button Note Jog dial zAbout the shutter speed When you set the shutter speed faster moving objects such as running people cars or splashing water etc appear stopped When you set the shutter speed slower the traces of moving objects su...

Страница 35: ...to F8 0 The shutter speed is automatically adjusted from 1 2000 to 8 seconds You can set the EV or ISO setting with the jog dial 4 Press the shutter button Note Jog dial zAbout the aperture The lower the aperture F value the wider the hole that lets light pass through The depth of focus decrease and everything except objects within a narrow range of distance will be out of focus This is good for p...

Страница 36: ... power is turned off Once you set a value you can reproduce the same exposure by simply setting the mode dial to Manual Exposure Shooting The flash is set to Flash On or Flash Off 1 Set the mode dial to Manual Exposure Shooting 2 Press the jog dial to select an item you desired to set Each time you press the jog dial the selectable items change 3 Turn the jog dial to set the value 4 Press the shut...

Страница 37: ... Reducing blur is less effective in the following situations Images with erratic movement The main object is too close from the camera Image with a repeating pattern such as sky sandy beach or lawn Image with constant change such as waves or water falls 1 Set the mode dial to Hand held Twilight or Anti Motion Blur Select Hand held Twilight when you shoot night scene without a tripod Select Anti Mo...

Страница 38: ...d smoothly You cannot create panoramic images in the following situations You pan the camera too fast or too slow There is too much camera shake You pan the camera in a different direction from the setting Under low light conditions panoramic images may be blurred 1 Set the mode dial to Sweep Panorama 2 Hold the camera at the position where you can see the LCD screen clearly Press the MENU button ...

Страница 39: ...is happens change lock angle and shoot again Sweep Panorama is not suitable for the following situations Objects are moving Objects are too close to the camera Image with a repeating pattern such as sky sandy beach or lawn Image with constant change such as waves or water falls Under lights that flicker such as fluorescent light the brightness or color of the combined image is not always the same ...

Страница 40: ...hoots up to 5 images per second in succession Burst Low Shoots up to 2 images per second in succession Bracket Shoots 3 images with different exposure 3 Press the shutter button Note Burst Bracket button zAbout the recording of High speed burst shooting images After shooting High speed burst images the shot images are displayed in frames on the LCD screen When all the images are fitted in the fram...

Страница 41: ... a face is detected in burst images a most suitable image is displayed as a main image When a face is not detected the first image will become a main image The main image can be changed Display All The burst images can be displayed in a list 1 Press z on the control button Burst groups are displayed as thumbnail images 2 Select images with b B Display or hide the index with V and press z to go bac...

Страница 42: ...hes the scene Scene Selection 1 Set the mode dial to Scene Selection A list of Scene Selection modes is displayed 2 Select the desired mode with v V b B on the control button t z If you want to switch to another scene press the MENU button ...

Страница 43: ...uch as sports Landscape Shoots with the focus on a distant subject Twilight Portrait Shoots sharp images of people in a dark place without losing the nighttime atmosphere Twilight Shoots night scenes without losing the nighttime atmosphere Gourmet Shoots food arrangements in delicious color Beach Shoots seaside or lakeside scenes with the blueness of the water captured more vividly Snow Shoots sno...

Страница 44: ...t b previous on the control button to select a movie 2 Press z Press z again to pause Press b B to fast rewind forward and press V to display the control panel Control panel 1 Set the mode dial to Movie Mode 2 Press the shutter button fully down to start recording 3 Press the shutter button fully down again to stop recording Note Button Available functions Rewind Playback Pause Fast forward Play s...

Страница 45: ...on a Memory Stick PRO Duo media The size of a movie file is limited to approx 2 GB During recording movie recording stops before reaching 29 minutes when the file size of the movie reaches approx 2 GB Movie image size Average bit rate Usage guidelines 1440 1080 Fine 12 Mbps Shoot highest quality movie for display on HDTV 1080 1440 1080 Standard 7 Mbps Shoot standard quality movie for display on HD...

Страница 46: ...Adjust the zoom scale and position Playback zoom lever Zooms in by turning to the T side Zooms out by turning to the W side v V b B on the control button Adjusts the position 1 Press the Playback button to display an image then turn the Index lever to the W side Turn Index lever again to display an index screen with even more images 2 Select an image with v V b B on the control button To return to...

Страница 47: ...images in Folder View 1 Press the Playback button to display an image then press the MENU button 2 Select View Mode with v V b B on the control button t desired mode t z Date View Displays images by the date Event View Analyzes the dates shots and frequency automatically organizes the images into groups and displays them Favorites Displays images registered as Favorites Folder View Displays and or...

Страница 48: ...This Image You can delete the currently displayed image Exit Cancels the deletion Delete button MENU button zDeleting all images Format You can delete all data stored on Memory Stick Duo media or the internal memory If a Memory Stick Duo media is inserted all data stored on the Memory Stick Duo media are deleted If no Memory Stick Duo media is inserted all data stored in the internal memory are de...

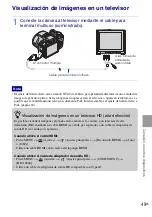
Страница 49: ...ied Note To the multi connector To audio video input jacks Cable for multi use terminal zViewing images on an HD High Definition TV You can view images recorded on the camera by connecting the camera to an HD High Definition TV with an HDMI cable sold separately or an HD Output Adaptor Cable sold separately When you use the HDMI cable Press MENU t Settings t Main Settings t HDMI Resolution t Auto ...

Страница 50: ...inter After the connection is made the indicator appears on the LCD screen 3 Press MENU t Print with v V b B on the control button t desired mode t z This Image Print the currently displayed image Multiple Images Press b B to display the image then z 4 Select the desired setting item then OK t z The image is printed Notes MENU button zPrinting at a shop You cannot print images stored in the intern...

Страница 51: ...sed For details consult with a photo printing service shop Printing at home Connect to a PictBridge compliant printer and press the MENU button then set Print t Date to Date or Day Time Superimposing dates on images using PMB With the supplied PMB software installed on a PC page 53 you can directly superimpose the date on an image However note that when images with a superimposed date are printed ...

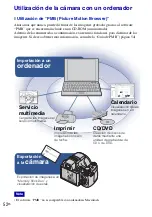
Страница 52: ...o those listed below for enjoying your images For details see the PMB Guide page 54 PMB is not compatible with Macintosh computers Note Export to camera Exporting images to a Memory Stick Duo media and viewing them Import to computer Media service Uploading the image to the media service Print Printing images with date stamps CD DVD Creating a data disc using a CD burner drive or DVD burner drive ...

Страница 53: ... faster 1440 1080 Standard Intel Pentium D 2 8 GHz or faster Intel Core Duo 1 66 GHz or faster Intel Core 2 Duo 1 20 GHz or faster Memory 512 MB or more For playing editing the High Definition movies 1 GB or more Hard Disk Disk space required for installation Approximately 500 MB Display Screen resolution 1 024 768 dots or more Video memory 32 MB or more Recommended 64 MB or more 1 64 bit editions...

Страница 54: ...ert a fully charged battery pack to the camera then press the Playback button 2 Connect the camera to your computer Connecting appears on the screen of the camera is displayed on the screen during the communication session Do not operate the computer while the indicator is displayed When the indicator changes to you can start using the computer again 3 Click the Import button For details see the P...

Страница 55: ...r Macintosh computer Recommended computer environment The following environment is recommended for a computer connected to the camera Recommended environment for importing images OS pre installed Mac OS 9 1 9 2 Mac OS X v10 1 to v10 5 USB jack Provided as standard Recommended environment for using Music Transfer OS pre installed Mac OS X v10 3 to v10 5 Memory 64 MB or more 128 MB or more is recomm...

Страница 56: ...n the control button then press z 3 Select Main Settings with v V b B on the control button then press Beep t desired mode t z Shutter Turns on the shutter sound when you press the shutter button High Low Turns on the beep shutter sound when you press the control shutter button If you want to lower the volume select Low Off Turns off the beep shutter sound MENU button ...

Страница 57: ...utton is Smile Shutter Custom Button is fixed to Smile Shutter in Easy Shooting and Demo Mode 1 Press the MENU button 2 Select Settings with V on the control button then press z 3 Select Shooting Settings with v V b B t Custom Button t desired mode t z Smile Shutter Shoots using the Smile Shutter default setting White Balance Displays the White Balance setting screen Metering Mode Displays the Met...

Страница 58: ...for each mode are displayed on the screen Select Settings t Main Settings t Initialize to initialize the settings to the default setting 1 Press the MENU button to display the menu screen 2 Select the desired menu item with v V b B on the control button During playback confirm by pressing z 3 Press the MENU button to turn off the menu screen MENU button ...

Страница 59: ...pot Bracket Set Sets the shooting with Bracket EXP 0 3 EXP 0 7 EXP 1 0 White Balance Color Mode Scene Recognition Automatically detects the shooting conditions and then takes the shot Auto Advanced Smile Detection Sensitivity Sets the level of sensitivity to detect smile Big Smile Normal Smile Slight Smile Face Detection Selects the priority subject for adjusting the focus when using Face Detectio...

Страница 60: ...lder View Filter by Faces Plays back images filtered to meet certain conditions Off All people Children Infants Smiles Change Main Image Set the burst images to display on the screen Add Remove Favorites Adds images to Favorites or removes images from Favorites This Image Multiple Images Add All in Date Range Remove All in Date Range The displayed text differs according to each View Mode Display B...

Страница 61: ... the image you want to print in a Memory Stick Duo media This Image Multiple Images Print Prints images using a PictBridge compliant printer This Image Multiple Images Rotate Rotates a still image Select Folder Selects the folder for viewing images Settings Changes settings other than shooting settings Item Description ...

Страница 62: ...y when settings have been entered from shooting mode 1 Press the MENU button to display the menu screen 2 Select Settings with V on the control button and confirm by pressing z 3 Select the desired item with v V b B on the control button then press z 4 Press the MENU button to turn off the setting screen MENU button ...

Страница 63: ...Language Setting Selects the language to be used in menu items warnings and messages Function Guide Selects whether or not to display the function guide when you operate the camera Initialize Initializes settings to their default settings Demo Mode Sets whether to view a demonstration of the Smile Shutter and Scene Recognition HDMI Resolution Sets the resolution to be output to a TV when the camer...

Страница 64: ...olders in Memory Stick Duo media Copy Copies all images in the internal memory to Memory Stick Duo media File Number Selects the method used to assign file numbers to images Internal Memory Tool Format Formats the internal memory File Number Selects the method used to assign file numbers to images Clock Settings Area Setting Adjusts the time to the local time of the selected area Date Time Setting...

Страница 65: ... page http www adobe com xFor Windows users xFor Macintosh users 1 Turn on your computer and insert the CD ROM supplied into the CD ROM drive 2 Click Cyber shot Handbook Cyber shot Step up Guide which contains information on accessories for the camera is installed at the same time 3 Start Cyber shot Handbook from the shortcut on the desktop 1 Turn on your computer and insert the CD ROM supplied in...

Страница 66: ...ode When shooting movies When playing back A Display Indication Battery remaining Low battery warning Image Size Scene Selection Mode dial Intelligent Auto Adjustment Program Auto Shutter Speed Priority Shooting Aperture Priority Shooting Manual Exposure Shooting Hand held Twilight Anti Motion Blur Sweep Panorama Movie shooting mode White Balance Metering Mode SteadyShot Vibration warning Scene Re...

Страница 67: ...ay Indication Display Indication z AE AF lock ISO400 ISO number NR slow shutter 125 Shutter speed F3 5 Aperture value 2 0EV Exposure value AF range finder frame indicator Macro REC Standby Recording a movie Standby a movie 0 12 Recording time m s 101 0012 Folder file number 2009 1 1 9 30 AM Recorded date time of the playback image z STOP z PLAY Function guide for playing image bB BACK NEXT Selecti...

Страница 68: ...g Mode Flash mode Flash charging White Balance ISO400 ISO number Display Indication Self Timer C 32 00 Self diagnosis display Destination Overheating warning Conversion Lens Face Detection Burst Bracket Management file full Bracket Set AF range finder frame Spot metering cross hair 2 0EV Exposure value 500 Shutter speed F3 5 Aperture value PictBridge connecting N Playback Playback bar 35 37 32 N 1...

Страница 69: ... pack The power turns off suddenly Depending on the camera and battery temperature the power may turn off automatically to protect the camera In this case a message is displayed on the LCD screen before the power turns off If you do not operate the camera for about three minutes while the power is on the camera turns off automatically to prevent wearing down the battery pack Turn on the camera aga...

Страница 70: ...alled correctly The temperature may be inappropriate for charging Try charging the battery pack again within the proper charging temperature range 10 C to 30 C 50 F to 86 F Cannot record images Check the free capacity of the internal memory or Memory Stick Duo media pages 32 45 If it is full do one of the following Delete unnecessary images page 48 Change the Memory Stick Duo media You cannot reco...

Страница 71: ...essed on a computer or images which were shot using other cameras The camera is in USB mode Delete the USB connection You may not be able to play back some images stored on the Memory Stick Duo media shot using other cameras Play such images in Folder View page 47 This is caused by copying images on your computer to the Memory Stick Duo media without using the PMB Play such images in Folder View p...

Страница 72: ...me On operating temperatures Your camera is designed for use under the temperatures between 0 C and 40 C 32 F and 104 F Shooting in extremely cold or hot places that exceed this range is not recommended On moisture condensation If the camera is brought directly from a cold to a warm location moisture may condense inside or outside the camera This moisture condensation may cause a malfunction of th...

Страница 73: ... set to Auto Approx 0 3 m to 9 2 m 11 7 8 inches to 30 feet 2 1 4 inches W approx 1 5 m to 5 1 m 4 feet 11 1 8 inches to 16 feet 8 7 8 inches T Viewfinder Electric view finder color Input and Output connectors Multi use terminal Type2d AV out SD HD Component HDMI USB Video output Audio output stereo HDMI output USB communication USB communication Hi Speed USB USB 2 0 compliant LCD screen LCD panel...

Страница 74: ... Duo Memory Stick PRO Duo Memory Stick PRO HG Duo Memory Stick Micro MagicGate BRAVIA PhotoTV HD Info LITHIUM HDMI the HDMI logo and High Definition Multimedia Interface are trademarks or registered trademarks of HDMI Licencing LLC Microsoft Windows DirectX and Windows Vista are either registered trademarks or trademarks of Microsoft Corporation in the United States and or other countries Macintos...

Страница 75: ...75GB Others ...

Страница 76: ...s de litio dañadas o con fugas Asegúrese de cargar la batería con un cargador de baterías original de Sony o con un dispositivo que pueda cargarla Mantenga la batería fuera del alcance de niños pequeños Mantenga la batería seca Sustitúyala únicamente por otra del mismo tipo o equivalente recomendada por Sony Deshágase de la baterías usada lo antes posible según el procedimiento que se describe en ...

Страница 77: ... los recursos naturales Para recibir información detallada sobre el reciclaje de este producto póngase en contacto con el ayuntamiento el punto de recogida más cercano o el establecimiento donde ha adquirido el producto Tratamiento de las baterías al final de su vida útil aplicable en la Unión Europea y en países europeos con sistemas de recogida selectiva de residuos Este símbolo en la batería o ...

Страница 78: ...nes de toma de imágenes automáticamente Reconocimiento de escena 22 Selección del método de enfoque 24 Enfoque de la cara del motivo Detección de cara 25 Toma de primeros planos Macro 27 Utilización del autodisparador 27 Selección de un modo de flash 28 Cambio de la visualización en pantalla 29 Selección del tamaño de la imagen para adaptarlo al tipo de uso 30 Toma de imágenes mediante Programa au...

Страница 79: ...Eliminación de imágenes 48 Eliminación de imágenes 48 Conexión con otros dispositivos 49 Visualización de imágenes en un televisor 49 Impresión de imágenes fijas 50 Utilización de la cámara con un ordenador 52 Modificación de los ajustes de la cámara 56 Modificación de los sonidos de funcionamiento 56 Configuración del botón personalizado 57 Utilización de los elementos de MENU 58 Utilización de l...

Страница 80: ... polvorientos puede ocasionar un fallo de funcionamiento Si se condensa humedad elimínela antes de utilizar la cámara página 72 No agite ni golpee la cámara Además de producirse un fallo de funcionamiento y de no poder grabar imágenes es posible que el soporte de grabación quede inutilizable o que los datos de las imágenes se dañen Limpie la superficie del flash antes de utilizarlo El calor de la ...

Страница 81: ...erno y a continuación ejecute Inicializar en Ajustes principales página 63 Al reproducir películas en otros dispositivos Esta cámara utiliza Main Profile MPEG 4 AVC H 264 para grabar películas Por lo tanto las películas grabadas con esta cámara no se podrán reproducir en dispositivos no compatibles con MPEG 4 AVC H 264 Aviso sobre los derechos de autor Los programas de televisión las películas las...

Страница 82: ...ivo 1 CD ROM 1 Software de aplicación Cyber shot Guía práctica de Cyber shot Guía avanzada de Cyber shot Manual de instrucciones este manual 1 xUso de la correa para el hombro Coloque la correa para el hombro y la correa de la tapa del objetivo para evitar que la cámara caiga o se dañe xAcerca del adaptador HDMI Cuando conecte la cámara al televisor mediante un cable HDMI acople el adaptador HDMI ...

Страница 83: ...or Es posible elegir tomar imágenes utilizando el visor con el botón FINDER LCD Ajuste el dial de ajuste del visor a su vista para que la imagen aparezca claramente en el mismo Dirija la cámara hacia la zona más luminosa para ajustarla con mayor facilidad KBotón FINDER LCD Encienda el visor o la pantalla LCD al realizar las tomas LGancho de la correa para el hombro MToma DC IN tapa de la toma DC I...

Страница 84: ... XBotón de control Menú activado v V b B z Menú desactivado DISP YAltavoz ZRanura de inserción de la batería wjPalanca de expulsión de la batería wkRanura para Memory Stick Duo wlIndicador luminoso de acceso e Batería tapa del Memory Stick Duo eaRosca para trípode Utilice un trípode que disponga de un tornillo con una longitud inferior a 5 5 mm De lo contrario no podrá fijar la cámara con segurida...

Страница 85: ...e más de una hora después de apagarse el indicador luminoso CHARGE la carga durará un poco más Carga completa Indicador luminoso CHARGE Iluminado Carga en curso Apagado Carga finalizada Carga normal 3Una vez finalizada la carga desconecte el cargador de batería Batería Indicador luminoso CHARGE Para los clientes de EE UU y Canadá Clavija Indicador luminoso CHARGE Cable de alimentación Para los cli...

Страница 86: ...Association La vida útil de la batería y el número de imágenes fijas que se pueden grabar ver pueden variar en función de los ajustes de la cámara Tiempo de carga completa Tiempo de carga normal Aprox 256 min minuto Aprox 205 min minuto Notas Duración de la batería min minuto N de imágenes Toma de imágenes fijas Pantalla LCD Aprox 195 Aprox 390 Visor Aprox 200 Aprox 400 Visualización de imágenes f...

Страница 87: ...e el Memory Stick Duo se vende por separado Introduzca el Memory Stick Duo con el lado del terminal orientado hacia el objetivo hasta que encaje 3Introduzca la batería Inserte la batería con la marca v hacia abajo mientras pulsa la palanca de expulsión de la batería en la dirección de la flecha 4Cierre la tapa ...

Страница 88: ...tick No es posible utilizar un Memory Stick con la cámara xPara extraer el Memory Stick Duo No retire el Memory Stick Duo la batería cuando el indicador luminoso de acceso esté encendido Podría dañar los datos del Memory Stick Duo memoria interna xCuando no hay insertado un Memory Stick Duo Las imágenes se almacenan en la memoria interna de la cámara aproximadamente 11 MB Para copiar imágenes de l...

Страница 89: ... el indicador de carga restante no sea correcto en determinadas circunstancias La capacidad de la batería disminuye con el uso y el paso del tiempo Cuando la duración de la batería se reduzca ostensiblemente después de una carga esto significa que será necesario sustituir la batería Adquiera una batería nueva Si no utiliza la cámara durante unos tres minuto se apagará automáticamente Función de ap...

Страница 90: ...ar el formato de visualización de la fecha y la hora Horario verano Permite seleccionar Activar Desactivar para el horario de verano Fecha y hora Permite ajustar la fecha y la hora 3Ajuste el valor numérico y el ajuste deseado mediante v V b B y a continuación pulse z La medianoche aparece indicada mediante 12 00 AM y el mediodía mediante 12 00 PM 4Seleccione Ir siguiente y a continuación pulse z ...

Страница 91: ... la utilización de PMB que se encuentra incluido en el CD ROM suministrado es posible imprimir o almacenar imágenes con la fecha xAjuste de la fecha y la hora de nuevo Pulse el botón MENU y a continuación seleccione Ajustes t Ajustes del reloj página 64 6Seleccione OK y a continuación pulse z Nota ...

Страница 92: ...e la palanca W T Zoom ligeramente para ampliar la imagen lentamente y gírela más para ampliarla rápidamente 3Pulse el botón del disparador hasta la mitad para realizar el enfoque se visualiza para indicar que SteadyShot se encuentra en funcionamiento Cuando se enfoca la imagen se escucha un pitido y el indicador z se ilumina La distancia de toma de imágenes más cercana es de aproximadamente 1 cm W...

Страница 93: ...ión de la imagen siguiente anterior Seleccione una imagen mediante B siguiente b anterior del botón de control También es posible seleccionar una imagen con el dial táctil xEliminación de imágenes 1 Pulse el botón Borrar 2 Seleccione Esta imagen mediante v del botón de control y a continuación pulse z xRegreso a la toma de imágenes Pulse el botón del disparador hasta la mitad xApagado de la cámara...

Страница 94: ...ash Pulse del botón de control t Seleccione Flash automático o Flash desactivado Pulse MENU t Flash t Seleccione Auto o Desactivar zAcerca del modo de visualización fácil Si se pulsa el botón Reproducción con el dial de modo ajustado en Toma fácil el texto de la pantalla de reproducción aumentará de tamaño y resultará más sencillo de visualizarse Asimismo se limitará el número de funciones que pue...

Страница 95: ...unción Captador de sonrisas se cancelará Si pulsa el botón del disparador mientras utiliza la función Captador de sonrisas la cámara tomará la imagen y a continuación regresará al modo Captador de sonrisas Botón Personalizado Marco de Detección de cara Indicador de Sensib detección sonrisas zSugerencias para mejorar la captura de las sonrisas 1 No permita que el flequillo cubra los ojos del motivo...

Страница 96: ...ámara hacia el motivo Cuando la cámara reconoce una escena se muestra un icono Reconocimiento de escena Crepúsculo Retrato crepúsculo Crepúsculo con trípode Contraluz Retrato a contraluz Paisaje Macro o Retrato en la pantalla LCD 3 Pulse el botón del disparador hasta la mitad para enfocar el motivo y a continuación tome las imágenes Icono Reconocimiento de escena ...

Страница 97: ...onoce el modo Retrato Se selecciona se muestra y se graba automáticamente una imagen sin los ojos cerrados Primera toma Segunda toma Tomada en modo de sincronización lenta Tomada con la sensibilidad aumentada para reducir el desenfoque Tomada en modo de sincronización lenta utilizando la cara más iluminada por el flash como referencia Tomada con la sensibilidad aumentada utilizando la cara más ilu...

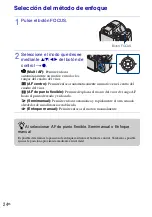
Страница 98: ...o del visor AF de punto flexible Permite desplazar el marco del visor de rango AF hacia el punto deseado y enfocarlo Semimanual Permite enfocar automática y rápidamente el área situada alrededor de una distancia establecida Enfoque manual Permite enfocar el motivo manualmente Botón FOCUS zAl seleccionar AF de punto flexible Semimanual o Enfoque manual Es posible determinar la posición de enfoque m...

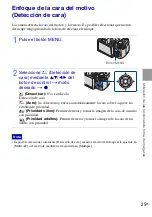
Страница 99: ...ue está ajustado en Multi AF o el modo de medición está ajustado en Múltiple 1 Pulse el botón MENU 2 Seleccione Detección de cara mediante v V b B del botón de control t modo deseado t z Desactivar No se utiliza la Detección de cara Auto Se selecciona y enfoca automáticamente la cara sobre la que se ha establecido prioridad Prioridad niños Permite detectar y tomar la imagen de la cara de un niño c...

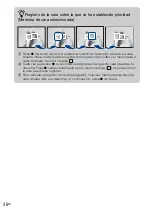
Страница 100: ... registra como cara con prioridad y el marco pasa a estar iluminado de color naranja 2 Cada vez que pulse z la prioridad se asignará a la siguiente cara situada a la derecha Pulse z varias veces hasta que el marco naranja se encuentre en la cara que desee registrar 3 Para cancelar el registro de caras Apagado mueva el marco naranja hacia la cara situada más a la derecha y a continuación pulse z de...

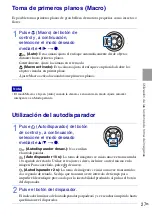
Страница 101: ...os objetos situados en primer plano Ajuste Macro activado cuando tome primeros planos Nota 1 Pulse Autodisparador del botón de control y a continuación seleccione el modo deseado mediante v V t z Autodisparador desac No se utiliza el autodisparador Autodisparador 10 s La toma de imágenes se inicia una vez transcurridos 10 segundo de retardo Utilice este ajuste si desea incluirse a usted mismo en l...

Страница 102: ...riación 1 Pulse Flash del botón de control y a continuación seleccione el modo deseado mediante b B t z Flash automático Destella cuando no hay suficiente luz o luz de fondo Flash activado El flash funciona siempre Sinc lenta Flash activado El flash funciona siempre La velocidad de obturación es lenta en lugares oscuros para captar con claridad los fondos que se encuentran fuera del alcance de la ...

Страница 103: ...ermite aumentar el brillo de la pantalla y visualizar la información Normal Permite establecer el brillo estándar de la pantalla y visualizar la información zAjustes del histograma y el brillo Un histograma es un gráfico en el que se muestra el brillo de una imagen El gráfico indica que una imagen es brillante cuando se encuentra torcida hacia el lado derecho y que es oscura cuando se encuentra to...

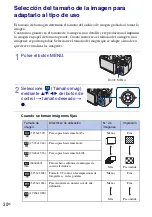
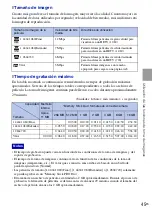
Страница 104: ...s imágenes 1 Pulse el botón MENU 2 Seleccione Tamaño imag mediante v V b B del botón de control t tamaño deseado t z Cuando se toman imágenes fijas Botón MENU Tamaño de imagen Directrices de utilización N de imágenes Impresión 3 456 2 592 Para copias hasta tamaño A3 Menos Más Fina Poco nítida 2 592 1 944 Para copias hasta tamaño A4 2 048 1 536 Para copias hasta tamaño L 2L 640 480 Para archivos ad...

Страница 105: ...11 MB 256 MB 512 MB 1 GB 2 GB 4 GB 8 GB 16 GB 9M 2 51 108 221 448 885 1 787 3 634 5M 3 68 143 293 595 1 174 2 372 4 821 3M 7 144 301 617 1 253 2 472 4 991 10 140 VGA 70 1 383 2 897 5 924 12 030 23 730 47 910 97 390 3 2 8M 2 51 107 219 445 879 1 774 3 607 16 9 6M 2 51 107 219 445 879 1 774 3 607 16 9 2M 11 230 482 987 2 005 3 955 7 986 16 230 Panorámico Ancho horizontal 3 60 127 259 527 1 040 2 101...

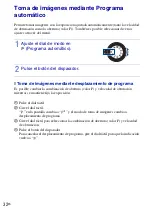
Страница 106: ... de abertura valor F y velocidad de obturación mientras se mantiene fija la exposición 1 Pulse el dial táctil 2 Gire el dial táctil en la pantalla cambia a y el modo de toma de imágenes cambia a desplazamiento de programa 3 Gire el dial táctil para seleccionar la combinación de abertura valor F y velocidad de obturación 4 Pulse el botón del disparador Para cancelar el desplazamiento de programa gi...

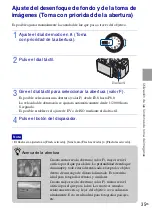
Страница 107: ...almente El flash se ajusta en Flash activado o Flash desactivado 1 Ajuste el dial de modo en Toma con prioridad de la velocidad del obturador 2 Pulse el dial táctil 3 Gire el dial táctil para seleccionar el valor de la velocidad de obturación Es posible seleccionar una velocidad de obturación a partir de 1 4 000 hasta 30 segundo Es posible establecer el ajuste de EV o de ISO mediante el dial tácti...

Страница 108: ...to como por ejemplo gente corriendo coches o agua que salpica etc aparecerán detenidos Cuando se ajusta una velocidad de obturación menor aparecerán los trazos de los motivos en movimiento como por ejemplo la corriente de un río un swing de golf etc Es posible tomar imágenes más naturales de imágenes de acción en vivo ...

Страница 109: ... F8 0 La velocidad de obturación se ajustará automáticamente desde 1 2 000 hasta 8 segundo Es posible establecer el ajuste de EV o de ISO mediante el dial táctil 4 Pulse el botón del disparador Nota Dial táctil zAcerca de la abertura Cuanto menor sea la abertura valor F mayor será el orificio por el que pasa la luz La profundidad de enfoque disminuye y todo estará desenfocado excepto los objetos d...

Страница 110: ...a vez que haya establecido un valor es posible reproducir la misma exposición simplemente ajustando el dial de modo en Toma con exposición manual El flash se ajusta en Flash activado o Flash desactivado 1 Ajuste el dial de modo en Toma con exposición manual 2 Pulse el dial táctil para seleccionar el elemento que desea ajustar Cada vez que pulsa el dial táctil los elementos seleccionables cambian 3...

Страница 111: ...esenfoque es menos efectiva en las siguientes situaciones Imágenes con movimiento imprevisible El motivo principal está demasiado cerca de la cámara Imágenes con un patrón de repetición como por ejemplo el cielo una playa de arena o césped Imágenes con un cambio constante como por ejemplo olas o cascadas 1 Ajuste el dial de modo en Crepúsculo manual o en Antidesenfoque de moción Seleccione Crepúsc...

Страница 112: ...s panorámicas en las siguientes situaciones Realiza panorámicas con la cámara demasiado rápido o demasiado lento Hay demasiadas sacudidas de cámara Realiza panorámicas con la cámara en una dirección distinta a la del ajuste En condiciones de poca iluminación las imágenes panorámicas pueden resultar borrosas 1 Ajuste el dial de modo en Barrido panorámico 2 Sujete la cámara en una posición en la que...

Страница 113: ...Si esto sucede cambie el ángulo de bloqueo y vuelva a tomar imágenes Barrido panorámico no es apropiado para las siguientes situaciones Los motivos se mueven Los motivos están demasiado cerca de la cámara Imágenes con un patrón de repetición como por ejemplo el cielo una playa de arena o césped Imágenes con un cambio constante como por ejemplo olas o cascadas Bajo luces que parpadean como por ejem...

Страница 114: ...enes por segundo en sucesión Ráfaga Bajo Permite tomar hasta 2 imágenes por segundo en sucesión Variación Permite tomar 3 imágenes con distinta exposición 3 Pulse el botón del disparador Nota Botón Ráfaga Variación zAcerca de la grabación de imágenes de tomas en ráfaga a alta velocidad Después de realizar la toma de imágenes en ráfaga a alta velocidad las imágenes tomadas se mostrarán en marcos en...

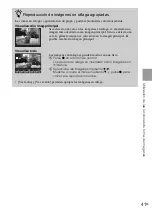
Страница 115: ... cara en las imágenes en ráfaga se mostrará una imagen más adecuada como imagen principal Si no se detecta una cara la primera imagen se convertirá en la imagen principal Es posible cambiar la imagen principal Visualiza todo Las imágenes en ráfaga se pueden mostrar en una lista 1 Pulse z en el botón de control Los grupos de ráfaga se mostrarán como imágenes en miniatura 2 Seleccione las imágenes m...

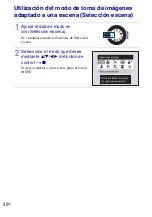
Страница 116: ...o a una escena Selección escena 1 Ajuste el dial de modo en Selección escena Se visualizará una lista de modos de Selección escena 2 Seleccione el modo que desee mediante v V b B del botón de control t z Si desea cambiar a otra escena pulse el botón MENU ...

Страница 117: ...isaje Permite tomar imágenes enfocando en sujetos lejanos Retrato crepúsculo Permite tomar imágenes nítidas de personas en lugares oscuros sin perder el ambiente nocturno Crepúsculo Permite tomar escenas nocturnas sin perder el ambiente nocturno Gourmet Permite tomar imágenes de conjuntos de alimentos con colores deliciosos Playa Permite tomar escenas en la orilla del mar o de un lago capturando e...

Страница 118: ...tón de control para seleccionar una película 2 Pulse z Pulse z de nuevo para detener la reproducción Pulse b B para rebobinar o avanzar rápidamente y pulse V para mostrar el panel de control Panel de control 1 Ajuste el dial de modo en Modo película 2 Pulse el botón del disparador a fondo para iniciar la grabación 3 Pulse el botón del disparador a fondo de nuevo para detener la grabación Nota Botó...

Страница 119: ...280 720 solamente se pueden grabar en un Memory Stick PRO Duo El tamaño de un archivo de película está limitado a 2 GB aproximadamente Durante el proceso de grabación la filmación de películas se detiene antes de alcanzar 29 minutos cuando el tamaño del archivo de película alcanza los 2 GB aproximadamente Tamaño de imagen de la película Velocidad de bits media Directrices de utilización 1 440 1 08...

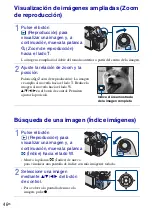
Страница 120: ...ión de zoom y la posición Palanca Zoom de reproducción La imagen se amplía al moverla hacia el lado T Reduce la imagen al moverla hacia el lado W v V b B en el botón de control Permiten ajustar la posición 1 Pulse el botón Reproducción para visualizar una imagen y a continuación mueva la palanca Índice hacia el lado W Mueva la palanca Índice de nuevo para visualizar una pantalla de índice con más ...

Страница 121: ...s 1 Pulse el botón Reproducción para visualizar una imagen y a continuación pulse el botón MENU 2 Seleccione Modo visualización mediante v V b B del botón de control t modo deseado t z Ver fecha Permite visualizar las imágenes ordenadas por fecha Ver evento Permite analizar las tomas y la frecuencia de las fechas y organiza y muestra automáticamente las imágenes en grupos Favoritos Permite visuali...

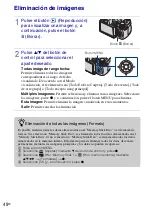
Страница 122: ...r Esta imagen Permite eliminar la imagen visualizada en estos momentos Salir Permite cancelar la eliminación Botón Borrar Botón MENU zEliminación de todas las imágenes Formato Es posible eliminar todos los datos almacenados en el Memory Stick Duo o en la memoria interna Si se inserta un Memory Stick Duo se eliminarán todos los datos almacenados en el Memory Stick Duo Si no se inserta un Memory Sti...

Страница 123: ...do Nota Al conector múltiple A las tomas de entrada de audio vídeo Cable para terminal multiuso zVisualización de imágenes en un televisor HD alta definición Es posible visualizar imágenes grabadas en la cámara si la conecta a un televisor de alta definición HD mediante un cable HDMI se vende por separado o un cable de adaptador de salida HD se vende por separado Cuando utilice el cable HDMI Pulse...

Страница 124: ...arece el indicador en la pantalla LCD 3 Pulse MENU t Imprimir mediante v V b B del botón de control t modo deseado t z Esta imagen Permite imprimir la imagen visualizada en estos momentos Múltiples imágenes Pulse b B para visualizar la imagen y a continuación z 4 Seleccione el elemento de ajuste deseado y a continuación OK t z Se imprimirá la imagen Notas Botón MENU zImpresión en un establecimient...

Страница 125: ...n de fotografías Impresión desde casa Establezca la conexión a una impresora compatible con PictBridge pulse el botón MENU y a continuación ajuste Imprimir t Fecha en Fecha o Día Hora Superposición de fechas a las imágenes mediante el software PMB Con el software PMB suministrado instalado en un ordenador página 53 es posible superponer directamente la fecha en una imagen Sin embargo tenga en cuen...

Страница 126: ...enes Si desea obtener más información consulte la Guía de PMB página 54 El software PMB no es compatible con ordenadores Macintosh Nota Exportación a la cámara Exportación de imágenes a un Memory Stick Duo y visualización de estas Importación a un ordenador Servicio multimedia Carga de las imágenes al servicio multimedia Imprimir Impresión de las imágenes con sello de fecha CD DVD Creación de disc...

Страница 127: ...or 1 440 1 080 Estándar Intel Pentium D a 2 8 GHz o superior Intel Core Duo a 1 66 GHz o superior Intel Core 2 Duo a 1 20 GHz o superior Memoria 512 MB o superior Para reproducir editar las películas en alta definición 1 GB o superior Disco duro espacio libre en disco necesario para realizar la instalación Aproximadamente 500 MB Pantalla La resolución de pantalla necesaria es de 1 024 768 puntos o...

Страница 128: ...Inserte una batería completamente cargada en la cámara y a continuación pulse el botón Reproducción 2 Conecte la cámara al ordenador El mensaje Conectando aparecerá en la pantalla de la cámara se visualizará en la pantalla durante la sesión de comunicación No utilice el ordenador mientras se visualiza el indicador Cuando el indicador cambia a puede empezar a utilizar el ordenador de nuevo 3 Haga c...

Страница 129: ...Entorno informático recomendado Para un ordenador conectado a la cámara se recomienda el entorno siguiente Entorno recomendado para importar imágenes Sistema operativo preinstalado Mac OS 9 1 9 2 Mac OS X v10 1 a v10 5 Toma USB Suministrada como estándar Entorno recomendado para utilizar el software Music Transfer Sistema operativo preinstalado Mac OS X v10 3 a v10 5 Memoria 64 MB o superior se re...

Страница 130: ...uación pulse z 3 Seleccione Ajustes principales mediante v V b B del botón de control y a continuación pulse Pitido t modo deseado t z Obturador Permite activar el sonido del obturador cuando el usuario pulsa el botón del disparador Alto Bajo Permite activar el pitido sonido del obturador cuando el usuario pulsa el botón de control del disparador Si desea bajar el volumen seleccione Bajo Desactiva...

Страница 131: ...or de sonrisas BotónPersonalizado está fijado en Captador de sonrisas en Toma fácil y en Modo demostración 1 Pulse el botón MENU 2 Seleccione Ajustes mediante V del botón de control y a continuación pulse z 3 Seleccione Ajustes de toma mediante v V b B t BotónPersonalizado t modo deseado t z Captador de sonrisas Permite tomar imágenes utilizando el Captador de sonrisas ajuste predeterminado Balanc...

Страница 132: ...e visualizan los elementos disponibles en cada modo Seleccione Ajustes t Ajustes principales t Inicializar para inicializar los ajustes a su valor predeterminado 1 Pulse el botón MENU para visualizar la pantalla del menú 2 Seleccione el elemento de menú deseado mediante v V b B del botón de control Durante la reproducción pulse z para confirmar 3 Pulse el botón MENU para desactivar la pantalla del...

Страница 133: ...Punto Grupo variación Permite establecer la toma de imágenes con Variación EXP 0 3 EXP 0 7 EXP 1 0 Balance Blanco Modo color Reconocimiento de escena Detecta automáticamente las condiciones de toma de imágenes y a continuación realiza la toma Auto Avanzado Sensib detección sonrisas Ajusta el nivel de sensibilidad para detectar sonrisas Sonrisa grande Sonrisa normal Sonrisa leve Detección de cara S...

Страница 134: ...vento Selecciona el grupo de eventos que desea reproducir Modo visualización Permite cambiar el Modo visualización Ver fecha Ver evento Favoritos Ver carpetas Filtro por caras Reproduce las imágenes filtradas para cumplir determinadas condiciones Desactivar Toda la gente Niños Bebés Sonrisas Cambia ima principal Permite establecer las imágenes en ráfaga que se mostrarán en la pantalla Agregar quit...

Страница 135: ...borrado accidental Esta imagen Múltiples imágenes Permite añadir una marca de orden de impresión a la imagen que desea imprimir de un Memory Stick Duo Esta imagen Múltiples imágenes Imprimir Imprime imágenes mediante una impresora compatible con PictBridge Esta imagen Múltiples imágenes Girar Gira una imagen fija Seleccionar carpeta Selecciona la carpeta de visualización de imágenes Ajustes Permit...

Страница 136: ...an introducido desde el modo de toma de imágenes 1 Pulse el botón MENU para visualizar la pantalla del menú 2 Seleccione Ajustes mediante V en el botón de control y confirme la selección pulsando z 3 Seleccione el elemento deseado mediante v V b B del botón de control y a continuación pulse z 4 Pulse el botón MENU para desactivar la pantalla de ajuste Botón MENU ...

Страница 137: ...cipales Pitido Selecciona o desactiva el sonido que se produce al realizar una operación en la cámara Language Setting Selecciona el idioma que se va a utilizar para visualizar los elementos de menú avisos y mensajes Guía funciones Permite seleccionar si desea mostrar la guía de funciones o no cuando utiliza la cámara Inicializar Inicializa los ajustes a sus valores predeterminados Modo demostraci...

Страница 138: ...ar imágenes Camb Carp Grab Cambia la carpeta utilizada actualmente para grabar imágenes ElimCarpGrabación Elimina carpetas del Memory Stick Duo Copiar Copia todas las imágenes que se encuentran en la memoria interna en el Memory Stick Duo Número Archivo Permite seleccionar el método utilizado para asignar números de archivo a las imágenes Herr memoria interna Formatear Formatea la memoria interna ...

Страница 139: ...iente página web http www adobe com xPara usuarios de Windows xPara usuarios de Macintosh 1 Encienda el ordenador e inserte el CD ROM suministrado en la unidad de CD ROM 2 Haga clic en Guía práctica de Cyber shot La Guía avanzada de Cyber shot que contiene información acerca de los accesorios de la cámara se instalará al mismo tiempo 3 Inicie la Guía práctica de Cyber shot desde el acceso directo ...

Страница 140: ...cil Cuando se filman películas Cuando se reproduce A Visualización Indicación Batería restante Advertencia de poca batería Tamaño imag Selección escena Dial de modo Ajuste automát inteligente Programa automático Toma con prioridad de la velocidad del obturador Toma con prioridad de la abertura Toma con exposición manual Crepúsculo manual Antidesenfoque de moción Barrido panorámico Modo Toma pelícu...

Страница 141: ...ión Indicación z Bloqueo AE AF ISO400 Número ISO Obturación lenta NR 125 Velocidad de obturación F3 5 Valor de abertura 2 0EV Valor de exposición Indicador del cuadro del visor de rango AF Macro GRABAR Espera Grabación modo de espera de una película 0 12 Tiempo de grabación minuto segundo 101 0012 Número de carpeta archivo 2009 1 1 9 30 AM Fecha hora grabada en la imagen en reproducción z STOP z P...

Страница 142: ...anco ISO400 Número ISO Visualización Indicación Autodisparador C 32 00 Visualización de autodiagnóstico Destino Advertencia de sobrecalentamiento Objetivo conver Detección de cara Ráfaga Variación Archivo de administración lleno Grupo variación Cuadro del visor de rango AF Cruz filial de medición de foco 2 0EV Valor de exposición 500 Velocidad de obturación F3 5 Valor de abertura Conexión PictBrid...

Страница 143: ...cierto tiempo en encenderse Inserte la batería correctamente página 13 La batería está descargada Inserte una batería cargada página 11 La batería ha llegado al final de su vida útil Reemplácela por una nueva Utilice una de las baterías recomendadas 1 Compruebe los elementos siguientes y consulte la Guía práctica de Cyber shot PDF Si aparece un código como por ejemplo C E ss ss en la pantalla cons...

Страница 144: ...ida útil Reemplácela por una nueva No es posible cargar la batería mientras se encuentra en la cámara No es posible cargar la batería mediante el adaptador de alimentación de ca se vende por separado Utilice el cargador de batería suministrado para cargar la batería El indicador CHARGE parpadea durante la carga de la batería Extraiga y vuelva a insertar la batería asegurándose de que está correcta...

Страница 145: ...ámara no puede reproducir imágenes Pulse el botón Reproducción página 19 El nombre de la carpeta o del archivo ha sido modificado en el ordenador En esta cámara no se garantiza la reproducción de archivos que contienen imágenes procesadas en un ordenador o imágenes tomadas mediante otras cámaras La cámara se encuentra en el modo USB Elimine la conexión USB Es posible que no pueda reproducir alguna...

Страница 146: ...o con objetos de goma o vinilo durante un tiempo prolongado Acerca de la temperatura de funcionamiento La cámara ha sido diseñada para utilizarse con temperaturas de entre 0 C y 40 ºC No se recomienda tomar imágenes en lugares extremadamente fríos o calurosos que excedan este rango Acerca de la condensación de humedad Si se traslada la cámara directamente de un lugar frío a uno cálido es posible q...

Страница 147: ...I USB Salida de vídeo Salida de audio estéreo Salida HDMI Comunicación USB Comunicación USB USB Hi Speed Cumple con el estándar USB 2 0 Pantalla LCD Panel LCD Unidad de TFT de 7 5 cm tipo 3 0 Número total de puntos 230 400 960 240 puntos Visor Panel 0 5 cm tipo 0 2 Número total de puntos Equivalente a aprox 201 000 puntos Alimentación general Alimentación Batería recargable NP FH50 6 8 V Consumo d...

Страница 148: ...o marcas comerciales de Microsoft Corporation en los Estados Unidos y o en otros países Macintosh y Mac OS son marcas comerciales o marcas comerciales registradas de Apple Inc Intel MMX y Pentium son marcas comerciales o marcas comerciales registradas de Intel Corporation Adobe y Reader son marcas comerciales o marcas comerciales registradas de Adobe Systems Incorporated en los Estados Unidos y o ...

Страница 149: ...75ES Otros ...

Страница 150: ...76ES ...

Страница 151: ...77ES Otros ...

Отзывы: