background image

11

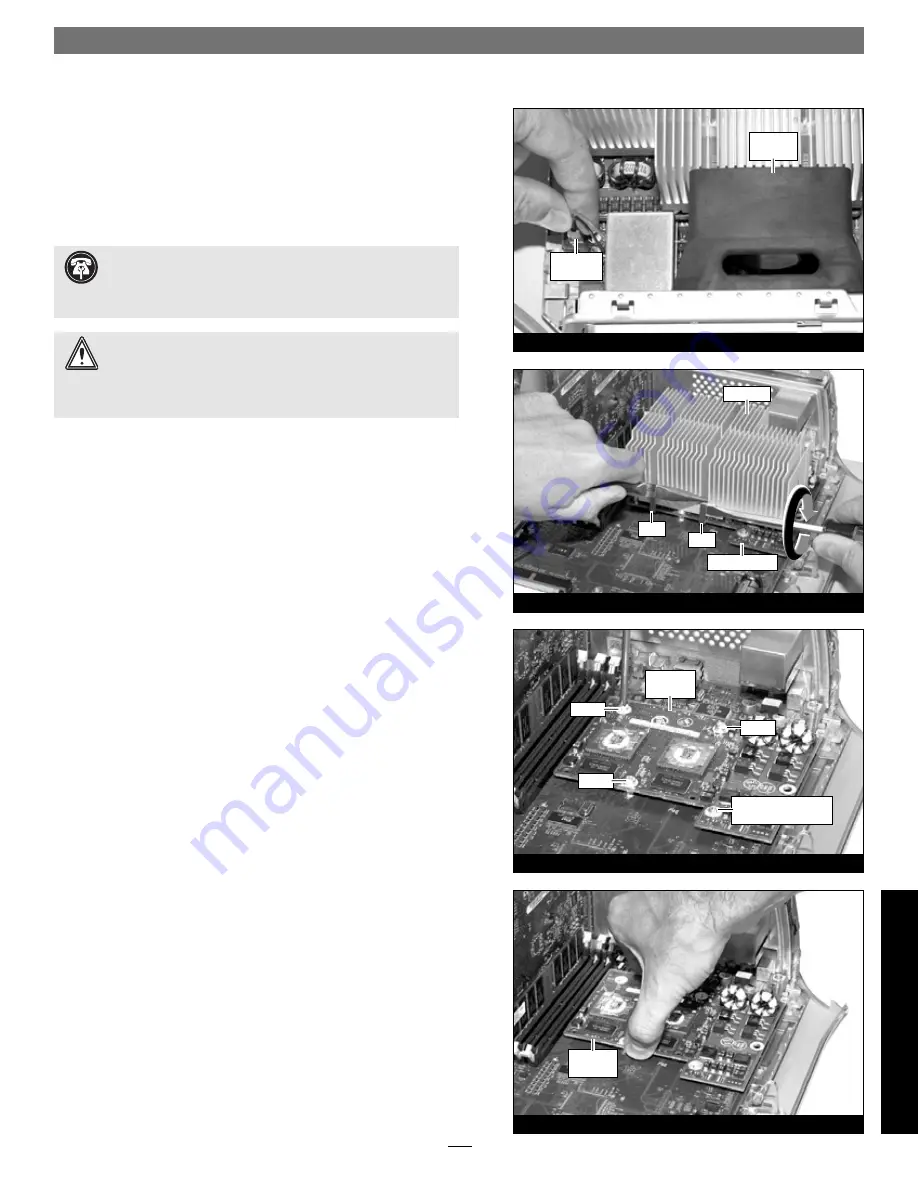
Figure 39

Figure 38

Figure 37

Figure 36

screw

screw w/lock washer 

(set aside for later use)

heat sink

screw

processor card

clip

clip

processor 

card

screw

fan 

assembly

2-pin 

connector

processor 

card

Installation—QuickSilver 2001 and 2002 Models


2.

 Locate and carefully disconnect the 2-pin fan power connec-

tor from the logic board, and then lift out the fan assembly 

(Figure 36)

Remove Heat Sink

With the front of the computer facing you, locate the clips securing 
the heat sink to the processor card 

(Figure 37)

. Carefully insert a fl at 

blade screwdriver between the right clip and the edge of the heat sink; 

do not touch the edge of the processor card

. Using extreme cau-

tion, press down on the edge of the clip with needle-nose pliers, and 
twist the screwdriver to unhook one side of the clip from the proces-
sor card 

(Figure 37)

. Push the clip away from you to unhook it from 

the other side. Repeat these steps with the left clip. Once the clips 
have been unhooked, gently lift the heat sink and clips away from the 
processor card and set them aside, but not on the logic board. 

Remove Processor Card


1.

 Remove the four screws securing the processor card to the logic 

board 

(Figure 38)

set aside the screw with a lock washer for 

later use


2.

 Grasping its edges, gently lift one edge of the processor card to 

separate it from the logic board, and then carefully lift it straight 
up and away

 (Figure 39)


 Support Note:

 The following steps address the removal of 

your system’s processor card heat sink. Please note, the dual 

processor heat sink is pictured, but the procedure to remove the 
single processor heat sink is identical.


 WARNING:

 Verify that the power cord is disconnected from 

your Power Mac before you remove the heat sink and proces-

sor card. The original processor card is secured to the logic board 
with four screws, one of which c12V and could spark if it is 
grounded when the system is on. 

Qui

ck

Si

lv

e

r 2

0

0

1

/2

00

2

Содержание ENCORE/ST G4 DUET

Страница 1: ...Mac OS compatibility information check our web site The Encore ST G4 Duet supports hard disk and display sleep in all compatible Power Mac G4 computers in some configurations deep sleep may not be supported You Should Have The following items should be included in your product package Encore ST G4 Duet processor upgrade card Power card Sonnet Installer CD The following items are required for insta...

Страница 2: ......

Страница 3: ...nother drive to install the software The installer will install the appropriate software into the System Folder of your computer 3 If the installation is successful a dialog box will appear Click Quit to leave the installer and shut down your computer CONTINUED ON NEXT PAGE Figure 1 Software and Firmware Installation Update Info Software Firmware Info Mac OS 9 2 User Alert Mac OS 9 2 users MUST ru...

Страница 4: ...e As of this writing Apple has not made this firmware updater available as an OS X application 3 Log on to the Internet and type the following in your browser window s address bar http docs info apple com article html artnum 120068 4 Click on the appropriate link to download the firmware Figure 4 5 Double click the G4 FW Update 4 2 8 smi file icon to mount the G4 Firmware Update disk image Double ...

Страница 5: ...el away from the computer s case Figure 7 Remove Heat Sink Locate the processor heat sink on the logic board Figure 8 your heat sink may appear different from what is pictured Using caution to avoid touching the processor card grasp one of the clips securing the heat sink with needle nose pliers between the heat sink and pro cessor card Pull down and away to unhook one side of the clip from the pr...

Страница 6: ...your card may differ from what is pictured Set the card heat sink side down on a flat level surface 2 Remove the power card from its anti static package make sure to handle the card by its edges Figure 11 your card may differ from what is pictured 3 Grasp the Duet processor card with its heat sink face down and the fan on the right Figure 12 Holding the power card as shown align its connector with...

Страница 7: ...re 15 Close Computer 1 Raise the side panel back into place Figure 16 2 Return the computer to your computing area if necessary and reconnect the power cord and peripheral cables to the computer Turn On Computer Turn on your Power Mac your accelerated machine should boot normally Run Sonnet X Tune Up Running the Sonnet X Tune Up install application is necessary only when Mac OS X any version is in...

Страница 8: ...econnect the power cord to the computer and an electrical outlet 3 Touch a port access cover on the back of the computer to dis charge any potential damaging static electricity Figure 17 4 Disconnect the power cord from the computer 5 If present remove the two indicated screws from the back plate of the computer Figure 18 Otherwise go to step 6 6 Locate the security lock at the back of the compute...

Страница 9: ...the clips securing the processor heat sink to the processor card Figure 23 your heat sink may appear different from what is pic tured Using caution to avoid touching the processor card grasp one of the clips securing the heat sink with needle nose pliers between the heat sink and processor card Pull down and away to unhook one side of the clip from the processor card Figure 23 Push the clip away f...

Страница 10: ...above the fan on the edge of the Duet processor card 4 Making sure the pins are lined up with the holes carefully and completely plug the power card into the Duet processor card Figure 27 If you encounter any unusual resistance separate the cards and check for bent pins if none are bent realign the pins with the holes and plug in the power card again 5 Carefully remove the cap covering the connect...

Страница 11: ...omputer Turn On Computer Turn on your Power Mac your accelerated machine should boot normally Run Sonnet X Tune Up Running the Sonnet X Tune Up install application is necessary only when Mac OS X any version is installed on your system This application installs a file that enables Mac OS X to properly identify processor speed as well as L2 and L3 cache size and speed Remember to install this softw...

Страница 12: ... to the computer and an electrical outlet 3 Touch a port access cover on the back of the computer to dis charge any potential damaging static electricity Figure 32 4 Disconnect the power cord from the computer 5 Locate the security lock at the back of the computer Figure 33 If it is not already pressed in press it in now 6 With the right side of the case facing you open your Power Mac by lifting t...

Страница 13: ...o unhook it from the other side Repeat these steps with the left clip Once the clips have been unhooked gently lift the heat sink and clips away from the processor card and set them aside but not on the logic board Remove Processor Card 1 Remove the four screws securing the processor card to the logic board Figure 38 set aside the screw with a lock washer for later use 2 Grasping its edges gently ...

Страница 14: ...ove the fan on the edge of the Duet processor card 4 Making sure the pins are lined up with the holes carefully and completely plug the power card into the Duet processor card Figure 42 If you encounter any unusual resistance separate the cards and check for bent pins if none are bent realign the pins with the holes and plug in the power card again 5 Carefully remove the cap covering the connector...

Страница 15: ...ten each of the three screws and secure the card snugly to the logic board do not overtighten the screws Figure 45 9 Using the screw with the lock washer you removed previ ously secure the power card snugly to the logic board do not overtighten the screw Figure 46 Reinstall Fan Assembly and Close Computer 1 While holding its 2 pin connector place the fan assembly between the Duet processor card s ...

Страница 16: ...identify processor speed as well as L2 and L3 cache size and speed Remember to install this software when you upgrade to Mac OS X For complete information on Sonnet X Tune Up please refer to the Read Me notes provided with the software 1 Boot your system in Mac OS X from a hard drive or parti tion not a CD ROM 2 Insert the Sonnet Installer CD into your CD ROM drive double click the ST ZIF OS X Sup...

Отзывы: