Installation
Precautions
• Choose the mounting location carefully so that the unit will not
interfere with the normal driving functions of the driver.
• Avoid installing the unit where it would be subject to high
temperatures, such as from direct sunlight or hot air from the heater, or
where, it would be subject to dust, dirt or excessive vibration.
• Use only the supplied mounting hardware for a safe and secure
installation.
• Be sure to remove the front panel before installation.
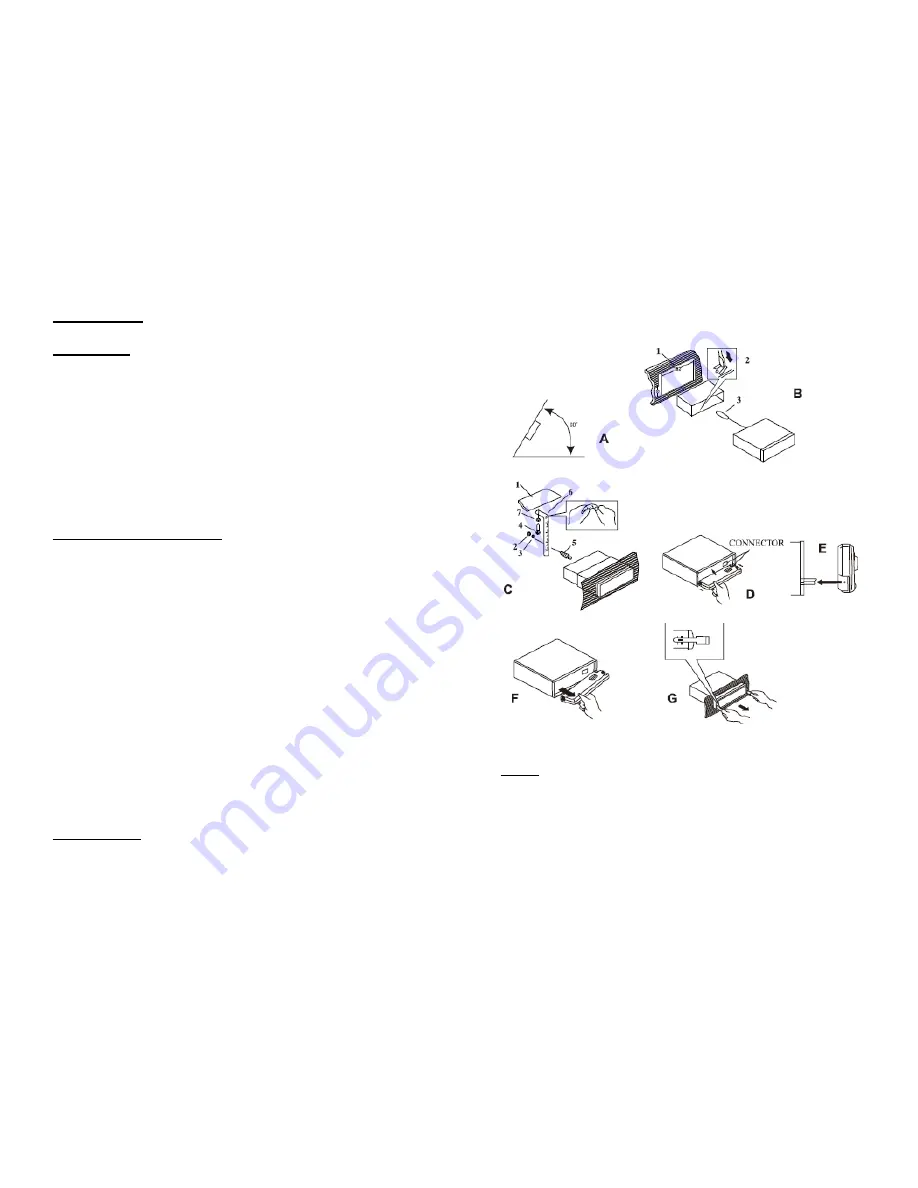
• If installation angle exceeds 60° from horizontal, the unit might not
give its optimum performance.
(A)
Step-by-Step Installation:
Please refer to the illustration and detailed step-by-step installation below:
Front installation
(B)
1. Instrument board.
2. Metal mantle
After putting the mantle in the instrument board, bend the steel of the
mantle making it fixed to the instrument board.
3. Fastening bolt.
Rear installation
(C)
1. Instrument board
2. Nut
3. Spring washer
4. Bolt
5. Fastening bolt
6. Fixed steel
In order to improve anti-interference, please fix the steel on the car under
frame. You can bend the steel if you need to.
Align the faceplate with the radio making sure the connectors line up
before you push the faceplate into place.
(D) (E)
Dismantling:
1. Remove faceplate and then the plastic frame.
(F)
2. Insert the dismantling key into the key hole of the device. Wait until the
hook lock unlocks, and then remove the key and unit.
(G)
3. Disconnect all the wires of the unit as well as the antenna plug.
Note:
Make sure that the front panel is the right way up when attaching it to
the unit as it cannot be attached upside down.
Do not press the front panel hard against the unit when attaching it. It
can be easily attached by pressing it tightly against the unit.
For safekeeping, always keep the front panel in the supplied
protective case and keep it at moderate temperature.
Do not press hard or give excessive pressure to the display window of
the front panel when attaching it to the unit.
Page 3
Page 4


