background image


- 24 - 


5  Attach the Sensors to the Patient 

Do  not  attach 

SOMNOscreen™  plus  directly  on  the  patient’s  skin.  It  is  preferable  to  attach  the 

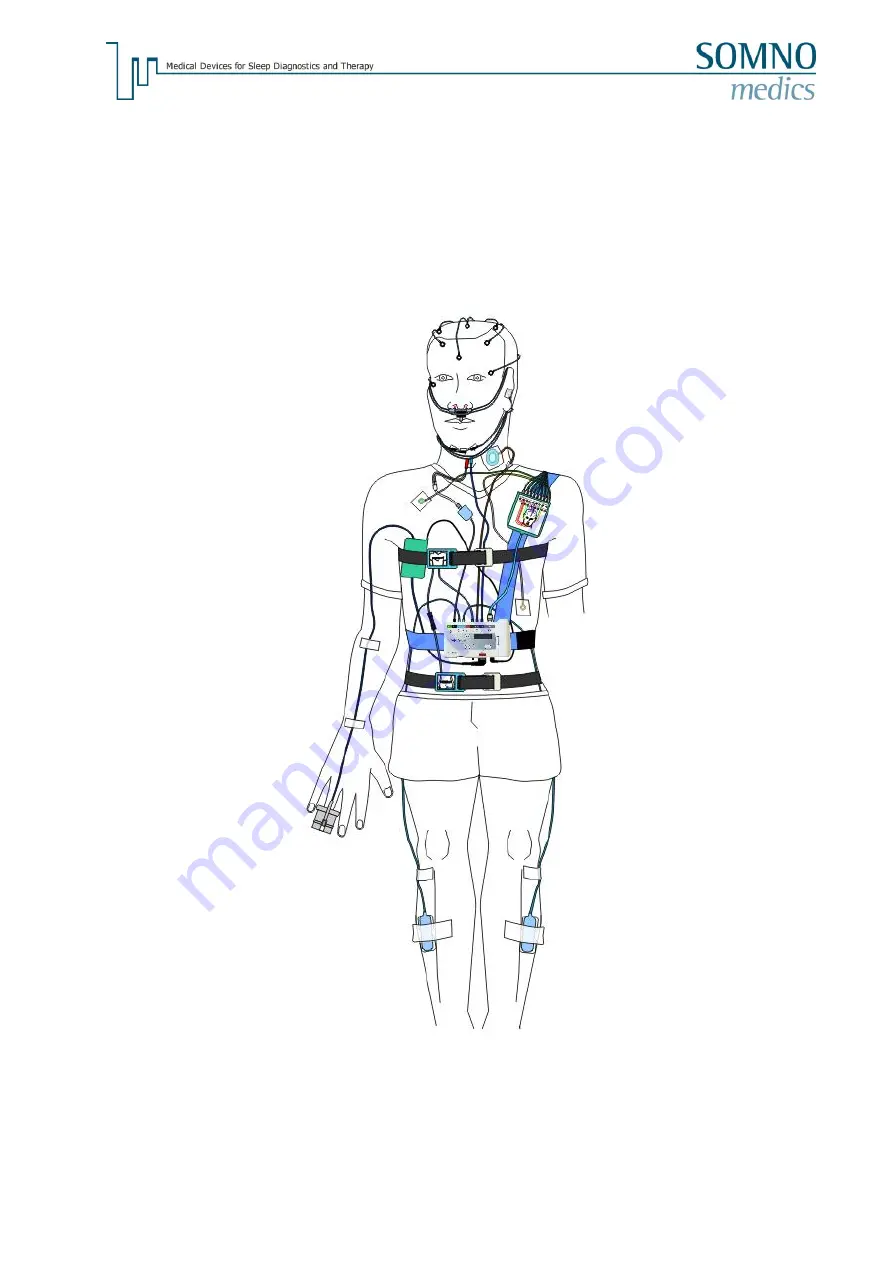
SOMNOscreen™ plus over a pyjama or t-shirt. Take the figures below to attach the SOMNOscreen™ 
plus and the sensors to the patient. If you attach the 

SOMNOscreen™ plus or the sensors in another 

way  to  the  patient,  invalid  data  may  be  recorded.  All  connectors  of  the  sensors  and  of  the  EXG 
adapter  are  mechanically  coded,  to  avoid  changing  the  polarity.  Therefore  it  is  only  possible  to 
connect the plugs in one direction. The 

SOMNOscreen™ plus has to be switched off while connecting 

the sensors. 


Fig. 5-1: Complete scheme 


Содержание SOMNOscreen plus

Страница 1: ...ederal law restricts this device to sale by or on the order of a physician USA SOMNOmedics America Inc 815 Ponce de Leon Blvd Suite P 209 Coral Gables FL 33134 Toll free 866 361 9937 info somnomedics diagnostics com www somnomedics diagnostics com ...

Страница 2: ... 2 SOMNOscreen is a registered trademark of the SOMNOmedics Company Rev 6 30 10 2019 ...

Страница 3: ...the Compact Flash Card 15 4 2 3 Manual Start 18 4 2 4 Programmed Start without signal check on Display 18 4 2 5 Auto Start with Prior Signal Check 19 4 2 6 Manual cancellation of recording 20 4 2 7 Manuel cancellation of the waiting mode 20 4 2 8 Saving Recording 20 4 2 9 Relevant information for Performing Measurements 21 4 3 Menu System Battery check Time Set Firmware update Reading Error log 23...

Страница 4: ... disinfection 46 7 3 Use and Maintenance of the Rechargeable Battery 50 8 Service 51 8 1 Biological Calibration and Measuring the Electrode Impedance 51 8 2 Technical Specification 52 8 3 Malfunctions 55 8 4 Warranty 55 8 5 Accessories and Spare Parts 55 8 6 Disposal of Parts Batteries or the SOMNOscreen plus Device 55 8 7 Contact 56 9 Notes 57 ...

Страница 5: ...ossible technical difficulties our staff cannot answer you will be redirected to our mail box If that is the case please leave your name and telephone number so that we can call you back as soon as possible In case accessories are used which do not come from SOMNOmedics a bill will be issued for any repairs The device is not guaranteed if opened Repairing or modifying the SOMNOscreen plus in any w...

Страница 6: ...abel on the bottom of the SOMNOscreen plus This instruction manual is a part of the device and it has to be kept available at all times 1 2 Explanation of Symbols used in this Manual Indicates a hint or tip This Symbol provides assistance with possible problems when working with the SOMNOscreen plus This Warning Symbol indicates potential danger to Patients Property or Data Loss Screen Views simil...

Страница 7: ...th Shorter Recording Period Capacity Empty Recording Will Not Be Started Battery Has To Be Charged System Check Check Battery And Storage Capacity Start Recording Selected Montage Device ID Record Check Signals weiß Logbook weiß Software Update Time Date Device ID Battery Capacity System Exit Main Menue Structure ...

Страница 8: ...ated for use in the recording displaying monitoring printing and storage of biophysical parameters for the purpose of assisting in the diagnosis of Neurological and Sleep Disorders 2 3 Device Description The SOMNOscreen plus is a portable physiological signal recording system intended to be used to record display monitor print and store biophysical events to aid in the diagnosis of neurologic and ...

Страница 9: ...ations on the Type Label Read the instruction manual very carefully before you start working with the SOMNOscreen plus Protection Class BF The CE icon and the correlating number show that the SOMNOscreen plus complies with the regulations for Medical Products This device complies with the IP Protection Class 20 This Classification states that the SOMNOscreen plus is NOT Waterproof This device work...

Страница 10: ...on Function S1 Moves the cursor up and down S2 Moves the cursor left and right S3 This button activates confirms the selected display item see the blinking cursor Also the patient uses the S3 button as a Marker during the measurement To place a marker for denoting an event going to bed getting up taking medication etc the patient must push this button for at least one second S4 Power ON This butto...

Страница 11: ...igurations include a Compact Flash Card Compact Flash Card Reader USB or adapter for PCMCIA slot 2 x Li ION Batteries 2550mAh with 1 x Battery Charger a Carry Bag for housing the SOMNOscreen plus and Sensors Instruction Manuals and the DOMINO software for Initialisation Data Transfer and Analysis ...

Страница 12: ...een and other intravascular dyes depending on the concentration may affect the accuracy of the SpO2 measurement Only sensors and accessories recommended by SOMNOmedics are allowed to be connected to the SOMNOscreen plus A minimal risk of injury through electric shock limited to 3 3 volts and 180µA may occur due to the use of Defective cables when a ground lead is contacted to the patient Check all...

Страница 13: ...ics and its authorised distributors may repair the unit Damaging the Guarantee Seal Warranty void if seal is broken will immediately void the guarantee of this SOMNOmedics product Use only Compact Flash Cards which are supplied by SOMNOmedics The use of any other Compact Flash Card could cause data to be corrupted SOMNOmedics cannot guarantee error free operation where incorrect Compact Flash Card...

Страница 14: ...4 2 6 to avoid any data loss The SOMNOscreen plus will switch itself off automatically after 8 minutes if none of the keys are pressed or no data is stored 4 2 Recording Measurements 4 2 1 Safety Instructions Before starting to Record a Measurement Format the Compact Flash Card Use only the FAT or FAT16 File System Follow instructions shown in chapter 4 2 2 It is very important that the SOMNOscree...

Страница 15: ... Database It is also possible to use an existing Patients Data from the Database using the button DB Select the Patient from the selection window and confirm with the button OK To speed up the database search it is possible to sort the columns patient ID s first last names and date of birth by clicking on the column heading If you click on Add to DB the patient data will be stored in the Patient d...

Страница 16: ...ood pressure can be measured manually A digital optocoppler can optionally be connected to the PC The battery power output 5 defines the maximal duration of the recordings The battery power output is written on the label of your battery The programmable period is between 00 00 and 23 59 o clock If the recording should start at 24 00 o clock please type in the date of the following day at Recording...

Страница 17: ...u require Please ensure that the displayed Hardware ID is identical to that on the SOMNOscreen plus label Selecting the Online Mode 4 activates data transfer via telemetry or cable Lastly click on the button Initialize Flash Card We recommend selecting Format Flashcard to delete old data during initialization After a few seconds a message Initialization Successful will appear All the data which wa...

Страница 18: ...tient has been fully set up The on button is found on the second O of the word SOMNOscreen plus If using the Auto Start Without Signal Check on Display the SOMNOscreen plus automatically changes to waiting mode after being switched on when the start time is reached The device carries out a system check and checks all settings In the event that there is insufficient battery capacity or storage spac...

Страница 19: ...gnal appears To view the detailed signal on the screen select Display with key S3 You may close and exit the Signal Display Mode at any time using the Back button You will be returned to the Main Menu and can now start the recording by selecting Record and confirming it with S3 Select OK and confirm with S3 Select OK and confirm with S3 Select START and confirm with S3 The device will execute a Sy...

Страница 20: ...the instructions Display What to do Press on S4 for at least a second Select in the main menu CANCEL with S2 and confirm with S3 Select YES with S2 and confirm with S3 The device Stops the waiting mode and brings you back to the main menu 4 2 8 Saving Recording A Compact Flash Card Reader and the DOMINO software are supplied with the SOMNOscreen plus One or more successfully completed recordings o...

Страница 21: ...will inform you of problems that prevent a successful recording Insufficient capacity of the Rechargeable Battery Compact Flash Card is Missing Compact Flash Card Memory is insufficient for the programmed recording A wrong montage was chosen If any of these messages appear use the following guide to correct the problem 4 2 9 1 Insufficient Battery Capacity for the Programmed Duration Display Funct...

Страница 22: ...card was initialized with a montage which does not belong to that SOMNOscreen plus Model Please initialize the card with a Montage that goes with your SOMNOscreen plus Model and the suitable Hardware ID Important The Hardware ID of the SOMNOscreen plus can be found on the label on the back of the device OR The card was initialized with a montage which does not belong to that SOMNOscreen plus Model...

Страница 23: ...nloaded or recorded to Press S1 to go to the first item of the pre programmed date DD MM YY To change the parameters DD press S3 Continue pressing S1 until the required day is displayed from 1 to 31 Press S3 to move the cursor MM press S1 until the required month is displayed from 1 to 12 Press S3 to move to YY press S1 until required year is displayed from 0 to 99 Pressing S3 again the cursor wil...

Страница 24: ...reen plus and the sensors to the patient If you attach the SOMNOscreen plus or the sensors in another way to the patient invalid data may be recorded All connectors of the sensors and of the EXG adapter are mechanically coded to avoid changing the polarity Therefore it is only possible to connect the plugs in one direction The SOMNOscreen plus has to be switched off while connecting the sensors Fi...

Страница 25: ... 5 2 In order for it not to move during respiration a shoulder belt is added Place the strap on the shoulder Then secure it at the back as shown in Fig 5 3 The other end goes under the device where it is secured to the Velcro patch Fig 5 2 Position of the SOMNOscreen plus Fig 5 3 Position of the shoulder belt ...

Страница 26: ...e straps The inductive Effort Belts should be placed above and below the SOMNOscreen plus Fig 5 5 Attaching the inductive belts Fig 5 6 Connecting the plug to the socket Fig 5 6 shows how to connect the green coloured plug to the SOMNOscreen plus ...

Страница 27: ...elt and an external effort belt Fig 5 7 Attaching the external effort sensor Fig 5 8 Connecting the plug to the socket Fig 5 8 shows how to connect the green coloured plug to SOMNOscreen plus Alternatively the SOMNOscreen plusTM can be placed on the abdomen The external effort belt is then placed on the Thorax ...

Страница 28: ...e electrodes have to be placed on Musculus Tibialis Anterior centred between the knee and the ankle of each leg Look at Fig 5 9 Use the 2 port snap electrodes to fit the electrodes on the correct position Additionally it is necessary to fix the cable with an extra tape to avoid interferences during the measurements Note Do not use dried up electrodes Use only the electrodes obtained from SOMNOmedi...

Страница 29: ...ugs of these sensors to SOMNOscreen plus 5 4 Activity Sensor wrist Use the activity sensor to measure movement of the extremities such as the arm during sleep Secure the sensor on the wrist of the non dominant hand right handed persons should wear the sensor on the left wrist and vice versa Use tape to secure the sensor to the patient s wrist Additionally it is necessary to secure the cable of the...

Страница 30: ...n pulse and plethysmography Attach the finger clip to the most suitable finger of the patient The embossed symbol of a finger has to point up as shown in Fig 5 14 You can fix the cable of the finger clip by using an extra tape Fig 5 14 Attaching the sensor to the patient s finger Fig 5 15 Connecting the plug to the socket Fig 5 15 shows how to connect the SUB D plug of the finger clip to SOMNOscre...

Страница 31: ...d when fitting the microphone Avoid strangulations to the patient s neck caused by the cable The plain site of the sensor has to be fitted on the patient s skin Fig 5 16 Attaching the microphone Fig 5 17 Fixation of the microphone Fig 5 18 Connecting the plug to the socket Fig 5 18 shows how to connect the brown coloured plug of the microphone to the SOMNOscreen plus ...

Страница 32: ...nsor have to be fitted directly below the nostrils The green coloured element has to be fitted in front of the patient s mouth Use the fixing tube to secure the sensor Additional you can adapt the sensor to the patients face by light bending Fig 5 49 Attaching the thermistor Fig 5 20 Connecting the plug to the socket Fig 5 20 shows how to connect the dark blue coloured plug to the SOMNOscreen plus...

Страница 33: ...oured plug to the correlating socket of the SOMNOscreen plus Fig 5 22 Lastly you can fit the nasal cannula sensor to the patient s face Notice that the red coloured tubes have to be placed in the nostrils of the patient look at Fig 5 21 Note Nasal Cannulas are disposable Fig 5 21 Attaching the CPAP pressure sensor Fig 5 22 Connecting the plug to the socket ...

Страница 34: ... if the CPAP mask contains an interface for a pressure tube outside Ø 5 mm inside Ø 2 mm Connect the supplied tube Length 20 cm outside Ø 5 mm inside Ø 2 mm via the Luer Lock connector to the pressure interface of the CPAP sensor Then connect the open end of this tube to the interface of the CPAP mask Fig 5 23 Possibility A connecting the CPAP pressure sensor ...

Страница 35: ...Luer Lock to the pressure interface of the CPAP sensor Connect the other end of this tube with the T adaptor also supplied The air supplying tube has to be fitted on the free end of the T adaptor Fig 5 24 Possibility B connecting the CPAP pressure sensor Fig 5 25 Connecting the plug to the socket Fig 5 25 shows how to connect the black coloured plug to the SOMNOscreen plus ...

Страница 36: ... coloured electrode has to be fitted to ICR 2 parasternal left with a disposable electrode too Fig 5 26 Attaching the ECG electrodes SOMNOscreen plus PSG Note Do not attach the SOMNOscreen plus directly on the patient s skin Attach the SOMNOscreen plus over a pyjama or t shirt Fig 5 27 Connecting the EXG adaptor to the socket Fig 5 27 shows how to connect the black grey coloured plug to the SOMNOs...

Страница 37: ...n coloured electrode should to be fitted to ICR 2 parasternal left with a disposable electrode Fig 5 28 Attaching the ECG electrodes SOMNOscreen plus EEG 32 Note Do not attach the SOMNOscreen plus directly on the patient s skin Attach the SOMNOscreen plus over a pyjama or t shirt Fig 5 59 Connecting the EXG adaptor to the socket Fig 5 59 shows how to connect the black grey coloured plug to the SOM...

Страница 38: ...ectrodes PSG fig 5 30 Attaching the EXG electrodes AASM GND Centre it in the middle of the forehead REF Is equal to Cz Take care of the 10 20 system to placing these Electrode EOG l Top left of the left eye EOG r Bottom right of the right eye Diagonal to EOG l F3 see 10 20 System F4 see 10 20 System C3 see 10 20 System C4 see 10 20 System O1 see 10 20 System O2 see 10 20 System M1 Behind the left ...

Страница 39: ... 39 b Attaching the electrodes EEG 32 Fig 5 31 Attaching the electrodes 10 20 For EEG 32 recordings the electrodes are placed according to the 10 distance 10 10 system ...

Страница 40: ... Rate too high Remove the Compact Flash Card from the SOMNOscreen plus and reinitialize it with a suitable montage A Special Firmware is available as an option if a higher sampling rate is required Please contact SOMNOmedics for details Problem Possible Reason What to do SOMNOscreen plus Unable to start SOMNOscreen plus Defective Snore Microphone Replace the microphone If a spare is not available ...

Страница 41: ...ociated to the Compact Flash Card Reader and select Format from the drop down list Try connecting the card reader to another PC Try formatting on this computer If it works try reinstalling it on the SOMNOmedics PC SOMNOpanel reports that you are not authorized to format You are not authorized to format Please contact your Networking Support or Technical Department to obtain the correct rights SOMN...

Страница 42: ...nitialize a Compact Flash Card for an Automatic Start Set the Start time to approximately 5 minutes ahead of the current time and the recording duration to 15 minutes Abort the recording by pressing all 3 keys at the same time Transfer the Data and check it in the Analysis Program Defective snore microphone Replace the microphone If a spare is not available as an alternative use a nasal cannula if...

Страница 43: ...iver module to a vertical position and ensure that it is secure If necessary restart the PC Antenna of the Receiver may not be correctly set up or lined up Change the position of the Receiving Antenna and if necessary of the Receiver as well Insufficient distance between Video and Data Receiver The distance between the Video and Data Receivers must be at least 1 5 m apart If possible place them at...

Страница 44: ...ter settings Check filters Recommended filter for EEG 0 3 30Hz and EOG 0 3 10Hz Contact sites not properly cleaned Clean the contact site with paste Nuprep and use GRASS Gold plated electrodes with GRASS EC2 crème Apply the reference REF to Cz Use the Impedance check in Online mode Ground electrode not clipped in Check that all the electrodes are clipped in and start the recording again Effort sig...

Страница 45: ...Description of Errors in the Logbook The Error Logbook is a useful tool integrated into SOMNOscreen plus E01 Lithium battery for integrated clock is flat E02 Voltage of Li ION battery during recording is less than 3 2 V E03 Waiting mode has been interrupted E04 Error in connection with access to Flash Card for example removal of the Flash Card during recording E06 Recording started with insufficie...

Страница 46: ...aning the device Wipe the case using only mild detergents DO NOT use a wet or fluffy cloth For cleaning we recommend Terralin Liquid This device complies with IP protection class 20 This means that the device is NOT waterproof Also protect the SOMNOscreen plus from coming into contact with water dust and dirt Other disinfectants approved by DGHM may be used after testing that they do not damage th...

Страница 47: ...AF Liquid Mikrozid AF Cloth Isopropanol spray Ready to use Ready to use 70 5 min 5 min 5 10 min After use Remove adhesives if necessary Follow manufacturer s instructions Effort Sensor Wipe disinfection For example Terralin Liquid Mikrozid AF Cloth Ready to use Ready to use 5min 5 min After use Remove adhesives if necessary Follow manufacturer s instructions CPAP Pneumatic Effort Sensor Quick disi...

Страница 48: ...ons Larynx microphone Wipe disinfection For example Terralin Liquid Mikrozid AF Cloth Ready to use Ready to use 5min 5 min After use Remove adhesives if necessary Follow manufacturer s instructions EEG EMG Electrode Cables Wipe disinfection For example Terralin Liquid Mikrozid AF Cloth Ready to use Ready to use 5min 5 min After use Remove adhesives if necessary Follow manufacturer s instructions S...

Страница 49: ...tachograph tube CPAP tube Terralin Liquid Ready to use 5min After use Keep the area that has to be disinfected moist during disinfection Fill the disinfectant into the tube with a luer lock adapter Do not perform immersion disinfection Follow manufacturer s instructions Transmitter Module Wipe disinfection For example Terralin Liquid Mikrozid AF Cloth Ready to use Ready to use 5min 5 min After use...

Страница 50: ...kes approximately 2 7 h to charge a fully flat battery The battery is fully charged when the red Charging LED on the charger turns off Never dispose of Li ION batteries in domestic waste It is strictly forbidden to put hazardous substances in domestic waste Please return used batteries to your distributor or hand them in at your local municipal collecting point Every charging cycle even when the b...

Страница 51: ...en Good Skin Contact R 4 kΩ 6 20Hz 10 15µV Good Skin Contact R 4 kΩ Bad Skin Contact R 10 kΩ 50Hz 20 30µV Bad Skin Contact R 10 kΩ EMG channel Viewed on the Display Muscles Relaxed Good Skin Contact R 4 kΩ 1 4Hz 5 10µV Good Skin Contact R 4 kΩ Bad Skin Contact R 10 kΩ 50Hz 10 20µV Bad Skin Contact R 10 kΩ Good Electrode to Skin Impedance measurements should be within the following ranges EOG 5 to ...

Страница 52: ...8mV 0 023 1kHz 5 Effort Abdomen 16 Bit 170mV 0 2Hz 35Hz 5 PLMr 16 Bit 120mV DC 1kHz 5 Snore 16 Bit 1 2V 40 1kHz 5 Effort Thorax 16 Bit 0 1 1 6Hz PLMl 16 Bit 120mV DC 1kHz 5 Body Position Right Left Supine Prone Upright Accu ext 12 Bit 0 4800mV Light 12 Bit Accu int 12 Bit 0 4800mV Component Channels Resolution Measurement range Frequency range Accuracy Dimensions and Weight Headbox PSG 10 x EEG EO...

Страница 53: ...dults using the finger clip sensor 70 95 3 for neonates using the child or neonates sensors 70 100 3 for adults using the flex or reflectance sensors 70 100 4 using the ear clip sensor Values below 70 are not specified for these sensors Temperature During operation 0 C to 50 C Storage 20 C to 70 C Humidity During operation 10 90 Non Condensing Storage 10 95 Non Condensing Connector DB9 ...

Страница 54: ...ife of approximately 500 charging cycles As a rule it should be changed every 3 years Interactive display Signal check at backlit Display Programmable Time Setting Keyboard for Menu Control Maximum 32 characters on 2 lines 16 characters per line and 2 fields 8 characters per field Storage medium Industrial Compact Flash memory card with up to 2 GB capacity Operating voltage 3 3 V 5 Maximal current...

Страница 55: ...he following conditions Updates modifications or repairs are only executed by authorized distributors or SOMNOmedics The device is operated only by trained and qualified personnel The device is transported in original packaging only The device is stored in a suitable environment The device is used according to the instruction manual and all safety instructions are followed The Warranty only covers...

Страница 56: ... will be redirected to our mail box If that is the case please leave your name and telephone number so that we can call you back as soon as we can You can send us important information by fax to 931 451 3757 We also provide service and support via e mail on service somnomedics de Our Service Hotline offers competent help and advice at 866 361 9937 toll free Our homepage www somnomedics diagnostics...

Страница 57: ... 57 9 Notes ...

Отзывы: