background image

52

Copyright © 2015-2016 Somfy SAS. All rights reserved.

Non contractual pictures

SUMMARY

WELCOME PAGE 

2

1. SAFETY 

3

2. NINA IO REMOTE CONTROL 

5

3. USE NINA IO 

13

Control an item of equipment 

13

My function 

15

Natural Control function 

19

Load a scenario 

22

Alarm function  

23

4. CUSTOMIZE NINA IO 

25

Customize equipment 

25

Customize groups 

29

Customize scenarios 

35

Customize remote control 

40

5. ADVANCED SETTINGS 

46

6. TROUBLESHOOTING 

57

7. ABOUT NINA IO 

58

Upgrade of an installation already equipped with Nina io

The Installer functions allow a professional motorisation and home automation installer to configure 
an installation already equipped with Nina io, by accessing the Settings menu. Nina io guides the 
installer step by step and displays the different key stages to follow to upgrade the installation.

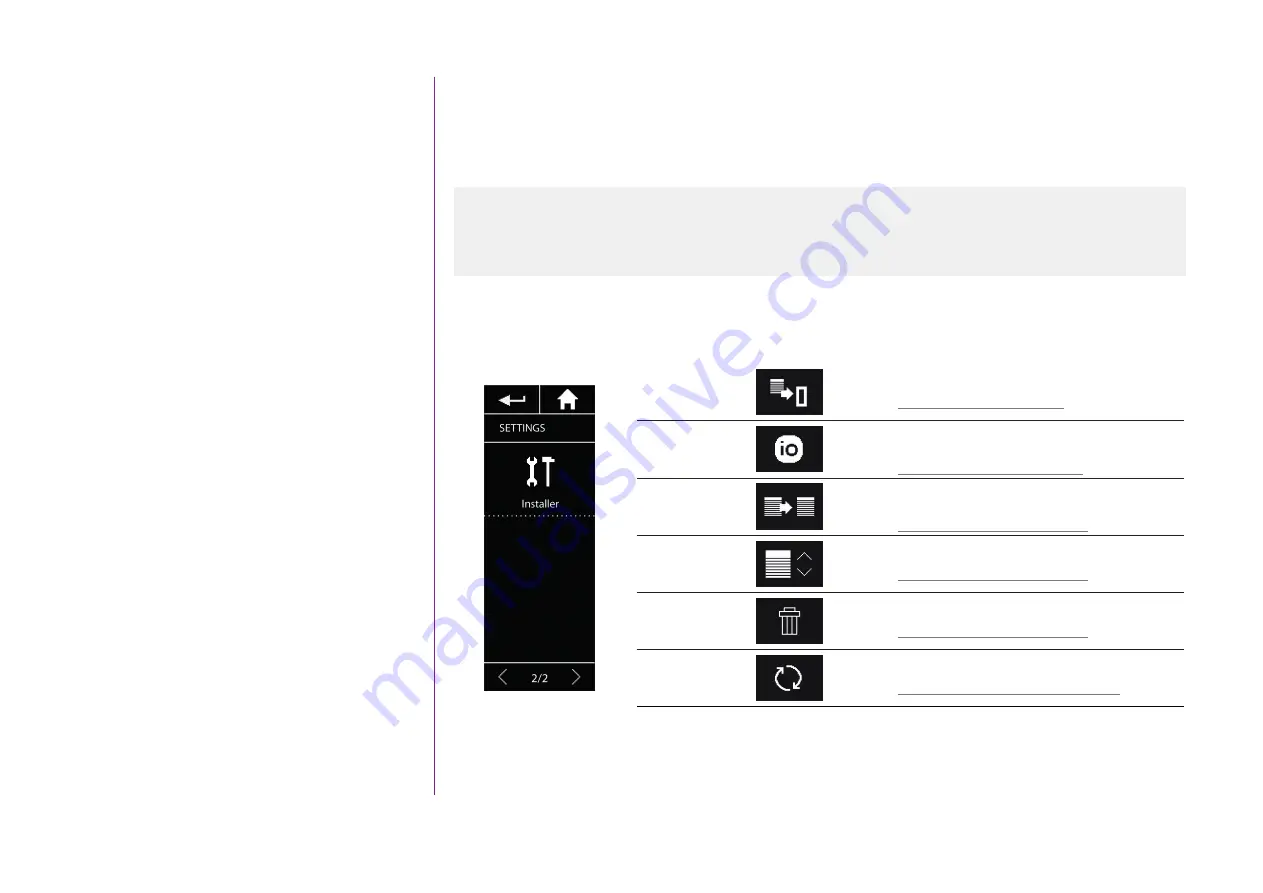
The following functions are available to modify or personalize the installation:


Pair equipment

Pairing of new equipment in the installation

Refer to 

Pair equipment , page 53

Manage io 

system 

Transfer, generation and reception of new keys in 

the io system

Refer to 

Manage io system , page 54

Replace 

equipment

Replacement of an item of equipment by a new 

product

Refer to 

Manage equipment, page 55

Re-set 

equipment

Re-setting of an item of equipment

Refer to 

Manage equipment, page 55

Delete 

equipment

Removal of one or several  items of equipment

Refer to 

Manage equipment, page 55

Reset to 

factory settings

Reset of all the installation from the beginning

Refer to 

Reset to factory settings , page 56

Pair equipment  

53

Manage io system  

54

Manage equipment 

55

Reset to factory settings  

56

Содержание nina

Страница 1: ... 3 USE NINA IO 13 Control an item of equipment 13 My function 15 Natural Control function 19 Load a scenario 22 Alarm function 23 4 CUSTOMIZE NINA IO 25 Customize equipment 25 Customize groups 29 Customize scenarios 35 Customize remote control 40 5 ADVANCED SETTINGS 46 6 TROUBLESHOOTING 57 7 ABOUT NINA IO 58 Ref 5126992A ...

Страница 2: ...t control integrate memorise and position all of the equipment in your home Control equipment individually or as a group Configure to suit your house Precise control Creation of scenarios Exclusive function of Somfy Natural Control Once you ve set up the interface pressing the screen for just 2 seconds is enough to control any piece of equipment With one simple gesture like magic Naturally attract...

Страница 3: ...m his customers of the operating and maintenance conditions for the product Never begin installing without first checking the compatibility of this product with the associated equipment and accessories If in doubt when installing this product and or to obtain additional information contact Somfy adviser or go to the website www somfy com General safety instructions Do not use or install this produ...

Страница 4: ...ver touch the mains adapter with damp or wet hands as this could cause electrocution The mains adapter and its cable must be kept out of the reach of children and away from pets while remaining accessible so that it can be disconnected quickly in case of emergency Remote control Only use the battery provided with the product to power the remote control When it needs replacing contact your professi...

Страница 5: ...ction 19 Load a scenario 22 Alarm function 23 4 CUSTOMIZE NINA IO 25 Customize equipment 25 Customize groups 29 Customize scenarios 35 Customize remote control 40 5 ADVANCED SETTINGS 46 6 TROUBLESHOOTING 57 7 ABOUT NINA IO 58 2 NINA IO REMOTE CONTROL Content of the package 6 Nina io remote control 7 Nina io navigation 8 Nina io charger 8 Nina io battery 9 What is an equipment 10 What is a group 11...

Страница 6: ...CED SETTINGS 46 6 TROUBLESHOOTING 57 7 ABOUT NINA IO 58 Content of the package Discover the different elements and documents provided in the packaging NINA IO REMOTE CONTROL Touch screen remote control including battery BACK FACE OF CUSTOMIZATION Removable back face to personalize Nina io BASE Holder of Nina io remote control REMOTE CONTROL CHARGER Power cable to charge Nina io remote control QUIC...

Страница 7: ...l is composed of the following elements BATTERY LEVEL INDICATOR GROUPS ACCESS TO GROUPS MANAGEMENT List of groups to manage equipment by groups by launching scenarios SETTINGS ACCESS TO SETTING MENUS Remote control settings languages screen parameters management by motion sounds about Nina io reset mode alarm code Groups equipment settings Installer settings functions only for a professional motor...

Страница 8: ...te on the screen of Nina io Click Swipe Slide Nina io charger To charge Nina io remote control place it on its base Nina io remote control functioning when it is on the base the screen is always ON To deactive this function refer to Manage state of screen when Nina io on base page 43 If necessary use the button at the back of the remote control to switch ON OFF Nina io Battery level The battery le...

Страница 9: ...ert the extremity of the charger in the back of the base 2 Plug the charger into an electrical outlet 3 Wait about two hours when Nina io is fully discharged 1 2 3 Changing the battery 1 Remove the back face of the remote control to access the cover of the battery 2 Turn off Nina io remote control and remove the cover of the battery by pushing it down 3 Unplug the battery and then remove it from t...

Страница 10: ...t is an equipment The Equipment menu allows to control and supervise the status of all equipment one by one List of io compatible equipment and associated icons Int Venetian Roller Shutter Tilt Rol Shutter Proj Rol Shutter Window Roof Window Garage Door Rolling Door Light Dimmer Light On Off Swinging Gate Gate Open Close Lock Window Lock Vertical Blind Roof Screen On Off Switch Awning Horiz Pergol...

Страница 11: ... equipment classified by rooms e g all the equipment of the living room the bathroom etc Any group whatsoever e g north facade south facade etc This way it is easy to control all equipment by scenario with one click 25 GROUPS ARE DEFINED BY DEFAULT AT INSTALLATION Home Bathroom Office Ground floor Pergola Living room Bedroom 1 Playground Outside Lights Dining room 1 Bedroom 2 Terrace Garage Rollin...

Страница 12: ...tion etc It is also possible to create new scenarios by programing one or more items of equipment of a group at the same time For example the I go scenario can regroup the closing of the exterior venetian the closing of the rolling shutter and the extinction of the lights In the created scenarios the position of each equipment is configurable to completely personalize the home ambiance in one clic...

Страница 13: ...icon All equipment is available using the navigation buttons or the swipe The available levels for the control of the selected equipment are displayed Control the equipment 3 Select the desired setting level by clicking or sliding on the corresponding position A B or C 4 The action starts once the button is released A wheel and a Stop button are displayed when the action is ongoing E Click on this...

Страница 14: ... or during the control of equipment To activate the discrete mode slows the movement of the roller shutter RS100 through its full travel To deactivate the discrete mode of the roller shutter RS100 To control the orientation of the slats on venetian exterior and interior and roller shutters with tilting slates gradhermetic To control the raising lowering of the slats on venetian blinds exterior and...

Страница 15: ...ed next to the memorized level To modify or delete this position see page 17 If the My position is not preset the My icon is dimmed at the top of the level scale To memorize a My position see page 16 Use the My function Once the setting of the My level is performed the equipment can automatically be placed in its favorite position in only one click 1 Select the Equipment menu by clicking on the co...

Страница 16: ...ize the My position 1 Select the Equipment menu by clicking on the corresponding icon 2 Select the desired equipment by clicking on the corresponding icon The My position of the selected equipment is not set the My icon is dimmed at the top of level scale 3 Selectthesettingleveloftheselectedequipment by clicking or by sliding on the corresponding position and then press and hold the dimmed My icon...

Страница 17: ...ct the Equipment menu by clicking on the corresponding icon 2 Select the desired equipment by clicking on the corresponding icon The My position of the selected equipment is already set the My icon is displayed next to the memorized level 3 Select a new setting level by clicking or sliding on the corresponding position and then press and hold the My icon for at least 5 seconds 4 Select the option ...

Страница 18: ...O 58 Delete the My position 1 Select the Equipment menu by clicking on the corresponding icon 2 Select the desired equipment by clicking on the corresponding icon The My position of the selected equipment is already set the My icon is displayed next to the memorized level 3 Click on the My icon for at least 5 seconds to remove its memorized position 4 Select the option Delete my position then clic...

Страница 19: ... and a single gesture directly from the home screen No need to select the equipment or the group or to enter the functionalities of Nina io After having associated one or more items of equipment to the Natural Control function intuitively adjust their position simply by touching the central area of the screen and by orienting the remote control There are two possibilities of position for all equip...

Страница 20: ...l function Release it to return to the home screen 2 When the function starts the message Natural Control is ready is displayed 3 Without releasing the central area of the screen raise lower the remote control up down to launch the raise descent or the opening closing or the turning on off or the locking unlocking of the favorite equipment Up or down arrows are displayed to indicate the ongoing mo...

Страница 21: ...atural Control function 1 Select the Settings menu by clicking on the corresponding icon 2 Click on the Remote control icon 3 Click on the Management by motion icon 4 Click on the Equipment icon to access the available list of equipment 5 Select one or several items of equipment to associate to the Natural Control function and click on OK to save Activate the Natural Control function 6 Select the ...

Страница 22: ... containing the equipment to control by clicking on the corresponding icon All rooms and groups are available using the navigation buttons or the swipe The available scenarios for the control of the selected room group are displayed Launch the scenario 3 Select the scenario by clicking on the corresponding icon or name 4 The action starts once the button is released A wheel and a Stop button are d...

Страница 23: ...ssary to enter a code specific for Nina io and different from the alarm code The Nina io alarm code is not necessary to activate the alarm By default the code is 0000 The Nina io alarm code can be modified in the Settings menu Deactivate the alarm 1 Select the Equipment menu by clicking on the corresponding icon 2 Click on the alarm icon in the equipment list The alarm icon is displayed in the equ...

Страница 24: ...NCED SETTINGS 46 6 TROUBLESHOOTING 57 7 ABOUT NINA IO 58 Change the alarm code 1 Select the Settings menu by clicking on the corresponding icon 2 Click on the Remote control icon to enter the corresponding settings settings 3 Click on the Alarm code icon A message asks to confirm the reset of the alarm code 4 Click on RESET to confirm A keyboard is displayed 5 Enter the new code using the keyboard...

Страница 25: ...GS 46 6 TROUBLESHOOTING 57 7 ABOUT NINA IO 58 4 CUSTOMIZE NINA IO Customize equipment Identify an item of equipment The identify function allows to locate an item of equipment in the home the corresponding equipment is triggered or is executing a back and forth movement to be easily spotted Select the equipment in the Settings menu and click on Identify to activate it When the equipment is located...

Страница 26: ...ion 23 4 CUSTOMIZE NINA IO 25 Customize equipment 25 Customize groups 29 Customize scenarios 35 Customize remote control 40 5 ADVANCED SETTINGS 46 6 TROUBLESHOOTING 57 7 ABOUT NINA IO 58 Rename an item of equipment Select the corresponding equipment in the Settings menu and rename it using the keyboard 1 2 3 4 6 7 5 Identify an item of equipment 25 Rename an item of equipment 26 Add delete an item...

Страница 27: ...HOOTING 57 7 ABOUT NINA IO 58 Add delete an item of equipment into a group Select the corresponding equipment in the Settings menu and check uncheck the checkboxes of the related groups Groups containing the selected equipment are already checked when accessing to the groups list It is possible to choose one or several groups for a same item of equipment by checking one or several checkboxes If al...

Страница 28: ... Customize groups 29 Customize scenarios 35 Customize remote control 40 5 ADVANCED SETTINGS 46 6 TROUBLESHOOTING 57 7 ABOUT NINA IO 58 Organize the list of equipment In the Settings menu select the equipment and use the up and down arrows to change their position in the list The order of the list is automatically saved after a click on the up or down arrow 1 2 3 4 4 Identify an item of equipment 2...

Страница 29: ...ROUBLESHOOTING 57 7 ABOUT NINA IO 58 Customize groups Modify the equipment list of a group In the Settings menu select the corresponding group and check uncheck the checkboxes of its related equipment GROUPS SELECT the group room to be edited CREATE a new group room DELETE groups rooms 1 2 Screen Screen All the equipment already included in the group is checked when accessing the equipment list If...

Страница 30: ...ize equipment 25 Customize groups 29 Customize scenarios 35 Customize remote control 40 5 ADVANCED SETTINGS 46 6 TROUBLESHOOTING 57 7 ABOUT NINA IO 58 Rename a group In the Settings menu select the corresponding group and rename it using the keyboard GROUPS SELECT the group room to be edited CREATE a new group room DELETE groups rooms 1 2 1 2 3 4 6 7 5 Modify the equipment list of a group 29 Renam...

Страница 31: ...e groups 29 Customize scenarios 35 Customize remote control 40 5 ADVANCED SETTINGS 46 6 TROUBLESHOOTING 57 7 ABOUT NINA IO 58 Change a group icon In the Settings menu select the corresponding group and choose its new icon GROUPS SELECT the group room to be edited CREATE a new group room DELETE groups rooms 1 2 The new icon is automatically saved when it is selected 1 2 3 4 5 6 Modify the equipment...

Страница 32: ...ESHOOTING 57 7 ABOUT NINA IO 58 Create a new group In the Settings menu define the icon and the name of the new room group and select the associated equipment GROUPS SELECT the group room to be edited CREATE a new group room DELETE groups rooms 1 2 5 Screen The new room group is added at the end of the groups list The new room group is automatically created with predefined scenarios To modify dele...

Страница 33: ...enarios 35 Customize remote control 40 5 ADVANCED SETTINGS 46 6 TROUBLESHOOTING 57 7 ABOUT NINA IO 58 Delete a group In the Settings menu select the corresponding group and delete it GROUPS SELECT the group room to be edited CREATE a new group room DELETE groups rooms 1 2 It is possible to delete several groups at the same time by ckecking several checkboxes when accessing the groups list 1 2 3 4 ...

Страница 34: ...ize remote control 40 5 ADVANCED SETTINGS 46 6 TROUBLESHOOTING 57 7 ABOUT NINA IO 58 Organize groups list In the Settings menu select the Groups select Organize list of groups rooms and use the up down arrows to change their position in the list GROUPS SELECT the group room to be edited CREATE a new group room DELETE groups rooms 1 2 GROUPS ORGANIZE list of groups rooms ORGANIZE scenarii list 2 2 ...

Страница 35: ...ed Create a scenario In the Groups menu select the group that will contain the new scenario and select New scenario at the end of the scenarios list Name the new scenario select its associated equipment and set its action One or several items of equipment can be selected in the new scenario by clicking on several check boxes in the equipment list one after the other After each equipment selection ...

Страница 36: ...t 25 Customize groups 29 Customize scenarios 35 Customize remote control 40 5 ADVANCED SETTINGS 46 6 TROUBLESHOOTING 57 7 ABOUT NINA IO 58 Rename a scenario In the Groups menu select the group containing the corresponding scenario select the scenario and rename it using the keyboard This function is not allowed with predefined scenarios Only scenarios created by the user can be renamed 1 2 3 4 5 6...

Страница 37: ... IO 58 Modify a scenario In the Groups menu select the group containing the corresponding scenario and select the scenario to modify it add or delete associated items of equipment by selecting checkboxes Change the setting level of the items of equipment if necessary The light terrace is removed from the CLOSE ALL scenario The new position of the rolling shutter bedroom in the CLOSE ALL scenario i...

Страница 38: ... Customize scenarios 35 Customize remote control 40 5 ADVANCED SETTINGS 46 6 TROUBLESHOOTING 57 7 ABOUT NINA IO 58 Delete a scenario In the Groups menu select the group containing the corresponding scenario select the scenario and delete it The entire CLOSE ALL scenario is deleted with all equipment and the associated actions To delete only one item of equipment in a scenario refer to Modify a sce...

Страница 39: ...e control 40 5 ADVANCED SETTINGS 46 6 TROUBLESHOOTING 57 7 ABOUT NINA IO 58 Organize scenarios list In the Settings menu select the Groups select Organize scenarii list Select the group in which scenarii will be reorganized and use the up down arrows to change their position in the list GROUPS SELECT the group room to be edited CREATE a new group room DELETE groups rooms 1 2 GROUPS ORGANIZE list o...

Страница 40: ...ize equipment 25 Customize groups 29 Customize scenarios 35 Customize remote control 40 5 ADVANCED SETTINGS 46 6 TROUBLESHOOTING 57 7 ABOUT NINA IO 58 Customize remote control Change languages In the Settings menu select the remote control to access the languages and choose the corresponding language There are 7 languages available 1 2 3 4 5 Change languages 40 Change screen intensity 41 Manage st...

Страница 41: ...mote control 40 5 ADVANCED SETTINGS 46 6 TROUBLESHOOTING 57 7 ABOUT NINA IO 58 Change screen intensity In the Settings menu select the remote control to access the screen settings Select the Intensity icon and set it as necessary 6 To select the maximum screen brightness click on To select the minimum screen brightness click on When Nina io is in low battery the intensity of backlight is reduced a...

Страница 42: ...CED SETTINGS 46 6 TROUBLESHOOTING 57 7 ABOUT NINA IO 58 Manage standby mode The time of inactivity before Nina io switches in standby mode can be setted In the Settings menu select the remote control to access the screen settings Select the Standby icon and set the timing as necessary 6 The standby mode allows to save battery life The intensity of backlight is reduced by 50 at the half remaining t...

Страница 43: ...ustomize remote control 40 5 ADVANCED SETTINGS 46 6 TROUBLESHOOTING 57 7 ABOUT NINA IO 58 Manage state of screen when Nina io on base When Nina io is on base it is possible to keep its screen On or Off In the Settings menu select the remote control to access the screen settings Select the On base icon and set the screen on ON or OFF 6 By default the screen remains On when Nina io is on base 1 2 3 ...

Страница 44: ...e groups 29 Customize scenarios 35 Customize remote control 40 5 ADVANCED SETTINGS 46 6 TROUBLESHOOTING 57 7 ABOUT NINA IO 58 Manage sounds In the Settings menu select the remote control to access the sounds settings and set the sounds of Nina io as necessary There are three adjustement options no sound only alerts sounds alerts sounds and keyboard clicks 1 2 3 4 5 Change languages 40 Change scree...

Страница 45: ...ction It is possible to reset Nina io that is to delete all the groups and scenarios in the same time The reset function does not delete the items of equipment that are retained in the Equipment menu and that always can be controlled The parameters of the Remote control menu are also retained In the Settings menu select the remote control to access the Reset function and reset all the groups rooms...

Страница 46: ... function 23 4 CUSTOMIZE NINA IO 25 Customize equipment 25 Customize groups 29 Customize scenarios 35 Customize remote control 40 5 ADVANCED SETTINGS 46 6 TROUBLESHOOTING 57 7 ABOUT NINA IO 58 5 ADVANCED SETTINGS The following functions are only for a professional motorisation and home automation installer Any change may cause a modification of the installation First installation of Nina io 47 Upg...

Страница 47: ... io The installation of Nina io remote control is guided by the product itself From the start Nina io displays step by step the different key stages to follow to perform the first installation Start Nina io 1 Switch the button to ON at the back of the remote control to turn on Nina io 2 Place the removable cover at the back of the remote control 3 Wait for a few seconds the end of the welcome anim...

Страница 48: ...ssociated to a centralized control 2W with feedback Equipment without control point Individual controls without feedback function can be used for control within sight of equipment in one room These equipment can be identified by the following symbols Centralized controls with feedback function can be used to control all equipment in the home Users receive constant information about whether or not ...

Страница 49: ...n groups rooms If no pre paired items of equipment have been detected the discovery of equipment is directly launched 2 Discover items of equipment already registred in a control point starting with 2W press on KEY or PROG button of the control point for 2 seconds and then click on OK to launch the research Click on No to directly search items of equipment without control point 3 If no equipment i...

Страница 50: ...equipment are available for utilisation in Groups menu Click on to locate the equipment in the installation the corresponding equipment will be triggered to be easily spotted When the equipment is located click on to stop its movement Click on to delete the displayed equipment If required specify the equipment profile by selecting one of the displayed options Place equipment into groups rooms 1 Fo...

Страница 51: ...ent exit the Installer menu to access the Using menu Complete installation 1 Click on No to exit the installation menu Click on Yes to return to the pairing page 2 Confirm this choice by clicking on Yes The number of equipment associated to Nina io is displayed Click on No to return to the pairing page 3 Click on OK to access the home screen 4 From the home screen access all the user and installer...

Страница 52: ...io guides the installer step by step and displays the different key stages to follow to upgrade the installation The following functions are available to modify or personalize the installation Pair equipment Pairing of new equipment in the installation Refer to Pair equipment page 53 Manage io system Transfer generation and reception of new keys in the io system Refer to Manage io system page 54 R...

Страница 53: ...tems of equipment from a control point and place them into groups rooms Refer to Place equipment into groups rooms page 50 Discover To discover all equipment with the same key or items of equipment without control point and place them into groups rooms Refer to Place equipment into groups rooms page 50 All the equipment transferred to another control point remains saved in Nina io A remote control...

Страница 54: ...G 57 7 ABOUT NINA IO 58 Manage io system There are 3 possibilities to manage the io system by using the key button at the back of the remote control Send key To transfer a new key 2 seconds press on the key button Generate key To generate a new key and send it to all controls with feedback 7 seconds press on the key button Receive key To receive a new key and transfer it to equipment of the instal...

Страница 55: ... give it the name of the old equipment and place it in the groups where the old equipment was Only similar items of equipment can be replaced Re set This function is recommended to re set an item of equipment with Nina io it is impossible to set an item of equipment without setting To re set an equipment the professional motorisation and home automation installer needs to know all ergonomics with ...

Страница 56: ...OMIZE NINA IO 25 Customize equipment 25 Customize groups 29 Customize scenarios 35 Customize remote control 40 5 ADVANCED SETTINGS 46 6 TROUBLESHOOTING 57 7 ABOUT NINA IO 58 Reset to factory settings Erasing all settings of the first installation paired equipment groups scenarios alarm code etc To restart the installation from the beginning refer to First installation of Nina io page 47 Pair equip...

Страница 57: ...13 My function 15 Natural Control function 19 Load a scenario 22 Alarm function 23 4 CUSTOMIZE NINA IO 25 Customize equipment 25 Customize groups 29 Customize scenarios 35 Customize remote control 40 5 ADVANCED SETTINGS 46 6 TROUBLESHOOTING 57 7 ABOUT NINA IO 58 6 TROUBLESHOOTING If the case is not correctly clipped onto the remote control Nina io can not charge when it is on its base ...

Страница 58: ...em of equipment 13 My function 15 Natural Control function 19 Load a scenario 22 Alarm function 23 4 CUSTOMIZE NINA IO 25 Customize equipment 25 Customize groups 29 Customize scenarios 35 Customize remote control 40 5 ADVANCED SETTINGS 46 6 TROUBLESHOOTING 57 7 ABOUT NINA IO 58 7 ABOUT NINA IO Technical specifications 59 Compatibility information 60 Software version 60 ...

Страница 59: ...tandard shell Black soft touch Product autonomy Autonomy when product not on the base For information only but not guaranteed 10 days with 12 actions per day for an installation of 15 items of equipment An eco mode is activated when the product is at 25 of charging The backlight decreases in order to reach the 10 days of autonomy A battery level indicator indicate the level of battery Radio freque...

Страница 60: ... Customize groups 29 Customize scenarios 35 Customize remote control 40 5 ADVANCED SETTINGS 46 6 TROUBLESHOOTING 57 7 ABOUT NINA IO 58 Compatibility information Nina io is compatible with all io homecontrol equipment except all io homecontrol sensors Software version Nina io version described in this manual instructions 5125742A05 Somfy hereby declares that this product is in compliance with the r...

Страница 61: ...Somfy SAS 50 avenue du Nouveau Monde F 74300 CLUSES www somfy com Somfy SAS capital 20 000 000 Euros RCS Annecy 303 970 230 02 2016 ...

Отзывы: