35
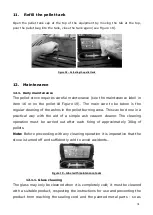
a) Remove the abutment next to the fume extractor. At the same time disconnect the
temperature probe, the silicone tube and the connecting cables that are attached to
the extractor.
a) Pilar b) Probe c) Tube d) Conectors
Figure 27 – Removal of the abutment and elements attached to the extractor
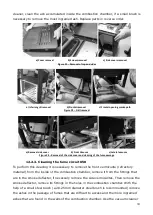
b) Remove the screws that support the turbine from the extractor, remove the turbine
from the extractor housing.
a) Screw removal b) Turbine removal
Figure 28 – Removal of the turbine from the extractor
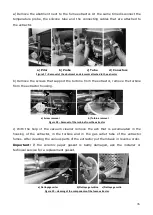
c) With the help of the vacuum cleaner remove the ash that is accumulated in the
housing of the extractor, in the turbine and in the gas outlet tube of the extractor
fumes. After cleaning the various parts of the extractor put them back in reverse order.
Important:
If the ceramic paper gasket is badly damaged, ask the installer or
technical service for a replacement gasket.
a) Nettoyage carter b) Nettoyage turbine c) Nettoyage sortie
Figure 29 – cleaning of the components of the fume extractor
Содержание K50
Страница 44: ...43 ...
Страница 45: ...44 ...
Страница 46: ...45 ...
Страница 59: ...58 20 2 Fluxograme Ignition ...
Страница 60: ...59 ...
Страница 61: ...60 Shutdown 20 3 Declaration of performence ...


