9
LIGHT FIXTURE INSTALLATION
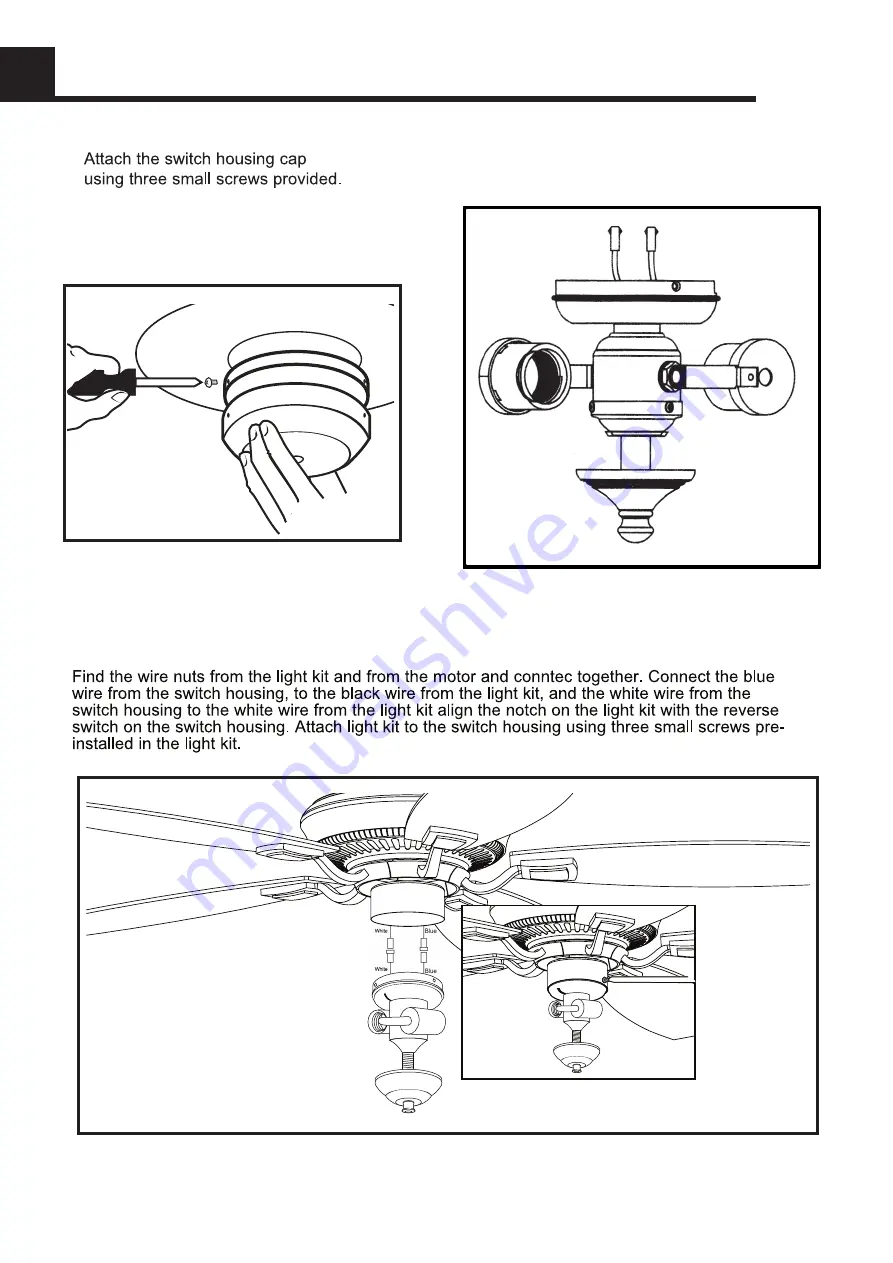
3.
1.
Connect the plugs from the upper and lower switch
housings.Then install three of the switch housing screws.
2
.
Страница 1: ...READ AND SAVE THESE INSTRUCTIONS CEILING FANS INSTALLATION INSTRUCTION MODEL SERIES LTG CF5002...
Страница 2: ...electrical system and choice of location meet these requirements If the location where you plan to install your fan does not already have an electrical outlet hire a licensed electrician to run the wi...
Страница 3: ...sk of fire electrical shock or personal injury mount this fan to an outlet box marked Acceptable for Fan Support and use the Mounting Screws provided with the outlet box CAUTION Install the primary mo...
Страница 4: ...outlet box suitable for fan support must support 35 lbs Before attaching fan to outlet box ensure the outlet box is securely fastened by at least two points to a structural ceiling member a loose box...
Страница 5: ...h the mounting bracket Loosen the two canopy mounting screws on the downside face of the mounting bracket Back them out about half way This will allow for easier installa tion of the ceiling canopy la...
Страница 6: ...insert the down rod into the down rod coupling Make sure to align the hole in the downrod with the hole in the downrod coupling Install cross pin 1 removed in step 6 through coupling and downrod Inser...
Страница 7: ...half ball in the center of the mounting bracket with the keyway pin inserted into the keyway on the ball Turn the fan left and right slightly to make sure it is seated on the bracket with the keyway p...
Страница 8: ...the Black live supply wire Connect the White wire with the red label to the White neutral supply wire 7 WIRE CONNECTION 1 Black hot power White neutral Bare Green ground Red White White White B l a c...
Страница 9: ...pening motor gaskets 2 and motor screws provided Tighten screws ecurely NOTE Some models do not utilize motor gaskets washers or stabilizer tabs 1 2 2 BLADE INSTALLATION 1 2 Always ensure that fan is...
Страница 10: ...9 LIGHT FIXTURE INSTALLATION 3 1 Connect the plugs from the upper and lower switch housings Then install three of the switch housing screws 2...
Страница 11: ...10 LIGHT FIXTURE INSTALLATION 4 5...
Страница 12: ...of up or down position Factory setting is all up Do not use this position Use a small screwdriver or ball point pen to slide firmly up or down Figure 1 Setting the codes on the receiver B a Slide cod...
Страница 13: ...sure power is correctly connected to the receiver b Make sure the fan pull chain if included at highest position c Make sure the light kit switch turned on d Make sure good battery in ransmitter e Ma...
Страница 14: ...____ ______ ______ ______ ______ ______ ______ ______ Hanging Bracket Canopy 4 in 6 in Downrods Yoke Cover Cross Pin Motor Assembly Blade x5 Blade Arms x5 Light Kit x2 Led Bulb x2 Glass Shade Receiver...
Страница 15: ...kit make sure the screws securing the glassware are tight Make sure the light bulbs are not touchingany other component 2 Fan sounds noisy Check that all blade and blade arm screws are secure Most fan...