Solstice SLS-ENVR2016 Series Скачать руководство пользователя страница 8

8


DNS server

 - address of the server which translates the DNS names to IP addresses. The 

address is often identical to the router address. If you do not specify the address of the DNS 
server or give an invalid address, it will not be possible to translate the domain names (e.g. 
Solstice.com) to an IP addresses, send e-mail messages, synchronize time with an NTP 
server, etc.  

Present as UPnP device

 - if checked, the SLS-ENVR is visible in the folder 

Locations in the 

Network

 in the Windows Explorer window. 

Domain Settings

 - in this section, you can set the device domain and hostname. 

NOTE

: To send 

e-mail messages from the SLS-ENVR, the SMTP server must be configured to send messages from a 
device with that domain name.

Enable second network interface as backup

. Select this option to use the network port “2” as 

a backup connection to the network if the connection through port ‘1” fails. 

Enable load balancing

. Select this option to use the 2nd network port “2” to balance traffic 

across both network ports. This creates a logical link for flow control to ensure data transmissions are 
operating optimally.

Failure detection


Link

: This option detects a disconnection of the network cable. If the cable from network 

port “1” is removed, the connection through network port “2” is automatically activated, 
and vice versa. 


Network

: This option checks for traffic flowing through the active network port of the 

NVR. If no network traffic is detected, the connection through the backup network port will 
be automatically activated. You must enter at least one IP address of an independent server 
or IP device to the IP address list.  

Check interval

 (ms): This sets the interval for checking availability of the connection. This interval 

is used for both types of failure detection. The default interval size is 100 ms. 

3.  After making changes, click 

Apply

.  

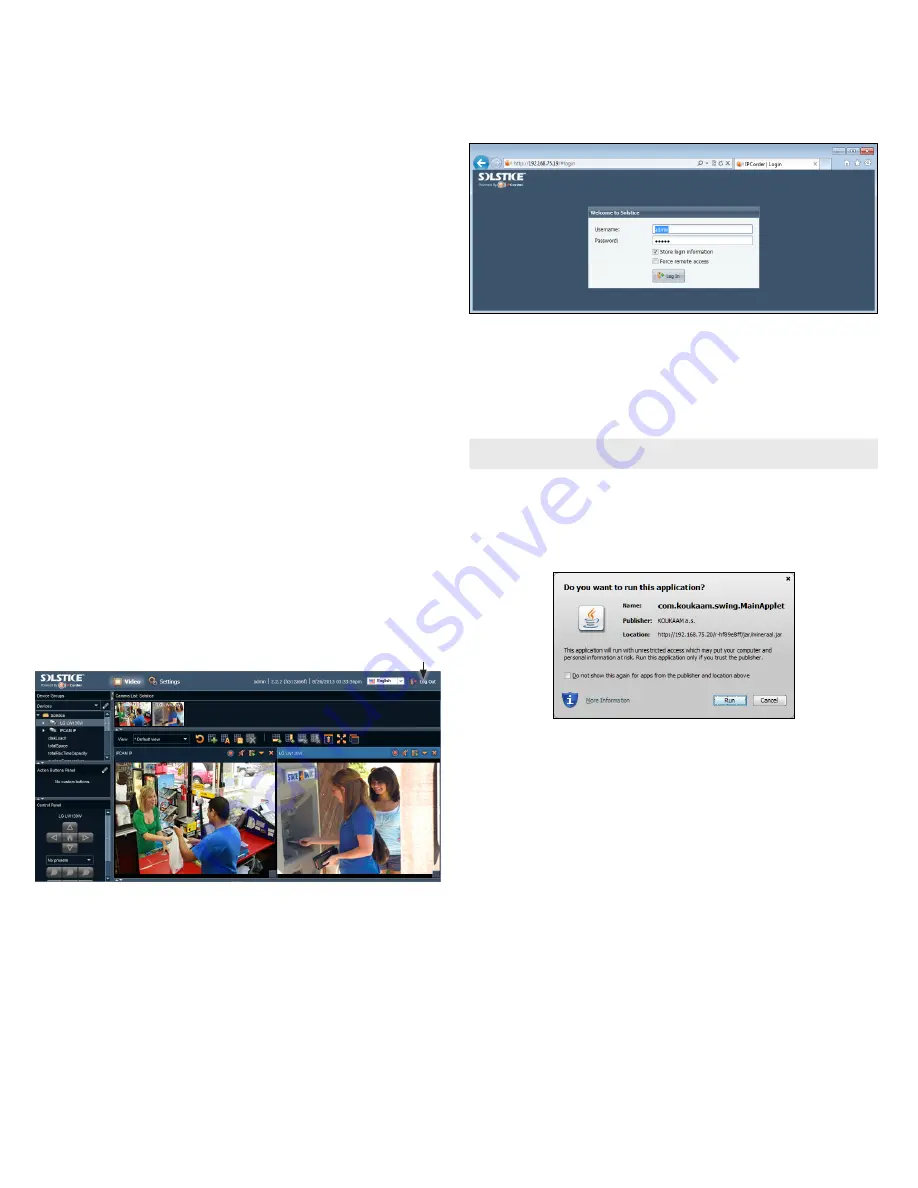
Step 10.  Logging out of the NVR

You can log out of the NVR at from any screen by clicking the 

Log Out

 button in the upper-right corner of 

the window. The browser will return to the NVR Log In screen. 

Log Out button

Typical Solstice NVR Video window

Step 11.  Logging into of the NVR

If your computer is on the same local network (subnet) as your Solstice NVR, you can log into the NVR by 
using the IP address of the NVR as the URL. In the example below, the IP address of the NVR is:  

192.168.75.19

.

If you are outside the local network, and the router of the LAN where your NVR is installed is reachable 
from your computer, you can usually assign a port in the router that will forward a connection through to 
(the local IP local address of) your NVR. In this configuration, the URL for your browser is in the form:  
 

<router IP address> : <port>.  


where <router IP address> is the IP address of the router of the LAN where the NVR is  


installed, and <port> is the router port number assigned to the IP address on the NVR. 

NOTE

The port number cannot be 80 or any port used by other equipment on the LAN. For more 
information, refer to the documentation for your router, or internet sources on “port forwarding”. 

If the connection to the NVR is successful, a login window will open. Enter your Username and Password, 
then click 

Log In

. The default administrative Username and Password is 

admin

 and 

admin

During the initialization process, a pop-up window similar to the follow will open. Click 

Run

 to continue 

and open the Solstice NVR Video window. 

Содержание SLS-ENVR2016 Series

Страница 1: ...ecord and playback video from up to 16 IP cameras It is very easy to install and use Your SLS ENVR2016 product includes components shown in the picture below Software CD SLS ENVR16 NVR Ethernet cable Quick Setup Guide Power adapter with cable HDD extractor What you need Your SLS ENVR2016 NVR hardware is pre configured with HDD s If you want to change the HDD or configure it differently RAID option...

Страница 2: ...Power on your computer and allow it to boot up 2 Insert the software CD provided with your NVR into the optical drive and allow it to initialize autorun The screen shown below should open 3 If Java is not loaded on your computer click the Download Java button on the Solstice window then follow the on screen instructions to install it 4 On the Solstice window click the Start Discover button 5 In th...

Страница 3: ...OTE IfyouchangethenetworksettingsoftheNVR theConfigurationWizardmayleadyoutorepeatsome stepscompletedpreviously 8 In the Configuration Wizard E mail configuration frame enter the SMTP settings and other e mail options to automatically send e mail when events occur recommended Click Apply and Continue The example below shows the setup for an account with all notifications selected 9 In the Configur...

Страница 4: ...R as an administrator click the Settings option in the header of the screen 2 In the right pane click Start Discover Compatible devices discovered on the network will be listed in the right frame 3 For each camera discovered on the network that you want to add to the NVR system check the select box to the left of the IP address then enter the appropriate information required in the configuration m...

Страница 5: ...you can edit the default preset schedules 4 Click Apply 5 Click Devices in the left frame then in the right pane click the Device Status button 6 Check the device select box to the left of the IP address of the camera you want to record then click the Video tab in the frame below Device select box Video tab a In the Video tab click the Add Recording Mode icon to configure a scheduled recording mod...

Страница 6: ...ols Video is shown in the view frame s you assigned to the camera s used to make the recordings Click the pause icon to Stop 3 To mark a segment of the time line for repeated playback or export a Click the Expand icon to expand the timeline This enables a more precise selection of a video segment to play or export b Place the mouse pointer over the timeline at the start of a video segment you want...

Страница 7: ... Otherwise go to Step 9 1 Click the Settings option in the header of the screen then click Configuration and then Network to open the Network menu Entries in the Network menu are identical to those in the initial Configuration Wizard menu step 5 of 7 except that it includes options to configure the second Backup network interface port 2 Select network settings as needed Fields in the Network menu ...

Страница 8: ...dependent server or IP device to the IP address list Check interval ms This sets the interval for checking availability of the connection This interval is used for both types of failure detection The default interval size is 100 ms 3 After making changes click Apply Step 10 Logging out of the NVR You can log out of the NVR at from any screen by clicking the Log Out button in the upper right corner...

Отзывы: