


5
SLS-ENVR2016 NVR Quick Setup Guide
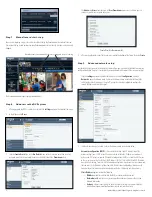
Step 5. Setting recording options
1. Click the
Settings
option in the header of the screen.
2. In the left frame, click
Schedules
to establish the weekly time frame when recording can occur.
In the following example, a time frame named
My schedule
was added to the list of pre-set
schedules included by default in the system.
NOTE
: The default schedules can be modified.
a. Click the
Create Schedule
icon at the top of the right frame, then enter a unique name in the
Schedule Name
entry field. In the example below, the name
My schedule
was entered.
b. Click the
Add Period
icon.
i.
Click In the Day entry field twice to open a drop-down list, then select the option you
prefer.
ii.
The
From
and
To
fields define the start time and end time when recording will occur
on the “Day” selected previously. The To and From fields are in the format HH:MM:SS in
24-hour notation (00:00:00 to 23:59:59). Edit these fields as needed.
c. Click the
Add Period
icon again to enter an additional time segment if needed.
3. Click the
Create
button to save the schedule. Notice that the new schedule is shown in the list in the
left frame.
Note
: you can edit the default preset schedules.
4. Click
Apply
.
5. Click
Devices
in the left frame, then, in the right pane, click the
Device Status
button.
6. Check the device select box to the left of the IP address of the camera you want to record, then click
the
Video
tab in the frame below.
Device select box
Video tab
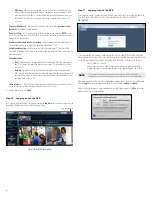
a. In the Video tab, click the
Add Recording Mode
icon to configure a scheduled recording mode.
b. Open the drop-down list to the right of
When to record
, then select the schedule you prefer.
c. Open the drop-down list to the right of
Recording type
, then select either
Off
,
On Trigger
,
or
Permanent
(continuous when scheduled). Selecting On Trigger can open additional options
depending on the features of the device.
d. Open the drop-down list to the right of
Camera Stream
, then select the stream (resolution)
you prefer.
e. You can open the
Advanced Recording Options
and
Advanced Video Options
submenus
by clicking the
q
icons. Edit the fields in those submenus if necessary.
Click to open/close the submenu
7. Click the
Apply
button to complete the recording mode setup for the camera. It may take a few
minutes for the device to fully initialize its recording mode.
8. Setup the recording modes for other cameras in the system as needed.
9. In the
Device Status
tab, verify the
Recording Status
of the devices you configured. See the
following figure.


