background image

45

44

24.  Rimuovere ed eliminare tutti i materiali di imballaggio e tutti 

gli adesivi o etichette prima di mettere in funzione il dispositivo 
per la prima volta.

25.  Prima di ogni utilizzo del ventilatore, controllare che l'unità,  

il cavo di alimentazione e la spina non siano danneggiati.

26.  Per evitare una scossa elettrica, non utilizzare l’apparecchio 

quando il cavo elettrico o la spina sono danneggiati o l’ap-
parecchio presenta ulteriori disturbi, sia caduto od altrimenti 
danneggiato. Non effettuare mai da soli riparazioni, ma por-
tare l’apparecchio presso Solis o presso un punto di servizio 
autorizzato Solis, per esaminarlo, ripararlo o per essere messo 
in funzione meccanicamente od elettricamente.

27.  Persone le cui capacità fisiche, sensoriali o mentali siano ridotte 

o persone inesperte così come bambini non devono utilizzare 
l’apparecchio, a meno che esse abbiano potuto beneficiare, 
attraverso l’intermediazione di una persona responsabile della 
loro sicurezza, di istruzioni riguardanti l’uso dell’apparecchio. 
Inoltre, devono aver capito esattamente i possibili pericoli 
e come il dispositivo possa essere utilizzato in modo sicuro. 
Pulizia e manutenzione dell’apparecchio non devono essere 
eseguiti da bambini senza sorveglianza. Il dispositivo non deve 
essere in alcun caso utilizzato o pulito da bambini sotto gli  
8 anni.

28.  I bambini devono essere sorvegliati per assicurarsi che non 

giochino con l'apparecchio.

29.  Assicurarsi sempre che l’apparecchio sia montato bene, prima 

di mettere in funzione il dispositivo. 

30.  Prima di spostare o pulire l'apparecchio, spegnerlo e atten-

dere sempre che la ventola si sia fermata; Quindi, scollegare il 
cavo di alimentazione dalla presa di corrente. Ciò vale anche 
quando il dispositivo non è in uso.

31.  Prestare particolare attenzione quando bambini, anziani o 

animali sono nelle vicinanze del ventilatore.

12.  Non effettuare nessuna variazione all’apparecchio, cavo elet-

trico, spina od accessorio.

13.  L'uso errato costituisce pericolo di lesioni! In caso di danni o 

lesioni, non può essere assunta alcuna responsabilità.

14.  Non afferrare mai l’apparecchio caduto in acqua. Staccare 

sempre la spina prima di estrarre il dispositivo dall’acqua. Non 
metterlo in funzione se non è stato prima controllato da Solis 
o un centro autorizzato Solis sulla sua funzione e sicurezza.

15.  Non posizionare mai il dispositivo in modo che possa venire 

in contatto con acqua o altri liquidi (ad esempio vicino a una 
piscina).

16.  Non immergere o portare in contatto con acqua o altri liquidi 

il dispositivo o parti dell’apparecchio come cavo di alimentazi-
one, spina o telecomando.

17.  Non posizionare il dispositivo in modo che non sia esposto alla 

luce diretta del sole. 

18.  Non inserire mai oggetti o attrezzi nelle aperture del disposi-

tivo o nella griglia del ventilatore o infilarvi le mani o le dita. Il 
dispositivo potrebbe essere danneggiato e si rischiano scosse 
elettriche e lesioni! Prestare particolare attenzione che bambini 
non tocchino il ventilatore.

19.  Non spruzzare nulla nel ventilatore – neanche spray-insetticida.
20.  Mentre l'unità è in funzione, non spostare o sollevare il ven-

tilatore.

21.  Utilizzare l’apparecchio solo come descritto in questo manuale. 

Utilizzare solo gli accessori in dotazione o consigliati da Solis, 
accessori errati possono danneggiare il dispositivo o provocare 
incendi, scosse elettriche o lesioni a persone.

22.  Non mettere mai in funzione l'apparecchio con un timer 

esterno o un altro telecomando.

23.  L’apparecchio è concepito soltano per l’utilizzo domestico e 

non per un impiego commerciale.

Содержание 7582

Страница 1: ...BREEZE 360 Typ Type Tipo 7582 S I N C E 1 9 0 8 Bedienungsanleitung Mode d emploi Istruzioni per l uso User Manual Gebruiksaanwijzing ...

Страница 2: ...ätzlichen Schutz bei der Verwendung von elektrischen Geräten zu gewährleisten Es ist ratsam einen Sicherheitsschalter mit einem Nennfehlerbetriebsstrom von maximal 30 mA zu verwenden Fachmännischen Rat erhalten Sie bei Ihrem Elektriker WICHTIGE SICHERHEITSHINWEISE Bitte lesen Sie vor Gebrauch Ihres Solis Standventilators Breeze 360 diese Bedienungsanleitung aufmerksam durch damit Sie Ihr Gerät ken...

Страница 3: ...en damit sie nicht mit dem Standventilator spielen 29 Stellen Sie sicher dass der Solis Ventilator korrekt zusammen gebaut ist bevor Sie ihn in Betrieb nehmen 12 Nehmen Sie keine Änderungen am Gerät Kabel Stecker oder am Zubehör vor 13 Bei unsachgemässem Gebrauch besteht Verletzungsgefahr Für evtl auftretende Schäden oder Verletzungen kann keine Haftung übernommen werden 14 Greifen Sie niemals nac...

Страница 4: ...ufhalten 32 Der Luftstrom des Ventilators sollte nicht direkt auf ältere oder kranke Personen bzw auf Kinder oder Haustiere gerichtet sein 33 Entfernen Sie sich niemals vom Standventilator während das Gerät in Betrieb ist 34 Das Gerät und das Zubehör immer sauber halten Beachten Sie dazu die Angaben in dieser Anleitung 35 Legen oder stellen Sie keine Gegenstände auf das Gerät 36 Netzkabel immer ko...

Страница 5: ...tere Mutter 5 Hinteres Schutzgitter 6 Motorwelle am Motorgehäuse 7 Verschlussklemme des Rahmenrings 8 Ventilatorkopf 9 Feststellschraube 10 Standsäule 11 Sockel mit abgewinkelter Schraube 12 Display 13 Bedienfeld mit Funktionstasten 14 Fernbedienung GERÄTEBESCHREIBUNG 1 2 3 4 5 6 7 8 9 10 11 12 13 14 ...

Страница 6: ...des So ckels mit der abgewinkelten Schraube a Abb 1 4 Schieben Sie das untere Ende des Ventilator Gehäuses bis zum Anschlag über die Standsäule fixieren Sie beides mit der Feststellschraube 9 Abb 2 5 Lösen Sie erst die Rotorblatt Mutter 2 und dann die hintere Mutter 4 von der Motorwelle 6 Die Rotorblatt Mutter drehen Sie im Uhrzeigersinn Richtung Loosen ab die hintere Mutter im Gegenuhrzeigersinn ...

Страница 7: ...inden Entfernen Sie als erstes die Schraube an der Verschlussklemme des Rahmenrings mit Hilfe eines Schraubenziehers klappen Sie den Verschluss auf Legen Sie den Rahmenring auf das hintere Schutzgitter Abb 8 die Führungs klammer im Rahmenring gegenüber dem Verschluss muss in einem Draht des hinteren Schutzgitters einrasten Abb 9 Dann muss ringsum jede Führungs vorrichtung des Rahmenrings im hinter...

Страница 8: ...illation in fol genden Winkeln eingestellt werden 0 keine Striche auf dem Display die Oszillation stoppt 60 90 180 360 0 die Oszillation stoppt Durch jeden Druck auf die Taste springt die Einstellung in den nächsten Winkel die Einstellung ist im Display anhand der strahlenförmigen Striche sichtbar 8 Oszillation im 60 Winkel 8 Oszillation im 90 Winkel 8 Oszillation im 180 Winkel 8 Rotation um 360 D...

Страница 9: ...e Geschwindigkeit gewählt so ar beitet das Gerät die ersten 30 Minuten wie im Natur Modus in der hohen Ge schwindigkeit dann die nächsten 30 Minuten wie im Natur Modus mit mittlerer Geschwindigkeit und dann die restliche Zeit im Natur Modus mit niedriger Geschwindigkeit Haben Sie im Schlaf Modus die mittlere Geschwindigkeit gewählt so arbeitet das Gerät die ersten 30 Minuten wie im Natur Modus in ...

Страница 10: ...icht ca 8 6 kg Technische Änderungen vorbehalten DIE FERNBEDIENUNG Generell gilt Die Funktionstasten auf der Fernbedienung entsprechen den Funktionstasten am Bedienfeld des Ventilators allerdings können Sie mit der Taste den Oszillations winkel resp die Rotation um 360 wählen Diese Taste gibt es nur auf der Fernbedienung Am Gerät selbst wird der Oszillationswinkel resp die Rotation um 360 durch wi...

Страница 11: ...nzeichnet Solis of Switzerland AG behält sich das Recht vor jederzeit technische und optische Veränderungen sowie der Produktverbesserung dienliche Modifikationen vorzu nehmen SOLIS HELPLINE 091 802 90 10 Nur für Kundinnen und Kunden in der Schweiz Dieser Artikel zeichnet sich durch Langlebigkeit und Zuverlässigkeit aus Sollte aber trotzdem einmal eine Funktionsstörung auftreten rufen Sie uns einf...

Страница 12: ...seillons d utiliser un interrupteur de sécurité avec une sen sibilité différentielle de maximum 30 mA Demandez conseil à votre électricien CONSIGNES DE SECURITE IMPORTANTES Merci de lire ce mode d emploi attentivement avant la pre mière utilisation afin de vous familiariser avec votre ventila teur à pied Solis Breeze 360 et de l utiliser en toute sécu rité Nous vous conseillons de conserver ce mod...

Страница 13: ...s du ventilateur 32 N orientez pas le ventilateur en direction de personnes ma lades ou âgées d enfants ou d animaux domestiques 33 Ne vous éloignez jamais du ventilateur lorsqu il est en marche 12 N apportez aucune modification à l appareil au cordon à la prise ou aux accessoires 13 Risque de blessures en cas d utilisation inappropriée Nous déclinons toute responsabilité pour tous les dommages ou...

Страница 14: ...a aux consignes indiquées dans le mode d emploi 35 Ne placez jamais d objets sur l appareil 36 Déroulez complètement le cordon électrique avant de le bran cher dans la prise secteur 37 Débranchez toujours l appareil après chaque utilisation Seul débranché l appareil est entièrement éteint ...

Страница 15: ...rière 5 Grille de protection arrière 6 Arbre moteur sur le châssis du moteur 7 Bride d arrêt de la bague 8 Tête du ventilateur 9 Vis de fixation 10 Pied 11 Socle avec vis angulaire 12 Écran 13 Tableau de commande avec touches de fonction 14 Télécommande DESCRIPTION DE L APPAREIL 1 2 3 4 5 6 7 8 9 10 11 12 13 14 ...

Страница 16: ... extrémité inférieure du châssis du ventilateur jusqu à la butée dans l autre extrémité du pied fixez les deux au moyen de la vis de fixation 9 ill 2 5 Dévissez tout d abord l écrou de l hélice 2 puis l écrou arrière 4 de l arbre moteur 6 Tournez l écrou de l hélice dans le sens des aiguilles d une montre en direction de Loosen et l écrou arrière dans le sens inverse des aiguilles d une montre en ...

Страница 17: ...rille de protection avant Retirez tout d abord la vis située sur la bride d arrêt de l anneau à l aide d un tournevis soulevez la bride d arrêt pour l ouvrir Placez l anneau sur la grille de protection arrière ill 8 le crampon situé sur l anneau en face de la bride doit s enclencher dans un fil de la grille de protection arrière ill 9 Tous les dispositifs de guidage de l anneau doivent alors s enc...

Страница 18: ... horizontale automatique peut être pro grammée avec les angles suivants 0 pas de trait sur l écran l oscillation est inter rompue 60 90 180 360 0 l oscillation s arrête A chaque fois que vous appuyez sur la touche la programmation passe sur le prochain angle et peut être contrôlée sur l écran grâce aux traits en forme de rayons 8 oscillation avec un angle de 60 8 oscillation avec un angle de 90 8 ...

Страница 19: ...vitesse élevée puis pendant les prochaines 30 minutes de la même manière qu en mode nature sur la vitesse moyenne et enfin pendant le reste du temps de la même manière qu en mode nature sur la vitesse faible Si vous avez sélectionné la vitesse moyenne sur le mode sommeil l ap pareil fonctionne pendant les 30 premières minutes de la même manière qu en mode nature sur la vitesse moyenne puis pendant...

Страница 20: ... Sous réserve de modification technique LA TELECOMMANDE D une manière générale Les touches de fonction de la télécommande corres pondent aux touches de fonction du tableau de com mande du ventilateur toutefois vous pouvez également sélectionner l angle d oscillation ou la rotation à 360 avec la touche Cette touche ne se trouve que sur la télécommande Sur l appareil lui même il est possible de séle...

Страница 21: ...isation et le recyclage des composants ainsi que des économies d énergie et de matières premières significatives Afin d attirer clairement l attention sur l obligation d élimination réglementaire de l appareil celui ci porte un symbole représentant un conteneur à ordures barré Solis of Switzerland SA se réserve le droit d apporter à tout moment des modifica tions techniques et de présentation ains...

Страница 22: ...terruttore di sicurezza con un nominale di impiego di corrente residua di un massimo di 30 mA Un consiglio da esperto Lei lo riceve dal Suo elettricista NORME DI SICUREZZA IMPORTANTI Leggere per cortesia attentamente prima dell uso del Suo ventilatore Breeze 360 questi istruzioni per l uso in modo che Lei conosca bene il Suo apparecchio e possa utilizzarlo in modo coretto Le consigliamo di conserv...

Страница 23: ...alla presa di corrente Ciò vale anche quando il dispositivo non è in uso 31 Prestare particolare attenzione quando bambini anziani o animali sono nelle vicinanze del ventilatore 12 Non effettuare nessuna variazione all apparecchio cavo elet trico spina od accessorio 13 L uso errato costituisce pericolo di lesioni In caso di danni o lesioni non può essere assunta alcuna responsabilità 14 Non afferr...

Страница 24: ... è in funzione 34 Tenere sempre l apparecchio e gli accessori puliti Fare riferi mento alle istruzioni riportate in questo manuale 35 Non collocare o appoggiare nulla sull unità 36 Srotolare sempre completamente il cavo di alimentazione prima di collegarlo alla presa di corrente 37 Dopo l uso scollegare sempre il cavo di alimentazione solo così il dispositivo è completamente spento ...

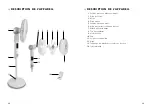
Страница 25: ...re 5 Griglia di protezione posteriore 6 Albero del rotore nell alloggiamento del motore 7 Linguetta di fissaggio dell anello 8 Testa del ventilatore 9 Vite di bloccaggio 10 Piantana 11 Base con vite angolata 12 Display 13 Pannello di controllo con i tasti funzione 14 Telecomando DESCRIZIONE DEL DISPOSITIVO 1 2 3 4 5 6 7 8 9 10 11 12 13 14 ...

Страница 26: ...della base Fig 1 4 Far scorrere l estremità inferiore dell alloggiamento del ventilatore sopra la pian tana fino alla battuta e fissare con la vite di bloccaggio 9 Fig 2 5 Prima allentare il dado della ventola 2 e quindi il dado posteriore 4 dall albero motore 6 Svitare il dado della ventola in senso orario direzione Loosen e il dado posteriore in senso antiorario direzione Loosen 6 Far scorrere l...

Страница 27: ...nnanzitutto rimuovere la vite della linguetta di bloccaggio sull anello di fissaggio per mezzo di un cacciavite quindi aprire il fermo Posizionare l anello di fissaggio sulla griglia di protezione posteriore Fig 8 la staffa di guida nell anello di fissaggio opposta alla serratura deve ingranarsi in un filo della griglia di protezione posteriore Fig 9 In seguito ogni dispositivo di guida dell anell...

Страница 28: ... anticipatamente Con il tasto di oscillazione può essere impostata l oscillazione orizzontale ai seguenti angoli 0 nessun trattino sul display l oscillazione si arresta 60 90 180 360 0 l oscillazione si arresta Ogni volta che si preme il tasto l im postazione salta all angolo successivo l impostazione sarà visibile sul display tramite i trattini a raggio 8 Oscillazione a 60 8 Oscillazione a 90 8 O...

Страница 29: ...naturale Se nella modalità sleep è stata scelta la velocità alta il dispositivo lavorerà i primi 30 minuti come nella modalità natura ad alta velocità poi nei 30 minuti successivi come nella modalità natura a media velocità e il tempo rimanente nella modalità natura a bassa velocità Se nella modalità sleep è stata scelta la velocità media il dispositivo la vorerà i primi 30 minuti come nella modal...

Страница 30: ...on riserva di modifiche tecniche IL TELECOMANDO Generalmente vale I tasti funzione del telecomando corrispondono ai tasti funzione del pannello di controllo del ventilatore tutta via è possibile utilizzare il tasto per regolare l angolo di oscillazione risp selezionare la rotazione di 360 Questo tasto è disponibile solo sul telecomando Sul di spositivo stesso l angolo di oscillazione risp la rotaz...

Страница 31: ...ntrassegnato con un simbolo di un contenitore di rifiuti barrato Solis of Switzerland SA si riserva il diritto di apportare in qualsiasi momento modifiche tecniche ed estetiche nonché modifiche atte a migliorare il prodotto SOLIS HELPLINE Solo per i clienti in Svizzera Questo articolo si contraddistingue per la sua lunga durata ed affidabilità Se dovessero presentarsi dei problemi di funzionamento...

Страница 32: ...e risk of injury No liability is assumed in the case of potential damages or injuries IMPORTANT SAFETY PRECAUTIONS Please read through this user manual thoroughly before us ing your Solis floor standing fan Breeze 360 so that you become familiar with your appliance and can use it safely We thoroughly recommend that you keep these instructions and if you pass the appliance on that you also hand the...

Страница 33: ...y then the appliance is fully switched off 14 Never take hold of an appliance that has fallen into water or another liquid Always pull the power plug before removing it Do not use the appliance again until you have had it s ability to function safely checked by Solis or a Solis approved service centre 15 Never place the appliance in such a way that it might fall into water or come into contact wit...

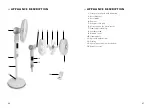
Страница 34: ...de 4 Rear nut 5 Rear protection grid 6 Motor shaft on the motor chassis 7 Frame ring locking clip 8 Ventilator head 9 Blocking screw 10 Standing post 11 Base with angled screw 12 Display 13 Control panel with function buttons 14 Remote control APPLIANCE DESCRIPTION 1 2 3 4 5 6 7 8 9 10 11 12 13 14 ...

Страница 35: ...the base with the angled screw a Fig 1 4 Push the lower end of the ventilator chassis all the way onto the standing post and fasten both parts with the blocking screw 9 Fig 2 5 Unscrew first the rotor blade nut 2 and then the rear nut 4 from the mo tor shaft 6 The rotor blade nut has to be unscrewed clock wisely towards Loosen the rear nut has to be unscrewed counter clock wisely towards Loosen 6 ...

Страница 36: ...tection grid with the front protection grid First remove the screw on the locking clip with a screwdriver and open the clip Place the frame ring on the rear protection grid fig 8 the guidance clip in the frame ring opposite the clip has to lock onto a wire of the rear protection grid fig 9 Then each guidance jig on the frame ring has to lock onto the rear protection grid Therefore you should push ...

Страница 37: ... horizontal oscillation can be set to the following angles with the oscillation button 0 no lines on the display the oscillation stops 60 90 180 360 0 oscillation stops By each press of the button the setting jumps to the next angle The setting can be read off the display by the beam shaped lines 8 Oscillation at a 60 angle 8 Oscillation at a 90 angle 8 Oscillation at a 180 angle 8 360 rotation TH...

Страница 38: ...tes For the next 30 minutes it works like it does in the Nature mode with the medium speed setting and then in the Nature mode with the low speed setting for the remaining time If you have selected the medium speed in Sleep mode the appliance works like it does in the Nature mode with the medium speed setting for the first 30 minutes and then in the Nature mode with the low speed setting for the r...

Страница 39: ...eight ca 8 6 kg Technical changes reserved THE REMOTE CONTROL Generally The function buttons on the remote control correspond to the function buttons on the control panel of the fan however the button can be used to choose the os cillation angle resp the 360 rotation This button can only be found on the remote control On the appliance itself the oscillation angle resp the 360 rotation can be selec...

Страница 40: ...arked with a crossed out dustbin Solis of Switzerland Ltd reserves the right to carry out technical and visual changes and modifications to improve the product at any time SOLIS HELPLINE Only for customers in Switzerland This item stands out due to its long life cycle and reliability Despite this though if a malfunction ever occurs simply give us a call Often a breakdown can be easily and quickly ...

Страница 41: ... van elektrische apparaten Het is raadzaam om een veiligheidsschakelaar te gebruiken met een nominale reststroom van maximaal 30 mA Neem voor deskundig advies contact op met uw elektricien BELANGRIJKE VEILIGHEIDSINFORMATIE Lees voor u de Solis staande ventilator Breeze 360 in ge bruik neemt aandachtig deze gebruiksaanwijzing door om het apparaat te leren kennen en veilig te kunnen bedienen Wij rad...

Страница 42: ...schakelen en wachten tot de ventilator volledig tot stilstand is gekomen Haal vervolgens de stekker uit het stopcontact Dit geldt ook wanneer het apparaat niet wordt gebruikt 12 Voer geen wijzigingen uit aan het apparaat het snoer de stekker en de accessoires 13 Onjuist gebruik kan tot lichamelijk letsel leiden Wij zijn niet aansprakelijk voor eventueel geleden schade of verwondingen 14 Probeer no...

Страница 43: ...eren worden gericht 33 Loop nooit weg van een werkende staande ventilator 34 Houd het apparaat en de accessoires altijd schoon Raadpleeg de informatie in deze gebruiksaanwijzing 35 Leg of plaats geen voorwerpen op het apparaat 36 Rol het snoer altijd helemaal uit voordat u de stekker in het stopcontact steekt 37 Trek na elk gebruik altijd de stekker uit het stopcontact Pas dan is het apparaat hele...

Страница 44: ...rste moer 5 Achterste beschermrooster 6 Motoras aan motorbehuizing 7 Vergrendelingsklem van de framering 8 Ventilatorkop 9 Vastzetschroef 10 Staander 11 Sokkel met gebogen schroef 12 Display 13 Bedieningspaneel met functietoetsen 14 Afstandsbediening APPARAATBESCHRIJVING 1 2 3 4 5 6 7 8 9 10 11 12 13 14 ...

Страница 45: ...ien in de onder kant van de sokkel Afb 1 4 Schuif het onderste uiteinde van de ventilatorbehuizing tegen de aanslag over de staander Bevestig beide delen met de vastzetschroef 9 Afb 2 5 Draai eerst de moer van het rotorblad los 2 en vervolgens de achterste moer 4 van de motoras 6 Schroef de moer van het rotorblad rechtsom richting Loosen los en de achterste moer linksom richting Loosen los 6 Schui...

Страница 46: ...r Gebruik een schroevendraaier om de schroef van de vergren delingsklem van de framering te verwijderen en klap de vergrendeling omhoog Leg de framering op het achterste beschermrooster afb 8 De geleidingsklem in de framering tegenover de vergrendeling moet in een draad van het achter ste beschermrooster worden bevestigd afb 9 Vervolgens moet linksom elke geleiding van de framering in het achterst...

Страница 47: ...matische horizontale oscillatie in de volgende hoeken worden ingesteld 0 geen streepjes op het display de oscillatie stopt 60 90 180 360 0 de oscillatie stopt Met elke druk op de knop springt de instelling naar de eerstvolgende hoek en is hij aan de hand van de straalvormige streepjes op het display zichtbaar 8 Oscillatie in 60 hoek 8 Oscillatie in 90 hoek 8 Oscillatie in 180 hoek 8 Rotatie om 360...

Страница 48: ...in slaapmodus geselecteerd dan werkt het apparaat gedurende de eerste 30 minuten zoals in de natuurmodus op hoge snelheid vervolgens 30 minuten zoals in de natuurmodus op middelste snelheid en vervolgens de resterende tijd in natuurmodus op lage snelheid Heeft u de middelste snelheid in slaapmodus geselecteerd dan werkt het apparaat gedurende de eerste 30 minuten zoals in natuurmodus op middelste ...

Страница 49: ...okkel Gewicht ca 8 6 kg Technische wijzigingen voorbehouden DE AFSTANDSBEDIENING Algemeen geldt De functieknoppen op de afstandsbediening komen overeen met de functieknoppen op het bedienings paneel van de ventilator Daarnaast kunt u met de knop een oscillatiehoek of rotatie van 360 selecteren De knoppen bevinden zich alleen op de afstandsbediening Op het apparaat zelf worden de oscillatiehoek en ...

Страница 50: ...an een doorgekruiste afvalbak afgebeeld Solis of Switzerland AG behoudt zich het recht voor om te allen tijde technische en optische wijzigingen en modificaties uit te voeren om zijn producten te verbeteren SOLIS HELPLINE 091 802 90 10 Nur für Kundinnen und Kunden in der Schweiz Dieser Artikel zeichnet sich durch Langlebigkeit und Zuverlässigkeit aus Sollte aber trotzdem einmal eine Funktionsstöru...

Отзывы: