PRODUCT MANUAL
LEDWizard Tablet and Smartphone LED
Control System w/ Optional Remote
SolidApollo.com
™
Tel. 425.582.7533
Toll Free. 866-592-3873
www.SolidApollo.com
page 2
LEDWizard Wi-Fi Control System
page 2
Connecting Lights to the Receiver:
RECEIVER:
There are 2 covers on the receiver attached by screws. Remove the screws to access the “Screw Down Connectors” where you will be inserting the wires.
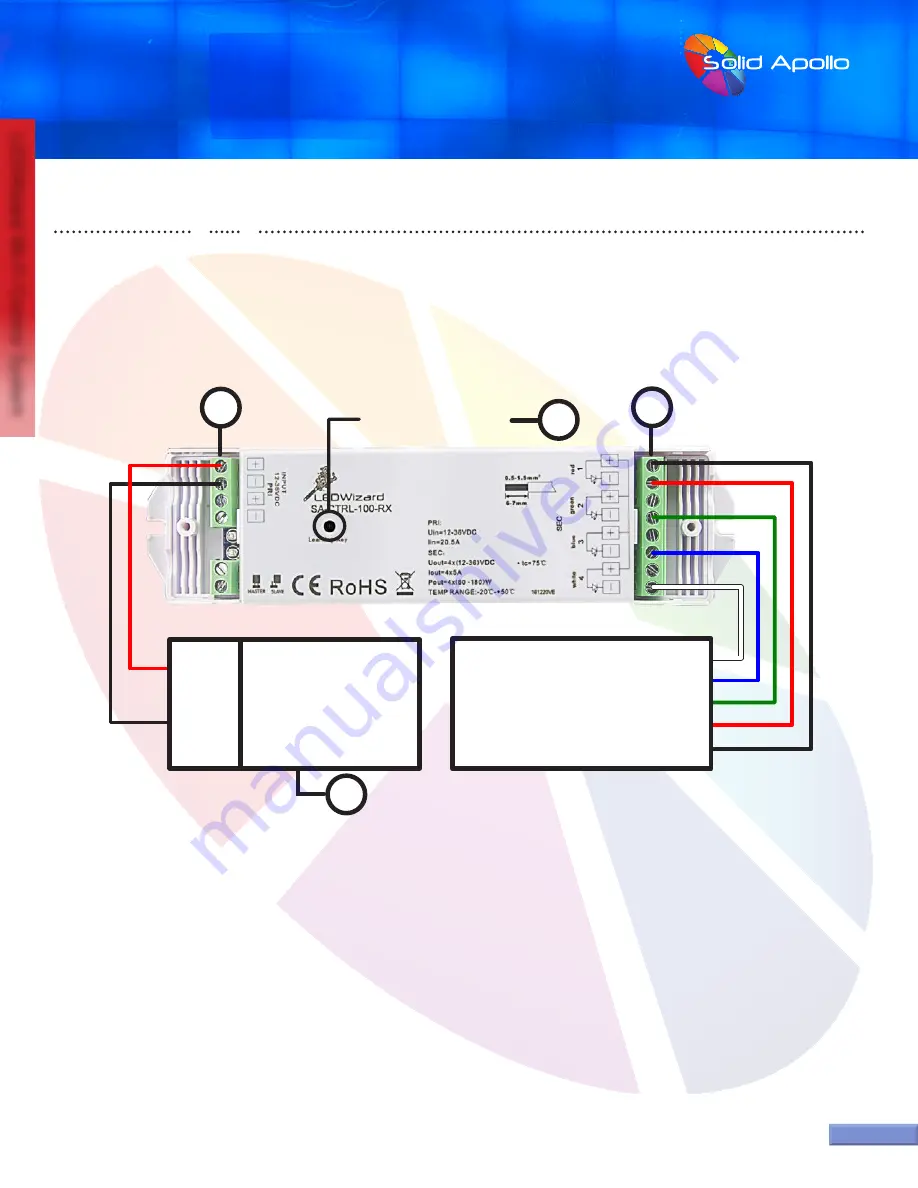
See receiver chart 1 for the following points:
1. DC Input Location- This area is where you would insert your choice of power supply wires of 12-36V DC.
2. Learning Button-This button is used to synchronize the receiver to a specific zone. Each time you install a new receiver or you reset the receiver,
the learning button has to be used again. Press for one second to synchronize to an optional remote and 15 seconds to reset the unit to factory
default (Do this to reassign the unit or to reset it in case of There is any synchronizing issues.
3. Outputs for the RGB color Changing LED lights- Connect the positive to the top + (positive) output, then connect the rest of the wires (3) to their
corresponding colors.
*Please Note: Corresponding colors should be inserted on the negative side, not positive, as shown above.
4. Power Supply to Input (Power Supply not included)- Always makes sure that you use the correct Power Supply that will be able to supply
enough power to your system.
If uncertain, please contact Solid Apollo.
Power Supply
12-36V DC
(V-)
Black
(V+)
Red
RGB
LED Lights
( 120W Max.
Per Channel )
(Green-)
(Blue-)
(Red-)
(V+)
(White-)
Learning Key
Chart 1:
1
4
3
2
Solid Apollo’s Smart Phone and Tablet control system includes Software, 1x receiver with 4 Outputs:
Red, Green, Blue and White. This receiver connects wirelessly to the included router, and the router to the Smartphone or the Tablet control
system. The smart receiver can be assigned to any of the 8 available zones. Inside each zone there can be as many receivers as needed.


