background image

Dyaco Canada Inc

.2013


-3-


IMPORTANT 

ELECTRICAL INFORMATION


WARNING! 

NEVER 

use a ground fault circuit interrupt (GFCI) wall outlet with this treadmill. As with 

any appliance with a large motor, the GFCI will trip often. Route the power cord away from 
any moving part of the treadmill including the elevation mechanism and transport wheels. 

NEVER 

remove any cover without first disconnecting AC power. If voltage varies by ten 

percent (10%) or more, the performance of your treadmill may be affected. Such conditions 
are not covered under your warranty. If you suspect the voltage is low, contact your local 
power company or a licensed electrician for proper testing.


NEVER

 expose this treadmill to rain or moisture. This product is 

NOT

 designed for use 

outdoors, near a pool or spa, or in any other high humidity environment. The maximum 
operating temperature specification is 40 degrees c, and humidity is 95% 
non-condensing (no water drops forming on surfaces).   

Circuit Breakers

: Some circuit breakers used in homes are not rated for high inrush 

currents that can occur when a treadmill is first turned on or even during use. If your 
treadmill is tripping the house circuit breaker (even though it is the proper current rating) 
but the circuit breaker on the treadmill itself does not trip, you will need to replace the 
home breaker with a high inrush type. This is not a warranty defect.This is a condition 
we as a manufacture have no ability to control. This part is available through most 
electrical supply stores. Examples: Grainger part # 1D237, or available online at 

www.squared.com 

part # QO120HM. 

GROUNDING 

INSTRUCTIONS 

This product must be grounded. If the treadmill should malfunction or breakdown, 
grounding provides a path of least resistance for electric current, reducing the risk of 
electric shock. This product is equipped with a cord having an equipment-grounding plug. 
The plug must be plugged into an appropriate outlet that is properly installed and 
grounded in accordance with all local codes and ordinances. 

DANGER


- Improper connection of the equipment-grounding conductor can 

result in a risk of electric shock. Check with a qualified electrician or serviceman if 
you are in doubt as to whether the product is properly grounded. Do not modify the 
plug provided with the product if it will not fit the outlet; have a proper outlet 
installed by a qualified electrician.


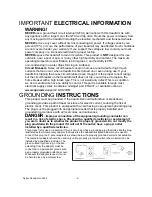
This product is for use on a nominal 110-volt circuit, and has a grounding plug that looks like the plug 
illustrated below. A temporary adapter that looks like the adapter illustrated below may be used to 
connect this plug to a 2-pole receptacle as shown below if a properly grounded outlet is not available. 
The temporary adapter should be used only until a properly grounded outlet, (shown below) can be 
installed by a qualified electrician. The 
green colored rigid ear-lug, or the like, 
extending from the adapter, must be 
connected to a permanent ground such 
as a properly grounded outlet box cover. 
Whenever the adapter is used, it must 
be held in place by a metal screw. 


Содержание F60 16810360

Страница 1: ...OWNER S MANUAL Model 16810360 PLEASE CAREFULLY READ THIS ENTIRE MANUAL BEFORE OPERATING YOUR NEW TREADMILL ...

Страница 2: ...tructions 4 Important Safety Instructions 5 Assembly Pack Checklist 6 Assembly Instructions 8 Folding Instructions 11 Transport Instructions 11 Operation of Your Treadmill 12 Programmable Features 16 General Maintenance 23 Service Checklist Diagnosis Guide 26 Exploded View Diagram 28 Parts List 29 Manufacturer s Limited Warranty 33 ...

Страница 3: ... 888 707 1880 If you purchased this fitness product from Sears they will be your contact for all service needs To contact Sears for any service issues call 1 800 4 MY HOME 1 800 469 4663 Please take a moment at this time to record below the name of the dealer their telephone number and the date of purchase for easy contact in the future We appreciate your confidence in SOLE and we will always reme...

Страница 4: ...away from all moving parts Never operate the treadmill if it has a damaged cord or plug If the treadmill is not working properly call your dealer Keep the cord away from heated surfaces Do not operate where aerosol spray products are being used or where oxygen is being administered Sparks from the motor may ignite a highly gaseous environment Never drop or insert any object into any openings Do no...

Страница 5: ...no ability to control This part is available through most electrical supply stores Examples Grainger part 1D237 or available online at www squared com part QO120HM GROUNDING INSTRUCTIONS This product must be grounded If the treadmill should malfunction or breakdown grounding provides a path of least resistance for electric current reducing the risk of electric shock This product is equipped with a...

Страница 6: ...e on console control keys They are precision set to function properly with little finger pressure SAFETY TETHER CORD A safety tether cord is provided with this unit It is a simple magnetic design that should be used at all times It is for your safety should you fall or move too far back on the tread belt Pulling this safety tether cord will stop tread belt movement T o Use 1 Place the magnet into ...

Страница 7: ... shipping strap please make sure the treadmill is positioned flat on the ground in the orientation it would be in if you were using the treadmill Do not turn the treadmill up on its side while removing the shipping strap This could cause the treadmill s folding mechanism to spring open If the end of the Velcro strap that you need to grab to remove it happens to be under the treadmill deck reach un...

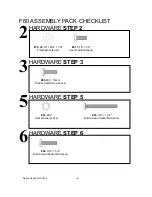
Страница 8: ...HARDWARE STEP 3 HARDWARE STEP 5 HARDWARE STEP 6 2 76 Ø5 16 Ø18 1 5T Flat Washer 8 pcs 3 95 M5 15m m Phillips Head Screw 6 pcs 5 93 Ø10 Split Washer 4 pcs 6 96 5 16 3 4 Button Head Socket Bolt 4pcs 94 3 8 1 1 2 Button Head Socket Bolt 4pcs 97 5 16 1 2 Hex Head Bolt 8pcs ...

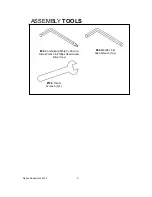
Страница 9: ...Dyaco Canada Inc 2013 7 ASSEMBLY TOOLS 98 Combination M5 25 90m m Allen Wrench Phillips Head Screw Driver 1pc 100 13m m Wrench 1pc 99 M6 68 88 Allen Wrench 1pc ...

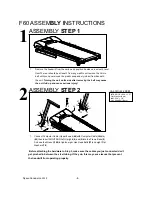
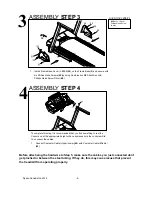
Страница 10: ...jury ASSEMBLY STEP 2 1 Connect Computer Cable Upper Lower 44 with Computer Cable Middle 43 then Insert RiGHT AND Left Uprights 4 and 5 into the Frame Base 2 And use the Wrench 100 to tighten eight Hex Head Bolts 97 and eight Flat Washers 76 Before attaching the hardware to Step 3 make sure the cables you just connected don t get pinched in between the steel tubing If they do this may cause issues ...

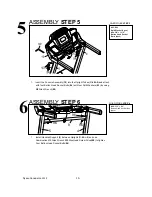
Страница 11: ...nd something to rest the Console on at the appropriate height or have someone hole the console while You connect the cables 1 Connect Computer Cable Upper Lower 44 with Computer Cable Middle 43 Before attacheing the hardware to Step 5 make sure the cables you just connected don t get pinched in between the steel tubing If they do this may cause issues that prevent the treadmill from operating prop...

Страница 12: ...it Washers 93 by using M6 Allen Wrench 99 ASSEMBLY STEP 6 AI 1 Install Handrail Support 9 between Uprights R 4 L 5 and use Combination M5 Allen Wrench Phillips Head Screw Driver 98 to tighten Four Button Head Socket Bolts 96 5 93 Ø10 Split Washer 4 pcs 94 3 8 1 1 2 Button Head Socket Bolts 4pcs HARDWARE STEP 5 6 96 96 96 4 5 9 96 5 16 3 4 Button Head Socket Bolt 4pcs HARDWARE STEP 6 ...

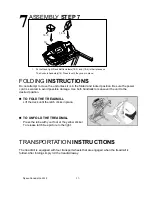
Страница 13: ...e power cord is secured to avoid possible damage Use both handrails to maneuver the unit to the desired position TO FOLD THE TREADMILL Lift the deck until the latch clicks in place TO UNFOLD THE TREADMILL Press the tube with your foot at the yellow sticker To release latch See picture to the right TRANSPORTATION INSTRUCTIONS The treadmill is equipped with four transport wheels that are engaged whe...

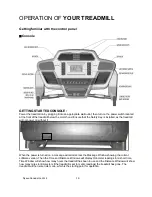
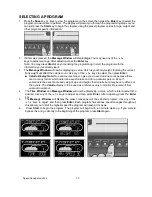
Страница 14: ...ed as the treadmill will not power on without it When the power is turned on a message will scroll across the Message Window showing the current software version Then the Time and Distance Windows will display Odometer readings for a short time Time Window will show how many hours the treadmill has been in use and the Distance Window will show how many miles or Kilometers if the treadmill is set t...

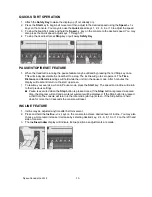
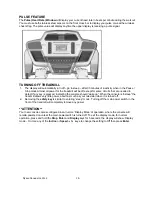
Страница 15: ... readings will hold while the unit is in the pause mode After 5 minutes the display will reset and return to the start up screen 2 To resume your exercise when in Pause mode press the Start key The speed and incline will return to their previous settings Pause is executed when the Stop button is pressed once If the Stop button is pressed a second time the program will end and a workout summary wil...

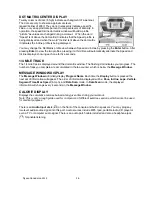
Страница 16: ...4 mile track is displayed around the dot matrix window The flashing dot indicates your progress The number of laps you complete are accumulated in the lap counter which is below the Message Window MESSAGE WINDOW DISPLAY The Message Window will initially display Program Name Each time the Display button is pressed the next set of information will appear The order of information displayed will be Pa...

Страница 17: ...at are needed to detect if any key is pressed indicating the console should wake up When the console is asleep the treadmill draws very little power about as much as your television when it is turned off 2 Removing the safety key is similar to entering sleep mode Turning off the main power switch in the front of the treadmill will completely remove any power ATTENTION Your new console comes config...

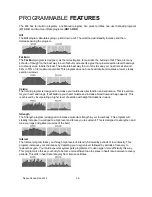
Страница 18: ...se your cardiovascular function and endurance This is exercise for your heart and lungs It will build up your heart muscle and increase blood flow and lung capacity This is achieved by incorporating a higher level of exertion with slight fluctuations in work Strength The Strength program is designed to increase muscular strength in your lower body This program will steadily increase in workload to...

Страница 19: ...ress Enter Calorie Display Note No exercise machine can give you an exact calorie count because there are too many factors which determine exact calorie burn for a particular person Even if someone is the exact same body weight age and height their calorie burn may be very differ ent than yours The Calorie display is to be used as a reference only to monitor improvement from workout to workout 4 T...

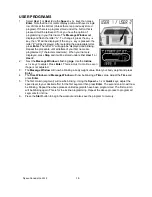
Страница 20: ...s maximum When your name is displayed press Stop and it will be stored under either User 1 or User 2 2 Next the Message Window is flashing Age Use the Incline keys to adjust Press Enter This is a must to continue even if age is not adjusted 3 The Message Window will now be blinking a body weight value Enter your body weight and press Enter 4 The Time Window and Message Window will now be blinking ...

Страница 21: ...o stay in for maximum benefit For someone who is 40 years old their target heart rate zone is calculated 220 40 180 maximum heart rate 180 x 6 108 beats per minute 60 of maximum 180 X 8 144 beats per minute 80 of maximum So for a 40 year old the training zone would be 108 to 144 beats per minute If you enter your age during programming the console will perform this calculation atomatically Enterin...

Страница 22: ...Perception of Effort 6 Minimal 7 Very very light 8 Very very light 9 Very light 10 Very light 11 Fairly light 12 Comfortable 13 Somewhat hard 14 Somewhat hard 15 Hard 16 Hard 17 Very hard 18 Very hard 19 Very very hard 20 Maximal You can get an approximate heart rate level for each rating by simply adding a zero to each rating For example a rating of 12 will result in an approximate heart rate of ...

Страница 23: ...n assures you of proper operation If you wish you may wear the transmitter over a shirt To do so moisten the areas of the shirt that the electrodes will rest upon Note The transmitter is automatically activated when it detects activity from the user s heart Additionally it automatically deactivates when it does not receive any activity Although the transmitter is water resistant moisture can have ...

Страница 24: ...w you are asked to adjust the HR1 or HR2 value The default is 60 HR1 220 age x 60 or 80 HR2 220 age x 80 You may select a higher or lower number also Adjust the number by pressing the Speed keys and press Enter to continue 5 The Time Window and Message Window will now be blinking Adjust the time and press Enter 6 Now you are finished editing the settings and can begin your workout by pressing the ...

Страница 25: ...E THIS TASK BELT ADJUSTMENTS Tread belt Tension Adjustment Belt tension is not critical for most users It is very important though for joggers and runners in order to provide a smooth steady running surface Adjustment must be made from the rear roller with the 6 mm Allen wrench 132 provided in the parts package The adjustment bolts are located at the end of the step rails as shown in the diagram b...

Страница 26: ...way If the belt is too close to the left side then turn the bolt only a 1 4 turn to the right clockwise and wait a few minutes for the belt to adjust itself Continue to make 1 4 turns until the belt stabilizes in the center of the running deck If the belt is too close to the right side turn the bolt counter clockwise The belt may require periodic tracking adjustment depending on use and walking ru...

Страница 27: ...the deck with a clean lint free cloth to remove any dirt Apply the whole tube of lubricant onto the deck surface about 18 inches from the motor cover Squeeze out the contents of the tube across the deck parallel to the motor cover in about a one foot line like toothpaste on a toothbrush The one foot line should be in the middle of the deck at approximately equal distance from both side edges of th...

Страница 28: ...ion on Tread belt Tension Adjust as necessary Motor is not responsive after pressing start If the belt moves but stops after a short time and thedisplay shows LS run calibration If you press start and the belt never moves then the display shows LS contact service Treadmill will only achieve approximately 7 mph but shows higher speed on display This indicates motor should be receiving power to oper...

Страница 29: ...he speed sensor is small and black with a wire connected to it 3 Make sure the sensor is as close as possible to the pulley without touching it You will see a magnet on the face of the pulley make sure the sensor is aligned with the magnet There is a screw that holds the sensor in place that needs to be loosened to adjust the sensor Re tighten the screw when finished MAINTENANCE MENU 1 Press and h...

Страница 30: ...Dyaco Canada Inc 2013 28 EXPLODED VIEW DIAGRAM ...

Страница 31: ...le Bottom Cover 1 19 3 1036019 3 Drink Bottle Holder L 1 19 4 1036019 4 Drink Bottle Holder R 1 19 5 1036019 5 Speaker Iron Net L 1 19 6 1036019 6 Speaker Iron Net R 1 19 7 1036019 7 Speaker Grill Anchor 6 19 9 1036019 9 300m m_Safety Switch Module W Cable 1 19 13 1036019 13 Fan Assembly 1 19 14 1036019 14 300m m_Speaker W Cable 1 19 15 1036019 15 750m m_Speaker W Cable 1 19 16 1036019 16 Amplifie...

Страница 32: ...omputer Cable 1 44 1036044 800m m_Computer Cable Upper 1 45 1036045 300m m_Running Belt Foot Rail 2 46 1036046 715m m_Running Belt Foot Rail 2 47 1036047 Pedal Cover Top 2 48 1036048 Pedal Cover Bottom 16 49 1036049 30 30m m_Square End Cap 2 50 1036050 350m m_Connecting Wire Black 1 51 1036051 Grommet 1 52 1036052 On Off Switch 1 53 1036053 Power Cord 1 54 1036054 Trapezoidal Safety Key 1 55 10360...

Страница 33: ...89 3 5 16 m m_Tapping Screw 10 91 1036091 M5 10m m_Phillips Head Screw 4 92 1036092 Wire Tie Mount 10 93 1036093 Ø10_Split Washer 4 94 1036094 3 8 1 1 2 _Button Head Socket Bolt 4 95 1036095 M5 15m m_Phillips Head Screw 6 96 1036096 5 16 3 4 _Button Head Socket Bolt 4 97 1036097 5 16 1 2 __Hex Head Bolt 8 98 1036098 Combination M5 25 90mm Allen Wrench Phillips 1 99 1036099 M6 66 88 _Allen Wrench 1...

Страница 34: ...5 Ø4 5 Ø25 15T_Rubber Foot Pad 2 126 10360126 Ø6 5 Ø25 10L_Rubber Foot Pad 1 127 10360127 3 8 1 1 2 _ Hex Head Bolt 1 128 10360128 M10 63m m_ Hex Head Bolt 1 129 10360129 M10 8 0T_ Nyloc Nut 1 130 10360130 Space Sleeve 1 132 10360132 4 6m m_Phillips Head Trilobular Screw 2 133 10360133 1200m m_Computer Cable Lower 1 134 10360134 Drink Bottle 1 ...

Страница 35: ...reimbursement period for treadmill not requiring component replacement or treadmill not in ordinary household use 3 Damages caused by services performed by persons other than authorized Dyaco Canada Inc service companies use of parts other than original Dyaco Canada Inc parts or external causes such as corrosion discoloration of paint or plastic alterations modifications abuse misuse accident impr...

Отзывы: