background image

SOLARIS® SMART 54W™

6

INSTALLATION

The fixture is designed for indoor use only and must be used in a dry location with adequate 

ventilation. Ensure that none of the fixture’s ventilation slots are blocked and ensure that the 

fixture is fastened to a secure structure or surface. Do not use the fixture to illuminate sur

-

faces less than 8 m (approx 26ft.) from the fixture.

FASTENING THE FIXTURE TO A FLAT SURFACE

The fixture can be fastened to a hard, fixed, flat surface that is oriented at any angle. Ensure 

that the surface and all fasteners used can support at least 10 times the weight of all fixtures 

and equipment they will support. Fasten the fixture Securely. Do not place it on a surface or 

leave it where it can be moved or fall over. If you install the fixture in a location where it may 

cause injury or damage if it falls, secure it as directed below with a securely anchored safety 

cable that will hold the fixture if the primary fastening method fails.

MOUNTING THE FIXTURE ON A TRUSS

The fixture can be clamped to a truss or similar rigging structure in any orientation. When 

installing the fixture hanging vertically down, you can use an open-type clamp such as a 

G-clamp. When installing in any other orientation, you must use a half-coupler clamp

that completely encircles the truss or pipe circumference. To clamp the fixture to a truss:

1. Check that the rigging structure can support at least 10 times the weight of all fixtures and 

equipment  to be installed on it.

2. Block access under the work area.

3. Working from a stable platform, hang the fixture on the

 truss and  fasten the rigging clamps onto the truss.

4. Secure the fixture with a safety cable as directed below.

5. Check that the head will not collide with other fixtures or objects.

SECURING WITH A SAFETY CABLE

Secure the fixture with a safety cable (or other secondary attachment) that is approved for 

the weight of the fixture so that the safety cable will hold the fixture if a primary attachment 

fails. Loop the safety cable through and around a secure metal anchoring point.

WARNING! READ SAFETY INFORMATION ON    

PAGE 3 BEFORE INSTALLING THE FIXTURE.

Содержание smart 54w

Страница 1: ...USER MANUAL...

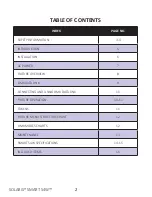
Страница 2: ...5 INSTALLATION 6 AC POWER 7 FIXTURE OVERVIEW 8 DMX DATA LINK 9 CONNECTING AND USING DMX DATA LINK 10 FIXTURE OPERATION 10 11 TOKENS 11 FIXTURE MENU STRUCTURE CHART 12 DMX MODES CHARTS 12 MAINTENANCE...

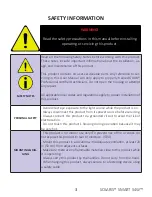
Страница 3: ...ERSONAL SAFETY Avoid direct eye exposure to the light source while the product is on Always disconnect this product from its power source before servicing Always connect this product to a grounded cir...

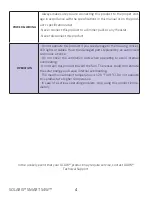
Страница 4: ...enses LED lights or cables Have the damaged parts replaced by an authorized technician at once Do not cover the ventilation slots when operating to avoid internal overheating Do not aim this product t...

Страница 5: ...his fixture Ideal for TV use The fixture can be controlled using any DMX compliant controller 3 Channel Mode 2 chan nel mode as well as automatic operation mode sound to light mode and manual mode BEF...

Страница 6: ...MOUNTING THE FIXTURE ON A TRUSS The fixture can be clamped to a truss or similar rigging structure in any orientation When installing the fixture hanging vertically down you can use an open type clam...

Страница 7: ...al installation if you want to install it permanently or a power plug not supplied that is suitable for the local power out lets can be installed on the power cable If you replace power plug on the po...

Страница 8: ...ink Input and Output XLR Connectors 4 Digital Screen for accessing menu with 4 buttons for navigation Menu Up Down and Enter 5 Aluminum body with fan and Heat sink UP Press UP to change current value...

Страница 9: ...rol of a fixture is required it must have its own DMX channels Fixtures that are required to behave identically can share the same DMX address and channels To add more fixtures or groups of fixtures w...

Страница 10: ...rom 001 you can change the unit s DMX address according to your lighting setup Optional DMX address values are 1 to 512 When you reach the desired value press ENTER to save your changes STANDALONE MOD...

Страница 11: ...ing Solaris fixtures The TOKENS are located above the digital screen on the back panel of the fixture This token indicates the maximum amount of power consumption Displays in Watts This token indicate...

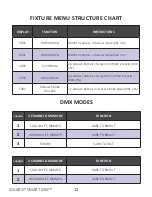
Страница 12: ...00 255 C001 Warm White Up Down Buttons change Warm White intensity 000 255 F001 Manual Strobe Function Up Down Buttons Increases Strobe Speed 001 255 FIXTURE MENU STRUCTURE CHART DMX MODES CHANNEL 3 C...

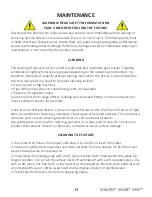
Страница 13: ...utdoor events for example If one or more of these factors is present inspect fixtures within their first 100 hours of oper ation to see whether cleaning is necessary Check again at frequent intervals...

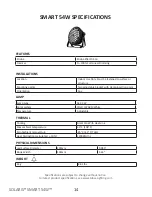
Страница 14: ...djustable bracket with clamp insertion point Orientation Any PHYSICAL DIMENSIONS LAMP Lamp type 54 X 3W Color system COLD WARM White Temperature Adjustable FEATURES Strobe Strobe Effect 01 16 Dimmer 0...

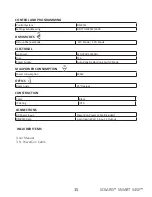
Страница 15: ...Input 1 Output ELECTRICAL AC Power 110 230V 50 60Hz Fuse T5A Power Supply Auto Ranging Electronic Switch Mode CONTROL AND PROGRAMMING Control System DMX512 Settings Addressing USITT DMX512 1990 CONST...

Страница 16: ...ANY OTHER LOSS OCCASIONED BY THE USE OF INABILITY TO USE OR RELIANCE ON THE INFORMATION CONTAINED IN THIS MANUAL THE GLOW LOGO THE SOLARIS LOGO THE GLOW PROFESSIONAL NAME THE SOLARIS PROFESSIONAL NAME...

Отзывы: