


6
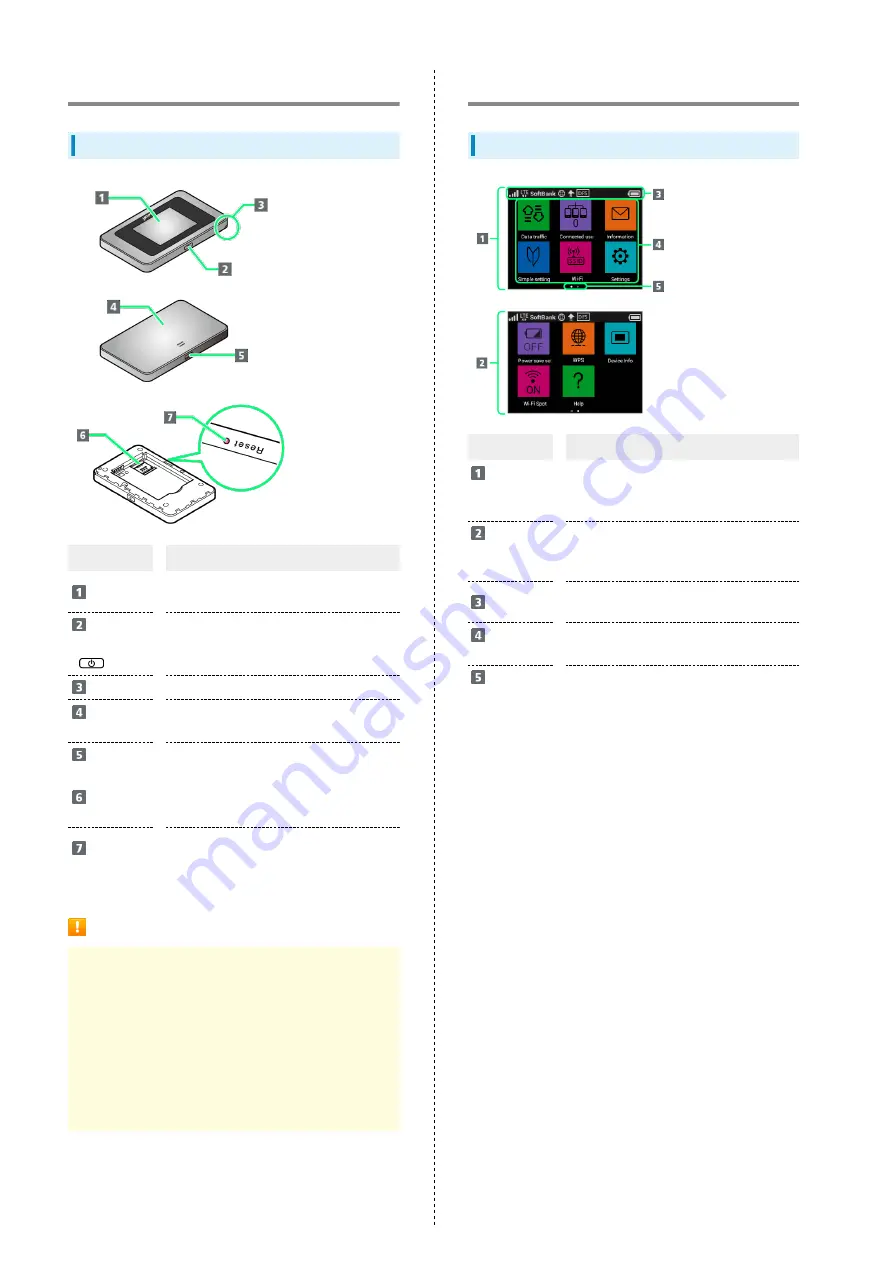
Parts & Functions
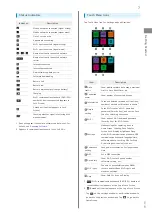
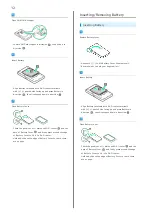
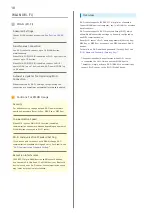
Front/Top/Bottom
Part
Description
Display
Wi-Fi router status appears; Display is
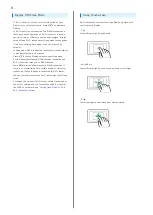
Touchscreen; Tap, Swipe/Flick, etc.
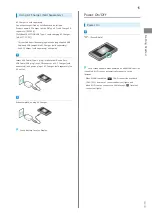
Power
Button
(
)
Power on/off and turn Display on/off
Notch
Use notch to remove Battery Cover
Battery
Cover
Remove Battery Cover to remove/insert
Battery or USIM Card
External
Device Port
Connect USB Cable and AC Charger (sold
separately)
USIM Card
Slot
Insert USIM Card
Reset
Button
Press & Hold with a fine-tipped object for
five seconds or more to reset settings to
defaults
Notes on Using Reset Button
Note the following for using Reset Button.
・Power on Wi-Fi router in advance.
・Be careful not to be injured when Pressing Reset Button.
・Do not Press Reset Button strongly. May cause damage.
・Do not use sharpened object. May cause damage.
・Using pen or pencil may make Reset Button dirty with ink
etc.
・The factory defaults are also reset from WEB UI. For
details, see "
."
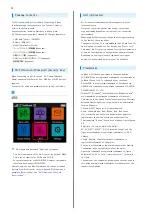
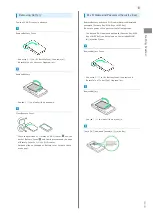
Home Screen
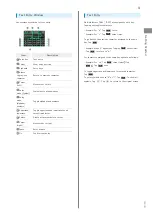
Layout
Part
Description
Home
Screen (First
Page)
First page of Home Screen
Home
Screen
(Second Page)
Second page of Home Screen; Flick left/
right to change page
Status Bar
Status Indicators for communication
status and battery level appear
Touch
Menu
Touch Menu Icons for various functions
Page
Indicator
Indicates which Home Screen page you are
in
Содержание 602HW
Страница 1: ...602HW User Guide...
Страница 2: ......
Страница 32: ...30...
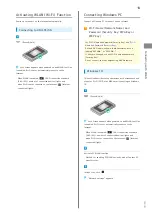
Страница 37: ...Connecting with USB Cable Mac Device Recognition Removal on Mac 36 Installing Uninstalling Driver Mac 36...
Страница 40: ...38...
Страница 74: ...72 Viewing Description for Touch Menu Icons Help Menu icon Description for Touch Menu Icons appears...
Страница 82: ...80 Set each item Apply LAN Wi Fi basic settings for Wi Fi name SSID A are made...
Страница 85: ...83 Settings Using WEB UI 602HW Set each item Apply LAN Wi Fi basic settings for Wi Fi name SSID B are made...
Страница 87: ...85 Settings Using WEB UI 602HW Set each item Apply LAN Wi Fi advanced settings are made...
Страница 91: ...89 Settings Using WEB UI 602HW OK MAC Address Filtering is canceled...
Страница 93: ...91 Settings Using WEB UI 602HW Set each item Apply DHCP is set...
Страница 95: ...93 Settings Using WEB UI 602HW Apply Network mode is set...
Страница 97: ...95 Settings Using WEB UI 602HW Select the network OK Network search is set...
Страница 100: ...98 New profile Set each item Apply Created profile appears for profile name...
Страница 102: ...100 Enter each item Apply Edited information appears...
Страница 113: ...111 Settings Using WEB UI 602HW Enter SoftBank Wi Fi spot password Apply SoftBank Wi Fi Spot setup is complete...
Страница 117: ...115 Settings Using WEB UI 602HW Set each item Apply Firewall is set...
Страница 119: ...117 Settings Using WEB UI 602HW In Filter mode Blacklist Whitelist Add...
Страница 122: ...120 Delete OK Apply IP address filtering settings are canceled...
Страница 125: ...123 Settings Using WEB UI 602HW Apply Domain Name Filter is set...
Страница 126: ...124 Canceling Domain Name Filter In Menu List Router Setting Domain Name Filter In Filter mode Blacklist Whitelist...
Страница 127: ...125 Settings Using WEB UI 602HW Delete OK Apply...
Страница 128: ...126 OK Domain name filtering settings are canceled...
Страница 131: ...129 Settings Using WEB UI 602HW Apply Portmapping is set...
Страница 132: ...130 Canceling Portmapping In Menu List Router Setting Portmapping Delete...
Страница 133: ...131 Settings Using WEB UI 602HW OK Apply Portmapping settings are canceled...
Страница 135: ...133 Settings Using WEB UI 602HW Add Enter each item OK...
Страница 136: ...134 Apply Special application settings are added...
Страница 137: ...135 Settings Using WEB UI 602HW Canceling Special Applications In Menu List Router Setting Special Applications Delete...
Страница 138: ...136 OK Apply Special application settings are canceled...
Страница 140: ...138 Set each item Apply DMZ host settings are applied...
Страница 142: ...140 Set each item Apply SIP ALG settings are applied...
Страница 144: ...142 Enable Disable Apply UPnP settings are applied...
Страница 146: ...144 Cone Symmetric Enter each item Apply NAT settings are applied...
Страница 154: ...152 OK Wi Fi router reboots to its default settings...
Страница 155: ...153 Settings Using WEB UI 602HW Rebooting Wi Fi Router In Menu List System Reboot Reboot...
Страница 156: ...154 OK Wi Fi router is rebooted...
Страница 162: ...160 Resetting Data Traffic In Main Menu Data Traffic Reset...
Страница 163: ...161 Settings Using WEB UI 602HW Yes Data traffic volume is reset...
Страница 165: ...163 Settings Using WEB UI 602HW Deleting Viewed Information In Main Menu Information Select information...
Страница 166: ...164 Delete OK Information is deleted after pop up screen is shown...
Страница 168: ...166 Delete OK Information is deleted after pop up screen is shown...
Страница 177: ...175 Settings Using WEB UI 602HW Enter Login password Login Settings open LAN Wi Fi...
Страница 178: ...176 Set time until entering Sleep mode Apply Select OFF to disable Sleep setting OK Sleep mode setting is complete...
Страница 180: ...178 Enter Login password Login Settings open LAN Wi Fi...
Страница 181: ...179 Settings Using WEB UI 602HW Set each item Apply OK LAN Wi Fi basic settings for Wi Fi name SSID A are made...
Страница 183: ...181 Settings Using WEB UI 602HW Enter Login password Login Settings open LAN Wi Fi...
Страница 185: ...183 Settings Using WEB UI 602HW OK LAN Wi Fi basic settings for Wi Fi name SSID B are made...
Страница 187: ...185 Settings Using WEB UI 602HW Mobile Network Change Network mode Apply Network mode is changed...
Страница 198: ...196 Data Usage Reset...
Страница 199: ...197 Settings Using WEB UI 602HW Yes Data volume is reset...
Страница 201: ...199 Settings Using WEB UI 602HW Information Information is shown Select information to confirm Information is shown...
Страница 203: ...201 Settings Using WEB UI 602HW Information Checkmark information to delete Checkmark Select All to select all...
Страница 204: ...202 Delete YES Information is deleted after pop up screen is shown...
Страница 206: ...204 Enter Login password Login Settings open Device Information Information is shown...
Страница 208: ...206 Connected Devices Information of connected devices is shown...
Страница 209: ...Appendix Troubleshooting 208 Specifications 211 Warranty Service 213 Customer Service 213...
Страница 216: ...214...
Страница 231: ......


