background image

11 

STEP 6: Navigate to Your Destination 


Note: The MyNavigator software offers many options for entering your 
destination. This Quick Start Guide only covers how to enter your 
destination by address. For instructions on using other options (e.g., 
choosing a point of interest), please refer to the User’s Guide. 


If you are using a notebook, wherever the instructions say “tap”, please 
substitute with “click.” 

 
1.  Start MyNavigator. Tap

 Start | Programs | My Navigator

. A warning 

screen will appear. Read it, then tap 

OK

 
2. Tap 

Menu | Destinations | Address


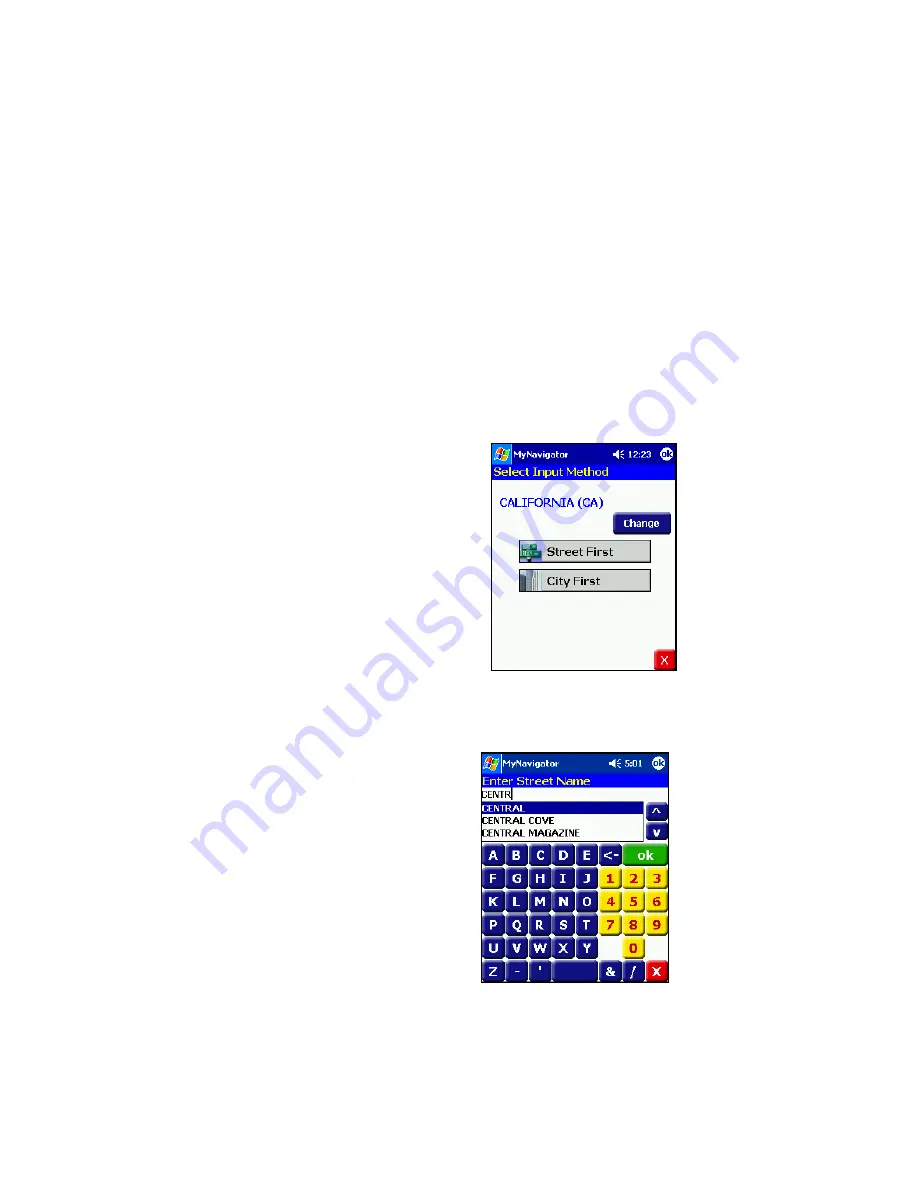
3. The 

Select Input Method

 screen will 

appear. At the top of the screen, the 
state/region of your destination will 
appear. 


• 

To change the state/region, click on 
the 

Change

 button. 


• 

If the correct state/region appears, 
you can enter your destination by 
tapping either 

Street First

 or 

City 

First


• 

For help, tap 

File | Help

 
4.  Screens will appear for you to enter address information. Tap on the 

keyboard to enter information. To enter a city or street, you can also 
scroll through the list. The list will change with each letter you enter to 
show possible matches. 
 

• 

After you enter the correct 
information, tap 

ok

. To return to 

the previous screen, tap 

X


• 

To help you quickly enter 
information, the software will only 
list valid streets for the city you 
select (if you choose to enter City 
First), and it will only list valid 
building numbers for the street you 
select.  


Содержание Bluetooth GPS Nav Kit

Страница 1: ...s Quick Start Guide GPS Nav Kit with Bluetooth Wireless Technology...

Страница 2: ...included GPS Receiver allows you to take advantage of your mobile computer s Bluetooth capability to wirelessly add GPS positioning technology If your mobile computer does not have Bluetooth functiona...

Страница 3: ...to power charger Device is running on battery power with battery more than 10 full Battery Power Jack and Charger Recharge the internal battery by inserting a DC or AC power charger into the power jac...

Страница 4: ...DC or AC adapter Connect a DC charger to a vehicle cigarette lighter or connect an AC charger to an electrical outlet As the device charges the Battery Status LED will emit a solid amber light 2 When...

Страница 5: ...ing on the memory resources available on your mobile computer Read the warning then click OK 4 Make sure the appropriate Socket CD is inserted into your host PC If you are using the North America Nav...

Страница 6: ...6 By Region By City 3 The total file size for the maps you selected will appear in the Selected Size field at the bottom of the screen...

Страница 7: ...nerating Map screen will appear Map files will begin to load Depending on the size of the files the process may take several minutes 7 When map installation is complete click OK 8 Pocket PCs only Afte...

Страница 8: ...he Device Discovery Wizard to search for the GPS Receiver 6 After you have completed the Device Discovery Wizard the GPS Receiver should appear in the Bluetooth Devices folder 7 Tap and hold your styl...

Страница 9: ...hted at the top of the Main Window 6 Double click on the Serial Port Service icon Alternatively right click on the icon for the GPS Receiver In the pop up menu click Connect Serial Port Profile 7 Your...

Страница 10: ...obile computer Pocket PC Tap Start Programs My Navigator Notebooks Click on the My Navigator icon on your desktop Alternatively click Start Programs Socket My Navigator 6 A warning screen will appear...

Страница 11: ...f the screen the state region of your destination will appear To change the state region click on the Change button If the correct state region appears you can enter your destination by tapping either...

Страница 12: ...ll appear Navigation instructions will begin both on screen and via voice commands Follow the navigation instructions to travel to your destination Note After you have successfully bonded your mobile...

Страница 13: ...PS status via car cursor Green indicates strong GPS signal Yellow indicates insufficient signal Red indicates no signal Toggle between North arrow and direction arrow Tap on arrow Alternatively you ca...

Страница 14: ...eeing Bank ATM Hotel Motel Airport Route List Guidance View Help Files Distance to next turn Car Cursor Color indicates GPS Status Route indicated in blue To access Help files Pocket PC Tap File Help...

Страница 15: ...ct with new or reconditioned parts and the returned product becomes Socket s property Socket warrants the repaired or replaced products to be free from defects in material or workmanship for ninety 90...

Страница 16: ...ility to use the SOFTWARE even if SOCKET has been advised of the possibility of such damages Because some states do not allow the exclusion or limitation of liability for consequential or incidental d...

Страница 17: ...ithout the permission of Socket Communications is expressly prohibited Please be aware that the products described in this manual may change without notice Feel free to contact SOCKET COMMUNICATIONS a...

Страница 18: ...rating the unit cease signal transmission 3 If other electrical interference or related problems occur contact Socket technical support at 1 510 744 2720 Radio Frequency Interference Requirements This...

Страница 19: ...Interference Requirements Canada This Class B digital apparatus meets the requirements of the Canadian Interference Causing Equipment Regulations Cet appareil num rique de la Classe B respecte toutes...

Страница 20: ...ng or using the GPS Nav Kit with Bluetooth Wireless Technology Socket has two technical support resources to help you Please note that technical support is available in English only 1 Socket On Demand...

Отзывы: