background image

13

Proper Care for Battery/Charger

m

WARNING! 

To reduce the risk of injury, always unplug 

the charger and remove the battery pack from the charger 

before performing any maintenance task. Never disassemble 

the battery pack or charger. Contact your Snow Joe

® 

 +  

Sun Joe

®

 dealer or the Snow Joe

®

 + Sun Joe

®

 customer 

service center for ALL repairs.

1. 

To reduce the risk of injury and damage, never immerse 

your battery pack or charger in liquid or allow any liquid to 

flow inside these components.

2.  Clean out dust and debris from charger vents and 

electrical contacts by blowing with compressed air.

3.  Use only mild soap on a damp cloth to clean the battery 

pack and charger, and keep away from all electrical 

contacts. Certain cleaning agents and solvents are 

harmful to plastics and other insulated parts. Some of 

these include gasoline, turpentine, lacquer thinner, paint 

thinner, chlorinated cleaning solvents, ammonia, and 

household detergents containing ammonia. Never use 

flammable or combustible solvents around battery packs, 

battery chargers, or tools.

4.  The EcoSharp

®

 iCHRG40 lithium-ion battery charger has 

no serviceable parts.

Replacing the Rubber Plates

m

WARNING! 

Make sure to turn off the switch and 

remove the battery before performing any maintenance task 

on your cordless snow blower.
NOTE:

 When replacing worn rubber plates, pay close attention 

to the order in which you remove the plates. Insert the new 

plates in the reverse order.

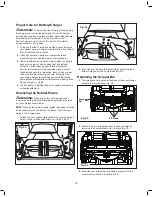
1.  Detach the worn rubber plate assembly by removing the 8 

sets of nuts and bolts used to secure it (Fig

s. 

20 & 21).

2.  Install the new rubber plate assembly by tightening the 8 

sets of nuts and bolts on both sides (Fig. 

20

).

Replacing the Scraper Bar

1.  The scraper bar is located at the base of the snow blower 

beneath the rotor housing (Fig. 22).

2.  Detach the worn scraper bar from the snow blower by 

removing the 3 screws that hold it in place (Fig. 23).

3.  Install the new scraper bar and fasten it securely to the 

snow blower with 

the 3

 screws

 (Fig. 22).

Fig. 20

Fig. 21

Fig. 22

Scraper 

bar

3 Screws

Fig. 23

Содержание iON21SB-PRO

Страница 1: ...tch and disconnect the battery before making any adjustments inspecting servicing changing accessories cleaning the snow blower or when any other dangerous conditions present Any such operation should...

Страница 2: ...ediately Do not use an extension cord unless it is absolutely necessary Using the wrong damaged or improperly wired extension cord poses a risk of fire and electric shock If an extension cord must be...

Страница 3: ...ked on the rating plate Never connect it to a different mains voltage 2 Protect the battery charger and its cord from damage Keep the charger and its cord away from heat oil and sharp edges Have damag...

Страница 4: ...the snow blower accidentally strikes an object first stop the snow blower and remove the battery next inspect for damage finally repair or replace any damaged part before restarting and operating the...

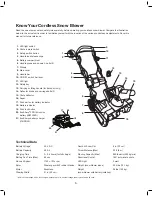
Страница 5: ...eep dry CAUTION Beware of stones and other foreign objects that could be thrown from the appliance DANGER Cutting dismemberment hazard Keep hands away from the rotating auger Do not use hands to unclo...

Страница 6: ...g min Directional Control 180 auto rotate chute LED Light 3 watt Weight snow blower alone 33 4 lbs 15 1 kg Weight snow blower with battery installed 36 lbs 16 3 kg Initial no load voltage when fully c...

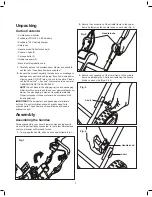
Страница 7: ...new cordless snow blower The packaging is made of recyclable materials Properly dispose of these materials in accordance with local regulations IMPORTANT The equipment and packaging material are not t...

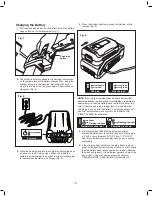
Страница 8: ...vel button does not appear to be working place the battery pack on the charger and charge as needed NOTE Immediately after using the battery pack the charge level button may display a lower charge tha...

Страница 9: ...abnormality i e that the battery pack is either too hot or too cold If there is only a red blinking light this indicates that something is wrong with the battery Contact the Snow Joe Sun Joe customer...

Страница 10: ...e covered by snow and are easy to overlook so be sure to conduct a thorough inspection of the area before beginning work NOTE Before using this machine make sure that the snow blower s auger and rubbe...

Страница 11: ...people 3 When moving the snow blower use the wheels as the pivot point Slightly tilt the snow blower on this pivot point to move it forward or backward 4 Start your clearing path outward throwing sno...

Страница 12: ...e the chute deflector too far forward as this can cause an opening to appear between the deflector and discharge chute Do not overtighten the knobs on the chute deflector Fig 19 Maintenance To order g...

Страница 13: ...household detergents containing ammonia Never use flammable or combustible solvents around battery packs battery chargers or tools 4 The EcoSharp iCHRG40 lithium ion battery charger has no serviceable...

Страница 14: ...n their charge during storage longer than other battery pack types As a general practice it is best to unplug the battery charger and remove the battery pack when they are not in use Recharge the batt...

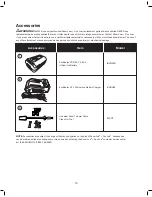
Страница 15: ...blower The use of any other attachment or accessory can be dangerous and could cause injury or mechanical damage NOTE Accessories are subject to change without any obligation on the part of Snow Joe S...

Страница 16: ...16 NOTES...

Страница 17: ...17 NOTES...

Страница 18: ...18 NOTES...

Страница 19: ...Snow Joe LLC is not liable for indirect incidental or consequential damages in connection with the use or misuse of the Snow Joe Sun Joe products covered by this warranty This warranty does not cover...

Страница 20: ...snowjoe com...
Отзывы: