background image

8


Snom D7C User Manual


Setting up the expansion module

5. 

 Holding the D7C and the connector backside up, push the connector against the footstand of 
the DC7 (Fig. 4).  If it does not snap securely into place, push the three levers on the connector 
towards the footstand of the D7C until you hear each one click into place (Fig. 5).

        Fig. 4 


             Fig. 5

6. 

 Push the other side of the connector against the footstand of the phone.  If it does not snap 
securely into place, push the three levers on the connector towards the footstand of the phone 

until you hear each one click into place.

7. 

 D785 only

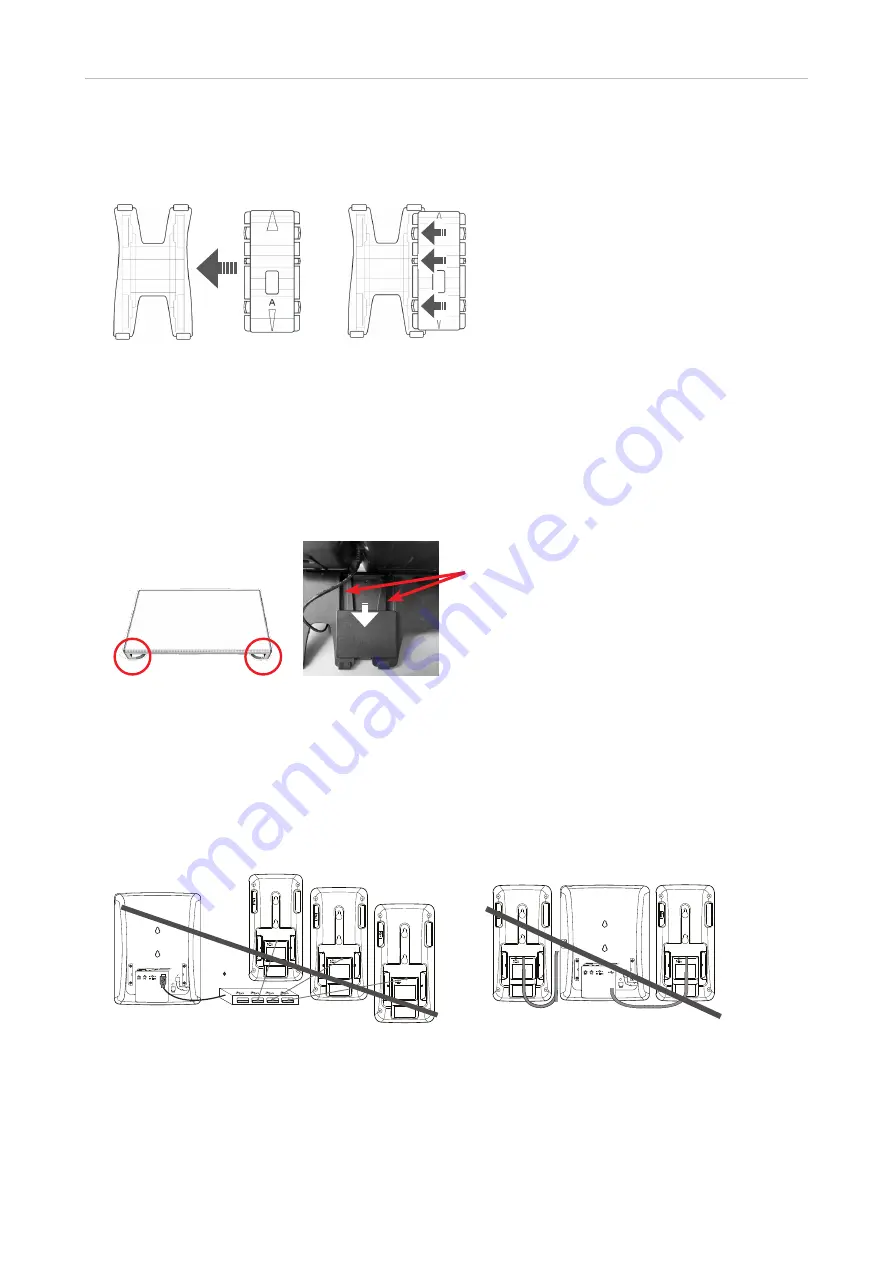
.  Place a soft cloth on the desktop and turn phone and D7C backside up. On either side 

of the small plate marked B there is a ridge (Fig. 6) that fits into the slideguides on the footstands.  
Insert the ridges into the slideguides of the footstands of phone and D7C and slide the connector 
down toward the tips of the "legs" (Fig. 7).


        Fig. 6 


Fig. 7

C

onnecting two or three D7Cs to a Snom phone  

Do not 

use a USB hub (Fig. 8).  If the phone has more than one USB port, 

do not

 connect expansion 

modules to more than one port (Fig. 9).  

The D7Cs must be daisy-chained

.  If they are not, the phone 

will not be able to identify the function keys on the modules, rendering them inoperable.  


        Fig. 8 


        Fig. 9

1. 

 Connect the modules to each other first.  If a module is connected to the phone already, connect 

the second and third module to each other. 

2.   

Important note: 

 Attach a power adapter (available separately) to the second module and to a wall 

outlet

 before 

connecting the daisy-chain to the phone or the second / second and third module to 

the D7C already connected to the phone (Fig. 10). 

Slide guide

Содержание D7C

Страница 1: ...D7C Expansion Module for Snom D717 D735 D765 D785 phones User Manual...

Страница 2: ...ting two or three D7Cs to a Snom phone 8 Detaching the connector 9 Connecting a wireless headset 9 Getting to Know Your Expansion Module 10 Display Layout 10 SmartLabels 11 Function key LEDs 11 Displa...

Страница 3: ...roduction and transmittal to third parties without express written permission may result in legal proceedings in the criminal courts as well as civil courts When this document is made available on Sno...

Страница 4: ...ndoor use only NOT FOR OUTDOOR USE Do not install the device in rooms with high humidity for example in bathrooms laundry rooms damp basements Do not immerse the device in water and do not spill or po...

Страница 5: ...00004393 Phihong model PSM10R 050 US Ten Pao model S018BAM0500200 SnomPN 00004446 Phihong model PSM10R 050 SIL model SSA 050200US Disposal of the device This device is subject to European Directive 20...

Страница 6: ...Installation Guide Attaching the footstand 1 Place the top of the grooves on the footstand Fig 1 below the slideguides on the back of the device Fig 2 For the upright position the short legs of the f...

Страница 7: ...second module is supplied with power by one of the separately available power adapters The third expansion module is supplied with power by the second module via the third module s USB cable Note In...

Страница 8: ...t fits into the slideguides on the footstands Insert the ridges into the slideguides of the footstands of phone and D7C and slide the connector down toward the tips of the legs Fig 7 Fig 6 Fig 7 Conne...

Страница 9: ...s are now ready for use Detaching the connector Push the three levers on the respective side inward to detach the connector from the footstand Connecting a wireless headset On phones with a single USB...

Страница 10: ...456733654 Line Free Line Free Line Free Line Free Line Free Line Free Line Free Line Free Line Free Line Free Fig 1 Fig 2 The module has 16 function keys with LED and a page key for scrolling through...

Страница 11: ...sion 1234 Extension 1234 Free Line Free Line Free Line Free 1 2 3 4 5 Fig 2 Depending on the function mapped onto the key its allocated display area will show the context information when the key even...

Страница 12: ...ou may also need to set the industrial UI color theme to improve the readability of the text Fig 1 light Fig 2 dark Fig 3 colorful Fig 4 industrial Fig 5 Fig 6 The intensity of the backlight can be ad...

Страница 13: ...ight to idle mode is set on the web interface Settings on the web interface UI color theme 1 Open the web interface of the phone 2 Click Preferences in the menu on the left side of the window 3 Click...

Страница 14: ...ion Module section enter a value from 0 to 15 in the text fields of backlight on activity and backlight when idle The defaults are 15 highest intensity for backlight on activity and 8 for backlight wh...

Страница 15: ...djusted separately DND Off DND On Extension Joe Miller Extension 1236 Joe Miller Joe Miller 1236 Line Free Extension 1234 Extension 1234 Extension 1234 Extension 1234 Free Line Free Line Free Line Fre...

Страница 16: ...is optional See SmartLabels on page 11 for more information Enter a name or other descriptive text and press or press without entering data to save 13 Press briefly to return to the Key Function menu...

Страница 17: ...abels on page 11 for more information 9 Click Apply and Save XML provisioning of settings The XML tags of the function keys are an exception from the general rules for XML mass provisioning of setting...

Страница 18: ...ine Free Extension 1234 Extension 1234 Extension 1234 Extension 1234 Free Line Free Line Free Line Free Parameter default_text Optional attribute that can be any string When the parameter label is not...

Страница 19: ...5 232 5555 fkey Intercom fkey idx 22 context 1 label Intercom Mary default_text name state perm icom sip 123 example com user phone fkey Forwarding all incoming calls fkey idx 23 context 1 label Fwd a...

Страница 20: ..._1 png mail u 0 inbox CllgCHrdkvGJQplKkpgwkjKZwnJTKkDbnwtQkXxJfmXVKFcshldksCQkTCLJhhBBkhphQbjjTNB projector 1 messagePartId 0 1 D717 SmartLabel keys on phone fkey idx 0 2 PUI 1 3 WUI P1 P3 D7C expansi...

Страница 21: ...81 96 Page 2 fkey idx 96 111 PUI 97 112 Page 3 fkey idx 112 127 PUI 113 128 D7C expansion module 3 Page 1 fkey idx 128 143 PUI 129 144 Page 2 fkey idx 144 159 PUI 145 160 Page 3 fkey idx 160 175 PUI 1...

Страница 22: ...UI P13 P18 Page 4 fkey idx 18 23 PUI 19 24 WUI P19 P24 D7C expansion module 1 Page 1 fkey idx 24 39 PUI 25 40 Page 2 fkey idx 40 55 PUI 41 56 Page 3 fkey idx 56 71 PUI 56 71 D7C expansion module 2 Pag...

Страница 23: ...the window 5 Enter the HTTP URL to the update file into the Firmware text field of the Manual Expansion Module Software Update section and click Load The progress of the update is shown on the phone s...

Страница 24: ...e D7C from the same phone you must replace the phone s URL in the firmware_uxm parameter with the update file s URL before updating the next module 1 Connect the expansion module you want to update to...

Страница 25: ...hmond British Columbia Canada V6V 0A3 Phone support 339 227 6160 Snom Technology GmbH 130 avenue Joseph KESSEL 78960 Voisins Le Bretonneux France Tel 33 1 85 83 00 15 Fax 33 1 80 87 62 88 o ce fr snom...

Отзывы: