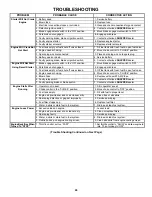
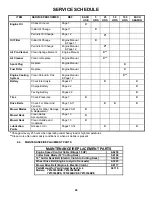
Snapper EYZ15334BVE Скачать руководство пользователя страница 16


16 

Section 4 - ADJUSTMENTS & REPAIR 


WARNING 

DO NOT attempt any adjustments, maintenance, 
service or repairs with the engine running. Stop engine. 
Stop blade. Engage parking brake. Remove key. 
Remove spark plug wire from spark plug and secure 
away from plug. Engine and components are HOT. 
Avoid serious burns, allow all parts to cool before 
working on machine. Fuel Filler Cap and Vent must be 
closed securely to prevent fuel spillage. 

 
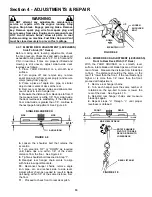
4.1  NEUTRAL POSITION & TRACKING ADJUSTMENTS 
The joystick controls the movement and stopping of the 
machine. Move the joystick to the center or neutral 
position to stop machine. IMPORTANT:  Always return 
the joystick with hand assistance to the neutral 
position. If machine does not come to a complete 
stop or has any movement when joystick is moved 
to the neutral position, adjustment must be made.
 It 
is recommended that these adjustments be made by an 
authorized SNAPPER dealer.  

4.1.1. NEUTRAL 

POSITION 

1.  Turn key to the ”OFF” position. 
2.  Raise both rear wheels off the ground. Wheels 

should be high enough to rotate freely. Machine 
should also be high enough to view the hydro 
pumps that are located underneath the main case. 
Secure the machine with safety blocks. 

3.  Turn key to start position and start machine. 

Move engine speed control to “FAST” position. 

4.  Disengage parking brake. Both rear wheels 

should not have any movement, not rotating. If 
wheels are not rotating, no adjustment is necessary. 

5.  If wheel or wheels are rotating, the hydro 

pumps will have to be adjusted until neutral position 
is found. 

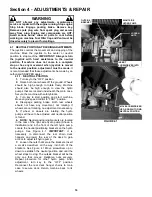
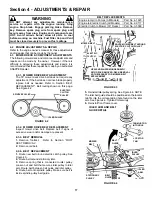
6. NOTE: Neutral positioning brackets are located 

in the rear of the right side hydro pump (Shown in 
Illustration) and in the front of the left hydro pump. 
Locate the neutral positioning brackets on the hydro 
pumps. See Figure 4.1. IMPORTANT: It is 
necessary to disconnect the rear chain deck 
hangers and lower the rear of the deck to gain 
access to adjust left hydro pump. 

7.  Loosen the nuts that secure the brackets. Insert 

a small screwdriver all the way into both of the 
brackets. See Figure 4.1 Move screwdriver up or 
down to establish the neutral position and until the 
wheel stops moving. The outside bracket will be the 
only one that moves. Retighten nuts securely. 
Repeat procedure for other hydro pump. After 
adjustment, turn key to the “OFF” position. 
Reconnect the rear deck hanger chains to main 
case to secure deck. Return machine back to its 
wheels. 


FIGURE 4.1 


INSERT 
SCREWDRIVER INTO 
BOTH BRACKETS 

MOVE SCREWDRIVER 
UP OR DOWN TO FIND 
NEUTRAL POSITION 

OUTSIDE 
BRACKET 

LOOSEN 
NUTS 

RIGHT SIDE 
HYDRO PUMP 
SHOWN 

Содержание EYZ15334BVE

Страница 1: ...33 Cutting Deck 4 Series Designation B Briggs Engine V Over Head Valve E Electric Start Thank you for buying a SNAPPER Product Before operating your YARD CRUISER read this manual carefully and pay pa...

Страница 2: ...DO NOT operate machine on slopes exceeding 15 degrees 27 grade 2 Exercise EXTREME CAUTION on slopes above 10 degrees 18 grade Turn blades OFF when traveling uphill Use a slow speed and avoid sudden o...

Страница 3: ...irectional changes OPERATION Continued From Previous Column 14 Exercise CAUTION when pulling loads Limit loads to those you can safely control and attach loads to hitch plate as specified with SNAPPER...

Страница 4: ...t Shaft Lubrication 14 Parking Brake Pivot Bushings Lubrication 14 Service Annually 15 Engine 15 Air Filter 15 Oil Filter 15 Engine Oil 15 Transaxle 15 Fuel Filter 15 Storage Out of Season 15 SECTION...

Страница 5: ...essential parts of the SNAPPER YARD CRUISER It is recommended that all operators of this equipment become thoroughly familiar with the controls components and operation of this machine before operati...

Страница 6: ...chine If any operator has difficulty in understanding certain symbols incorporated in the decals an authorized SNAPPER dealer should be contacted for explanation READ MANUAL 2 8700 EUROPEAN NOISE CONT...

Страница 7: ...ment FIGURE 2 2 2 1 5 Clean exterior surfaces of cutting deck and engine of any accumulation of dirt grass oil etc Keep engine air intake screen and cooling fins clear at all times 2 1 6 Add fuel to t...

Страница 8: ...gaged and the blade switch is in the OFF position 2 2 2 OPERATION Be seated on the YARD CRUISER before attempting to start the engine with the key switch 1 Make certain the blade switch is in the OFF...

Страница 9: ...Stop motion of riding mower by moving joystick to neutral N position See to Figure 2 8 2 3 3 MOWER BLADE 1 Push the blade switch in to OFF position to disengage or stop the mower blades See Figure 2...

Страница 10: ...handle only it is not necessary to pull up on the release lever at the same time Use the release lever when moving deck cutting height to a lower cutting position 1 Grasp both handles together to dise...

Страница 11: ...hing in and rotating clockwise to close Wipe up any oil that may have spilled Dispose of drained oil properly See Figure 3 1 7 Change oil filter at every oil change Refer to your engine owner s manual...

Страница 12: ...r 3 2 4 CHECK TRANSAXLE DRIVE BELTS 1 Checking Transaxle Belt Tension The transaxle drive belts require no adjustment If belts are frayed slit severed or belt strands exposed replace belt before opera...

Страница 13: ...ent 2 Mower Drive Belt Check belt for proper tension No adjustment required Replace belt as needed 3 Mower Blade Check blade for sharpness wear damage and torque Refer to Section MOWER BLADE REPLACEME...

Страница 14: ...moved to lubricate the pivot shaft The access hole is at the rear of the front structure underneath frame cover a The pivot shaft grease fitting can be accessed through a hole at the rear of the front...

Страница 15: ...o the nearest authorized Snapper dealer for service 3 4 6 Fuel Filter Service fuel filter as instructed below Turn key to OFF position Engine MUST be stopped and MUST be cold before removing filter Tu...

Страница 16: ...th safety blocks 3 Turn key to start position and start machine Move engine speed control to FAST position 4 Disengage parking brake Both rear wheels should not have any movement not rotating If wheel...

Страница 17: ...mower drive belt Replace belt if signs of excessive wear and or damage are present 4 3 3 BELT REMOVAL 1 Remove footrest Refer to Section FOOT REST REMOVAL 2 Remove old belt 4 3 4 BELT REPLACEMENT 1 Ro...

Страница 18: ...or repaired and is functioning properly Contact your SNAPPER dealer for assistance 4 3 6 ADJUSTING MOWER BLADE The straightness of the mower blade s is essential for smooth even mowing Adjust blade st...

Страница 19: ...ntinue to the next page for adjustment See Figure 4 8 FIGURE 4 8 6 Loosen the shoulder bolt that retains the eccentric 7 Turn eccentric UP or DOWN as required until blade tips are within 1 8 of the sa...

Страница 20: ...gns of excessive wear or damage See Figure 4 12 4 4 2 BLADE SHARPENING 1 Make sure fuel cap is on tight Turn fuel shut off valve If equipped to the CLOSED position Start engine and allow it to run unt...

Страница 21: ...battery Refer to Section BATTERY REMOVAL 2 Place battery in a well ventilated area on a level surface 3 Using distilled water refill cells as required to cover cell plates of which can also be visual...

Страница 22: ...tate 4 With cell caps removed connect battery charger to battery terminals RED to positive and BLACK to negative terminal WARNING DO NOT OVERFILL DO NOT attempt to charge battery while installed on th...

Страница 23: ...gaged 2 Engage park brake 3 Fuel tank empty or fuel shut off valve closed 3 Fill fuel tank with fresh fuel open fuel valve 4 Engine needs choking 4 Move choke control to CHOKE position 5 Blown Fuse 5...

Страница 24: ...sure 1 Bring to proper pressure Improperly 2 Cutting height too low or high 2 Adjust cutting height 3 Engine speed too slow 3 Move engine speed control to FAST position 4 Forward speed too fast 4 Move...

Страница 25: ...7 X X Drive Belts Check For Wear And Tension Page 16 17 X X X Mower Blades Check For Wear Damage Replacement Pages 20 21 X Mower Deck Clean Debris Accumulation Page 13 X Mower Deck Clean Outside and U...

Страница 26: ...ginal purchase date SNAPPER will not be responsible for any installation cost incurred The battery warranty only covers original equipment batteries and does not cover damage to the battery or machine...

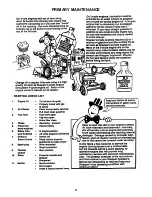
Страница 27: ...28 PRIMARY MAINTENANCE...

Страница 28: ...29 PRIMARY MAINTENANCE...

Страница 29: ...30 PRIMARY MAINTENANCE...

Страница 30: ...31 PRIMARY MAINTENANCE...

Страница 31: ...have any questions about your Snapper product contact your local authorized Snapper dealer or contact Snapper Customer Service at Snapper McDonough GA 30253 Phone 1 800 935 2967 COPYRIGHT 2002 SNAPPE...

Отзывы: