background image

S

Sn

na

ap

pp

pe

err  ZZ--V

Va

ac

c  D

De

ec

ca

all  G

Grro

ou

up

p

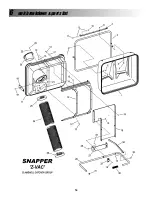
Item

Part No.

Qty

Description

1

3079231

1

DECAL, Z-Vac

2

3046850

1

DECAL, Danger, Fast-Vac

3

3046851

1

DECAL, Warning, Fast Vac

4

3046883

1

DECAL, Warning, Fast-Vac

5

73956

1

DECAL, Warning, Billboard (on clamshell unit)

unit breakdown & parts list     

6

23

Содержание 7011299

Страница 1: ... TI IO ON NS S O OP PE ER RA AT TO OR R S S M MA AN NU UA AL L P PA AR RT TS S L LI IS ST T Models covered Includes Clamshell Blower and Weight Kits 48 Kit P N 7600003 52 Kit P N 7600004 61 Kit P N 7600005 Manual No 7011299 I R 03 11 05 Z Z V VA AC C Clamshell Grass Catcher Kit for NZM Mid Mount Riders ...

Страница 2: ...es our factory in excellent condition occasionally however some damage may occur during shipment If any such damage is found upon initial inspection immediately notify the transport carrier who delivered your machine as they are solely responsible for such damage as well as any subsequent adjustments necessary Before assembly please take a moment and record your model number and serial number belo...

Страница 3: ...er hood in place Never leave a running unit unattended Always stop engine before leaving unit Never operate with guards not securely in place Be sure all safety features are attached adjusted properly and func tioning properly Never operate with the hose or cover removed or altered Do not change the engine governor setting or over speed the engine Stop on level ground shut off engine before leavin...

Страница 4: ...t up procedures when returning the unit to service Never store the machine or fuel container inside where there is an open flame such as in a water heater Allow unit to cool before storing Shut off fuel while storing or transporting Do not store fuel near flames or drain indoors Keep all hardware tight and keep all parts in good work ing condition Replace all worn or damaged decals Never tamper wi...

Страница 5: ... and install supplied blower pulley on top of existing pulley Replace nut and torque to 70 80 ft lbs Replace deck belt onto groove of bottom pul ley NOTE Nut secures blade bolt in place Support bolt from beneath while installing pulley IMPORTANT Use gloves when working under deck Sharp blades can cause injury STEP 5 Set blower against deck discharge Align holes in blower mount with holes in deck d...

Страница 6: ...STEP 8 Lay supplied pulley guard onto deck aligning holes in guard with holes in deck Install with bolts securing original guard tightening securely NOTE 48 deck shown 52 and 61 deck guard configurations may differ STEP 6a Remove bolts securing impeller pulley cover to blower and remove cover STEP 6b Check to see that blower belt is routed around impeller pulley and idler pulleys after belt is ins...

Страница 7: ... 11 Install bumper mount standoffs onto rear bumper of machine utilizing existing hardware on machine NOTE Invert hardware when installing standoffs installing bolts out through bumper with nuts facing out NOTE When installing standoffs be sure that the bumper mount plate mounting holes along the back bar of both standoffs are oriented towards the right side of the machine Refer to the Parts List ...

Страница 8: ...ount onto pins in bottom of bumper mount plate then raise clamshell assembly up against bumper mount IMPORTANT Assistance is required when installing clamshell unit STEP 14 Slide hitch rod through aligned holes in clamshell mount and bumper mount plate secur ing with hair pin IMPORTANT Assistance is required when installing clamshell unit 8 HOOK CLAMSHELL MOUNT ONTO BUMPER MOUNT PLATE PINS RAISE U...

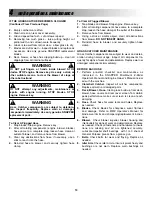
Страница 9: ... catcher closed and latched properly before operating EMPTYING GRASS CATCHER 1 Empty Grass Catcher often to avoid overfilling Overfilling reduces performance and causes clogging of hose blower and deck 2 Turn blades off Drive machine to location the clippings are to be dumped DO NOT operate blades in reverse If you must back machine to dump clippings in desired location LOOK and SEE behind and dow...

Страница 10: ...oration Replace worn or damaged components immediately BEFORE EACH USE 1 Perform pre start checklist and maintenance as instructed in the SNAPPER Mid Mount Z Rider Operator s Manual and Engine Owner s Manual includ ed with the machine 2 Clamshell Catcher Inspect all catcher components Replace all worn or damaged parts 3 Deck Blower Hose Clean grass build up from deck blower hose covers and rear co...

Страница 11: ... or durability Batteries have a one 1 year warranty period with free replacement if required for one 1 year from the original purchase date SNAPPER will not be responsible for any installation cost incurred The battery warranty only covers original equip ment batteries and does not cover damage to the battery or machine caused by neglect or abuse destruction by fire explosion freezing overcharging...

Страница 12: ...6 unit breakdown parts list 12 ...

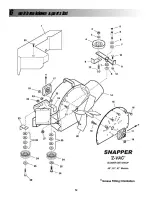
Страница 13: ...3 91218 1 SCREW 1 2 13 x 2 1 2 Hex Head Cap GR5 14 3046781 1 WELDMENT Blower Housing 15 3046853 1 BACK PLATE Blower 16 91541 7 SCREW 5 16 18 x 3 4 Hex Washer Self Tap 17 3022832 2 BEARING Pillow Block Blower includes grease fitting 18 90839 8 NUT 7 16 14 Hex Center Lock GR5 or B 19 3031920 4 SCREW 7 16 14 x 1 1 2 Hex Head Cap GR5 20 3046854 1 IMPELLER Fast Vac Blower weldment 21 3031919 4 SCREW 7 ...

Страница 14: ...6 unit breakdown parts list 14 ...

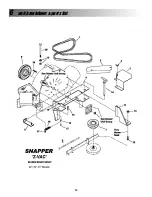
Страница 15: ...er Input 61 7 3036324 1 PULLEY 48 52 Spindle 8 3027505 1 WELDMENT 48 Blower Mount 8 3027506 1 WELDMENT 52 Blower Mount 8 33873 1 WELDMENT 61 Blower Mount 9 3027507 1 WELDMENT Guard Support Bracket 10 91541 4 SCREW 5 16 18 x 3 4 Hex Washer Self Tap 11 3027508 1 WELDMENT Deck Mount Bracket 12 91304 2 SCREW 3 8 16 x 1 Hex Head Cap GR5 13 90613 4 NUT 3 8 16 Hex Flange Lock 14 3032118 1 WELDMENT T Hand...

Страница 16: ...6 unit breakdown parts list 16 ...

Страница 17: ...ER 190 ID x 75 OD Flat Not Shown 91079 2 NUT 10 24 Hex Flange Lock Not Shown 12 43333 1 BRACE Front Cover Weldment 13 91527 13 SCREW 5 16 18 x 1 1 4 Hex Head Cap GR5 14 91528 21 WASHER 375 ID x 875 OD Flat 15 91298 16 NUT 5 16 18 Nyloc 16 11292 1 MOUNT Clamshell 17 16314 4 WASHER 33 ID x 1 25 OD Flat 18 11296 1 HANDLE BRACE Clamshell 19 91303 7 BOLT 5 16 18 x 1 Carriage 20 43334 1 TUBE ADAPTER WEL...

Страница 18: ...6 unit breakdown parts list 18 ...

Страница 19: ... Gr ro ou up p Item Part No Qty Description 1 50551 2 STANDOFF Bumper Mount weldment 2 1723436 1 WELDMENT Bumper Mount Plate 3 91318 4 SCREW 5 16 18 x 3 4 Hex Head Cap GR5 4 91601 4 NUT 5 16 18 Hex Flange Lock GR5 5 1717085 1 ROD Hitch 6 15067 1 HAIR PIN 3 32 x 1 1 2 Cotter unit breakdown parts list 6 19 ...

Страница 20: ...6 unit breakdown parts list 20 ...

Страница 21: ... 3027501 1 CHANNEL Weight Mounting 2 3046992 2 BAR Clamp 3 91131 4 BOLT 3 8 16 x 4 Hex Tap GR5 4 90546 4 NUT 3 8 16 Hex Center Lock GR5 or B 5 3027502 13 BAR Weight 6 3031021 3 SCREW 1 2 13 x 4 1 2 Hex Head Cap 7 90619 3 NUT 1 2 13 Hex Flange Lock 8 3032142 2 PAD Anti Skid Self Adhesive unit breakdown parts list 6 21 ...

Страница 22: ...6 unit breakdown parts list 22 ...

Страница 23: ... Gr ro ou up p Item Part No Qty Description 1 3079231 1 DECAL Z Vac 2 3046850 1 DECAL Danger Fast Vac 3 3046851 1 DECAL Warning Fast Vac 4 3046883 1 DECAL Warning Fast Vac 5 73956 1 DECAL Warning Billboard on clamshell unit unit breakdown parts list 6 23 ...

Страница 24: ...l No 7011299 I R 03 11 05 A AS SS SE EM MB BL LY Y I IN NS ST TR RU UC CT TI IO ON NS S O OP PE ER RA AT TO OR R S S M MA AN NU UA AL L P PA AR RT TS S L LI IS ST T Z Z V VA AC C Clamshell Grass Catcher Kit for NZM Mid Mount Riders ...

Отзывы: