background image

12

     Prepare a machine compatible with the 10W Laser Module. You can choose from 
the following Snapmaker 2.0 models: A250, A350, A250T, A350T, A250ENT, A350ENT, 
A250DET, A350DET, F250, F350, F250DE, and F350DE.
     Prepare a laser engraving and cutting platform matched with the work area of the 
machine you prepared in Step

      .

     Prepare a Snapmaker Enclosure matched with the size of the machine you prepared 
in Step     . 
If you already have the Enclosure installed on your machine, refer to Scenario 1 in 
Machine Assembly to install the 10W Laser Module and other hardware. 
If the Enclosure is not installed on your machine, refer to Scenario 2 in Machine 
Assembly to install the 10W Laser Module and other hardware.
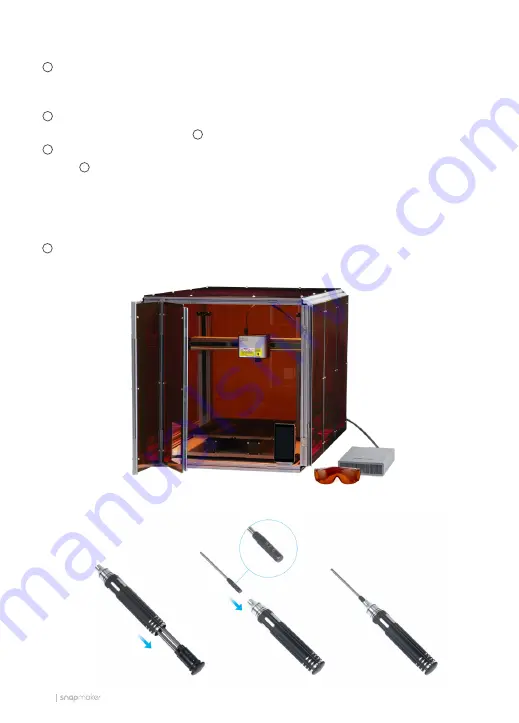
     Prepare sufficient pairs of the laser safety goggles for all the users and bystanders 
present.

1.7.3 Hardware Preparation

1

1

1

2

3

4

1.7.4 Tool Preparation

Содержание TH-L-P100-W450

Страница 1: ...10W Laser Module MAKE SOMETHING WONDERFUL QUICK START GUIDE ...

Страница 2: ......

Страница 3: ...Contents Before You Start Machine Assembly Laser Engraving and Cutting Maintenance 01 15 23 37 ...

Страница 4: ......

Страница 5: ...Before You Start ...

Страница 6: ...of the guide is verified by the manufacturer Original Instruction No part of this publication including pictures may be reproduced or made public whether by printing photocopying microfilm or by any other means whatsoever without the prior written permission of Snapmaker ...

Страница 7: ...ingement on any third party intellectual property rights or violation of any applicable laws or regulations The application of Snapmaker products in making objects are beyond the control of Snapmaker For this reason Snapmaker does not assume responsibility and expressly disclaims liability for any objects made by using Snapmaker products The conditions or methods used for the assembly handling sto...

Страница 8: ... occurs You smell burning in this product at any point You see any damage to the interior components of this product The machine stops working unexpectedly Unusual lights sparks or sounds come out of this product which has never occurred previously Laser Safety Information The 10W Laser Module is a Class 4 laser product You should operate this product only if you have sufficient knowledge of i the...

Страница 9: ...ser safety goggles are specially designed for this product However the laser safety goggles may not be able to provide you with effective protection when you operate other products Wear proper protective equipment depending on the product you operate Snapmaker does not assume responsibility and expressly disclaims liability for any personal injury or property damage suffered by the user or any thi...

Страница 10: ...ce not explicitly approved by manufacturer could void your authority to operate this equipment This device complies with part 15 of the FCC Rules Operation is subject to the following two conditions 1 This device may not cause harmful interference and 2 this device must accept any interference received including interference that may cause undesired operation This equipment complies with FCC radia...

Страница 11: ... sur l exposition aux radiofréquences et compliance d acquérir les informations correspondantes La distance minimale du corps à utiliser le dispositif est de 20cm 1 3 Labels on the Product Laser radiation Laser aperture Class 4 laser product Avoid eyes and skin exposure to direct or scattered radiation Laser radiation is emitted from this aperture On the 10W Laser Module On the 10W Laser Module IE...

Страница 12: ...er 10 W Class 4 Class 1 Maximum Output 10 W Wavelength 450 460 nm AVOID EXPOSURE LASER RADIATION IS EMITTED FROM THIS APERTURE 8 10W Laser Module Product Model Dimensions W D H Weight Frame Material Input Voltage Laser Type Laser Power Laser Class without Enclosure Protection Laser Class with Enclosure Protection 0 35 Operating Temperature 2 2 1 ...

Страница 13: ...nut Bamboo MDF Leather Fabric Canvas Corrugated Paper Cardboard Plastic Dark Acrylic Blue excluded etc Note 1 The specifications listed might be slightly changed in any meaningful way when Snapmaker refines the product 2 Enclosure particularly refers to the Enclosure released by Snapmaker or certified partners of Snapmaker 3 The data is obtained based on the 1 5 mm basswoods Depending on your mate...

Страница 14: ...m 1 Calibration Card 1 10W Laser Module 1 Laser Safety Goggles 1 M4 8 Hex Socket Head Screw 6 Laser Lens Protector 1 Anodized Aluminum Plate 2 mm 1 CAUTION NOTE TIPS Ignoring this type of message might result in malfunction or damage of the machine and injuries to users Details you should be aware of throughout the process Tips offer you convenient operations and additional options ...

Страница 15: ...ine to a Wi Fi network swipe left on the Touchscreen tap Settings Firmware Update Check for Updates Update Now Complete Download our firmware from https support snapmaker com insert the USB flash drive into the controller turn on the machine swipe left on the Touchscreen tap Files tap USB tap the firmware file to update 1 7 2 Firmware Update Before use update the firmware to version 1 14 0 or late...

Страница 16: ...maker Enclosure matched with the size of the machine you prepared in Step If you already have the Enclosure installed on your machine refer to Scenario 1 in Machine Assembly to install the 10W Laser Module and other hardware If the Enclosure is not installed on your machine refer to Scenario 2 in Machine Assembly to install the 10W Laser Module and other hardware Prepare sufficient pairs of the la...

Страница 17: ...dule for 4 axis laser engraving and cutting For more information about how to use the 10W Laser Module together with the Rotary Module refer to the User Manual of the 10W Laser Module on https support snapmaker com The Quick Start Guide is intended to guide you through the first operation of the 10W Laser Module Here is the workflow calibrate the machine fasten the material use Camera Capture to d...

Страница 18: ...14 ...

Страница 19: ...15 Quick Start Guide Machine Assembly ...

Страница 20: ...emonstrated in 3 2 Change Machine Functions in the Quick Start Guide of the Enclosure Turn off the machine and detach the existing toolhead and platform Then follow Steps 01 04 to install the laser engraving and cutting platform and the 10W Laser Module If the the Enclosure is not installed on your machine follow Step 01 04 to install the laser engraving and cutting platform and the 10W Laser Modu...

Страница 21: ...the laser engraving and cutting platform to the support platform of the machine M4 10 Hex Socket Head Screw 14 Laser engraving and cutting platform 1 Ensure that the power switch is in the Off position A250 A250T F250 A350 A350T F350 ...

Страница 22: ...that the 10W Laser Module is installed with the air concentrator hood vertically downward or the machine cannot emit laser beam after turned on If the Touchscreen shows Toolhead Not Installed Correctly you need to turn off the machine and reinstall the toolhead M4 8 Hex Socket Head Screw 4 ...

Страница 23: ...19 Quick Start Guide Do not connect or disconnect any cables when the machine is turned on 03 Connect the 10W Laser Module to the Toolhead port of the controller Toolhead Cable 1 ...

Страница 24: ...20 Cable Holder 1 M4 8 Hex Socket Head Screw 2 04 Attach the cable holder to the Z Axis and then lock the toolhead cable into place Ensure that there is enough cable length for the toolhead to move ...

Страница 25: ...21 Quick Start Guide Refer to the Quick Start Guide of the Enclosure to install the Enclosure Assemble successfully You are now ready to start laser engraving and cutting Congratulations 05 ...

Страница 26: ...22 ...

Страница 27: ...Engraving and Cutting 3 1 Read Safety Notes 3 2 Calibrate Toolhead Focus 3 3 Calibrate the Thickness Measurement System 3 4 Calibrate the Camera 3 5 Fasten the Material 3 6 Prepare the G code File and Start Engraving and Cutting ...

Страница 28: ...n click Get Started and the machine will automatically enter the Guide process The initial guide which helps you get started will appear only once If you need to launch it again swipe left on the Home Screen of the Touchscreen select Settings tap Guides 3 1 Read Safety Notes ...

Страница 29: ...r the 10W Laser Module the focal length f is a fixed value Besides the distance h1 from the center of the lens to the bottom of the air concentrator hood is also known to the machine Based on these two values the machine can calculate the lifting height h2 of the toolhead after the toolhead touches the laser engraving and cutting platform and thus do auto focusing f focal length h1 the distance be...

Страница 30: ...ing platform Place the calibration card or a piece of A4 paper between the 10W Laser Module and laser engraving and cutting platform Keep adjusting the Z Offset until you feel slight resistance when you pull out the calibration card and it should be wrinkled when you push it forward Then tap Next to finish Toolhead Focus Calibration 1 2 Start Toolhead Focus Calibration ...

Страница 31: ...zes the image data to calculate the material thickness Before you use the thickness measurement system for the first time you need to calibrate its initial parameters Place the provided calibration target on the center of the laser engraving and cutting platform and tap Start 1 The red laser emitter is a Class 2 laser product Do not look directly into its aperture when laser beam is emitted How It...

Страница 32: ...ibration points to complete the calibration and measure the thickness of the calibration target to verify the result 2 If you have detached the 10W Laser Module from the X Axis or reassembled the machine recalibrate the thickness measurement system swipe left on the Home Screen of the Touchscreen select Settings tap 10W Laser tap Thickness Measurement Calibration ...

Страница 33: ...e detached the 10W Laser Module from the X Axis or reassembled the machine recalibrate the camera swipe left on the Home Screen of the Touchscreen select Settings tap 10W Laser tap Camera Calibration Remove the calibration target Fasten a piece of blank A4 paper on the center of the laser engraving and cutting platform and click Next 1 2 3 4 Calibrate the Camera ...

Страница 34: ...rface Remove the cut paper Fasten the material on the center of the laser engraving and cutting platform by using the silicone plugs 1 2 You can also fasten materials using other tools Ensure that the clamp set will not collide with any portions of the machine 3 5 Fasten the Material ...

Страница 35: ...select Wi Fi click Refresh select your machine from the drop down list click Connect tap Yes on the Touchscreen 2 On your computer launch the Snapmaker Luban On the menu bar select Settings Machine Settings to select the machine model and the type of the Laser Module 1 You can also connect Snapmaker Luban to your machine using the USB cable 3 6 Prepare the G code File and Start Engraving and Cutti...

Страница 36: ...a photo of the work area and use it as the background for the engraving and cutting object After the photo is captured click Confirm 3 Zoom into the image and move the lines until they perfectly match the square and then click Confirm Apply to see the finished image If the object in the photo remains twisted click Calibrate and repeat this step a If the captured image is twisted out of shape click...

Страница 37: ...object file from your computer and add it to the canvas Click to select the object edit the object by using tools in the Edit panel and click Next 4 After you obtain a normal shaped image click Confirm The finished image will be loaded in the coordinate system b ...

Страница 38: ...g method in the Preset list Based on the selected Preset option Snapmaker Luban will generate a set of recommended parameters You can also configure work parameters on yourself Then click Save Generate G code and Preview Click Export Load G code to Workspace On the G code Files window click Start on Luban On the pop up Start Job window select Auto Mode and click Start The machine will measure the ...

Страница 39: ...emperature drops back to normal Then click Resume to continue laser engraving and cutting If the thickness measurement fails you can unselect Auto Mode on the Start Job window so that you can enter the Manual Mode Manually input material thickness and click Start to start laser engraving and cutting The material thickness is over 50 mm The material texture is transparent or the material surface is...

Страница 40: ...tion see the User Manual of the 10W Laser Module on https support snapmaker com After the laser engraving and cutting job is complete open the Enclosure and take out the finished work 7 分享 你可将你的作品分享至我们 的 Facebook 群组及论坛 Share your finished work in our Facebook group and our forum Share ...

Страница 41: ... this situation you need to clean the laser lens protector to recover the engraving and cutting capability Maintenance Clean the Laser Lens Protector Scenarios How to Clean the Laser Lens Protector Prepare the required clean tools cotton swabs and ethyl alcohol Turn off the machine and disassemble the 10W Laser Module from the machine Dampen a cotton swab with ethyl alcohol and then stick it into ...

Страница 42: ...ebsite select Snapmaker 2 0 go to User Manual https support snapmaker com hc en us We are here for you whenever you need general information or technical support support snapmaker com For any sales inquiries sales snapmaker com For product purchases https shop snapmaker com Share anything you want with other Snapmaker users in our forum https forum snapmaker com Share anything you want via the fol...

Страница 43: ...Y 3 B A 0069 01 V1 0 0 Original Instruction Darkness cannot drive out darkness only light can do that Hate cannot drive out hate only love can do that Martin Luther King Jr ...

Отзывы: