background image

20 


Preparing the appliance for operation: 

It is recommended to prepare the appliance for operation with a helper. 


When  moving,  do  not  make  excessive  pressure  to  the  door  or  top  cover,  otherwise 
deformation will occur. 


Do  not  turn  upside,  horizontally  place  or  vibrate  the  refrigerator,  the  carrying  angle 
can not be greater than 45°. Please hold the door and hinge when moving. 

When  positioning  the  appliance  in  chosen  location,  it  will  move  more  easily  into 
position if you lift the front a little and incline it backward (less than 20°), allowing it 

to roll on its casters. 


Be careful not to damage the floors (e.g.parquet) when moving the appliance. Install 

the appliance on a floor or support strong enough to take its weight and in a place 
suitable for its size and use. 


Before use, remove all packing materials, including bottom cushions, foam pads and 
tapes inside of the  

The  appliance 

should  not  be  connected

  to  the  mains  until  all  packing  and 

transport materials aren’t removed.

 Suitably dispose the packaging material. 

First use: 


Before using the appliance for the first time, the interior and all internal accessories 
should be washed with lukewarm water and some neutral soap to remove the typical 

smell of a brandnew product, then dried thoroughly. 

Wait  at  least  4  hours  before  connecting  the  appliance  to  the 
power supply

. This is to allow the oil to flow back in the compressor. 


When first starting-up or after a period out of use, before putting the products in the 
compartment let the appliance run at least 2-3 hours.  

The appliance shall run continuously once it is started. Generally, the operation of the 
appliance shall not be interrupted; otherwise the service life may be impaired. 

DESCRIPTION OF THE APPLIANCE

see pages 1, fig. 1.


THE  APPLIANCE  ACCESSORIES  LISTED  BELOW  MAY  DIFFER  FROM  THE 

ACCESSORIES  OF  THE  APPLIANCE  YOU  HAVE  BOUGHT  IN  QUANTITY  AND  IN 
DESIGN.  This  description  is  adapted  for  entire  group  of  two

compartment 

refrigerator-freezer combinations. 

Shelves 

Freezer section drawers 

Cold section drawer 

The front leveling feet 

Fruit and vegetable drawer 

door trays 


Содержание RF59FB-TN00NE0

Страница 1: ...15 27 EE K lmik s gavk lmik Instruktsioonis 28 39 RU 40 54 RO MD Frigider i congelator Instruc iuni de utilizare 55 68 UA i 69 82 CZ Chladni ka mrazni ka N vod k instalaci a obs u 83 95 SK Chladni ka...

Страница 2: ...1...

Страница 3: ...2 RF62FB TNCBNE0 RF59FB TNCBNE0 RF59FB TN00NE0 RF59FG TN00NF0...

Страница 4: ...goti maisto produktus aldymo prietaisas yra pa ym ti CE enklu ir turi atitikties deklaracij kuri tikrina atsakingos rinkos prie i ros institucijos SAUGOS TAISYKL S Bendrieji saugos reikalavimai SP JIM...

Страница 5: ...naudotis prietaisu juos supa indino asmuo atsakingas u j saugum Neleisti vaikams lipti arba u lipti ant aldymo prietaiso kad jie ne strigt jame arba nesusi eist nukrit nuo aldymo prietaiso Vaikams nuo...

Страница 6: ...augiam naudojimui I jungus aldymo prietais valant perstumiant kit viet ir t t j v l jungti galima pra jus ne ma iau kaip 15 min kad neb t pa eistas kompresorius Jeigu bandoma jungti aldikl prie nustat...

Страница 7: ...rie alia esan i elektrini prietais SVARBU aldytuvas aldiklis jungiamas 220 240V 50Hz galios elektros tinkl Aplink aldymo prietais turi b ti gera oro cirkuliacija tarp prietaiso korpuso vir aus ir vir...

Страница 8: ...aldymo prietais naudoti po valymo ir atitirpinimo ar po elektros tiekimo sutrikim jungus prietais jis turi veikti nuolat Bendruoju atveju prietaiso veikimas neturi b ti trikdomas mat kitu atveju gali...

Страница 9: ...uvo skyriaus temperat ros nustatymas Paspauskite mygtuk 6 kad pasirinktum te aldytuvo zon mirks s atitinkamas simbolis Tuomet temperat ros mygtuku 6 sureguliuokite temperat r Galiausiai paspauskite my...

Страница 10: ...Greitojo v sinimo Fast Cooling re ime aldytuvo temperat ra nenustatoma Greitojo v sinimo Fast Cooling funkcijos jungimas Paspauskite 8 mygtuk Function kad pasirinktum te greitojo v sinimo re im indika...

Страница 11: ...d pasirinktum te atostog re im turi mirks ti Vacation indikacija 4 tuomet paspauskite mygtuk OK kad patvirtintum te Atostog re imas bus i jungtas PASTABA jungus i man j Smart ECO ECO ar greitojo u ald...

Страница 12: ...atymas bus atmestas Nustatymams sigaliojus temperat ra i kart bus reguliuojama pagal pasirinkto re imo nustatymus Temperat ros re im ciklas yra is 2 4 5 6 8 FAST COOL 2 Greitas atv sinimas FAST COOL G...

Страница 13: ...i ar popieriniais rank luos iais Tokie klotai trukdo cirkuliuoti orui tad prietaiso veiksmingumas ma ja Prie dedant maisto produktus aldytuv rekomenduojama juos sud ti indus kad i j nei garuot dr gm i...

Страница 14: ...daus ir stal i sieneli gali susikaupti erk nas Tai visi kai normalu Ta iau kuo storesnis erk no sluoksnis tuo didesn s elektros energijos s naudos Jei No Frost sistema nesp jo i garinti dr gm s pertek...

Страница 15: ...ar jo dalis reikia alinti atskirai t y specialiai iuo enklu pa ym tus konteinerius stambiagabaritini atliek aik teles I sami informacij kur saugiai pristatyti sen aldymo prietais suteiks vietin s val...

Страница 16: ...atikrinkite ar priedai i d styti tinkamose vietose Negalima nustatyti temperat ros Patikrinkite ar jungta Smart ECO ECO Fast Freezing ar Atostog Vacation funkcijo I eikite i specialiojo veikimo re imo...

Страница 17: ...ucts The freezer compartment is designed for the freezing and long term storage of food products This appliance is intended to be used in household and similar applications This appliance is not for p...

Страница 18: ...allow children to play with the packaging material from the appliance Cleaning and user maintenance shall not be made by children without supervision This appliance can be used by children aged from 8...

Страница 19: ...vices next the appliance in such a way that they could squeeze and damage the electrical cord This can cause a short circuit and a fire Make sure that the plug of the electrical cord is not squeezed b...

Страница 20: ...limate class is ST 16 TO 43 DEGREES CELSIUS the appliance climate class is T INSTALLATION AND OPERATING CONDITIONS Positioning The appliance operates properly at the ambient temperature see product fi...

Страница 21: ...port materials aren t removed Suitably dispose the packaging material First use Before using the appliance for the first time the interior and all internal accessories should be washed with lukewarm w...

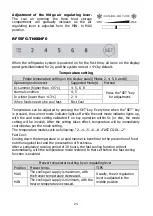
Страница 22: ...ts illuminated on the display Temperature setting Fridge temperature setting Press the Fridge key to select the fridge zone with the corresponding icon flickering and then press the key 6 to adjust th...

Страница 23: ...tion with their nutrition not lost Under the Fast Cooling mode the fridge temperature is subject to no adjustment Enabling the Fast Cooling function Press the Function key to select Fast Cooling until...

Страница 24: ...n mode press the Function key to select Vacation until the corresponding icon 4 gets flickering and then press the OK key for confirmation The Vacation function will get exited NOTE When the Smart ECO...

Страница 25: ...icator lights off while the next mode indicator lights up with the said mode setting validated if no key operation within 5s or else the mode setting will be invalid After the setting takes effect tem...

Страница 26: ...r drip onto other food If the refrigerating appliance is left empty for long periods switch off defrost clean dry and leave the door open to prevent mould developing within the appliance Appliance sto...

Страница 27: ...t be consumed quickly or cooked immediately and then refrozen after cooling Fast freezing RF62FB TNCBNE0 RF59FB TNCBNE0 RF59FB TN00NE0 Refer to the description about fast freezing function in the ELEC...

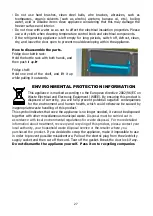
Страница 28: ...he European directive 2002 96 EC on Waste Electrical and Electronic Equipment WEEE By ensuring this product is disposed of correctly you will help prevent potential negative consequences for the envir...

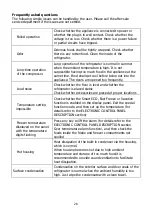
Страница 29: ...tor is placed stably Check whether accessories are placed at proper locations Temperature setting impossible Check whether the Smart ECO Fast Freeze or Vacation function is enabled on the display pane...

Страница 30: ...29...

Страница 31: ...30...

Страница 32: ...31...

Отзывы: