


www.smoothfitness.com
33
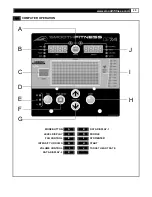
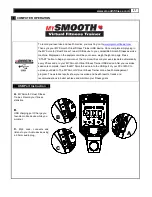
COMPUTER OPERATION
IMPORTANT: The console software will calculate the user’s SAFE MAXIMUM HEART RATE based on the formula: (220pbm-
AGE). User’s are encouraged to consult with a doctor or personal Training consultant to more accurately estimate their
SAFE MAXIMUM HEART RATE in order to workout safely.
PULSE display shows the calculated TARGET HEART RATE based on the user age setting from the above step. The TARGET
HEART RATE = 85% MAXIMUM SAFE HEART RATE. Press INTENSITY UP/DOWN button to adjust the target heart rate then
press the STOP/ENTER bottom to confirm.
After adjust the TARGET HEART RATE, the TIME display shows factory default setting “32:00”. Press INTENSITY UP/DOWN
button to adjust the target time and press STOP/ENTER to confirm.
Press the START button to start the 3 minute WARM UP. The purpose of warm up program is to bring the user’s heart rate to 65%
of the MAXIMUM SAFE HEART RATE. Time counts down from “3.00” to “0:00”. Intensity Level Profile displays “WARM UP” 3 times.
During the WARM UP, if the actual heart rate is less than 65% of the user’s MAXIMUM SAFE HEART RATE, the intensity level will
be increased
by 1 level every 30 sec
onds. If the actual heart rate reaches 65% MAXIMUM SAFE HEART RATE twice within the
warm up, the HEART RATE CONTROL program will start after finished 3minute WARM UP.
If user’s actual hear rate fails to reach 65% of MAXIMUM SAFE HEART RATE during the warm up, the user will be placed into a 2
nd
or 3
rd
(if necessary) 3 minute warm up program. If user’s actual heart rate fails to reach 65% of the MAXIMUM SAFE HEART RATE
after the 3
rd
3 warm up program, the INTENSITY LEVEL PROFILE dot matrix will display “FAIL” then return to POWER ON status in
10 seconds.
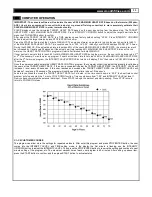
Once the user successfully enters the HEART RATE CONTROL program, the computer will actively adjust the intensity level to keep
the users at the TARGET HEART RATE. If the user is consistently below the TARGET HEART RATE, the INTENSITY LEVEL will
increase 1 level every 30 seconds. If the user reaches and exceeds the TARGET HEART RATE, the INTENSITY LEVEL will
decrease 1 level every 30 seconds. The program will continue until the time runs out. If the user’s
heart rate continues to exceed the TARGET HEART RATE for 3 minutes, or the time counts down to “0:00”, the heart rate control
program will stop and start the 1 minute COOL DOWN function. Time counts down from “1:00” and INTENSITY LEVEL
at level 1 .
Now you have completed the personal data input. Press START to begin the workout and start pedaling. Press STOP twice to
return to POWER ON status.
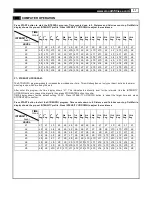
C1~C5 CUSTOMER COURSE
The program can allow store the settings for repeated workouts. After enter this program and press STOP/ENTER button, the user
comes into the INTENSITY LEVEL, and TIME setting mode. In the display the first minute is flashing, use the INTENSITY
UP/DOWN button to adjust the INTENSITY LEVEL. Then press the STOP/ENTER button to reserve the setting and continue to next
minute setting of the program, etc. The maximum workout time of each user program is 60 minutes. After setting up above item,
press the START button to confirm, and then press START button to activate status.
Содержание CE 7.4
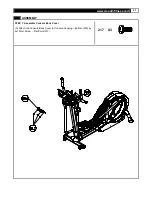
Страница 10: ...10 SMOOTH CE7 4 ELLIPTICAL TRAINER PARTS DIAGRAM MOST OF THE PARTS SHOWN HERE HAVE BEEN PRE ASSEMBLED...
Страница 11: ...www smoothfitness com 11 PARTS DIAGRAM A MAJORITY OF THE PARTS SHOWN HERE HAVE BEEN PREASSEMBLED AT THE FACTORY...
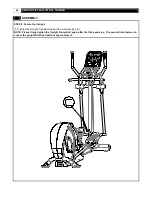
Страница 12: ...12 SMOOTH CE7 4 ELLIPTICAL TRAINER PARTS DIAGRAM MOST OF THE PARTS SHOWN HERE HAVE BEEN PRE ASSEMBLED...
Страница 13: ...www smoothfitness com 13 PARTS DIAGRAM MOST OF THE PARTS SHOWN HERE HAVE BEEN PRE ASSEMBLED...


