background image

Página 14

CONTINÚA INSTRUCCIONES DE OPERACIÓN

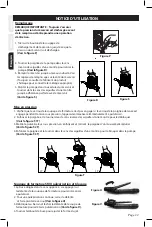
Pasos para limpiar el atomizador

*** Para evitar problemas de obstrucción, después de cada uso limpie el atomizador.***

PRODUCTOS A BASE DE AGUA

1. Libere la presión en el atomizador a través de la válvula de alivio de presión. No suelte la manija sin liberar 

    antes la presión.

2. Descargue el producto químico remanente en su recipiente original.

3. Llene el atomizador con agua, vuelva a colocar la bomba en el tanque y apriétela.

4. Agite vigorosamente el agua en el tanque para tratar de disolver los residuos de las paredes interiores del

    atomizador. En caso necesario, repita este paso cada vez que rellene el tanque con agua.

5. Presurice el atomizador y rocíe el agua durante 30 a 45 segundos en un depósito desechable, y luego

    libere la presión y quite la bomba del tanque.

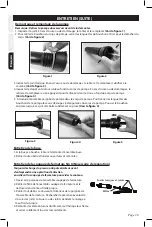
6. Incline y vacíe el tanque, y a continuación póngalo en posición vertical. Mantenga la extensión y el 

    dispositivo de cierre por encima del tanque y presione el dispositivo de cierre. El líquido drenará dentro

    del tanque, vuelva a vaciarlo.

7. Repita los pasos anteriores según sea necesario.

8. Seque el tanque al aire, dejando la bomba fuera del tanque durante la noche. 

Productos ácidos

1. Release pressure in your sprayer via pressure relief valve.  Do not undo handle without removing pressure.

2. Empty remaining chemical back into original filling container.

3. Fill sprayer with water mixed with 2 cups of baking soda or garden lime, place pump back into tank, and

    tighten.

4. Shake the liquid in the tank to try and get the residue off of the inside walls of the sprayer.  Repeat step if

    necessary, each time refilling with fresh mixture of water and baking soda or garden lime.

5. Pressurize the sprayer and spray for 30-45 seconds into an empty container, then release the pressure and

    remove the pump from the tank.

6. Tip the tank and empty any remaining water/baking soda mixture into the container, then set the tank

    upright.  Hold the wand and shut-off above the tank and depress the shut-off.  The liquid will drain into

    the tank, tip and empty the tank once again.

7. Repeat the steps above as necessary.

8. Allow the tank to air dry by leaving the pump outside the tank overnight.

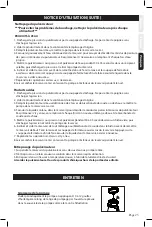
Almacenamiento del atomizador

1. El tanque del atomizador se debe colgar boca abajo, habiendo quitado la bomba.

2. No almacene ni deje ninguna solución en el tanque después de usarlo.

3. Almacénelo en un lugar templado y seco, lejos de la luz solar directa.

4. Mantenga el atomizador y todos los productos químicos fuera del alcance de los niños.

MANTENIMIENTO

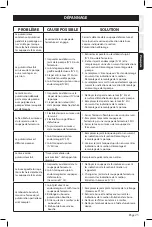
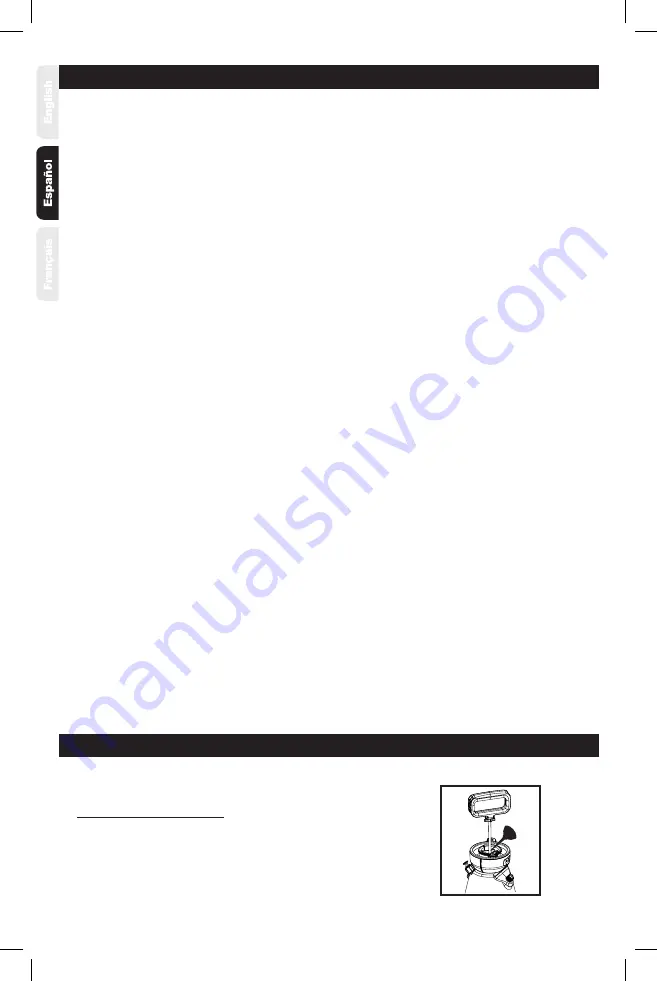
Lubricación de la bomba

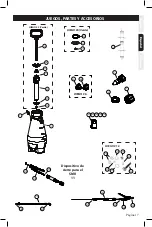
La bomba debe ser lubricada periódicamente aplicando de 10 a 

12 gotas de aceite ligero abajo del eje de la bomba a través de la 

abertura en la tapa de la bomba como se muestra.

Содержание 190449

Страница 1: ... Inc 23 Garden St New York Mills NY 13417 1 800 311 9903 www TheFountainheadGroup com www smithperformancesprayers com CAUTION Read and follow all instructions Manual No 183280 Rev A 10 27 16 ECN16 078 5 1 2 X 8 1 2 Booklet Use and Care Manual Acid Compression Sprayer Industrial and Contractor Series Acid 190449 ...

Страница 2: ...nk Always release pressure when sprayer is not in use and before removing pump from tank Do not stand with face or body over top of tank when pumping or loosening pump to prevent pump or solution from striking you resulting in serious injury Clean and rinse sprayer thoroughly after each use Never attempt to alter sprayer from original condition Always use replacement parts from original manufactur...

Страница 3: ...AY ANGLE SPRAY PATTERN FAN FAN FAN FAN FLOW RATE 10 GPM 13 GPM 10 GPM 20 GPM COLOR 6 RED 10 BLACK 8 GRAY 12 BROWN 30 FAN 15 GPM SPRAY ANGLE SPRAY PATTERN FLOW RATE 70 FAN 25 GPM SPRAY ANGLE SPRAY PATTERN FLOW RATE RED HIGH VOLUME FAN NOZZLE USES YELLOW LOW VOLUME FAN NOZZLE USES CERAMIC CONEJET TIP NOZZLE USES 1 Turf and Argiculture Series Green 2 Industrial and Contractor Series Orange 3 Cleaning...

Страница 4: ...all the pump into the tank opening and turn clockwise until tightly sealed against the tank See Figure S Pressurizing 1 Make sure shut off lock is not engaged If shut off lock is engaged while pressurizing the unit will immediately start spraying 2 Push down on the handle and turn counterclockwise to unlock the handle See Figure T 1T 3 Pressurize the sprayer by pumping the handle in a smooth up an...

Страница 5: ...remaining chemical back into original filling container 3 Fill sprayer with water mixed with 2 cups of baking soda or garden lime place pump back into tank and tighten 4 Shake the liquid in the tank to try and get the residue off of the inside walls of the sprayer Repeat step if necessary each time refilling with fresh mixture of water and baking soda or garden lime 5 Pressurize the sprayer and sp...

Страница 6: ...o hole in bottom of barrel See Figure 4 5 Insert the pump handle assembly into the barrel Align the tabs of the pump cap with the rectangle cutouts on the barrel Push cap into place until the cap snaps securely into position See Figure 5 Figure 2 Figure 1 Figure 3 Figure 4 Figure 5 MAINTENANCE CONTINUED O rings Seals Filter Always depressurize sprayer before maintenance by activating shut off and ...

Страница 7: ...escribed in Pump Disassembly Reassembly section Hose leaks at tank or shut off 1 Loose hose at tank 2 Cracked swollen or faulty hose 3 Loose hose at shut off 1 Tighten hose nut at tank 2 Replace shut off assembly for SM II shut off 3 Tighten hose at shut off Sprayer is difficult to pump 1 Damaged piston o ring 3D 2 Piston o ring 3D is dry 1 Replace piston o ring as described in Pump Disassembly Re...

Страница 8: ...ARTS ACCESSORIES 5 10 1 10 2 10 3 10 4 10 5 6A KIT 6 6B SM II Shut off 11 12A 12B 12C 7 KIT 4 Green 3F 3G 3D 14 12D 12C 12B 12A 12F 12E 13 12B 12G 12F 12E 12C 12A 12D KIT 12 2 1 3A 3C 3D 3E 3F 3G 3B KIT 3 Green 8 9 ...

Страница 9: ... 4 GREEN POLY 07 GPM 80 2 182796 NOZZLE 6 RED POLY 10 GPM 80 3 182797 NOZZLE 10 BLACK POLY 10 GPM 80 4 182784 NOZZLE 8 GRAY POLY 13 GPM 80 5 182798 NOZZLE 12 BROWN POLY 20 GPM 80 KEY PART DESCRIPTION 13 183088 21 WAND ASSEMBLY ACID 14 183177 SHUT OFF ASSEMBLY SM II WITH HOSE AND DIP TUBE 2 GAL ACID KIT 12 183141 SM II POLY SHUT OFF SERVICE KIT ACID SPRAYER 12A 183079 SEAL VITON SHUT OFF SM II ACID...

Страница 10: ...23 Garden St New York Mills NY 13417 1 800 311 9903 www TheFountainheadGroup com www smithperformancesprayers com PRECAUCIÓN Lea y siga todas las instrucciones Manual No 183280 Rev A 10 27 16 ECN16 078 5 1 2 X 8 1 2 Booklet Manual de uso y cuidado Atomizador de compresión para ácidos Serie industrial y para contratista Ácido 190449 ...

Страница 11: ...ice la bomba original No almacene productos químicos en este tanque Libere siempre la presión cuando el atomizador no esté en uso y antes de retirar la bomba del tanque No ponga la cara o el cuerpo sobre la parte superior del tanque al estar bombeando o al desenganchar la bomba para evitar que la bomba o la solución lo impacte y ocasione lesiones graves Limpie y enjuague perfectamente el atomizado...

Страница 12: ...cultura Verde 2 Serie industrial y para contrastista Naranja 3 Serie para limpieza y restauración Azul 4 Serie para control de plagas Blanco Utilizadas en 1 Serie para césped y agricultura Verde 2 Serie industrial y para contrastista Naranja 3 Serie para limpieza y restauración Azul Utilizadas en 1 Serie para césped y agricultura Verde 2 Serie industrial y para contrastista Naranja 3 Serie para li...

Страница 13: ...a 4 Instale la bomba en la abertura del tanque y gire hacia la derecha hasta quede cerrado herméticamente en el tanque Vea la figure S Presurización 2 Empuje la manija hacia abajo y gírela hacia la izquierda para desbloquearla Vea la figura T 1T 3 Presurice el atomizador bombeando con la manija en un movimiento suave ascendente y descendente Vea la figura T 2T 4 Empuje la manija hacia abajo y gíre...

Страница 14: ... handle without removing pressure 2 Empty remaining chemical back into original filling container 3 Fill sprayer with water mixed with 2 cups of baking soda or garden lime place pump back into tank and tighten 4 Shake the liquid in the tank to try and get the residue off of the inside walls of the sprayer Repeat step if necessary each time refilling with fresh mixture of water and baking soda or g...

Страница 15: ...e inferior del cilindro Vea la figura 4 5 Introduzca la manija de la bomba en el cilindro Alinee las lengüetas de la tapa de la bomba con los cortes rectangulares del cilindro Presione la tapa hasta que encaje a presión en su posición Vea la figura 5 Figura 2 Figura 1 Figura 3 Figura 4 Figura 5 CONTINÚA MANTENIMIENTO Despresurice siempre el atomizador antes de darle mantenimiento activando el disp...

Страница 16: ... el dispositivo de cierre 1 Manguera suelta en el tanque 2 Manguera agrietada dilatada o defectuosa 3 Manguera suelta en el dispositivo de cierre 1 Apriete la tuerca de la manguera en el tanque 2 Reemplace el conjunto del dispositivo de cierre SM II 3 Apriete la manguera en el dispositivo de cierre Atomizador difícil de bombear 1 La junta tórica del pistón 3D está dañada 2 La junta tórica del pist...

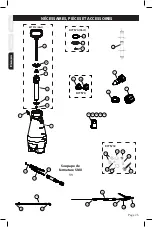
Страница 17: ...ORIOS 5 10 1 10 2 10 3 10 4 10 5 6A JUEGO 6 6B Dispositivo de cierre para el SM II 11 12A 12B 12C 7 JUEGO 4 Verde 3F 3G 3D 14 12D 12C 12B 12A 12F 12E 13 12B 12G 12F 12E 12C 12A 12D JUEGO 12 2 1 3A 3C 3D 3E 3F 3G 3B JUEGO 3 Verde 8 9 ...

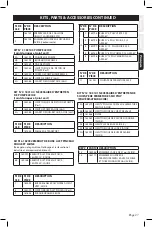
Страница 18: ...UMERGIBLE DE 2 GALONES PARA ÁCIDO JUEGO 12 183141 SMITH II POLICARBONATO JUEGO PARA SERVICIO DE DISPOSITIVO DE CIERRE ATOMIZADOR PARA ÁCIDO 12A 183079 SELLO DE DISPOSITIVO DE CIERRE VITON SMITH II ÁCIDO 12B 183081 JUNTA TÓRICA DEL CUERPO DE LA VÁLVULA 12C 181468 FILTRO 12D 183082 JUNTA TÓRICA DEL CONECTOR ÁCIDO 12E 183090 SELLOS PARA BOQUILLA PLANA PARA ÁCIDO 12F 183089 JUNTA TÓRICA DE LA EXTENSIÓ...

Страница 19: ...York Mills NY 13417 USA 1 800 311 9903 www TheFountainheadGroup com www smithperformancesprayers com ATTENTION Lire entièrement et suivre scrupuleusement le mode d emploi Manual No 183280 Rev A 10 27 16 ECN16 020 5 1 2 X 8 1 2 Booklet Série Industrie et entreprises de bâtiment Acide 190449 Pulvérisateur d acide à pression préalable Notice d utilisation et d entretien ...

Страница 20: ...née et avant de retirer la pompe du réservoir Ne jamais placer le visage ou le corps au dessus du couvercle du réservoir lors du pompage ou du dégagement de la pompe pour ne pas être heurté par la pompe ou recevoir de projections qui occasionneraient de graves blessures Nettoyer et rincer soigneusement le pulvérisateur après chaque utilisation Ne jamais tenter de modifier le pulvérisateur Toujours...

Страница 21: ...PM 4 VERTE 80 80 80 80 SPRAY ANGLE SPRAY PATTERN FAN FAN FAN FAN 10 GPM 13 GPM 10 GPM 20 GPM COULEUR 6 ROUGE 10 NOIRE 8 GRISE 12 MARRON 30 FAN 15 GPM 70 FAN 25 GPM DÉBIT UTILISATIONS DU FORT DÉBIT ROUGE UTILISATIONS DU FAIBLE DÉBIT JAUNE UTILISATIONS DU CONE RÉGLABLE Utilisée sur 1 La série gazon et agriculture verte 2 La série industriel et enterprises de ba timent orange 3 La série nettoyage et ...

Страница 22: ...on 1 Vérifier que le verrou de la soupape de fermeture n est pas engagé si le verrou de la poignée de lance est engagé pendant la mise sous pression l appareil commencera immédiatement à pulvériser 2 Enfoncer la poignée et la tourner dans le sens inverse des aiguilles d une montre pour la débloquer Voir la figure T 1T 3 Mettre le pulvérisateur sous pression en enfonçant et retirant la poignée d un...

Страница 23: ...nt de remplissage d origine 3 Remplir le pulvérisateur d eau additionnée de 2 tasses de bicarbonate de soude ou de chaux remettre la pompe dans le réservoir et serrer 4 Secouer le liquide contenu dans le réservoir pour décoller le résidu des parois intérieures du pulvérisateur Recommencer s il y a lieu en remplissant chaque fois d un nouveau mélange d eau et de bicarbonate de soude ou de chaux 5 M...

Страница 24: ...ir la figure 4 5 Introduire l ensemble poignée de pompe dans le corps de pompe Positionner les languettes du bouchon de la pompe face aux découpes rectangulaires du corps de pompe Pousser le bouchon en place jusqu à ce qu il s emboîte solidement en place Voir la figure 5 Figure 3 Figure 4 Figure 5 Toujours décharger la pression du pulvérisateur avant d entreprendre une opération d entretien en act...

Страница 25: ...ervoir ou de la soupape de fermeture 1 Flexible desserré au niveau du réservoir 2 Flexible fissuré gonflé ou défectueux 3 Tuyau desserré au niveau de la soupape de fermeture 1 Serrer l écrou du flexible au niveau du réservoir 2 Remplacer l ensemble soupape de fermeture par une soupape de fermeture SM II 3 Serrer le tuyau au niveau de la soupape de fermeture Le pulvérisateur est difficile à pomper ...

Страница 26: ...T ACCESSOIRES 5 10 1 10 2 10 3 10 4 10 5 6A KIT N 6 6B Soupape de fermeture SM II 11 12A 12B 12C 7 KIT N 4 Vert 3F 3G 3D 14 12D 12C 12B 12A 12F 12E 13 12B 12G 12F 12E 12C 12A 12D KIT N 12 2 1 3A 3C 3D 3E 3F 3G 3B KIT N 3 Vert 8 9 ...

Страница 27: ...BOUT À JET PINCEAU POLY 0 26 GPM 70 ROUGE 6B 180168 EMBOUT À JET PINCEAU POLY 0 15 GPM 30 JAUNE KEY PART DESCRIPTION 13 183088 ENSEMBLE LANCE DE 21 po ACIDE 14 183177 ENSEMBLE SOUPAPE DE FERMETURE SMITH II AVEC FLEXIBLE ET TUBE PLONGEUR 2GAL ACIDE KIT N 12 183141 NÉCESSAIRE D ENTRETIEN DE SOUPAPE DE FERMETURE SM II POLY PULVÉRISATEUR ACIDE 12A 183079 JOINT VITON DE SOUPAPE DE FERMETURE SMITH II AC...

Страница 28: ...ONT DISPONIBLES EN CONTACTANT The Fountainhead Group Inc Customer Service Center Lundi Vendredi 8 h 17 h HNE Sans frais 1 800 311 9903 ou e mail Info TheFGI com ou Accès en ligne à www TheFountainheadGroup com ou www Smithperformancesprayer com Page 28 ...

Отзывы: