Step 2a - Inside mount
The mounting brackets should be
positioned 4" in from the edge of the
window frame on each side.There has to
be a minimum 1" of space between the
back of the mounting bracket and the
nearest obstruction such as a window
handle, lock, etc.This space is to allow the
vanes to rotate properly. Attach the
mounting brackets using the bracket shims
and screws provided. Proceed to
step 3
.
Step 2b - Outside mount
Center the headrail over the window
opening at the desired height. Mark the
position of the ends of the headrail on the
wall. Attach the mounting brackets to the
wall 4" inches in from the marks making
sure the mounting brackets are level with
each other. Proceed to
step 3
.
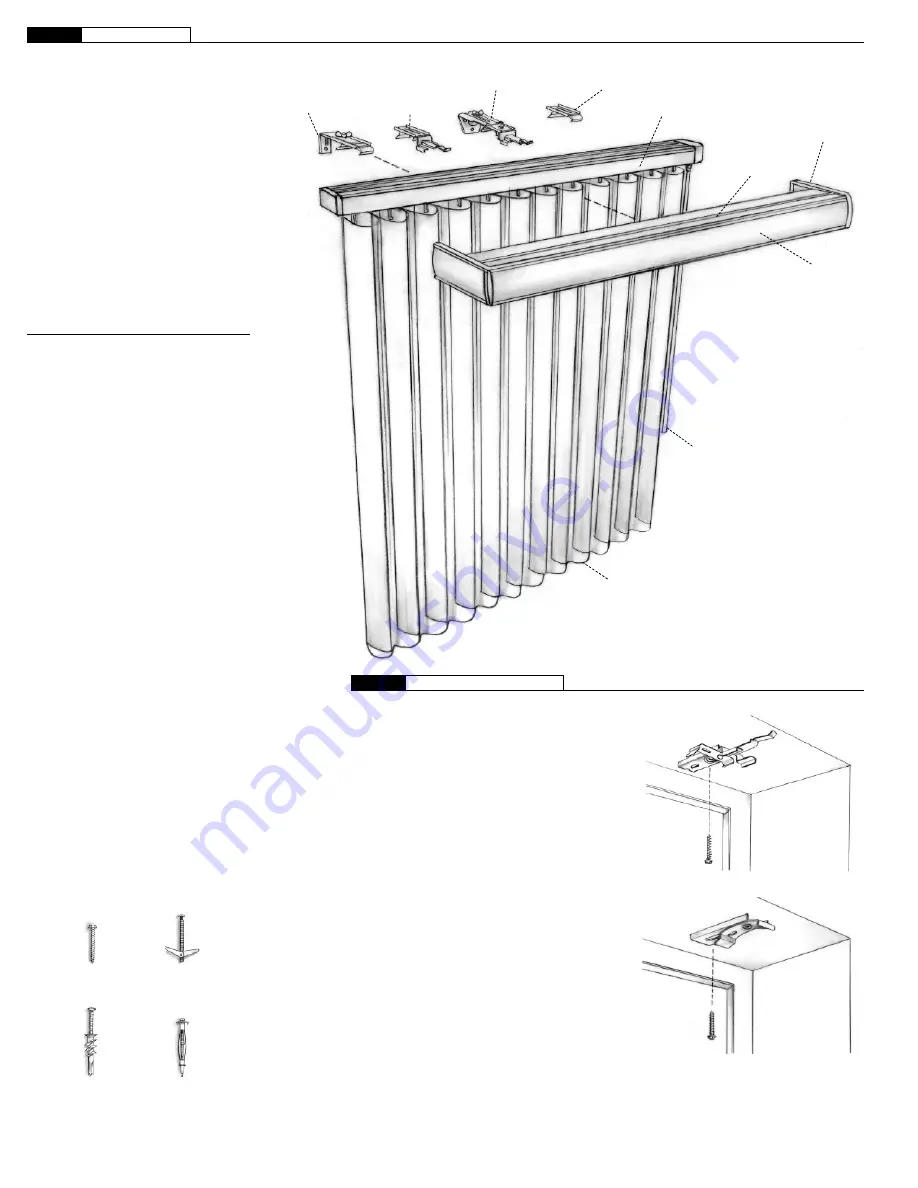
VALANCE
RETURN
OUTSIDE MOUNT
BRACKET
(WITH VALANCE)
WAND
FABRIC PANELS
HEADRAIL
VALANCE
DUST COVER
molly
bolt
self drilling
anchor
toggle
bolt
screws
(included)
Thank you
for purchasing from
Smith+Noble.Your new shadings have
been custom- crafted to your exact
window dimensions from the highest
quality materials. Once in your windows,
they will provide you with a lifetime of
beauty and trouble-free use.
Installing
your new shadings is easy.
Simply follow our step-by-step
instructions.We recommend that you
read through all the instructions before
you start. If you have questions, our
customer service representatives are
available from 5am to 7pm Mon-Fri or
7am to 4pm Sat-Sun Pacific time at
800.780.8889.
Getting Started
Remove
the shadings from the packaging.
Do not dispose of packaging until the
shadings are operating to your
satisfaction.
Check the diagram to make sure you
have all the parts indicated for the
appropriate type of installation.
Tools
you will need to install your
shadings: pencil, screwdriver, level and a
drill with
1
⁄
16
" drill bit.
Your brackets must be securely attached
to the mounting surface.When screwing
into a surface, the included screws must
hit wood studs. Otherwise, use a secure
fastener as illustrated (not included).
Wallboard or Plaster:
Use a secure fastener designed for hollow
wall applications.
Metal:
Pre-drill holes and use the
included screws.
Concrete, Stone, Brick or Tile:
Use
a masonry drill and appropriate plugs,
anchors or screws.
✱
When selecting a fastener, make sure it
is designed to support the weight of the
product being installed. Follow the
fastener manufacturer’s instructions for
proper installation of the fastener.
INSIDE MOUNT
BRACKET
(WITH VALANCE)
OUTSIDE MOUNT
BRACKET
(WITHOUT VALANCE)
S T E P 1
Yo u r N ew B l i n d
S T E P 2
A t t a c h i n g Yo u r B r a c ke t s
INSIDE MOUNT WITH VALANCE
INSIDE MOUNT WITHOUT VALANCE
For Ceiling Mount
Center the headrail over the window opening. Mark the position of the ends of the headrail
on the ceiling. Attach the mounting brackets to the ceiling 4" in from marks.
INSIDE MOUNT
BRACKET
(WITHOUT VALANCE)


