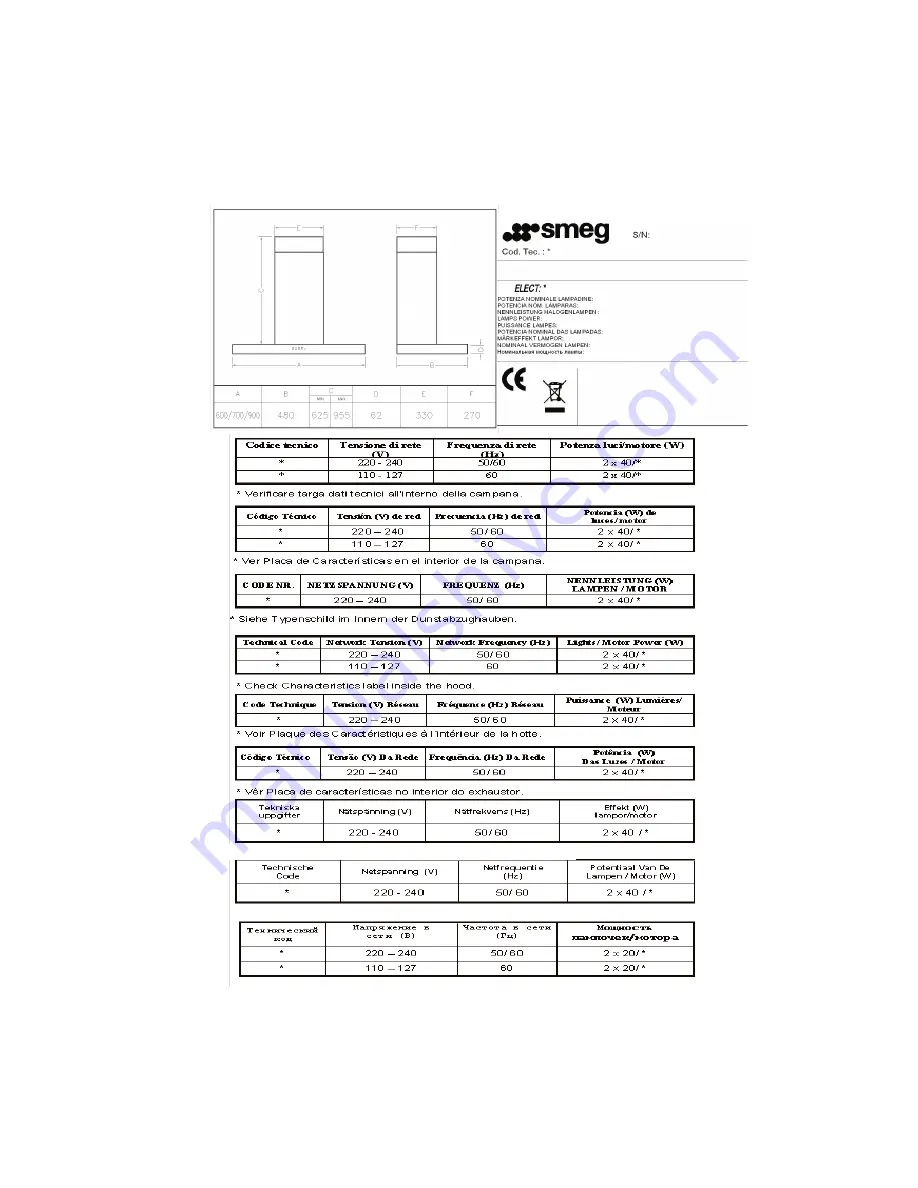
38
* Se Informationsbricka inuti fläktkåpan.
* Zie beschrijving van de eignschappen in het interieur van de afzuigkap.
* проверьте табличку характеристик внутри вытяжки
Страница 1: ...bzugshauben KSE 61X 71X 91X Instructions Manual Kitchen Hoods KSE 61X 71X 91X Manuel d instructions Hottes aspirantes KSE 61X 71X 91X Manual de Instruções Exaustores KSE 61X 71X 91X Bruksanvisning Köksfläktar KSE 61X 71X 91X Gebruiksaanwijzing Afzuigkappen KSE 61X 71X 91X Инструкция по эксплуатации Кухонные вытяжки KSE 61X 71X 91X Rev 1108 ...
Страница 2: ... over electric hobs and 65 cm over gas or mixed hobs FOLLOW THE HOBS MANUFACTURER S MINIMUM RECOMMENDATIONS Never leave gas hobs lit if not covered by a container The fat accumulated in the filters may drip or catch fire when the temperature increases Avoid cooking under the kitchen hood if the metal filters are not fitted e g while they are being cleaned in the dishwasher You must not produce fla...
Страница 3: ... Vertically adjustable tubecovers Switch on the extractor fan a few minutes before you start to cook in order to ensure that a steady air flow has been established before fumes appear Allow the extractor fan to run for several minutes after you have finished cooking between 3 to 5 minutes in order to expel all the grease from the outlet duct This prevents the return of grease smoke and smells Desc...
Страница 4: ...ilters can be cleaned by soaking them in hot water with neutral detergent until the fat dissolves and then rinsing them under the tap or using special anti grease products They can also be washed in a dishwasher In this case it is advisable to stack them vertically to avoid food residues to stick to them Dishwasher cleaning may damage the metallic surface blackening it although this will not affec...
Страница 5: ...n figure 1 Lift the upper tubecover up to the desired height and mark its shape on the wall Remove the tubecovers 9 Fit the clips F to the support C 10 Centre the support C around the shape marked trace and drill the fixing points for the wall plugs E Ø6 x 30 Attach the support C with the long bolts D Ø4 x 30 11 Fit the part B if the inner tube not supplied is Ø120 12 Attach the inner tube with a ...
Страница 6: ...38 Se Informationsbricka inuti fläktkåpan Zie beschrijving van de eignschappen in het interieur van de afzuigkap проверьте табличку характеристик внутри вытяжки ...
Страница 7: ...39 2 1 ...