background image

EN

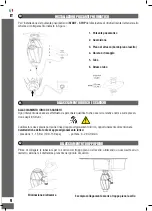
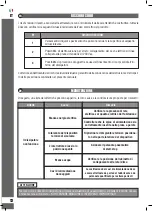
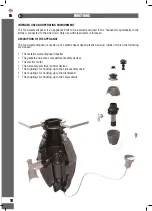
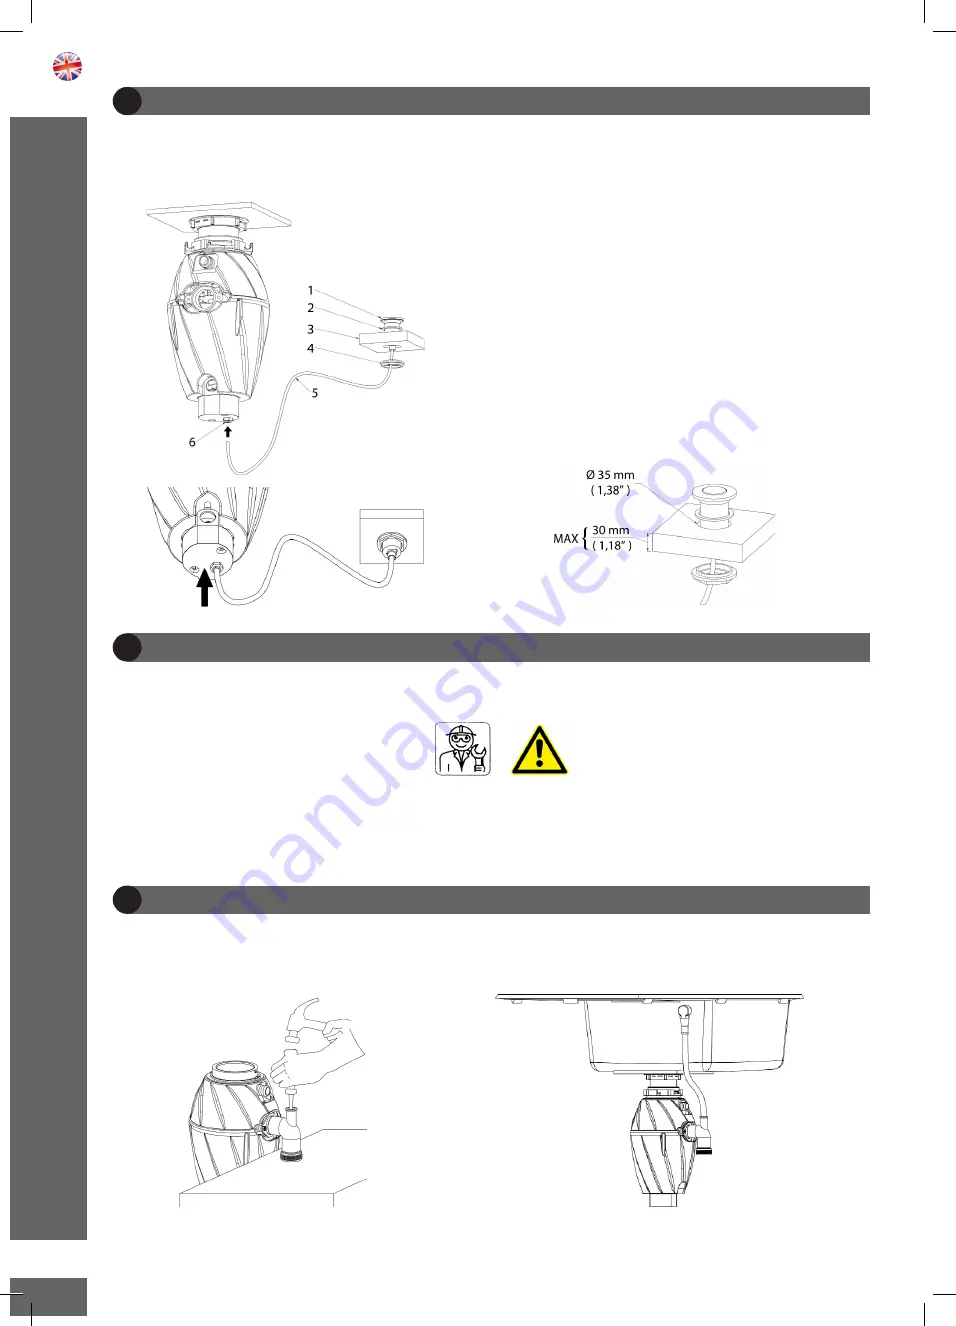
BUTTON SWITCH INSTALLATION

10

For installation of the food waste disposer 

START - STOP

 pneumatic push button follow the connection 

diagram shown in the figure:

1.  Pneumatic push button

2.  Gasket

3.  Connection surface (sink edge/surface)

4.  Fixing ring nut

5.  Pipe

6.  Pipe fitting

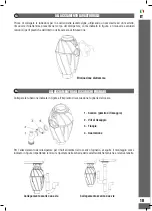
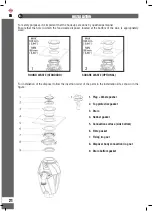
OVERFLOW CONNECTION

12.

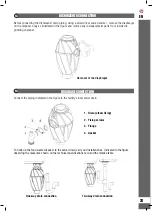
Before connecting the sink overflow drain piping, using a screwdriver and a  hammer, remove the diaphragm 

on the drain elbow.

Removal of the diaphragm 

Example of sink overflow drain connection

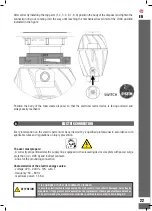
WATER AND DRAINAGE CONNECTION

11.

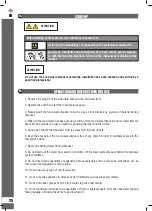
Every intervention must be carried out by a qualified professional in accordance with the applicable rules and 

regulations on injury prevention.

The user must prepare a proportioned water supply line 

Characteristics of the water supply source:

- pressure: 1 - 1,5 Bar (100 -150 kpa)            - capacity : 8 - 20 L/min

23

Содержание KITFD050

Страница 1: ...MODELS KITFD050 KITFD050UK KITFD075 KITFD075UK KITFD100 KITFD100UK MANUALE D ISTRUZIONI INSTRUCTION MANUAL BEDIENUNGS UND WARTUNGSANLEITUNG MANUEL D UTILISATION code MANIA02...

Страница 2: ...installazione l uso la manutenzione e garantisce con l osservanza delle sue indicazioni un ottimo funzionamento ed un perfetto rendimento dell apparecchiatura Rinno vando il ringraziamento per la scel...

Страница 3: ...ntari pi comunemente noto come tritarifiuti della serie KITFD050 KITFD075 KITFD100 Il dissipatore per rifiuti alimentari un apparecchio elettrico progettato e realizzato esclusivamente per uso domesti...

Страница 4: ...e qualificato dotato di tutte le attrezzature necessarie al corret to svolgimento delle operazioni in accordo con quanto contenuto nel presente manuale d uso secondo le normative vigenti e le regole d...

Страница 5: ...te nell apposita sezione Sbloccaggio del Dissipatore per sbloccare l appa recchiatura e Per rimuovere eventuali oggetti dal dissipatore per rifiuti alimentari utilizzare una pinzetta a becchi lun ghi...

Страница 6: ...PARECCHIATURA Il dissipatore per rifiuti alimentari si compone di un involucro in materiale plastico isolante termoformato all interno del quale sono alloggiati La girante metallica tritarifiuti Le gu...

Страница 7: ...ORBIMENTO Ampere giri min Peso Kg KITFD050 KITFD075 KITFD100 375 550 750 220 240 1 7 2 5 3 4 4 5 4 8 4 7 2800 DIMENSIONI PER L INSTALLAZIONE MODELLO MISURE IN MILLIMETRI 1 2 3 4 5 6 IT 6 KITFD050 KITF...

Страница 8: ...ni PILETTA TONDA STANDARD PILETTA QUADRATA OPZIONALE Per il montaggio del dissipatore rispettare la sequenza di inserimento dei particolari presenti nel kit di instal lazione come riportato in figura...

Страница 9: ...rtuni L utilizzatore deve predisporre linea elettrica di alimentazione opportunamente dimensionata dotata di un dispositivo di sezionamento completo di protezioni contro le sovracorrenti Id 0 03 A ed...

Страница 10: ...pieno del lavello utilizzando un cacciavite ed un martello eliminare il diaframma presente nel gomito di scarico Eliminazione diaframma Esempio collegamento scarico troppo pieno lavello IT ALLACCIAMEN...

Страница 11: ...ne Eliminazione diaframma ALLACCIAMENTO AGLI SCARICHI FOGNARI 14 Collegare la tubazione indicata in figura all impianto di evacuazione fognaria del locale 1 Scarico gomito di fissaggio 2 Viti di fissa...

Страница 12: ...ntari e la sciare scorrere l acqua per circa 20 30 secondi per consentire la pulizia della camera di triturazione e degli scarichi 5 Durante l utilizzo accertarsi che il flusso d acqua abbia una porta...

Страница 13: ...edda per alcuni secondi per sciacquare il tutto Posizione corretta guarnizione di protezione Guarnizione superiore di protezione Tappo SBLOCCAGGIO DEL DISSIPATORE 18 Se il motore del dissipatore di ri...

Страница 14: ...ono apparire le loro cause e le contromisure proposte per risolverli IT 13 Difetto Causa Rimedio Il dissipatore non funziona Manca energia elettrica Intervento del dispositivo termico di sicurezza L i...

Страница 15: ...tate le seguenti situazioni che determinano la decadenza delle clausole di garanzia Installazione impropria eseguita da personale non autorizzato e o specializzato Guasto o anomalia del dispositivo pe...

Страница 16: ...ar Client You have purchased an SMEG product and we would sincerely like to thank you for your choice The tradition and reliability of our Company guarantees the technical and aesthetic quality of the...

Страница 17: ...s a waste disposal in the range KITFD050 KITFD075 KITFD100 The food waste disposer is an electrical device designed and built exclusively for domestic use It cannot be used in environments with partic...

Страница 18: ...ance with this Instruction Manual and accor ding to existing laws SMEG Spa will be not held responsible for improper installation calibration and maintenance of the device ATTENTION Before carrying ou...

Страница 19: ...ever introduce hands or fingers into the food waste disposer g To reduce the risk of personal injury from materials ejected from the food waste disposer for never use the appliance without the top pro...

Страница 20: ...ON OF THE APPLIANCE The food waste disposer is made up of a plastic heat shaped plastic housing inside of which the following are housed The metallic waste disposal impeller The gaskets and access com...

Страница 21: ...E Vac ABSORBTION Ampere r min Weight Kg DIMENSIONS FOR INSTALLATION MODEL KITFD050 KITFD075 KITFD100 MEASURES IN MILLIMETER 1 2 3 4 5 6 370 420 180 185 420 185 70 70 205 205 70 205 140 140 250 255 140...

Страница 22: ...nk is appropriately sized ROUND WASTE STANDARD SQUARE WASTE OPTIONAL For installation of the disposer follow the insertion order of the parts in the installation kit as shown in the figure 1 Plug Wast...

Страница 23: ...tions on injury prevention The user must prepare A correctly proportioned electric supply line equipped with an isolating device complete with power surge protection ld 0 03 A and indirect contacts A...

Страница 24: ...ecting the sink overflow drain piping using a screwdriver and a hammer remove the diaphragm on the drain elbow Removal of the diaphragm Example of sink overflow drain connection WATER AND DRAINAGE CON...

Страница 25: ...ng chamber Removal of the diaphragm DRAINAGE CONNECTION 14 Connect the piping indicated in the figure to the facility s local sewer drain 1 Drain elbow fixing 2 Fixing screws 3 Flange 4 Gasket To hook...

Страница 26: ...he food waste disposer and let water flow for about 20 30 seconds in order to clean the grinding chamber and the drains 5 During use ensure that the water flow is at least 6 8 litre per minute 6 Keep...

Страница 27: ...smelling residues Let cold water flow for a few seconds in order to rinse everything Correct position of the protective gasket Top protective gasket Plug UNLOCKING OPERATION 18 If the food waste disp...

Страница 28: ...ppear their causes and the proposed countermeasu res for resolving them EN 27 Problem Cause Solution The disposer does not work No electrical power The thermal safety device has been tripped The start...

Страница 29: ...certained to have brought about the cancel lation of the warranty s provisions Improper installation carried out by unauthorized and or incompetent individuals Damage or defect of a device for imprope...

Страница 30: ...ilfreiche und sichere Anleitung f r Installation Ge brauch und Wartung Bei Beachtung der Hinweise und Angaben werden ein optimaler und leistungsstar ker Betrieb des Ger ts gew hrleistet Wir bedanken u...

Страница 31: ...erer bekannt der Baureihe KITFD050 KITFD075 KITFD100 Der K chenabfallzerk leinerer ist ein Elektroger t das ausschlie lich f r die Verwendung im Haushalt entworfen und gebaut wurde Er darf nicht in R...

Страница 32: ...ich von qualifiziertem Fachpersonal vorgenommen werden Bei unsachgem er Installation Einstellung und Wartung des Ger ts b ernimmt die Firma SMEG Spa keinerlei Haftung ACHTUNG Vor dem Ausf hren etwaige...

Страница 33: ...ers beschriebenen Verfahren verwenden um die Verstopfung des Ger ts zu l sen Um etwaige Gegenst nde aus dem Abfallzerkleinerer zu entfernen eine Pinzette mit langen Schn beln verwenden f Niemals die H...

Страница 34: ...auberem Wasser vorgesehen BESCHREIBUNG DES GER TS Der K chenabfallzerkleinerer besteht aus einem warmgeformten isolierenden Kunststoffgeh use in dessen Inneren untergebracht sind Das Abfallzerkleineru...

Страница 35: ...VGS STROMAUFNAH ME Ampere U min Gewicht kg EINBAUAUSMASSE MODELL MASSE IN MILLIMETERN 1 2 3 4 5 6 DE 34 KITFD050 KITFD075 KITFD100 375 550 750 220 240 1 7 2 5 3 4 4 5 4 8 4 7 2800 KITFD050 KITFD075 K...

Страница 36: ...Siebk rbchen Rund Standard Siebk rbchen Quadratisch Optional F r die Montage des K chenabfallzerkleinerers die Einbauabfolge der im Installations Bausatz enthaltenen Einzelteile wie in der Abbildung a...

Страница 37: ...sonal vorgenommen werden Dabei m ssen kundenseitig folgenden Voraussetzungen gegeben sein geeignete Netzversorgung mit vollkommener Trennvorrichtung berlastschutzvorrichtungen Id 0 03 A und Isolierung...

Страница 38: ...aufs der Sp le mithilfe eines Schraubenziehers und einem Hammer die Scherblende in der Kurve des Ablaufs beseitigen Beseitigung der Scherblende Beispiel des Anschlusses des Sp len berlaufs WASSERANSCH...

Страница 39: ...der Scherblende ANSCHLUSS AN DAS KANALISATIONSSYSTEM 14 Das in der Abbildung gezeigte Rohr an die Kanalisation des Raums anschlie en 1 Ablauf 2 Befestigungsschrauben 3 Flansch 4 Dichtung F r den Ansch...

Страница 40: ...die Reinigung der Zerkleinerungskammer und der Abfl sse zu erm glichen 5 W hrend des Gebrauchs sicherstellen dass das Wasser einen Durchsatz von mindestens 6 8 Liter pro Minute besitzt 6 Den Raum unte...

Страница 41: ...nde zu entfernen einige Sekunden lang kaltes Wasser laufen lassen um das Ganze zu sp len Richtige Lage der Schutzdichtung Obere Schutzdichtung St psel L SEN DES ZERKLEINERERS 18 Sollte der Motor des...

Страница 42: ...ntsprechenden Behebungsvor schl ge St rung Problem Aufl sung Der Zerkleinerer funktioniert nicht Es fehlt Strom Einschreiten der Thermo schutzvorrichtung Besch digten Kabeln Der Startschalter befindet...

Страница 43: ...hren den von der Garantie abgedeckten Eingriff nicht vorzunehmen Unsachgem e Installation ausgenommen von nicht befugtem bzw nicht qualifiziertem Personal Defekt oder St rung der Vorrichtung infolge...

Страница 44: ...ion l usage l entretien Le respect des observations qui y sont report es permet de garantir un fonctionnement et un rendement optimal de l appareil Nous vous remercions nouveau d avoir choisi notre pr...

Страница 45: ...eur de d chets alimentaires est un appareil lectrique con u et r alis exclusivement pour un usage domestique il ne peut pas tre utilis dans des environnements pr sentant des conditions particuli res c...

Страница 46: ...s en vigueur SMEG Spa d cline toute responsabilit d rivant d une installation d un r glage et d un entretien de l appareil erron s ATTENTION Avant d effectuer la moindre intervention d entretien coupe...

Страница 47: ...cet effet pour d bloquer l appareil e Pour retirer d ventuels objets pr sents dans le broyeur de d chets alimentaires utiliser une pince becs longs f Ne jamais introduire ses mains ou ses doigts dans...

Страница 48: ...PPAREIL Le broyeur de d chets alimentaires est compos d une enveloppe en mati re plastique isolante thermofor m e l int rieur de laquelle se trouvent Le disque m tallique de broyage Les joints et les...

Страница 49: ...BSORPTION Amp re tours min Poids kg DIMENSIONS POUR L INSTALLATION MOD LE MESURES EN MILLIM TRES 1 2 3 4 5 6 FR 48 KITFD050 KITFD075 KITFD100 375 550 750 220 240 1 7 2 5 3 4 4 5 4 8 4 7 2800 KITFD050...

Страница 50: ...te des dimensions ad quates Bonde ronde STANDARD Bonde carr e OPZIONALE Pour le montage du broyeur respecter la s quence d insertion des composants pr sents dans le kit d installation comme indiqu dan...

Страница 51: ...nt les normes de pr vention des accidents L utilisateur doit s occuper de pr parer la ligne lectrique d alimentation opportun ment dimensionn e dot e d un dispositif de sectionnement et de protections...

Страница 52: ...lein de l vier l aide d un tournevis et d un marteau liminer le diaphragme pr sent dans le coude d vacuation limination diaphragme Exemple de raccordement vacuation trop plein vier RACCORDEMENT EAU ET...

Страница 53: ...limination diaphragme RACCORDEMENT VACUATION DES EAUX US ES 14 Raccorder la tuyauterie indiqu e dans la figure au syst me d vacuation des eaux us es de la pi ce 1 vacuation 2 Vis de fixation 3 Bride 4...

Страница 54: ...sser couler l eau pendant environ 20 30 secondes afin de permettre le nettoyage de la chambre de broyage et des vacuations 5 Pendant l utilisation s assurer que le flux d eau pr sente un d bit d au mo...

Страница 55: ...malodorants faire couler de l eau froide pendant quelques secondes puis rincer le tout Position correcte du dispositif de protection Dispositif sup rieur de protection Bouchon D BLOCAGE DU BROYEUR 18...

Страница 56: ...qui peuvent appara tre leur cause et les solutions propos es pour y rem dier D faut Causes Solution Le broyeur ne fonctionne pas Absence d nergie lectrique Intervention du dispositif ther mique de s c...

Страница 57: ...d terminant l annulation des clauses de ga rantie sont av r es Installation impropre effectu e par un personnel non autoris et ou non sp cialis Panne ou anomalie du dispositif pour usage impropre Mod...

Страница 58: ...AR 57 SMEG SMEG...

Страница 59: ...1 2 58 AR KITFD050 KITFD075 KITFD100...

Страница 60: ...cchio 04014 PONTINIA LT ITALY Tel 39 0 773 840036 Fax 39 0 773 840038 3 4 5 59 AR SMEG SMEG PRODUCER Elleci S p A Strada Longitudinale A 1258 Z I Mazzocchio 04014 Pontinia LT Italy Tel 39 0773 840036...

Страница 61: ...60 AR...

Страница 62: ...6 61 AR...

Страница 63: ...1 2 3 4 5 6 62 AR 7 KITFD050 KITFD075 KITFD100 375 550 750 220 240 1 7 2 5 3 4 4 5 4 8 4 7 2800 KITFD050 KITFD075 KITFD100 370 420 180 185 420 185 70 70 205 205 70 205 140 140 250 255 140 255...

Страница 64: ...8 63 AR 1 2 3 4 5 6 7 8 9...

Страница 65: ...9 64 AR 1 2 3 4 6 7 8 9 LOCK Id 0 03 A 220 50 60 1 5...

Страница 66: ...10 12 11 65 AR 1 2 3 4 5 6 1 1 5 100 150 8 20...

Страница 67: ...13 14 66 AR 1 2 3 4...

Страница 68: ...15 16 67 AR PE...

Страница 69: ...17 18 68 AR...

Страница 70: ...19 20 69 AR 1 2 230 3 start stop...

Страница 71: ...21 22 23 70 AR KITFD050 KITFD075 KITFD100...

Страница 72: ...arie 2006 95 CE Bassa Tensione LVD 2004 108 CE Compatibilit Elettromagnetica EMC ed alle norme tecniche applicabili CEI EN 60335 1 CEI EN 61770 CEI EN 60529 is in conformity with the EU directives 200...

Отзывы: