background image

CHAPTER 1

WELCOME

2

smarttech.com/kb/171554

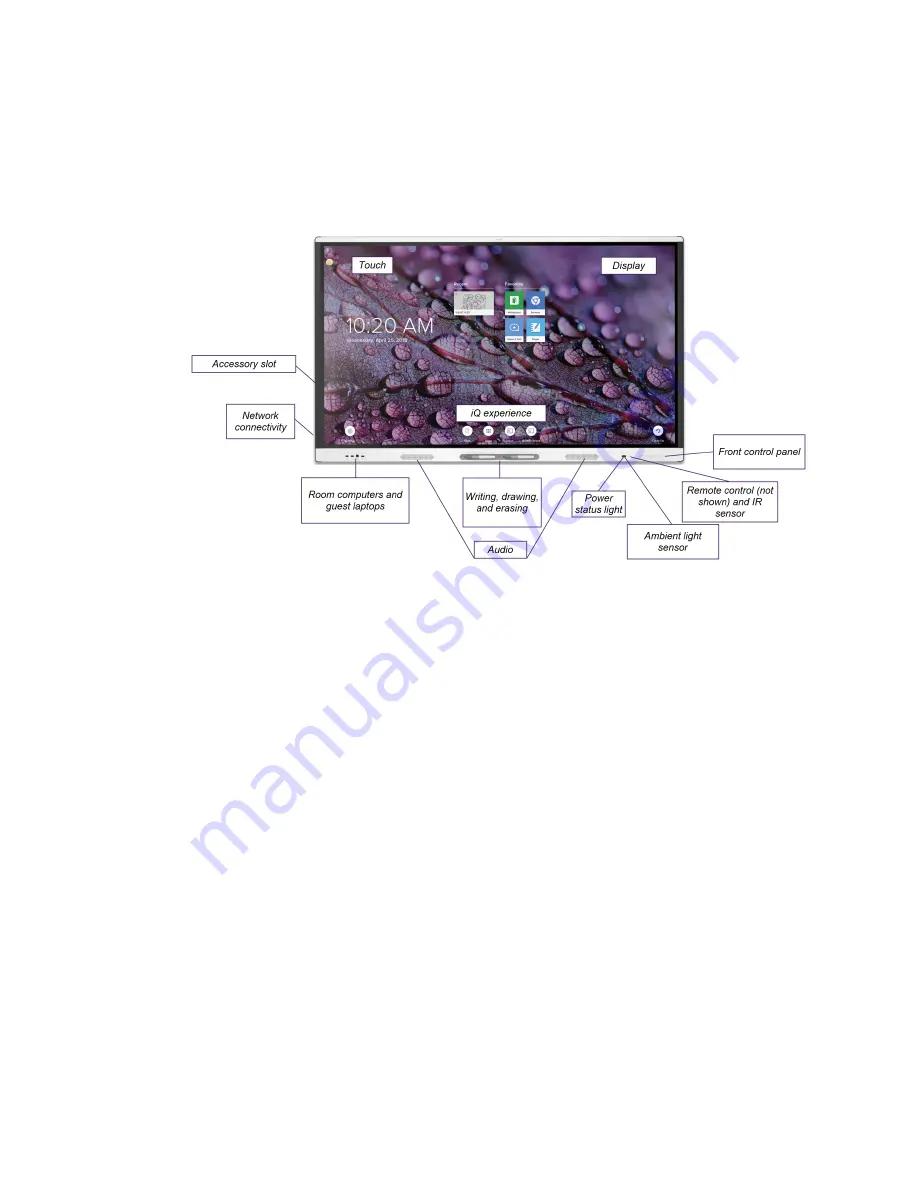
About the display

The SMART Board MX (V2) interactive display with iQ is the hub of your classroom.

The display includes an extensive set of features and components:

Touch

You can do everything on the display that you can do at your computer—open and close

applications, meet with others, create new documents or edit existing ones, visit websites, play

and manipulate videos, and so on—by touching the display’s surface.

You can use an array of gestures within applications, including panning, scaling, rotating, and

zooming in and out.

For more information, see

Using touch

on page 13.

Writing, drawing, and erasing

The display comes with two pens, which you can use to write or draw on the screen.

Use your fist or palm to erase digital ink on the screen.

With Object Awareness™, the display responds automatically to the tool or object you’re using,

whether it’s a pen, finger, or palm. The display’s Simultaneous Tool Differentiation technologies

allow two people to write independently and simultaneously.

For more information, see

Writing, drawing, and erasing

on page 15.

Содержание Board MX V2 Series

Страница 1: ...Was this document helpful smarttech com docfeedback 171554 SMART Board MX V2 series interactive displays USER GUIDE SBID MX265 V2 SBID MX275 V2 SBID MX286 V2 ...

Страница 2: ...r countries All third party product and company names may be trademarks of their respective owners Copyright notice 2019 SMART Technologies ULC All rights reserved No part of this publication may be reproduced transmitted transcribed stored in a retrieval system or translated into any language in any form by any means without the prior written consent of SMART Technologies ULC Information in this ...

Страница 3: ...lation holes because they could touch dangerous voltage points and cause electric shock fire or product damage which may not be covered by the warranty l Do not place heavy objects on the power cable Damage to the cable could cause shock fire or product damage which may not be covered by the warranty l If the glass is broken do not touch the liquid crystal To prevent injury handle glass fragments ...

Страница 4: ...t users have come to expect As shipped your display delivers ENERGY STAR performance and savings However changing some settings may increase energy consumption beyond the limits required for ENERGY STAR certification For example increased brightness and contrast will increase power consumption Please consider the environment when you choose non ENERGY STAR settings Federal Communication Commission...

Страница 5: ... limit and iii the maximum antenna gain permitted for devices in the band 5725 5825 MHz shallcomply with the e i r p limits specified for point to point and non point to point operation as appropriate iv Users should also be advised that high power radars are allocated as primary users i e priority users of the bands 5250 5350 MHz and 5650 5850 MHz and that these radars could cause interference an...

Страница 6: ...250 5 350 MHz et 5 470 5 725 MHz doit se conformer à la limite de p i r e iii le gain maximald antenne permis pour les dispositifs utilisant la bande 5 725 5 825 MHz doit se conformer à la limite de p i r e spécifiée pour l exploitation point à point et non point à point selon le cas iv De plus les utilisateurs devraient aussiêtre avisés que les utilisateurs de radars de haute puissance sont désig...

Страница 7: ...ing and using the Home screen 10 Using the front control panel 10 Using the remote control 11 Using touch 13 Writing drawing and erasing 15 Adjusting the volume 16 Freezing or hiding the screen 16 Chapter 3 Using the iQ apps 19 Using the Apps Library 19 Using the Files Library 20 Using kapp Whiteboard 20 Using SMART Notebook Player 20 Using Browser 21 Using Screen Share 21 Using screenshots 21 Ins...

Страница 8: ...e screen 32 There s no sound or there s a problem with the sound 33 Touch isn t working as expected 34 The pens and erasers aren t working as expected 35 iQ apps aren t working as expected 35 SMART software on connected computers isn t working as expected 35 The SMART PCM8 OPS PC isn t working as expected 36 Contacting your reseller for additional support 36 ...

Страница 9: ...g your specific model 5 Accessories 6 SMART PCM8 series OPS PC 6 SBA 100 projection audio system 6 SMART Audio 400 classroom amplification system 7 Stands 7 USB extenders 7 More information 7 This chapter introduces the SMART Board MX V2 series interactive displays About this guide This guide explains how to use a SMART Board MX V2 series interactive display This guide is intended for individuals ...

Страница 10: ... s surface You can use an array of gestures within applications including panning scaling rotating and zooming in and out For more information see Using touch on page 13 Writing drawing and erasing The display comes with two pens which you can use to write or draw on the screen Use your fist or palm to erase digital ink on the screen With Object Awareness the display responds automatically to the ...

Страница 11: ... about the iQ apps see Chapter 3 Using the iQ apps on page 19 Display The 4K ultra high definition LCD display provides optimal image clarity and wide viewing angles The size of the display varies by model Models Size diagonal SBID MX265 V2 65 SBID MX275 V2 75 SBID MX286 V2 86 Audio The display includes two 15 W integrated speakers which are designed to provide sound at the front of a room Network...

Страница 12: ...S PC on page 6 CAUTION The accessory slot s maximum available power is 60 W The slot is not a limited power source To reduce the risk of fire make sure that accessories connecting to the slot satisfy the fire enclosure requirements of IEC 60950 1 and or IEC 62368 1 Front control panel The front control panel contains buttons for turning the display on and off controlling the volume freezing and un...

Страница 13: ...ntrol and IR sensor You can use the remote control to turn the display on and off adjust display settings and so on The IR sensor for the remote control is located in the bottom right corner of the display s frame For more information about the remote control see Using the remote control on page 11 Identifying your specific model SMART offers several models of the SMART Board MX V2 series interact...

Страница 14: ...ble in two standard configurations SMART PCM8 series OPS PCs are WHQL certified and fully licensed with Windows 10 Pro out of the box Install the OPS PC in a display s OPS slot to provide a complete 4K UHD Windows 10 solution at your fingertips without the need for an external PC or additional cables Install familiar Windows software applications such as SMART Notebook collaborative learning softw...

Страница 15: ... weight you can install the display on a SMART floor stand USB extenders As noted in the display s specifications there is a maximum length for USB cable connections between the display and computer When using USB 2 0 the cable should be no longer than 16 5 m When using USB 3 0 the cable should be no longer than 9 3 m Use one of the following USB extenders if you need a longer USB connection Exten...

Страница 16: ......

Страница 17: ...d hiding the screen shade 17 This chapter explains how to wake the display when it s asleep how to view connected computers input and how to interact with the display Waking up the display and putting it back to sleep To wake the display press the Power button on the front control panel or remote control To return the display to a partial sleeping state press the Power button on the front control ...

Страница 18: ...n more about the Home screen see Understanding the Home screen Using the front control panel The front control panel contains buttons for returning to the iQ Home screen switching the input source showing and hiding a screen shade controlling the volume freezing and unfreezing the screen and turning the display on and off No Name Procedure 1 Home Press to return to the iQ Home screen see Opening a...

Страница 19: ...splay and putting it back to sleep on page 9 Using the remote control The infrared remote control enables you to turn the display on or off change the input source change the volume access the display s iQ apps and more You can also use the remote control to open the on screen menus and change the display s settings IMPORTANT l Do not subject the remote control to strong shock l Keep the remote co...

Страница 20: ...ailable right after waking up the display or turning it on Wait a few seconds and then the display will respond to touch l Press and hold for four seconds to turn off the display l Press and hold for 10 seconds to reset the display 2 Home Open the iQ Home screen see Opening and using the Home screen on page 10 3 Up and down buttons Select a menu option in the settings 4 Set Open a selected menu op...

Страница 21: ...ge 16 13 Volume mute Mute the volume see Adjusting the volume on page 16 Using touch You can do everything on the display that you can do at your computer open and close applications meet with others create new documents or edit existing ones visit websites play and manipulate videos and so on by touching the display s surface You can use an array of gestures within applications including panning ...

Страница 22: ...CHAPTER2 USING BASIC FEATURES 14 smarttech com kb 171554 Pan one finger Pan two fingers scroll Pinch to zoom in scale enlarge Pinch to zoom out scale reduce Rotate Flick Erase with palm Erase with fist ...

Страница 23: ...perties temporarily or use some of SMART Ink s tools such as screen capture spotlight screen shade and so on To learn more about using SMART Ink and its toolbar visit the SMART Ink support page Here are a few quick links to get you started l Turning SMART Ink on or off l Open the toolbar l Close the toolbar keep SMART Ink on but hide the floating toolbar l Using presentation tools such as Spotligh...

Страница 24: ...el or the remote control NOTES l Press and hold the Volume Down button to rapidly decrease the volume l When you press the Volume Up or Volume Down button on the front control panel or the remote control you can use the on screen slider to adjust the volume To mute the volume Press the Mute button on the remote control Freezing or hiding the screen You can temporarily freeze or hide the contents o...

Страница 25: ...isplay of those applications To unfreeze the screen press the Freeze button again Showing and hiding the screen shade You can temporarily hide the contents of the screen behind a virtual screen shade by pressing the Screen Shade button on the front control panel or the remote control To remove the screen shade and reveal the screen contents press the Screen Shade button again ...

Страница 26: ......

Страница 27: ...kapp Whiteboard You can use these apps along with the Files Library and Apps Library to deliver lessons in a classroom or coordinate meetings and other collaborative activities NOTE Some apps such as Screen Share require a configured network connection If you re experiencing issues with these apps contact your IT administrator to make sure the network and display have been properly configured Usin...

Страница 28: ... Library Using kapp Whiteboard Using kapp Whiteboard you can write and erase notes on the display just as you do on a traditional dry erase board You can also save your notes for later reference and share them using the SMART kapp app kapp Whiteboard is the default whiteboard for enterprise models To learn how to write draw and erase in kapp Whiteboard see Writing drawing and erasing on page 15 To...

Страница 29: ... l Windows computers using Miracast1 Chrome browser or AirParrot l Mac computers and iOS devices using AirPlay l Android devices using Cast Screen To learn how to use the other features of Screen Share see Sharing your device s screen to the display Using screenshots When using the Browser or Screen Share apps you can write or draw on a screenshot and save it to the Files Library To learn more abo...

Страница 30: ...PS 22 smarttech com kb 171554 Cleaning up the display After you ve finished using the display tap Clean Up on the Home screen to clean up the display for the next user To learn more see Preparing the display for the next user ...

Страница 31: ...ing the OPS PC input 28 Connecting external displays 28 Connecting USB drives peripherals and other devices 29 WARNING Ensure that any cables that cross the floor to the display are properly bundled and marked to avoid a trip hazard Installing and using SMART software The display comes with the following software which you can install on connected computers Software Description Licensing details S...

Страница 32: ...sold separately Software Description SMART Remote Management Cloud based mobile device management software for remotely maintaining supporting controlling and securing the display and your other devices Contact your authorized SMART reseller smarttech com where for information about purchasing SMART software Downloading and installing SMART software You can download SMART software from smarttech c...

Страница 33: ... and interact with their inputs Side and bottom connector panel Front connector panel NOTES l Install SMART software on any computers you connect to the display see Installing and using SMART software on page 23 l Your organization s installers might have connected cables to the display and run the cables behind a wall or under the floor to a desk or table where you can place your computer ...

Страница 34: ...no device is connected to an input o A black thumbnail indicates a device is connected to an input but is in Sleep mode o A thumbnail showing a preview screen indicates an active device is connected to an input 3 Tap the computer s thumbnail Setting a connected computer s resolution and refresh rate The following table presents the recommend resolutions and refresh rates for the display s HDMI 1 H...

Страница 35: ...z 1024 768 4 3 XGA 60 XGA 70 XGA 75 60 004 Hz 70 069 Hz 75 029 Hz 800 600 4 3 SVGA 60 SVGA 72 SVGA 75 60 317 Hz 72 188 Hz 75 000 Hz 640 480 4 3 VGA 60 59 940 Hz If possible set any connected computers to these resolutions and refresh rates See the connected computers operating system documentation for instructions Connecting USB drives peripherals and other devices You can use USB drives periphera...

Страница 36: ...PC on page 6 CAUTION Do not install the OPS PC or remove it from the accessory slot while the display is turned on TIP You can install the SMART software that is included with the display on the OPS PC For more information on installing software see Installing and using SMART software on page 23 Viewing the OPS PC input To view the OPS PC input 1 Press the Input button on the front control panel o...

Страница 37: ...cted computers and devices installed in the accessory slot such as the SMART PCM8 series OPS PC The following table shows which USB 3 0 Type A receptacles you can use with each input source and the supported USB speed Input source USB 3 0 Type A receptacle on the side connector panel USB 2 0 Type A receptacle on the front connector panel iQ SuperSpeed Hi Speed HDMI 1 SuperSpeed Hi Speed HDMI 2 Sup...

Страница 38: ...om kb 171554 NOTE If a SMART PCM8 series OPS PC is installed in the accessory slot you can connect USB drives peripherals and other devices to the USB 2 0 Type A USB 3 0 Type B and USB Type C receptacles on the OPS PC to access those devices from the OPC PC input ...

Страница 39: ...ms aren t covered below or the solutions to the symptoms don t work refer to the SMART knowledge base for additional troubleshooting information community smarttech com s topic 0TO0P000000Xt5yWAC mx series The display isn t turning on Symptom Troubleshooting steps The power light isn t lit l Make sure the power cable is securely fastened to the power outlet and the display NOTE If the power cable ...

Страница 40: ...age is dim l Switch to a different input and then backto the first input l Make sure any connected computers are on and not in Standby mode l Set any connected computers resolution and refresh rate to values that the display supports See Setting a connected computer s resolution and refresh rate on page 26 l Restart the display and any connected computers l Replace the video cables connecting any ...

Страница 41: ...ume is low OR The sound is distorted or muffled l If you re using an externalaudio system make sure it is turned on l Make sure the cables connecting the display to the computer are securely fastened NOTES o The display s stereo 3 5 mm in connector works with the VGA input only o Connecting an audio cable to the display s stereo 3 5 mm out connector disables the internalspeakers o If you re using ...

Страница 42: ...uest laptops on page 25 l l Make sure any connected computers have detected the display s USB connection and SMART Product Drivers 12 14 or later is installed l On Windows computers open Device Manager and make sure there is no red X or yellow explanation mark over the display s icon l On Mac computers open System Information and make sure there are no error messages in the display s row l For Mac...

Страница 43: ...Make sure SMART Product Drivers is 12 14 or later When you write on the screen the inkappears in the wrong place OR Writing is intermittent OR Inkdisappears as you write l Restart the display l Confirm with the installers that the computer is connected to the display with only a single cable l Make sure SMART Product Drivers and SMART Inkare installed and running on any connected computers l Remov...

Страница 44: ... Use the On Screen Keyboard OSK to type l Enable tablet mode Tap the notification icon in the bottom right corner of the screen and then select Tablet mode For more information see Turn tablet mode on or off Windows 10 or the OPS PC are unresponsive l Restart the OPS PC a Press and hold the power button on the OPS PC b Wait two minutes c Press the power button to turn on the OPS PC l If restarting...

Страница 45: ... left side of the display pictured TIPS l Scan the QR code on the label to view the SMART Board MX V2 series interactive display support pages on the SMART website l You can also find the serial number in the iQ settings Refer to the SMART Board MX V2 series interactive displays installation and maintenance guide smarttech com kb 171555 for more information ...

Страница 46: ......

Страница 47: ......

Страница 48: ...SMART TECHNOLOGIES smarttech com support smarttech com contactsupport smarttech com kb 171554 ...

Отзывы: