background image

 8.3.3 

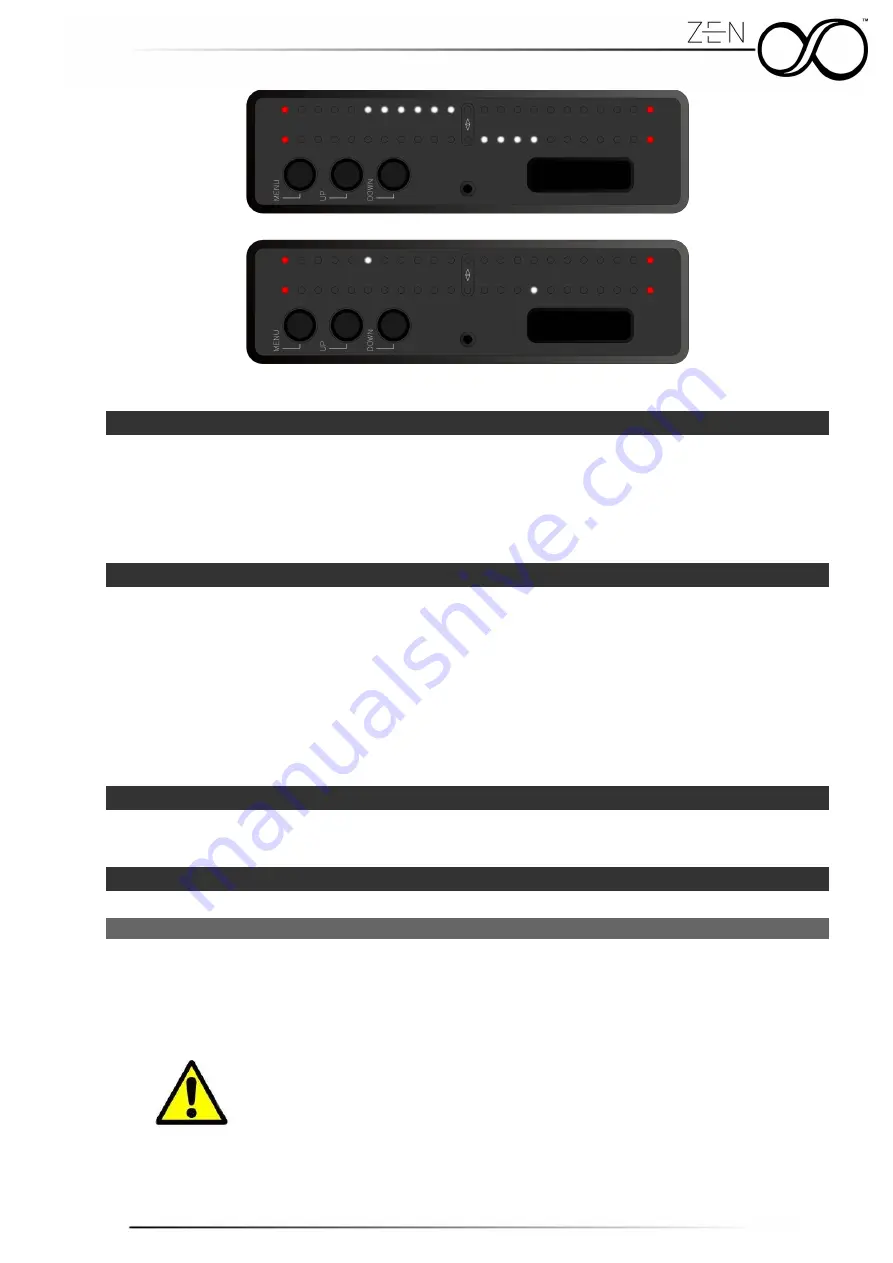
LED Deadband

Permette di definire uno spazio arbitrario tra il LED centrale ed il primo LED utile a destra
e sinistra per la visualizzazione dell'inclinazione dell'asse.
Risulta   essere   molto   utile   per   avere   un   riscontro   visivo   immediato   quando   l'asse
visualizzato è a zero.

 8.3.4 

Brightness

E' possibile variare la luminosità delle due barre LED in modo da ottimizzare l'intensità
luminosa in base all'ambiente di lavoro.
Grazie al sensore di luminosità integrato in SmartCAM Zen, è possibile non solo definire
una luminosità fissa, ma soprattutto definire un range di luminosità minimo e massimo.
Tale possibilità è disponibile solo impostando la modalità automatica la quale permette una
regolazione autonoma della luminosità dei LED (tra il valore minimo e massimo perscelti)
in base all'ambiente circostante.

 8.4  System

In questo menù è possibile selezionare alcuni parametri di sistema di SmartCAM Zen.

 8.4.1 

Options

 8.4.1.1 

Auto Power On

Come   riportato   nel   capitolo   6,   lo   stato   operativo   di   ZEN   subito   dopo   aver   fornito
alimentazione è SLEEP MODE.
E'   possibile   impostare   invece   un   override   di   questa   modalità   e   permettere   di   entrare
automaticamente in STANDARD MODE all'accensione.

Questo menu è presente ed accessibile solo in SmartCAM Zen come
prodotto Standalone.

13

Содержание SmartCam Zen

Страница 1: ...1 v 1 3 ...

Страница 2: ... 8 1 3 1 2 Auto Disengage 10 8 1 3 2 Sensitivity 10 8 1 4 Defaults 10 8 2 Axis Manager 11 8 2 1 Axis Selection 11 8 2 2 Ranges 11 8 2 3 Response Speed 12 8 2 4 Flip Direction 12 8 3 Display Setup 12 8 3 1 Display Style 12 8 3 2 Markers 12 8 3 3 LED Deadband 13 8 3 4 Brightness 13 8 4 System 13 8 4 1 Options 13 8 4 1 1 Auto Power On 13 8 4 1 2 Zen Upside Down 14 8 4 1 3 Fast Menu Exit 14 8 4 2 Zen ...

Страница 3: ...able 23 8 1 3 1 2 Auto Disengage 23 8 1 3 2 Sensitivity 23 8 1 4 Defaults 23 8 2 Axis Manager 23 8 2 1 Axis Selection 24 8 2 2 Ranges 24 8 2 3 Response Speed 25 8 2 4 Flip Direction 25 8 3 Display Setup 25 8 3 1 Display Style 25 8 3 2 Markers 25 8 3 3 LED Deadband 26 8 3 4 Brightness 26 8 4 System 26 8 4 1 Options 26 8 4 1 1 Auto Power On 26 8 4 1 2 Zen Upside Down 27 8 4 1 3 Fast Menu Exit 27 8 4...

Страница 4: ...odotto In caso di guasto la riparazione del prodotto deve essere eseguita solo da personale qualificato ed autorizzato da SmartSystem Srl Utilizzare solo per lo scopo preposto Non rimuovere alcuna parte o procedere al disassemblaggio di SmartCAM Zen Non sono presenti parti riutilizzabile dall utente all interno di SmartCAM Zen ATTENZIONE AL FINE DI PREVENIRE INCENDI ESPLOSIONI O SHOCK ELETTRICI NO...

Страница 5: ...e Assi contemporaneamente con regolazione fissa o automatica della luminosità in base alla luminosità ambientale Display grafico per gestione e visualizzazione parametri operativi Connessione USB C per aggiornamento Firmware o Alimentazione Tensione di alimentazione tramite PushPull 2 Poli da 5V a 20V Auto spegnimento per tensione minori di 5V o superiori di 20V Protetto contro inversioni di polar...

Страница 6: ...porzionale a quanto impostato per lo specifico asse Per ogni barra LED sono presenti 23 emettitori che permettono quindi di suddividere l angolo massimo prescelto in 11 suddivisioni Questo permette di avere una migliore granularità nella visualizzazione permettendo al contempo di sfruttare gli emettitori esterni come markers sempre attivi e mantenere una risoluzione minima adeguata 6 ...

Страница 7: ...cesso dei segnali senza però visualizzare alcun elemento grafico sia nelle barre led che nel display principale La modalità operativa principale è definita STANDARD MODE ed è la modalità operativa in cui le barre LED mostrano i dati provenienti dai sensori in base alle scelte dell utente mentre il Display principale di SmartCAM Zen permette la visualizzazione diretta degli assi prescelti con una p...

Страница 8: ...sul display Long Click Permette di eseguire l azione visualizzata sul display e di tornare immediatamente in STANDARD MODE oppure di effettuare un RETURN al menu precedente in base alla configurazione vedi 8 4 1 3 7 2 Tasto UP Modalità Operativa Stato pulsante Descrizione SLEEP MODE Single Click Permette il passaggio a STANDARD MODE Long Click STANDARD MODE Single Click Long Click Permette di eseg...

Страница 9: ...rnare ad un livello superiore di menu La pressione del pulsante menu abilita o disabilità la funzione indicata 8 1 Zero Set Permette di azzerare SmartCAM Zen in qualunque posizione 8 1 1 Execute Esegue l azzeramento degli assi nella posizione corrente Gli assi che vengono azzerati sono solo quelli correntemente visualizzati Eseguendo l azzeramento tramite menu verrà effettuato un conto alla rovesc...

Страница 10: ...epite dal sensore Nel caso queste variazioni corrispondessero ad un pattern ciclico alta luminosità bassa luminosità ottenibile anche effettuando un saluto con la mano di fronte al sensore il sistema provvederà ad azzerare automaticamente gli assi visualizzati La presenza della funzione attivata è mostrata all utente con il simbolo posto nelle vicinanze della rappresentazione numerica dell asse vi...

Страница 11: ...n vedi 8 4 2 STANDARD MODE Voce di menu BARRA LED SUPERIORE BARRA LED INFERIORE ROLL ROLL TILT TILT PAN PAN ROLL TILT ROLL TILT ROLL PAN ROLL PAN TILT PAN TILT PAN ROLL STS ROLL STS DYNAMIC MODE Voce di menu BARRA LED SUPERIORE BARRA LED INFERIORE ROLL ROLL TILT TILT ROLL TILT ROLL TILT ROLL STS ROLL STS Ovviamente il display riporterà in STANDARD MODE i valori numerici rilevati dai sensori di Sma...

Страница 12: ...uesta modifica non interviene nella rapresentazione numerica nel display 8 3 Display Setup E possibile configurare lo stile di visualizzazione per quanto riguarda le barre LED superiore ed inferiore di SmartCAM Zen 8 3 1 Display Style Indipendentemente se la visualizzazione è singolo o doppio asse è possibile visualizzare l angolo selezionato in modalità MOVING DOT SLIDING BAR 8 3 2 Markers Come a...

Страница 13: ... ma soprattutto definire un range di luminosità minimo e massimo Tale possibilità è disponibile solo impostando la modalità automatica la quale permette una regolazione autonoma della luminosità dei LED tra il valore minimo e massimo perscelti in base all ambiente circostante 8 4 System In questo menù è possibile selezionare alcuni parametri di sistema di SmartCAM Zen 8 4 1 Options 8 4 1 1 Auto Po...

Страница 14: ...è consigliata per un utilizzo su mezzi statici dove ZEN viene sottoposta raramente e continui movimenti 8 4 2 2 Dynamic Mode In questa modalità operativa i sensori presenti in ZEN sono tarati in modo tale da fornire la massima accuratezza nel rilevamento delle rotazioni inerenti ROLL TILT e STS Questa modalità è consigliata per un utilizzo su mezzi mobili dove ZEN viene sottoposta continuamente a ...

Страница 15: ...ivo 25 luglio 2005 n 151 Attuazione delle Direttive 2002 95 CE 2002 96 CE e 2003 108 CE relative alla riduzione dell uso di sostanze pericolose nelle apparecchiature elettriche ed elettroniche nonché allo smaltimento dei rifiuti il simbolo del cassonetto barrato riportato sull apparecchiatura o sulla sua confezione indica che il prodotto alla fine della propria vita utile deve essere raccolto sepa...

Страница 16: ...to dopo l accertamento del difetto dietro presentazione della scheda di garanzia debitamente compilata oppure a titolo sostitutivo del contratto di acquisto del primo compratore La garanzia scade dopo 24 mesi non verrà prolungata né dalla presentazione di un reclamo né da eventuali adempimenti a posteriori Dalla garanzia sono esclusi eventuali danni causati da un uso improprio e o errato dell attr...

Страница 17: ...y different from the one provided with the product In case of failure the SmartCAM Zen must be repaired only by qualified staff authorized by SmartSystem Srl Use SmartCAM Zen just for its own function Do not remove any part or disassembly the SmartCAM Zen There are no reusable parts in the SmartCAM Zen WARNING To prevent fire explosion or electrical shock NEVER USE the product in the rain in wet o...

Страница 18: ...ixed or automatic brightness adjustment based on ambient brightness Graphic display for management and for visualization of operating parameters USB C connection for powering the unit and for Firmware update Power supply via PushPull 2 Poles connector Voltage range from 5V to 20V Auto shutdown for voltage lower than 5V or higher than 20V Protected against polarity inversions Temperature range 10 C...

Страница 19: ...ional to what is set for the specific axis For each LED bar there are 23 emitters which therefore make it possible to divide the maximum selected angle into 11 subdivisions This allows to have a better granularity in the visualization while allowing to exploit the external emitters as markers always active and to maintain an adequate minimum resolution 19 ...

Страница 20: ...sors and signal processing components active without displaying any graphic elements LED Bars and main display are OFF The main operating mode is called STANDARD MODE and it is the operating mode in which the LED bars show the data coming from the sensors according to the user s choices The main display of SmartCAM Zen allows the direct visualization of the selected axis with an accuracy of up to ...

Страница 21: ...splay Long Click Allows you to perform the action shown on the display and immediately return to STANDARD MODE or to execute a RETURN BACK to the previous menu based on the specific configuration see 8 4 1 3 7 2 Up Button Operational Mode Button State Description SLEEP MODE Single Click Set the operational mode to STANDARD MODE Long Click STANDARD MODE Single Click Long Click It allows you to quic...

Страница 22: ...the indicated function 8 1 Zero Set It allows you to reset SmartCAM Zen in any position 8 1 1 Execute It executes the zeroing of the axis in the current position The axis that are zeroed are only those currently displayed By performing the zero set via menu a countdown will be carried out in order to minimize vibrations or movements imposed on the system during interaction with SmartCAM ZEN It is ...

Страница 23: ...of the sensor the system will automatically reset the displayed axis The presence of the activated function is shown to the user with the symbol placed near the numeric representation of the displayed axis 8 1 3 1 2 Auto Disengage Auto disengage allows you to disable the touchless reset function immediately after the first run This function is enabled by default as soon as the user activates the g...

Страница 24: ...D BAR ROLL ROLL TILT TILT PAN PAN ROLL TILT ROLL TILT ROLL PAN ROLL PAN TILT PAN TILT PAN ROLL STS ROLL STS DYNAMIC MODE MENU ITEM UPPER LED BAR LOWER LED BAR ROLL ROLL TILT TILT ROLL TILT ROLL TILT ROLL STS ROLL STS Obviously the display will show in STANDARD MODE the numerical values detected by the SmartCAM ZEN sensors based on what the user has chosen 8 2 2 Ranges This menu allows you to speci...

Страница 25: ...r This change does not affect the numerical representation on the display 8 3 Display Setup It is possible to configure the visual style for the upper and lower LED bars of SmartCAM Zen 8 3 1 Display Style Regardless if you are in single or dual axis you can visualize the angle on the led bar with these styles MOVING DOT SLIDING BAR 8 3 2 Markers To help the operator make the extremes of the prese...

Страница 26: ...s possible not only to define a fixed brightness but above all to define a minimum and maximum brightness range This possibility is available only by setting the automatic mode which allows an autonomous adjustment of the brightness of the LEDs between the minimum and maximum values chosen based on the external environment 8 4 System In this menu it is possible to select some system parameters of ...

Страница 27: ...This mode is recommended for use on static vehicles where ZEN is rarely subjected to continuous movements 8 4 2 2 Dynamic Mode In this operating mode the sensors inside ZEN are calibrated in such a way as to provide maximum accuracy in detecting rotations inherent in ROLL TILT and STS This mode is recommended for use on mobile vehicles where ZEN is continuously subjected to movements 8 4 3 Menu Ti...

Страница 28: ...es in charge of scrapping metallic materials and waste disposal Pursuant to Article 13 of the Italian Legislative Decree no 151 of 25 July 2005 Implementation of Directives 2002 95 EC 2002 96 EC and 2003 108 EC regarding the reduction in use of dangerous substances in electrical and electronic equipment as well as waste disposal Products bearing the barred dustbin symbol must be disposed of separa...

Страница 29: ...defect or providing the customer with a new product Any claims due to manufacturing or materials faults must be communicated by the customer upon presentation of the warranty card properly completed or of a proof of purchase The warranty which will expire after 24 months will not be extended either by a complaint or by subsequent executions Damage caused by accident misuse do it yourself repairs o...

Отзывы: