The Communication Interface
SMA
Technologie AG
Page 60
SB25_30-11:SE0307
Installation Guide
11.1 Connection of the Communication Interface
1.
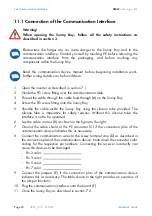
Open the inverter as described in section 7.1.
2.
Guide the PG screw fitting over the communication cable.
3.
Thread the cable through the cable feed-through (A) on the Sunny Boy.
4.
Screw the PG screw fitting onto the Sunny Boy.
5.
Sheathe the cable inside the Sunny Boy using the silicone tube provided. The
silicone tube is imperative for safety reasons. Without this silicone tube, the
interface is not to be operated.
6.
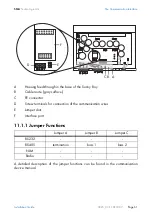
Lay the cable in area (B) as shown in the figure to the right.
7.
Ground the cable shield at the PE connector (C) if the connection plan of the
communication device indicates this as necessary.
8.
Connect the communication wires to the screw terminal strip (D) as described in
the connection plan of the communication device. Note down the connector color
coding for the respective pin numbers. Connecting the receiver incorrectly can
cause the devices to be damaged.
- Pin 2 color:
- Pin 3 color:
- Pin 5 color:
- Pin 7 color:
9.
Connect the jumpers (E) if the connection plan of the communication device
indicates this as necessary. The table shown to the right provides an overview of
the jumper functions.
10. Plug the communication interface onto the board (F).
11. Close the Sunny Boy as described in section 7.2.
Warning!
When opening the Sunny Boy, follow all the safety instructions as
described in section 3.
Electrostatic discharges are an acute danger to the Sunny Boy and to the
communication interface. Ground yourself by touching PE before removing the
communication interface from the packaging, and before touching any
components within the Sunny Boy.
Read the communication device manual before beginning installation work.
Further wiring details can be found there.
Содержание Sunny Boy SB 2500
Страница 2: ......
Страница 6: ...Explanation of the Symbols Used SMA Technologie AG Page 6 SB25_30 11 SE0307 Installation Guide...
Страница 10: ...Safety Instructions SMA Technologie AG Page 10 SB25_30 11 SE0307 Installation Guide...
Страница 20: ...Installation Requirements SMA Technologie AG Page 20 SB25_30 11 SE0307 Installation Guide...
Страница 34: ...Opening and Closing the Sunny Boy SMA Technologie AG Page 34 SB25_30 11 SE0307 Installation Guide...
Страница 58: ...Rating for a Line Circuit Breaker SMA Technologie AG Page 58 SB25_30 11 SE0307 Installation Guide...
Страница 62: ...The Communication Interface SMA Technologie AG Page 62 SB25_30 11 SE0307 Installation Guide...
Страница 65: ......

