4 Disconnecting the Inverter from Voltage Sources
SMA Solar Technology AG
Replacement Manual
STP50-40-BFS-RM-xx-10
13
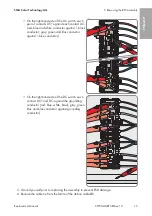
9. For STP 50-40 / STP 50-JP-40 (use of Sunclix DC connectors): Release and remove the DC
connectors. To do so, insert a flat-blade screwdriver or an angled screwdriver (blade width:
3.5 mm) into one of the side slots and pull the DC connectors out. When doing so, do not
lever the DC connectors out, but insert the tool into one of the side slots only to release the
locking mechanism, and do not pull on the cable.
10. For STP 50-US-40 / STP 33-US-41 / STP 50-US-41 / STP 62-US-41 (use of Amphenol DC
connectors): Unlock the DC connectors using the corresponding unlocking tool and remove
(refer to the manufacturer manual for further information).
11. Ensure that the DC connectors on the product and those that are equipped with DC
conductors are in perfect condition and that none of the DC conductors or DC plug contacts
are exposed.
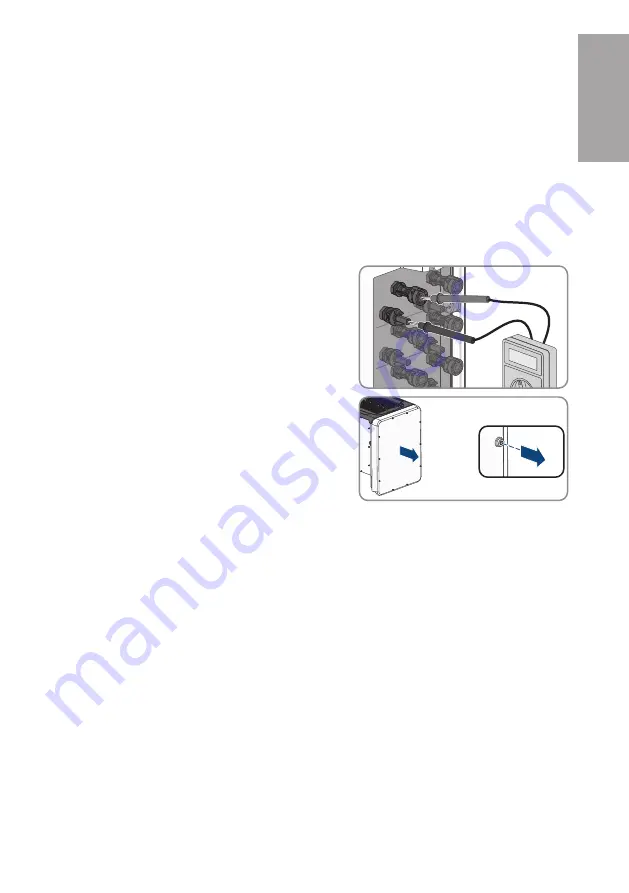
12. Ensure that no voltage is present at the DC inputs on
the inverter using a suitable measuring device.
A
B
C
<30V
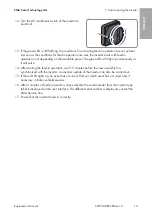
13. Unscrew (TX25) all 10 screws of the enclosure lid of
the AC-Connection Unit and remove the enclosure
lid carefully towards the front.
10x
14. Set the screws and the enclosure lid aside and store safely.
15. Ensure there is no voltage on the AC terminal block between L1 and N, L2 and N, and L3 and
N using a suitable measuring device. To do so, insert the test probe (maximum diameter:
2.5 mm (0.078 in)) into the measuring points of the respective terminal blocks.
16. Ensure that there is no voltage on the AC terminal block between L1 and grounding
conductor, L2 and grounding conductor, and L3 and grounding conductor using a suitable
measuring device. To do so, insert the test probe (maximum diameter: 2.5 mm (0.078 in)) into
the measuring points of the respective terminal blocks.
ENGLISH
Содержание NR PL-BFS5-JP-01
Страница 69: ...1 SMA Solar Technology AG STP50 40 BFS RM xx 10 69 1 5...
Страница 70: ...1 SMA Solar Technology AG STP50 40 BFS RM xx 10 70 1 6 X703 1 X703 6 10 Enter WCtlHz Hz 1 7 BFS BFS BFS...
Страница 72: ...2 SMA Solar Technology AG STP50 40 BFS RM xx 10 72 2 2 5 DC DC DC DC...
Страница 73: ...2 SMA Solar Technology AG STP50 40 BFS RM xx 10 73 5 C DC DC AC...
Страница 74: ...2 SMA Solar Technology AG STP50 40 BFS RM xx 10 74 DC 1000 V DC 5 C...
Страница 75: ...2 SMA Solar Technology AG STP50 40 BFS RM xx 10 75 v v SMA SMA SMA Solar Technology AG...
Страница 81: ...5 BFS SMA Solar Technology AG STP50 40 BFS RM xx 10 81 DC DC DC 1 1 DC DC DC PE PE 5 6 X1...
Страница 85: ...7 SMA Solar Technology AG STP50 40 BFS RM xx 10 85 12 DC I 13 LED LED 14 15 15 LED 16 5 SMA 17...
Страница 86: ...8 SMA Solar Technology AG STP50 40 BFS RM xx 10 86 8 1 SMA Solar Technology AG 2...
Страница 245: ...1 SMA Solar Technology AG STP50 40 BFS RM xx 10 245 1 5 1 6 X703 1 X703 6 10...
Страница 246: ...1 SMA Solar Technology AG STP50 40 BFS RM xx 10 246 WCtlHz Hz 1 7 BFS OCS OCS...
Страница 248: ...2 SMA Solar Technology AG STP50 40 BFS RM xx 10 248 5 DC DC DC DC DC...
Страница 249: ...2 SMA Solar Technology AG STP50 40 BFS RM xx 10 249 5 AC DC DC AC...
Страница 250: ...2 SMA Solar Technology AG STP50 40 BFS RM xx 10 250 DC 1000 V DC 5 C...
Страница 251: ...2 SMA Solar Technology AG STP50 40 BFS RM xx 10 251 SMA SMA SMA Solar Technology AG...
Страница 255: ...4 SMA Solar Technology AG STP50 40 BFS RM xx 10 255 15 AC L1 N L2 N L3 N 2 5 mm 0 078 in 16 AC L1 L2 L3 2 5 mm 0 078 in...
Страница 257: ...5 BFS SMA Solar Technology AG STP50 40 BFS RM xx 10 257 DC DC DC 1 1 DC DC DC 1 5 6 X1...
Страница 261: ...7 SMA Solar Technology AG STP50 40 BFS RM xx 10 261 12 DC I I 13 LED LED 14 15 15 LED 16 5 SMA 17...
Страница 262: ...8 SMA Solar Technology AG STP50 40 BFS RM xx 10 262 8 1 SMA Solar Technology AG 2...
Страница 265: ......
Страница 266: ...www SMA Solar com...

