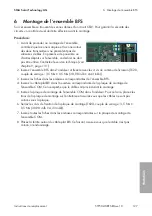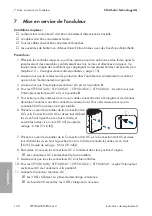
4 Mise hors tension de l’onduleur
SMA Solar Technology AG
Instructions de remplacement
STP50-40-BFS-RM-xx-10
121
4
Mise hors tension de l’onduleur
Avant toute intervention sur l’onduleur, mettez toujours ce dernier hors tension comme décrit dans
ce chapitre. Pour cela, respectez toujours l’ordre prescrit.
AVERTISSEMENT
Danger de mort par choc électrique lors de la destruction d’un appareil de
mesure due à une surtension
Une surtension peut endommager un appareil de mesure et créer une tension au niveau du
boîtier de l’appareil de mesure. Le contact avec le boîtier sous tension de l’appareil de mesure
entraîne des blessures graves, voire la mort par choc électrique.
• Utilisez exclusivement des appareils de mesure avec une plage de tension d’entrée DC d’au
moins 1000 V ou supérieure.
Mise à jour du firmware avant la mise hors tension de l’onduleur
Afin de garantir une mise en service sans problème de l’ensemble, le micrologiciel de
l’onduleur doit être mis à jour à la version actuelle avant que l’onduleur ne soit activé.
• Vérifiez que le micrologiciel de l’onduleur est à jour avant la mise hors tension.
• Au besoin, effectuez une mise à jour du micro-logiciel.
Procédure :
1. Coupez le disjoncteur miniature AC et sécurisez-le contre tout réenclenchement.
2. Pour les STP 50-US-40 / STP 33-US-41 / STP 50-US-41 / STP 62-US-41 : réglez l’interrupteur-
sectionneur AC de l’onduleur sur la position
O
.
3. Réglez l’interrupteur-sectionneur DC de l’onduleur sur la position
O
.
4. Si vous utilisez le relais multifonction, désactivez, le cas échéant, la tension d’alimentation de
la charge.
5. Attendez que les DEL s’éteignent.
6. Assurez-vous de l’absence de courant au niveau de tous les câbles DC à l’aide d’une pince
ampèremétrique.
7. Notez la position des connecteurs DC.
FRANÇAIS
Содержание NR PL-BFS5-JP-01
Страница 69: ...1 SMA Solar Technology AG STP50 40 BFS RM xx 10 69 1 5...
Страница 70: ...1 SMA Solar Technology AG STP50 40 BFS RM xx 10 70 1 6 X703 1 X703 6 10 Enter WCtlHz Hz 1 7 BFS BFS BFS...
Страница 72: ...2 SMA Solar Technology AG STP50 40 BFS RM xx 10 72 2 2 5 DC DC DC DC...
Страница 73: ...2 SMA Solar Technology AG STP50 40 BFS RM xx 10 73 5 C DC DC AC...
Страница 74: ...2 SMA Solar Technology AG STP50 40 BFS RM xx 10 74 DC 1000 V DC 5 C...
Страница 75: ...2 SMA Solar Technology AG STP50 40 BFS RM xx 10 75 v v SMA SMA SMA Solar Technology AG...
Страница 81: ...5 BFS SMA Solar Technology AG STP50 40 BFS RM xx 10 81 DC DC DC 1 1 DC DC DC PE PE 5 6 X1...
Страница 85: ...7 SMA Solar Technology AG STP50 40 BFS RM xx 10 85 12 DC I 13 LED LED 14 15 15 LED 16 5 SMA 17...
Страница 86: ...8 SMA Solar Technology AG STP50 40 BFS RM xx 10 86 8 1 SMA Solar Technology AG 2...
Страница 245: ...1 SMA Solar Technology AG STP50 40 BFS RM xx 10 245 1 5 1 6 X703 1 X703 6 10...
Страница 246: ...1 SMA Solar Technology AG STP50 40 BFS RM xx 10 246 WCtlHz Hz 1 7 BFS OCS OCS...
Страница 248: ...2 SMA Solar Technology AG STP50 40 BFS RM xx 10 248 5 DC DC DC DC DC...
Страница 249: ...2 SMA Solar Technology AG STP50 40 BFS RM xx 10 249 5 AC DC DC AC...
Страница 250: ...2 SMA Solar Technology AG STP50 40 BFS RM xx 10 250 DC 1000 V DC 5 C...
Страница 251: ...2 SMA Solar Technology AG STP50 40 BFS RM xx 10 251 SMA SMA SMA Solar Technology AG...
Страница 255: ...4 SMA Solar Technology AG STP50 40 BFS RM xx 10 255 15 AC L1 N L2 N L3 N 2 5 mm 0 078 in 16 AC L1 L2 L3 2 5 mm 0 078 in...
Страница 257: ...5 BFS SMA Solar Technology AG STP50 40 BFS RM xx 10 257 DC DC DC 1 1 DC DC DC 1 5 6 X1...
Страница 261: ...7 SMA Solar Technology AG STP50 40 BFS RM xx 10 261 12 DC I I 13 LED LED 14 15 15 LED 16 5 SMA 17...
Страница 262: ...8 SMA Solar Technology AG STP50 40 BFS RM xx 10 262 8 1 SMA Solar Technology AG 2...
Страница 265: ......
Страница 266: ...www SMA Solar com...

