

6
The information contained in this document is subject to change without notice.
Air Delights, Inc
9
9
7
4 SW Arctic Dr.
B
eaverton, Or. 9
700
5
Phone: 1-800-
44
0
-555
6 or 1-
5
0
3-352-12
0
1
Fax: 1-
5
0
3-
6
43-8224
www.
airdelights
.com
Copyright © 2010 Sloan Valve Company
Rev. 2 (05/10)
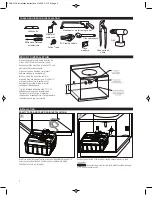
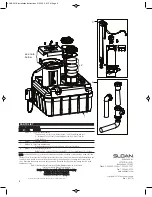
Collection Tank/Toilet Tank Parts
Item #
Part No.
Description
1
HMA-1-A
Collection Tank Assembly
Tank Assembly, 2 Access Caps, Basket Screen, 12 VAC Power Plug with cord
½” Polythylene Tube (12 feet), Pump Cartridge Assembly, O-Rings, Tank Pad,
Screw Pan Head
2
HMA-65
Disinfectant Tablets (3)
3
HMA-60-A
Toilet Tank Installation kit
Water Inlet Assembly, Level Sensor Assembly, Lid Support, Wire Nuts
4
HMA-55-A
Drain Installation Starter kit
Baffle Tee PVC, 2 L-Bend PVC Pipes, Straight PVC, 1½” Slip Joint Washer, 1½” Slip Nut
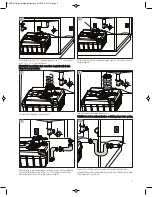
NOTE: Cartridge Assembly can be rotated 90 degrees to adapt to the installation by removing the 4 screws hold the
Cartridge Cover. Disconnect the Tank Cover level sensor wires from circuit board (remember what terminal the wires
came from, you will need to reconnect them). Remove the Cartridge Assembly by removing the 2 screws on the
sides. Reposition the housing as needed and reassemble. Route the Level Sensor Wires through the slots in the
Cartridge and Cover.
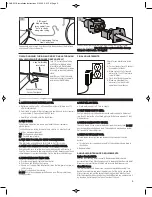
Refer to the Sloan Water Conservation System Maintenance Guide for additional
Troubleshooting and Repair Part information.
If further assistance is required, call the Sloan Valve Company
Installation Engineering Department at
1-847-671-4300 or 1-800-9-VALVE-9.
PARTS LIST
1
4
3
see note
below
2
AQUS WCS Installation Instructions 5/25/10 2:01 PM Page 6


