Slide Kamera AION IQ Скачать руководство пользователя страница 12

12

AION

TM

IQ

After the user determines the desired starting position, information about cur-

rent parameters will appear on the LCD. In order to start, move the joystick in 

a direction you selected earlier. After the first step, move the joystick again to 

initiate another steps. The user can freely move a step forward or backward (by 

moving the joystick right or left) or skip a few steps forward or backward (by 

holding the joystick longer in a selected direction).

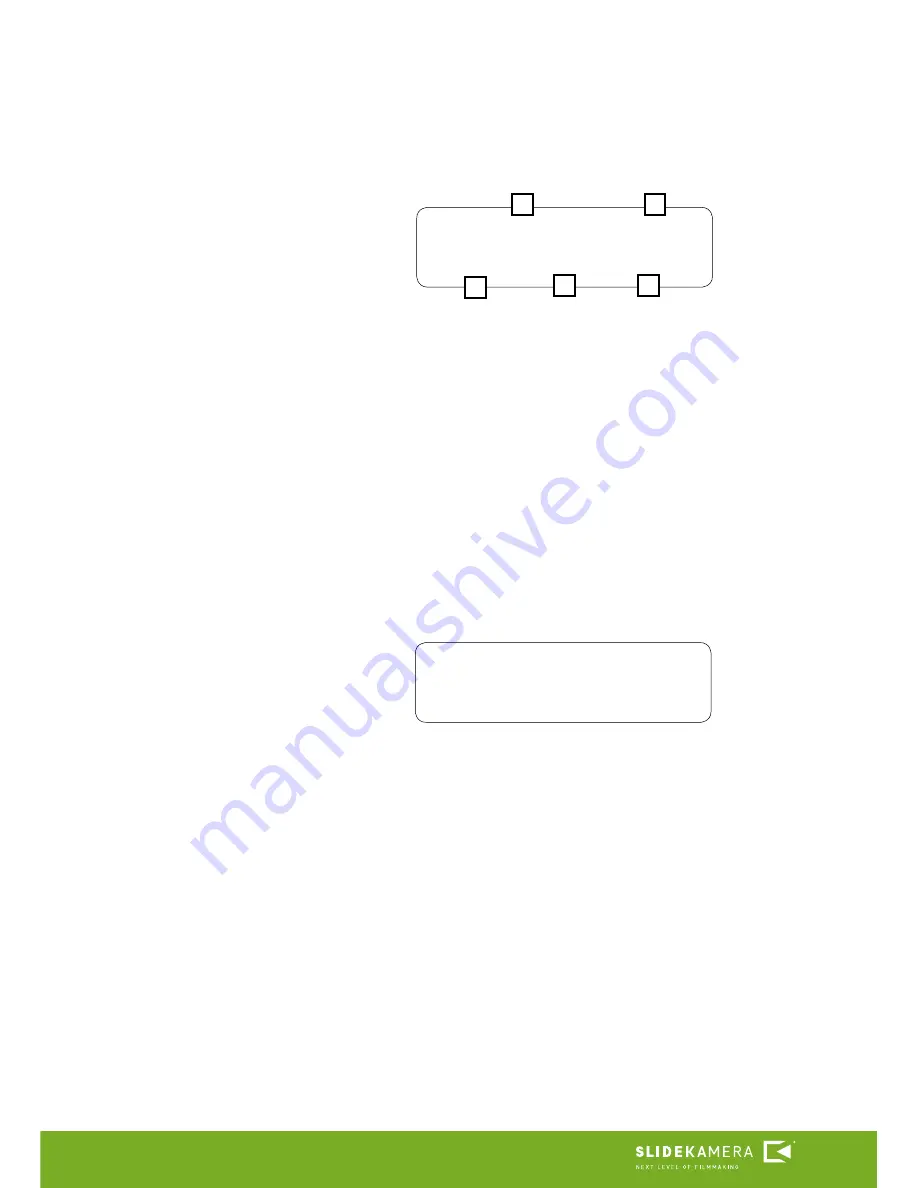
Selected movement direction

 [1]

Current position of the cart 

[2]

Current step/ number of programed steps 

[3]

Length of step 

[4]

Number of shots already taken / number of all shots to take

 [5]

Sample screen presented above informs that the user selected right as move-

ment direction 

[1]

. If the user chose left, there would be: dirL- on the screen. 

Current position of the cart is 80mm 

[2]

 from the left reference point in AUTO 

or MAN mode, or starting point in 

FREE Mode

. Length of step set by the user 

is 40mm 

[4]

. The drive currently performs second step out if thirty steps set 

[3]

. The drive has already taken three shots out of five shots set 

[5]

.The user 

can stop the program at any time by pressing the joystick. When the drive has 

taken all the photos and stops the program there will be a message on the 

screen with the current position of the cart. Press the joystick to return to the 

main menu.

ANIM dirR      80.0

2/30   40.0     3/5

2

1

3

4

5

ANIM dirR   327.0

press OK. to exit

Содержание AION IQ

Страница 1: ...CONTROLLER AION TM IQ User Manual pdf version of the manual available for download www slidekamera com...

Страница 2: ...of the manual They are not essential for the correct operation of the device but you might find them useful TIP Before you start your work with the controller SLIDEAIONTM IQ we strongly recommend to r...

Страница 3: ...cable socket and power switch are located on the upper wall of the controller housing Joystick placed in the centre of the front panel enables user friendly programming controlling and configuration...

Страница 4: ...pressing OK understood as pressing the joystick the main menu appears on the screen 2 1 2 MAN manual calibration In case of MAN working mode the controller moves to the manual calibration This mode al...

Страница 5: ...enu features four entries VIDEO ANIMATION TIMELAPSE and CONFIG 2 2 1 Menu CONFIG After entering Info there will be information about the voltage Vin and range of motion for the cart determined during...

Страница 6: ...the reference points After the automatic calibration is performed there will be a message on the screen displaying the length of motion range for the cart for your XTM SLIDER After the power is turned...

Страница 7: ...s to set the acceleration deceleration time within the range from 0 1s to 10s Sample screen presented above informs that the maximum speed of the cart is set on 200mm s 2 the currently set speed of th...

Страница 8: ...er to finish the recording and return to the menu press the joystick The controller can store 59 seconds of the recording Recorded movement is stored in the controller until the power supply is switch...

Страница 9: ...direc tion once it reaches the end of the movement range There is no need for the user to determine the direction of the movement The user can change SPEED and DAMPING parameters at any time during th...

Страница 10: ...lculated from the place where the cart is currently located to the end of the range of movement in a set point direction Direction If specified startup parameters were AUTO or MAN the controller will...

Страница 11: ...ction of movement Shots number of shots to take after the cart stops Delay time of the delay Time after the cart stops before the drive triggers the shutter 0 9s Start ANIMATION program starts Back co...

Страница 12: ...taken number of all shots to take 5 Sample screen presented above informs that the user selected right as move ment direction 1 If the user chose left there would be dirL on the screen Current positi...

Страница 13: ...r or if the repair proves impossible replacement of the product with a new one Hovewer the cost of repair of the product cannot overrun the catalogue value of the product The warranty does not cover d...

Страница 14: ......

Отзывы: